
Setting up a new printer can seem daunting, but it’s actually a straightforward process. Whether you’ve just unboxed your first printer or you’re upgrading to a new model, this guide will walk you through the essential steps to get your printer up and running in no time. We’ll cover everything from connecting the cables to installing software and even troubleshooting common issues. Let’s dive in and make printer setup a breeze!
Step-by-Step Guide to Setting Up Your New Printer
Follow these simple steps to set up almost any printer, ensuring a smooth and efficient installation process.
1. Unpack and Prepare Your Printer
Carefully remove your new printer from its box. Take out all packing materials, including tapes and protective films, both inside and outside the printer. Make sure you have all the components: the printer itself, power cable, USB cable (if it’s not a wireless model), ink or toner cartridges, and the instruction manual.
2. Connect the Power Cable and Turn On the Printer
Locate the power port on the back of your printer and firmly plug in the power cable. Then, plug the other end of the cable into a working electrical outlet. Once connected, press the power button on your printer to turn it on. You’ll typically find the power button on the front or top of the printer, often indicated by a power symbol. Wait for the printer to complete its start-up process, which may involve some initial noises and display activity.
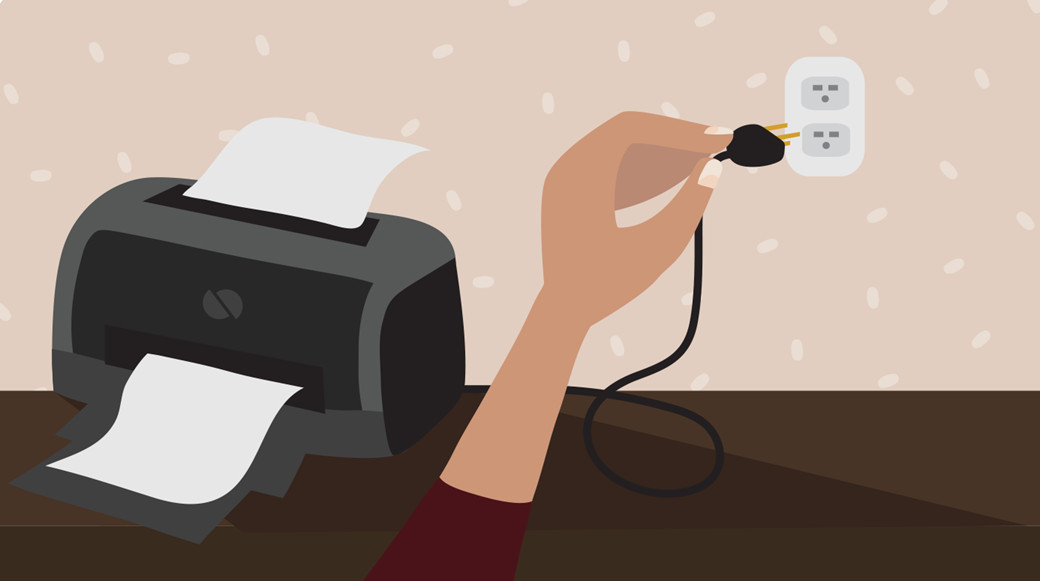 Connecting the printer power cable
3. Install Ink or Toner Cartridges
Open the printer cover to access the ink or toner cartridge compartment. Refer to your printer’s manual for the exact location and procedure. Remove the cartridges from their packaging. Gently shake them (if toner cartridges) and remove any protective tape. Insert each cartridge into its designated slot, ensuring they click into place. Close the cartridge compartment cover securely.
4. Connect the Printer to Your Computer
This step varies slightly depending on whether you are setting up a USB or a wireless printer.
-
For USB Printers: Connect the USB cable. Locate the USB port on the back of your printer and connect one end of the USB cable. Connect the other end to a USB port on your computer. Ensure your computer is turned on.
 Connecting the USB cable from printer to computer
 -
For Wireless Printers: For a wireless connection, you typically won’t need to physically connect the printer to your computer with a USB cable initially (though some setups might require a temporary USB connection for initial Wi-Fi setup). Ensure your printer and computer are connected to the same Wi-Fi network. The specific steps for connecting to Wi-Fi vary by printer model and are usually detailed in your printer’s manual. This often involves using the printer’s control panel to select your Wi-Fi network and enter the password.
5. Install Printer Drivers and Software
- Automatic Installation (Often for USB Printers): When you connect a USB printer to your computer, in many cases, your operating system (like Windows or macOS) will automatically detect the new printer and start installing the necessary drivers. Follow any on-screen prompts that appear on your computer to complete the driver installation.
- Manual Installation (Recommended and for Wireless Printers): It’s generally recommended to install the printer drivers and software manually, especially for wireless printers, to ensure you get the latest drivers and any additional software features.
- Using the Installation CD/DVD (If provided): If your printer came with an installation CD/DVD, insert it into your computer’s CD/DVD drive. The setup program should launch automatically. Follow the on-screen instructions to install the drivers and software.
- Downloading from the Manufacturer’s Website (Recommended): Visit the manufacturer’s website (e.g., HP, Canon, Epson, Brother). Navigate to the “Support” or “Downloads” section. Search for your printer model. Download the correct drivers and software for your operating system (Windows or macOS, and the specific version). Run the downloaded installer file and follow the on-screen prompts.
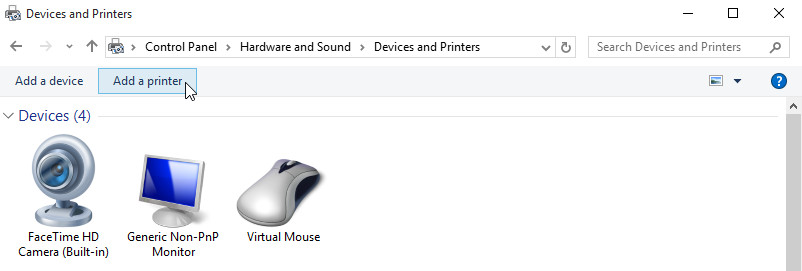
6. Add the Printer in Your Operating System
Even after driver installation, you might need to manually add the printer in your operating system settings to ensure it’s recognized as an available printing device.
-
For Windows:
- Open the Control Panel. (You can search for “Control Panel” in the Windows search bar).
- Go to Hardware and Sound or Devices and Printers (the exact wording may vary slightly depending on your Windows version).
- Click on Devices and Printers.
- Click Add a printer.
- Windows will scan for available printers. If your printer is detected, select it and click Next. Follow any further instructions. If it’s not automatically found, you may need to click “The printer that I want isn’t listed” and follow the prompts to add it manually (e.g., by IP address for network printers or by selecting the port for USB printers).
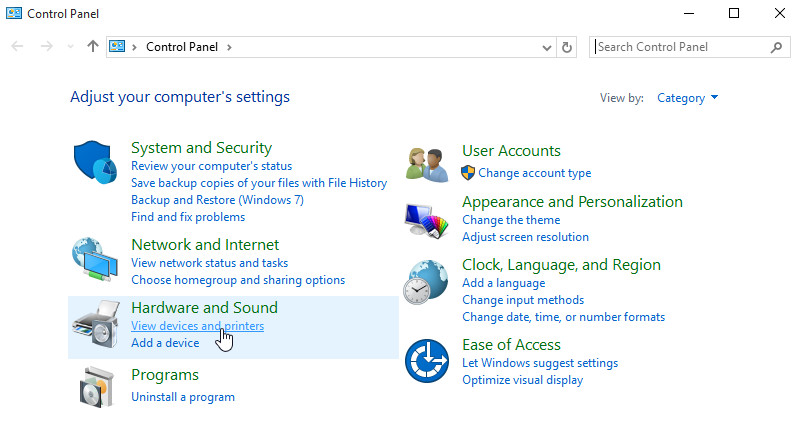 Selecting Printers option in Windows Control Panel
 -
For macOS:
- Click on the Apple menu in the top-left corner of your screen.
- Select System Preferences.
- Click on Printers & Scanners.
- Click the “+” button at the bottom-left to add a printer.
- Select your printer from the list if it appears. If not, click “Add Printer or Scanner…” and follow the prompts.
 Adding a new printer in Windows
7. Print a Test Page
After successfully adding your printer, it’s time to test it out!
-
Print a Test Page from Printer Settings: In the “Printers & Scanners” (macOS) or “Devices and Printers” (Windows) settings, right-click on your newly added printer and look for options like “Print test page” or “Printer properties” (then find “Print Test Page” button). Click this option to print a test page directly from your printer settings.
-
Print from an Application: Open any application like a web browser or a word processor. Try printing a document or a webpage. For example, you can print this test page. Go to File > Print (or press Ctrl+P on Windows or Command+P on macOS).
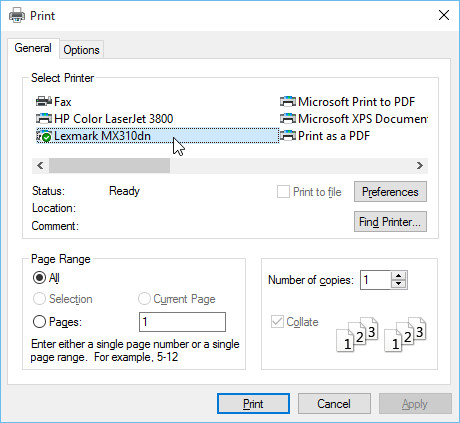 Using the Print dialog box to select printer and print
In the print dialog box, make sure your new printer is selected from the printer list, and click Print.
If the test page prints successfully, congratulations! Your printer setup is complete.
Troubleshooting Common Printer Problems
Even with careful setup, you might encounter some common issues. Here are solutions to help you troubleshoot:
-
Problem: Printer is not printing.
- Check Power and Connections: Ensure the printer is turned on and properly connected to the power outlet and your computer (or Wi-Fi network for wireless printers).
- Check Paper and Ink/Toner: Make sure there is paper in the correct paper tray and that ink or toner cartridges are not empty and are correctly installed. Check for any paper jams inside the printer and clear them carefully.
- Restart Printer and Computer: Sometimes, simply restarting both your printer and your computer can resolve connection glitches. Turn off both devices, wait for a few moments, and then turn them back on.
- Check Print Queue: Sometimes print jobs get stuck in the print queue. Clear the print queue on your computer. In Windows, you can do this by going to Control Panel > Devices and Printers, double-clicking on your printer, and then clicking “See what’s printing.” Cancel any pending print jobs. On macOS, go to System Preferences > Printers & Scanners, select your printer, and click “Open Print Queue.” Delete any jobs in the queue.
- Update or Reinstall Drivers: Outdated or corrupted printer drivers can cause printing problems. Visit the manufacturer’s website and download the latest drivers for your printer model and operating system. You might need to uninstall the old drivers first before installing the new ones.
-
Problem: Printer is online but not printing.
- Set as Default Printer: Ensure your newly installed printer is set as the default printer on your computer. In “Devices and Printers” (Windows) or “Printers & Scanners” (macOS), right-click on your printer and select “Set as default printer.”
- Check Printer Status: In the printer settings, check the printer status. It should say “Ready” or “Idle.” If it says “Offline” or “Error,” there might be a connection issue or a problem with the printer itself.
-
Problem: Print quality is poor (light text, streaks, or blurry prints).
- Check Ink/Toner Levels: Low ink or toner is a common cause of poor print quality. Check the ink/toner levels using your printer’s software or control panel. Replace cartridges if they are low or empty.
- Clean Print Heads: Many printers have a print head cleaning function. Refer to your printer’s manual to find out how to run a print head cleaning cycle. This can often resolve issues like streaks or missing colors.
- Check Paper Type: Ensure you are using the correct type of paper for your printer and the type of printing you are doing. Using the wrong paper can sometimes result in poor print quality.
Advanced Troubleshooting and Support
If you are still experiencing issues after trying these basic troubleshooting steps, there are more resources available:
-
Printer Manufacturer’s Support Website: Most printer manufacturers have dedicated support pages on their websites. These pages often provide detailed troubleshooting guides, FAQs, driver downloads, and contact information for technical support.
-
Online Forums and Communities: Online forums and communities dedicated to printers or computer tech support can be valuable resources. You can search for your specific printer model and problem to see if others have encountered and resolved similar issues.
-
Search Engines: Use search engines like Google to search for your specific problem. For example, if you have a Canon MX920 printer that is not responding, search for “Canon MX920 not responding” to find relevant articles, forum discussions, and videos.
 Searching Google for printer troubleshooting solutions
Setting Up Wireless Printers: Key Considerations
Wireless printers offer great convenience, allowing printing from multiple devices without physical connections. However, wireless setup can sometimes be a bit more complex than USB setup. Here are key points to consider:
- Wi-Fi Network Compatibility: Ensure your printer is compatible with your Wi-Fi network’s frequency (usually 2.4GHz). Some newer printers also support 5GHz networks.
- Wi-Fi Setup Process: Wireless printer setup typically involves connecting the printer to your Wi-Fi network. This is often done through the printer’s control panel, using a WPS button on your router (if supported by your printer), or through a temporary USB connection to a computer for initial Wi-Fi configuration. Refer to your printer’s manual for the specific wireless setup steps.
- Network Security: When setting up a wireless printer, ensure your Wi-Fi network is secured with a strong password to prevent unauthorized access to your printer and network.
- Firewall and Security Software: Sometimes, firewalls or security software on your computer can block communication with wireless printers. You may need to configure your firewall or security software to allow printer communication.
Setting up your new printer should now be much less intimidating. By following these steps and troubleshooting tips, you’ll be printing documents and photos in no time! Enjoy the convenience of your new printer.