
Printing emails directly from your iPad is a convenient feature, especially when you need a hard copy for your records or for situations where a digital version isn’t sufficient. The native Mail app on iPadOS offers a straightforward print option. This guide will walk you through the process of printing emails from your iPad and troubleshoot common issues you might encounter.
Printing Emails from the iPad Mail App
The print functionality is readily available within the Mail app on your iPad. Here’s how to access it:
-
Open the Mail App: Locate and open the Mail app on your iPad.
-
Select the Email: Navigate to the email you wish to print and tap to open it.
-
Find the Share Icon: Look for the Share icon at the top or bottom of the email. This icon typically looks like a square with an arrow pointing upwards.
-
Choose Print: Tap the Share icon. In the Share Sheet that appears, scroll down and select Print.
You will then be taken to the Printer Options screen where you can select your printer, choose the number of copies, and adjust other settings before printing your email. Ensure your printer is set up to be AirPrint compatible or connected to your iPad.
Troubleshooting Email Printing Problems on iPad
If you are having trouble printing emails from your iPad, here are a few troubleshooting steps to resolve common issues:
Force Restart Your iPad
A simple force restart can often resolve temporary software glitches that might be preventing the print option from working correctly. The method to force restart your iPad varies depending on your iPad model:
For iPads with Face ID or Touch ID on the top button:
- Press and quickly release the volume button closest to the top button.
- Press and quickly release the volume button furthest from the top button.
- Press and hold the top button.
- Release the top button when the Apple logo appears.
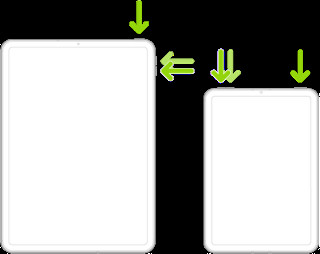 Force restarting an iPad with Face ID, showing the sequence of pressing volume up, volume down, and holding the top button until the Apple logo appears, as part of troubleshooting steps for printing emails from an iPad.
For iPads with a Home button:
- Press and hold both the top button and the Home button simultaneously.
- Release both buttons when the Apple logo appears.
After your iPad restarts, check if the print option is now available in the Mail app.
Reset All Settings
If a force restart doesn’t solve the printing issue, resetting your iPad settings might help. This will not erase your data but will reset settings like Wi-Fi passwords, Home screen layout, and notification settings back to their defaults.
To reset all settings:
- Open the Settings app on your iPad.
- Tap General.
- Scroll down and tap Transfer or Reset iPad.
- Tap Reset.
- Select Reset All Settings.
- You may be asked to enter your passcode. Confirm the reset when prompted.
Restore to Factory Settings
As a last resort, if the problem persists, you can restore your iPad to its factory settings. Important: This will erase all content and settings from your iPad, so ensure you have a recent backup before proceeding.
To restore your iPad to factory settings:
- Open the Settings app on your iPad.
- Tap General.
- Tap Transfer or Reset iPad.
- Tap Erase All Content and Settings.
- Follow the on-screen instructions to complete the factory reset.
Contact Apple Support
If none of the above steps resolve the issue, it is recommended to seek direct assistance from Apple Support. They can provide more specific troubleshooting tailored to your device and software.
You can contact Apple Support through their website or by using the Apple Support app, which can be downloaded from the App Store.
Conclusion
Printing emails from your iPad should be a straightforward process using the built-in Mail app. By following these steps and troubleshooting tips, you should be able to easily print your important emails whenever needed. If you continue to experience difficulties, Apple Support is available to provide further assistance.