Printing photos at home offers a tangible way to preserve memories and create personalized items. Whether you’re aiming for frame-worthy prints or custom greeting cards, understanding the process is key. This guide explores straightforward methods to print your photos effectively, drawing from expert advice shared in online communities.
One common challenge users face is achieving the correct layout, especially when printing items like foldable greeting cards. Let’s delve into practical solutions using readily available software.
For those seeking precise control over layout, image editing software like Photoshop Elements provides robust features. Here’s a step-by-step approach inspired by a user, Old Toad:
- Prepare your file: Begin by printing your desired card design to a PDF file directly from your photo application.
- Convert PDF pages to images: Use Preview or a similar tool to convert each page of the PDF into individual JPEG images. This allows for easier manipulation within an image editor.
- Create a canvas: Open Photoshop Elements and create a new blank image with dimensions of 8.5 x 11 inches, set at 300 dpi for high resolution, and ensure a borderless setup for printing edge-to-edge if your printer supports it.
- Arrange your card: Place the front and back images (initially the first page of your PDF) in the top left corner of your blank canvas. Then, position the inside pages (from the second page of your PDF) in the lower left corner, as illustrated below.
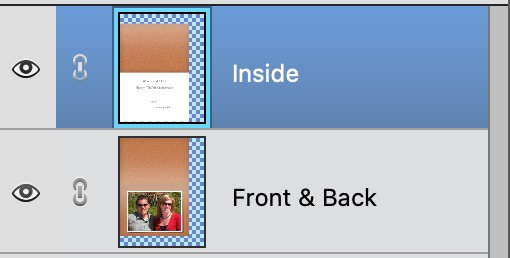 Photoshop Elements layout for printing a 5×7 card showing front/back and inside pages arranged on an 8.5×11 canvas
- Print in layers: To print each side of your card correctly, first hide the layer containing the inside pages. Print the visible layer, which should be the front/back page layout.
- Flip and print the reverse: Crucially, flip the printed paper end-over-end (not side-to-side). Then, in Photoshop Elements, hide the front/back page layer and make the inside pages layer visible. Print again. This method ensures correct alignment for a 5×7 inch foldable card.
Alternatively, for a simpler approach, consider using office programs like Word, PowerPoint, or Pages. As suggested by TonyCollinet, these programs offer easy image positioning on a page. Simply export your photo and insert it into a document. You can then drag and resize the image directly within the program to fit your desired layout before printing.
Another clever workaround involves creating a blank white image the same size and orientation as your photo. By printing both images side-by-side, with one being your photo and the other effectively acting as blank space, you can achieve specific layouts without complex software. Here’s how to create a blank image using basic photo editing adjustments:
- Duplicate your photo: Create a copy of the photo you wish to print.
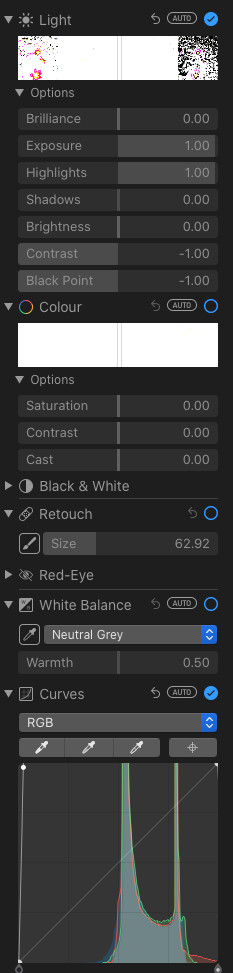
- Edit for blankness: In your photo editor, maximize exposure and highlights to 100 and minimize contrast and black point to -100. Adjust the curves by dragging a point on the curve line towards the top left corner until the image becomes completely white, as shown.
 Screenshot of photo editing panel showing adjustments to create a blank white image
- Print side-by-side: Arrange your original photo and the newly created blank white image side by side in a document or printing interface. Ensure they are positioned as needed for your print layout.
 Example of side-by-side layout for printing, one image is a photo, the other is blank white
In conclusion, printing photos at home is achievable through various methods, catering to different software availability and desired complexity. Whether you opt for layered printing in image editors, simple layouts in office programs, or the side-by-side blank image technique, you can effectively print your photos and create personalized prints right from your home. Choose the method that best suits your needs and software access to start bringing your digital memories into the physical world.