
Polishing 3D prints transforms the surface of your rapid prototypes, enhancing aesthetics and functionality; amazingprint.net is dedicated to providing the most effective methods. This involves smoothing techniques and surface finishing, which dramatically improve the final appearance and structural integrity of 3D-printed objects. Explore our guides at amazingprint.net for practical insights on achieving pristine results and also delve into optimizing 3D printing services.
1. Why Polish 3D Prints?
Polishing 3D prints refines the surface, removing imperfections and layer lines for a smoother, more appealing finish. This is crucial because polishing not only enhances the appearance of 3D printed objects but also improves their functionality by reducing surface friction and increasing durability.
1.1. Aesthetic Enhancement
Polishing significantly upgrades the look of 3D prints. Here’s how:
- Removes Layer Lines: Polishing eliminates the visible layer lines typical of FDM (Fused Deposition Modeling) prints.
- Increases Shine: The process can add a glossy finish, making parts look more professional.
- Improves Color Consistency: Polishing can even out color variations, providing a uniform appearance.
1.2. Functional Improvements
Beyond aesthetics, polishing also boosts the performance of 3D prints. Consider these benefits:
- Reduces Friction: A smooth surface minimizes friction, which is vital for moving parts.
- Increases Durability: Polishing can close small surface cracks, improving the strength and longevity of the print.
- Enhances Cleanliness: Smooth surfaces are easier to clean and less likely to harbor bacteria, essential for medical or food-related applications.
1.3. Cost and Time Efficiency
While polishing adds a step to the 3D printing process, it can save time and money in the long run:
- Faster Print Times: By focusing on polishing, you can use faster, less precise print settings.
- Reduced Material Waste: Polishing can salvage prints with minor imperfections, reducing waste.
- Better Final Product: A polished print is more likely to meet quality standards, avoiding the need for reprints.
1.4. What are the different types of 3D printing?
There are several types of 3D printing, each with its own unique process and best-suited applications:
- Fused Deposition Modeling (FDM): This method involves melting and extruding plastic filament, which is then deposited layer by layer to build the object. FDM is popular for its affordability and the wide range of materials available.
- Stereolithography (SLA): SLA uses a UV laser to cure liquid resin layer by layer. This process creates highly accurate and detailed parts with a smooth surface finish.
- Selective Laser Sintering (SLS): In SLS, a laser selectively sinters powdered material, such as nylon or metal, to form the object. SLS is ideal for producing functional parts with complex geometries.
- Selective Laser Melting (SLM): Similar to SLS, SLM fully melts powdered metal to create strong, dense parts. This technology is used in aerospace and medical industries for manufacturing high-performance components.
- Material Jetting: This method jets droplets of liquid photopolymer onto a build platform and cures them with UV light. Material jetting allows for multi-material and multi-color printing with excellent accuracy and surface finish.
- Binder Jetting: Binder jetting uses a liquid binder to bond powdered material together layer by layer. This process is often used for creating sand molds for metal casting or for producing colorful prototypes.
- Direct Energy Deposition (DED): DED involves melting and depositing material simultaneously using a focused energy source, such as a laser or electron beam. This technology is used for repairing or adding features to existing metal parts.
2. What are the Key Steps Before You Polish 3D Prints?
Before polishing, preparing the 3D print is essential for achieving the best results; cleaning, support removal, and initial sanding lay the groundwork for a smooth final finish.
2.1. Cleaning the Print
- Removing Loose Debris: Use a soft brush or compressed air to remove any loose particles or support material.
- Washing the Print: Wash the print with warm, soapy water to remove any remaining residue. Dawn dish soap works well.
- Drying the Print: Allow the print to air dry completely before proceeding to the next step.
2.2. Support Removal
- Manual Removal: Carefully remove supports using pliers, tweezers, or a sharp knife. Be gentle to avoid damaging the print.
- Dissolvable Supports: If you used dissolvable supports, soak the print in the appropriate solvent (e.g., water for PVA) until the supports dissolve completely.
- Post-Removal Cleaning: After removing supports, clean the print again to remove any remaining support material or residue.
2.3. Initial Sanding
- Purpose: Initial sanding helps to remove large imperfections and layer lines.
- Coarse Sandpaper: Start with a coarse-grit sandpaper (e.g., 200-400 grit) to remove significant bumps and ridges.
- Technique: Sand the print in circular motions, applying even pressure. Avoid sanding too aggressively, which can damage the print.
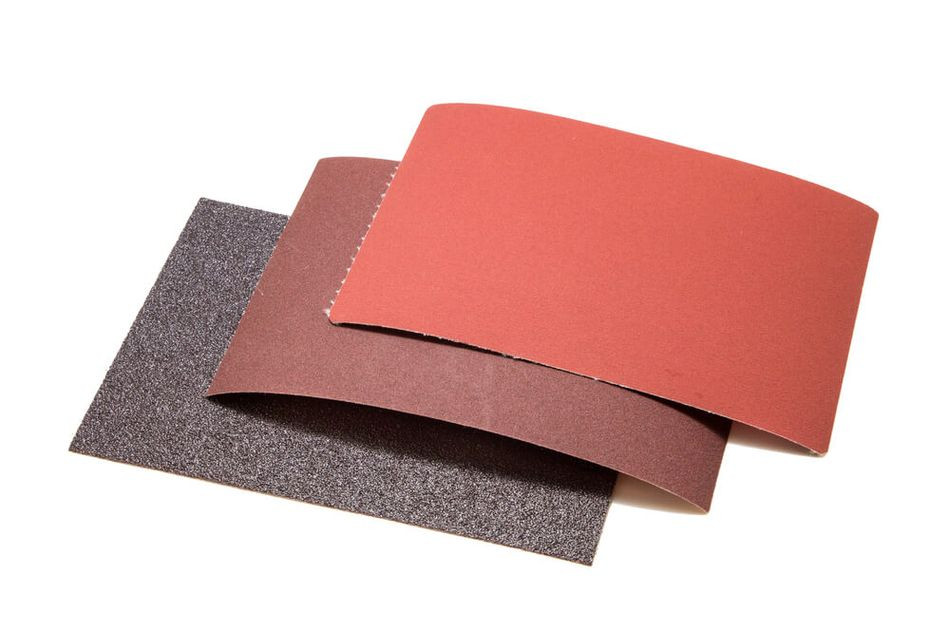 Sandpaper various grit sizes
Alt: Sandpaper in various grit sizes for smoothing PLA parts
2.4. Filling Gaps
- Epoxy Putty: Use epoxy putty to fill any large gaps or imperfections. Apply the putty evenly and allow it to cure completely.
- Sanding After Filling: Once the putty is cured, sand it smooth to blend it with the rest of the print.
- Plastic Filler: For very deep cavities, consider using a plastic filler instead of primer.
2.5. Safety Precautions
- Ventilation: Work in a well-ventilated area to avoid inhaling dust or fumes.
- Protective Gear: Wear a dust mask, gloves, and eye protection to protect yourself from particles and chemicals.
- Proper Disposal: Dispose of used sandpaper, solvents, and other materials properly according to local regulations.
3. What are the Sanding Techniques to Polish 3D Prints?
Sanding is a fundamental step in polishing 3D prints, involving multiple grades of sandpaper and careful technique to achieve a smooth surface.
3.1. Wet Sanding vs. Dry Sanding
- Wet Sanding: Uses water as a lubricant. It reduces friction, minimizes dust, and prevents sandpaper from clogging.
- Dry Sanding: Done without water. It is faster but produces more dust and can clog sandpaper more quickly.
- Recommendation: Wet sanding is generally preferred for PLA as it reduces the risk of overheating and warping the plastic.
3.2. Sandpaper Grit Selection
- Coarse Grit (200-400): Used for initial sanding to remove significant imperfections and layer lines.
- Medium Grit (600-800): Used for refining the surface and removing scratches left by coarse sandpaper.
- Fine Grit (1000-2000): Used for achieving a smooth, matte finish and preparing the surface for polishing.
- Ultra-Fine Grit (2500-3000+): Used for final polishing and creating a high-gloss finish.
3.3. Step-by-Step Sanding Process
- Start with Coarse Grit: Begin with 200-400 grit sandpaper to remove major imperfections. Sand in circular motions with even pressure.
- Progress to Medium Grit: Switch to 600-800 grit sandpaper to smooth out the surface further. Continue sanding in circular motions.
- Use Fine Grit: Use 1000-2000 grit sandpaper to achieve a smooth, matte finish. Wet sanding is recommended at this stage.
- Final Polishing: Finish with 2500-3000+ grit sandpaper for a high-gloss finish. Use a polishing compound for best results.
- Rinse and Dry: After each sanding stage, rinse the print with water and allow it to dry completely before moving on to the next grit.
3.4. Tips for Effective Sanding
- Use a Sanding Block: Wrap sandpaper around a sanding block for even pressure and a flat surface.
- Keep Sandpaper Clean: Regularly clean sandpaper to prevent clogging. Use a brush or tap it against a hard surface.
- Avoid Overheating: Do not sand too aggressively, as this can generate heat and warp the PLA.
- Sand in Circular Motions: Circular motions help to blend the surface and avoid creating straight-line scratches.
- Be Patient: Sanding takes time and effort. Be patient and work methodically for the best results.
3.5. Addressing Difficult Areas
- Corners and Crevices: Use small pieces of sandpaper or specialized sanding tools for hard-to-reach areas.
- Fine Details: Be extra careful when sanding fine details to avoid damaging them. Use fine-grit sandpaper and light pressure.
- Curved Surfaces: Use flexible sanding pads or sponges to conform to curved surfaces.
4. What is the Priming and Painting Process to Polish 3D Prints?
Priming and painting enhances the aesthetic appeal of polished 3D prints by providing a smooth base for color application and protecting the surface.
4.1. Why Priming is Important
- Surface Preparation: Primer fills in small imperfections and creates a smooth, uniform surface for paint to adhere to.
- Adhesion: Primer improves the adhesion of paint, preventing it from peeling or chipping.
- Color Uniformity: Primer helps to create a consistent base color, ensuring that the final paint color is accurate and vibrant.
4.2. Types of Primers
- Spray Primer: Convenient and easy to apply, spray primer provides a thin, even coat.
- Brush-On Primer: Allows for more precise application and is suitable for small or detailed areas.
- Filler Primer: Designed to fill in larger imperfections and provide a smoother surface.
4.3. Applying Primer
- Clean the Print: Ensure the print is clean, dry, and free of any dust or debris.
- Apply a Thin Coat: Apply a thin, even coat of primer to the entire surface of the print. Avoid applying too much primer at once, which can cause drips and runs.
- Allow to Dry: Allow the primer to dry completely according to the manufacturer’s instructions.
- Sand Lightly: After the primer is dry, sand it lightly with fine-grit sandpaper (e.g., 600-800 grit) to smooth out any imperfections.
- Apply Additional Coats: Apply additional coats of primer as needed to achieve a smooth, uniform surface. Sand lightly between each coat.
4.4. Painting Techniques
- Spray Painting: Provides a smooth, even finish and is ideal for large surfaces.
- Brush Painting: Allows for more precise application and is suitable for small or detailed areas.
- Airbrushing: Offers the highest level of control and is ideal for creating intricate designs and gradients.
4.5. Types of Paint
- Acrylic Paint: Water-based and easy to clean up, acrylic paint is a popular choice for 3D prints.
- Enamel Paint: Oil-based and durable, enamel paint provides a glossy finish but requires more care to use and clean up.
- Lacquers: Fast-drying and provide a hard, durable finish, lacquers are often used for automotive or industrial applications.
4.6. Step-by-Step Painting Process
- Apply Base Coat: Apply a thin, even base coat of paint to the entire surface of the print. Allow it to dry completely.
- Apply Additional Coats: Apply additional coats of paint as needed to achieve the desired color and coverage. Allow each coat to dry completely before applying the next.
- Sanding Between Coats: Sand lightly with fine-grit sandpaper (e.g., 1000-1200 grit) between coats to remove any imperfections and ensure a smooth finish.
- Apply Clear Coat: Apply a clear coat to protect the paint and add a glossy or matte finish. Allow it to dry completely.
4.7. Post-Painting Tips
- Drying Time: Allow the paint to dry completely before handling the print to avoid smudging or damaging the finish.
- Curing Time: Some paints may require additional curing time to fully harden and become durable.
- Handling: Handle the painted print with care to avoid scratching or damaging the finish.
5. How to Use Epoxy Resin to Polish 3D Prints?
Epoxy resin provides a durable, glossy coating that fills imperfections and enhances the structural integrity of 3D prints.
5.1. Benefits of Using Epoxy Resin
- High Gloss Finish: Epoxy resin creates a smooth, glossy finish that enhances the appearance of 3D prints.
- Durability: Epoxy resin is highly durable and resistant to scratches, impacts, and chemicals.
- Filling Imperfections: Epoxy resin fills in small imperfections and layer lines, creating a smooth, uniform surface.
- Structural Integrity: Epoxy resin adds structural integrity to 3D prints, making them stronger and more resistant to damage.
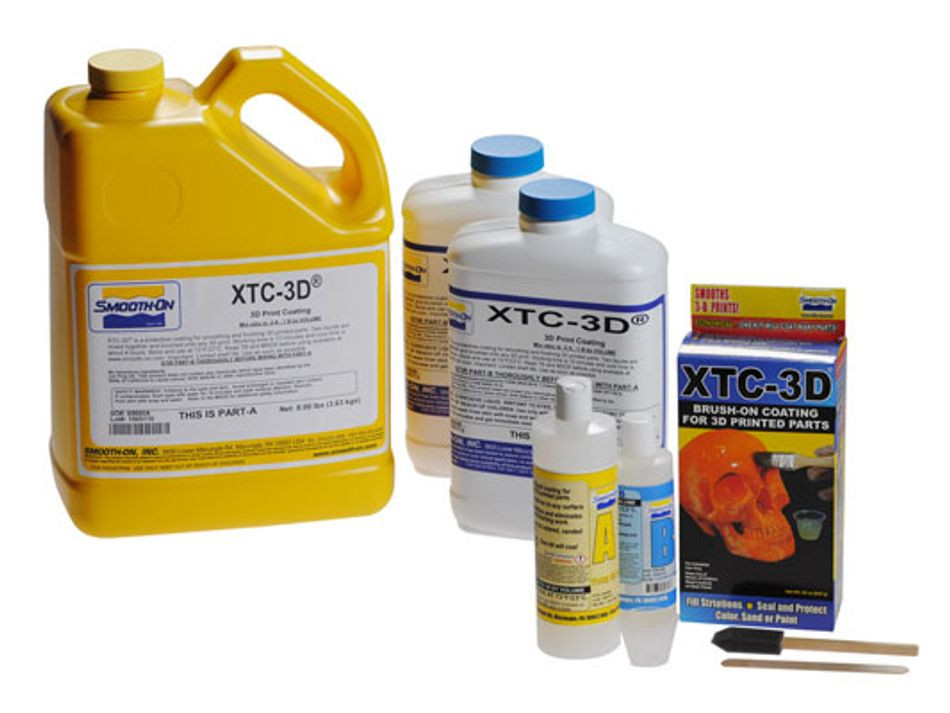 xtc-3d
Alt: Epoxy resins like Smooth-On XTC-3D improve PLA smoothness
5.2. Types of Epoxy Resin
- General Purpose Epoxy Resin: Suitable for a wide range of applications, general-purpose epoxy resin is easy to use and provides good results.
- UV Resistant Epoxy Resin: Designed to resist yellowing and degradation from UV exposure, UV-resistant epoxy resin is ideal for outdoor applications.
- Fast Curing Epoxy Resin: Cures quickly, allowing for faster project completion.
- 3D Printing Specific Epoxy Resin: Formulated specifically for 3D prints, such as Smooth-On XTC-3D, these resins offer enhanced adhesion and smoothness.
5.3. Preparing the Epoxy Resin
- Measure Resin and Hardener: Carefully measure the resin and hardener according to the manufacturer’s instructions. Use separate containers to avoid contamination.
- Mix Thoroughly: Mix the resin and hardener thoroughly, scraping the sides and bottom of the container to ensure complete mixing. Mix for the recommended time (usually 2-3 minutes).
- Remove Bubbles: Use a heat gun or vacuum chamber to remove any bubbles from the mixed epoxy resin.
5.4. Applying Epoxy Resin to the Print
- Clean the Print: Ensure the print is clean, dry, and free of any dust or debris.
- Apply a Thin Coat: Apply a thin, even coat of epoxy resin to the entire surface of the print using a brush or foam applicator.
- Remove Excess Resin: Use a brush or paper towel to remove any excess resin from the print.
- Allow to Cure: Allow the epoxy resin to cure completely according to the manufacturer’s instructions. This may take several hours or even days.
- Sand Lightly: After the epoxy resin is cured, sand it lightly with fine-grit sandpaper (e.g., 600-800 grit) to smooth out any imperfections.
- Apply Additional Coats: Apply additional coats of epoxy resin as needed to achieve the desired thickness and smoothness. Sand lightly between each coat.
5.5. Troubleshooting Epoxy Resin Issues
- Bubbles: To prevent bubbles, mix the epoxy resin slowly and use a heat gun or vacuum chamber to remove any trapped air.
- Tacky Finish: A tacky finish can be caused by incorrect mixing ratios or insufficient curing time. Ensure you are using the correct mixing ratios and allow the epoxy resin to cure completely.
- Yellowing: Yellowing can be caused by UV exposure. Use a UV-resistant epoxy resin for outdoor applications.
- Uneven Coating: An uneven coating can be caused by applying too much resin or not spreading it evenly. Apply thin, even coats and use a brush or foam applicator to spread the resin evenly.
5.6. Safety Precautions
- Ventilation: Work in a well-ventilated area to avoid inhaling fumes.
- Protective Gear: Wear gloves, eye protection, and a respirator to protect yourself from chemicals.
- Skin Contact: Avoid skin contact with epoxy resin. If contact occurs, wash immediately with soap and water.
- Proper Disposal: Dispose of used epoxy resin and containers properly according to local regulations.
6. What are Solvent Smoothing Methods to Polish 3D Prints?
Solvent smoothing uses chemicals to dissolve the outer layer of the print, reducing layer lines and creating a smooth surface.
6.1. Understanding Solvent Smoothing
- How It Works: Solvents dissolve the outer layer of the plastic, causing it to flow and smooth out layer lines and imperfections.
- Materials Compatibility: Different solvents work with different materials. PLA is not compatible with acetone but can be smoothed with other solvents.
- Safety Concerns: Many solvents are hazardous and require strict safety precautions.
6.2. Safe Solvents for PLA
- Ethyl Acetate: Found in nail polish remover, it is a safer alternative for smoothing PLA.
- Tetrahydrofuran (THF): More effective but requires laboratory equipment and strict safety measures.
- Dichloromethane (DCM): Highly effective but extremely hazardous and should only be used by experienced professionals.
6.3. Step-by-Step Solvent Smoothing Process
- Prepare the Print: Ensure the print is clean and free of any dust or debris.
- Safety Gear: Wear gloves, eye protection, and a respirator. Work in a well-ventilated area or fume hood.
- Apply Solvent: Apply the solvent to a cloth or cotton swab and gently wipe the surface of the print.
- Monitor Smoothing: Monitor the smoothing process closely. Avoid over-smoothing, which can cause the print to lose detail or structural integrity.
- Allow to Dry: Allow the print to dry completely in a well-ventilated area.
6.4. Vapor Smoothing
- How It Works: Vapor smoothing involves exposing the print to solvent vapors in a controlled environment.
- Equipment: Requires a vapor smoothing chamber or automated machine like the Polymaker Polysher.
- Process: The solvent vapors gently dissolve the outer layer of the print, creating a smooth, even finish.
6.5. Safety Precautions
- Ventilation: Work in a well-ventilated area or fume hood.
- Protective Gear: Wear gloves, eye protection, and a respirator.
- Solvent Handling: Handle solvents with care and avoid skin contact.
- Proper Disposal: Dispose of used solvents and containers properly according to local regulations.
6.6. Choosing the Right Solvent
- Safety: Choose the safest solvent that is effective for your material.
- Effectiveness: Consider the level of smoothing required and choose a solvent that provides the desired results.
- Availability: Choose a solvent that is readily available and easy to obtain.
- Regulations: Be aware of any regulations or restrictions on the use of certain solvents in your area.
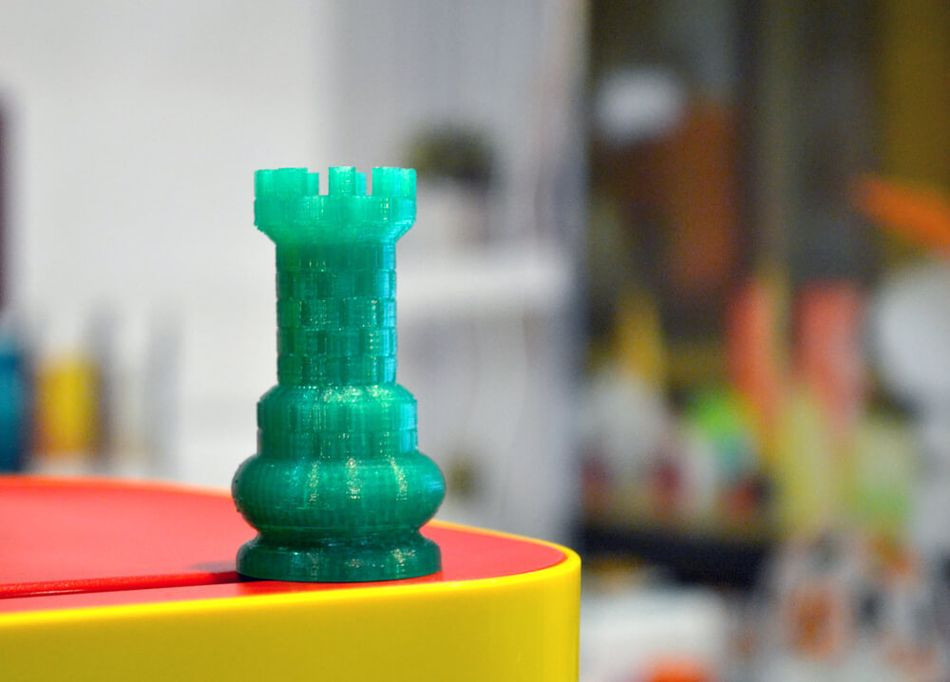 FDM chess piece layer lines
Alt: Untreated FDM parts show visible layer lines
7. How Does Heat Gun Smoothing Work to Polish 3D Prints?
Heat gun smoothing melts the surface of the print to reduce layer lines, offering a quick but less precise method for polishing.
7.1. Understanding Heat Gun Smoothing
- How It Works: A heat gun melts the outer surface of the plastic, causing it to flow and smooth out layer lines.
- Materials Compatibility: Works best with PLA and other thermoplastics.
- Limitations: Can be difficult to control and may result in warping or loss of detail.
7.2. Step-by-Step Heat Gun Smoothing Process
- Prepare the Print: Ensure the print is clean and free of any dust or debris.
- Safety Gear: Wear gloves and eye protection. Work in a well-ventilated area.
- Apply Heat: Hold the heat gun a few inches away from the surface of the print and move it evenly to avoid overheating.
- Monitor Smoothing: Monitor the smoothing process closely. Avoid overheating, which can cause the print to warp or melt.
- Allow to Cool: Allow the print to cool completely before handling it.
7.3. Tips for Effective Heat Gun Smoothing
- Use Low Heat: Start with a low heat setting and gradually increase it as needed.
- Keep Moving: Keep the heat gun moving to avoid overheating any one area.
- Focus on Layer Lines: Focus the heat on the layer lines to smooth them out.
- Avoid Fine Details: Be careful when smoothing fine details to avoid melting or distorting them.
7.4. Alternatives to Heat Gun Smoothing
- Hair Dryer: A hair dryer can be used as a gentler alternative to a heat gun, but it may not be as effective.
- Warm Water: Soaking the print in warm water can help to soften the plastic and make it easier to smooth.
7.5. Safety Precautions
- Ventilation: Work in a well-ventilated area to avoid inhaling fumes.
- Protective Gear: Wear gloves and eye protection to protect yourself from heat and fumes.
- Heat Handling: Handle the heat gun with care to avoid burns.
- Avoid Overheating: Avoid overheating the print, which can cause it to warp or melt.
7.6. Ideal Applications for Heat Gun Smoothing
- Large Parts: Heat gun smoothing is best suited for large parts with simple geometries.
- Rapid Prototyping: It is a fast and easy way to smooth prints for rapid prototyping.
- Cost-Effective: Heat gun smoothing is a cost-effective alternative to more complex smoothing methods.
8. What Are the Best Polishing Compounds and Tools to Polish 3D Prints?
Choosing the right polishing compounds and tools ensures a high-gloss finish on 3D prints, enhancing their aesthetic appeal.
8.1. Types of Polishing Compounds
- Plastic Polish: Specifically designed for plastics, plastic polish removes scratches and restores shine.
- Automotive Polish: Suitable for a variety of materials, automotive polish provides a high-gloss finish.
- Metal Polish: Can be used on metal-filled filaments to enhance the metallic appearance.
- Jewelry Polish: Provides a gentle polishing action and is ideal for delicate parts.
8.2. Tools for Polishing
- Microfiber Cloths: Soft and non-abrasive, microfiber cloths are ideal for applying and buffing polishing compounds.
- Buffing Wheels: Used with a rotary tool, buffing wheels provide a fast and efficient way to polish large surfaces.
- Rotary Tools: Versatile tools that can be used with a variety of polishing attachments, such as buffing wheels and polishing pads.
- Polishing Pads: Available in a variety of materials and sizes, polishing pads are used with rotary tools to polish intricate details.
8.3. Step-by-Step Polishing Process
- Prepare the Print: Ensure the print is clean and free of any dust or debris.
- Apply Polishing Compound: Apply a small amount of polishing compound to a microfiber cloth or polishing pad.
- Polish the Surface: Gently rub the polishing compound over the surface of the print in circular motions.
- Buff the Surface: Use a clean microfiber cloth or buffing wheel to buff the surface and remove any excess polishing compound.
- Repeat as Needed: Repeat the polishing process as needed to achieve the desired level of shine.
8.4. Tips for Effective Polishing
- Use Small Amounts of Compound: Use small amounts of polishing compound to avoid buildup and ensure even coverage.
- Apply Even Pressure: Apply even pressure to avoid creating scratches or uneven areas.
- Keep Tools Clean: Keep your microfiber cloths and polishing pads clean to avoid transferring dirt or debris to the print.
- Work in Sections: Work in small sections to ensure thorough polishing and avoid missing any areas.
8.5. Polishing Difficult Areas
- Corners and Crevices: Use small polishing pads or cotton swabs to reach hard-to-reach areas.
- Fine Details: Be extra careful when polishing fine details to avoid damaging them. Use gentle pressure and small polishing pads.
- Curved Surfaces: Use flexible polishing pads or sponges to conform to curved surfaces.
8.6. Safety Precautions
- Ventilation: Work in a well-ventilated area to avoid inhaling dust or fumes.
- Protective Gear: Wear gloves and eye protection to protect yourself from chemicals and debris.
- Tool Handling: Handle rotary tools with care to avoid injury.
- Proper Disposal: Dispose of used polishing compounds and materials properly according to local regulations.
9. How to Troubleshoot Common Polishing Problems in 3D Prints?
Addressing common polishing problems ensures a smooth, high-quality finish on 3D prints, saving time and materials.
9.1. Scratches
- Cause: Scratches can be caused by using too coarse of sandpaper, applying too much pressure, or using dirty polishing tools.
- Solution: Start with a finer grit sandpaper, apply less pressure, and use clean polishing tools.
9.2. Uneven Surface
- Cause: An uneven surface can be caused by uneven sanding, applying too much polishing compound, or not buffing the surface evenly.
- Solution: Sand the surface evenly, apply small amounts of polishing compound, and buff the surface evenly.
9.3. Cloudy Finish
- Cause: A cloudy finish can be caused by using the wrong polishing compound, not buffing the surface enough, or using a dirty buffing wheel.
- Solution: Use the correct polishing compound, buff the surface thoroughly, and use a clean buffing wheel.
9.4. Over-Polishing
- Cause: Over-polishing can cause the print to lose detail or structural integrity.
- Solution: Monitor the polishing process closely and avoid over-polishing.
9.5. Bubbles in Epoxy Resin
- Cause: Bubbles can be caused by mixing the epoxy resin too quickly, not removing air bubbles before applying, or applying too thick of a coat.
- Solution: Mix the epoxy resin slowly, remove air bubbles before applying, and apply thin, even coats.
9.6. Tacky Finish with Epoxy Resin
- Cause: A tacky finish can be caused by incorrect mixing ratios, insufficient curing time, or high humidity.
- Solution: Use the correct mixing ratios, allow the epoxy resin to cure completely, and work in a dry environment.
9.7. Warping During Heat Gun Smoothing
- Cause: Warping can be caused by applying too much heat or not moving the heat gun evenly.
- Solution: Use a low heat setting, keep the heat gun moving, and avoid overheating any one area.
9.8. Chemical Damage During Solvent Smoothing
- Cause: Chemical damage can be caused by using the wrong solvent, over-smoothing, or not allowing the print to dry properly.
- Solution: Use the correct solvent, monitor the smoothing process closely, and allow the print to dry completely.
10. What are the Finishes and Post-Treatment Methods to Polish 3D Prints?
Applying post-treatment methods after polishing enhances the appearance and durability of 3D prints, ensuring a professional finish.
10.1. Clear Coating
- Purpose: Protects the polished surface from scratches, UV damage, and environmental hazards.
- Types: Spray-on lacquers or varnishes.
- Application: Follow the manufacturer’s instructions and allow sufficient drying time between coats.
10.2. Waxing
- Purpose: Adds a layer of protection and enhances the shine of the polished surface.
- Types: Carnauba wax or beeswax.
- Application: Apply a thin layer of wax and buff the surface with a clean microfiber cloth.
10.3. Ceramic Coating
- Purpose: Provides a durable, scratch-resistant finish.
- Application: Apply the ceramic coating according to the manufacturer’s instructions.
10.4. Hydrographic Printing
- Purpose: Applies decorative patterns or designs to the surface of the print.
- Process: The print is dipped into a tank of water with a floating hydrographic film, which adheres to the surface.
10.5. Metal Plating
- Purpose: Adds a metallic finish to the print.
- Process: The print is coated with a thin layer of metal using electroplating or other techniques.
10.6. Sandblasting
- Purpose: Creates a matte finish and removes imperfections.
- Process: The print is blasted with abrasive particles to create a textured surface.
10.7. Laser Engraving
- Purpose: Adds custom designs or markings to the surface of the print.
- Process: A laser is used to engrave the design onto the surface of the print.
10.8. Painting and Detailing
- Purpose: Adds color and detail to the print.
- Process: The print is painted using acrylic paints or other types of paint and detailed with fine brushes or airbrushes.
10.9. Applying Decals
- Purpose: Adds decorative elements to the print.
- Process: Decals are applied to the surface of the print and sealed with a clear coat.
10.10. Assembling Components
- Purpose: Connects multiple parts of the print to create a complete model.
- Process: Parts are assembled using adhesives, screws, or other fasteners.
By following these steps and best practices, you can achieve professional-quality results when polishing and finishing your 3D prints. Remember to always prioritize safety and work in a well-ventilated area when using chemicals or power tools.
At amazingprint.net, we understand the importance of high-quality 3D prints. Whether you are a hobbyist or a professional, our comprehensive guides and resources will help you achieve the best possible results. Explore our website today to discover more tips, techniques, and inspiration for your 3D printing projects. Let us help you bring your ideas to life with amazing 3D prints.
Ready to take your 3D prints to the next level? Visit amazingprint.net today and discover the best techniques for polishing, finishing, and enhancing your 3D printed creations. Explore our guides, compare options, and find inspiration for your next project. Contact us for expert advice and personalized solutions. Let amazingprint.net be your partner in achieving printing perfection!
Frequently Asked Questions (FAQs)
Can I use acetone to smooth PLA prints?
Acetone is not recommended for smoothing PLA prints because it does not effectively react with PLA. Alternative solvents like ethyl acetate are better suited for chemical smoothing of PLA prints.
How long does it take to smooth a PLA print using sanding?
The time to sand a PLA print depends on the size, complexity, and desired smoothness. It can range from a few minutes for small, simple prints to several hours for larger, more intricate ones.
Can I use a heat gun for heat treatment of PLA prints?
A heat gun can treat PLA prints, but precise temperature control is crucial to prevent warping or melting. Avoid focusing heat on any single area for too long.
Can I paint my PLA print directly after smoothing?
Before painting, clean the surface of the smoothed PLA print and apply a primer to ensure good paint adhesion. Let the primer dry as directed before painting.
What is the best way to fill large gaps in a 3D print before polishing?
For large gaps, use epoxy putty or plastic filler. Apply evenly, allow to cure, and then sand smooth to blend with the print.
How do I prevent bubbles when using epoxy resin on 3D prints?
Prevent bubbles by mixing the resin slowly, using a heat gun to remove trapped air, and applying thin, even coats.
Is vapor smoothing safe for all types of 3D printed materials?
Vapor smoothing is not safe for all materials. It’s essential to use the correct solvent for the specific material and follow safety precautions, including working in a well-ventilated area and wearing protective gear.
What is the ideal grit range for sanding 3D prints to achieve a smooth finish?
Start with a coarse grit (200-400) to remove imperfections, progress to medium grit (600-800) for refining the surface, and finish with fine grit (1000-2000) for a smooth finish.
How can I avoid damaging fine details when polishing a 3D print?
Protect fine details by using fine-grit sandpaper, applying light pressure, and using specialized tools for hard-to-reach areas.
What safety precautions should I take when using solvents to smooth 3D prints?
When using solvents, work in a well-ventilated area, wear gloves, eye protection, and a respirator to protect yourself from harmful fumes and chemicals.
References
- Tuazon BJ, Espino MT, Dizon JR. Investigation on the effects of acetone vapor-polishing to fracture behavior of ABS printed materials at different operating temperature. In Materials Science Forum 2020 (Vol. 1005, pp. 141-149). Trans Tech Publications Ltd.
- Zhang B. Does Acetone Dissolve PLA? [Internet]. EcoReprap. 2021 [cited 2022Mar1]. Available from: https://ecoreprap.com/dissolve-pla/
- Kočí J. Improve your 3D prints with chemical smoothing [Internet]. PrusaPrinters Blog. 2020 [cited 2022Mar1]. Available from: https://blog.prusaprin