
Printing directly from your Android tablet is now simpler than ever, offering a convenient way to produce hard copies of your documents, photos, and other important files. Can I Print From An Android Tablet is a common question, and at amazingprint.net, we’re here to provide a comprehensive guide that makes the process easy and efficient. Whether you’re printing documents, photos, or web pages, understanding the steps involved can significantly enhance your productivity.
1. What Are The Key Benefits Of Printing From An Android Tablet?
Printing from an Android tablet offers numerous benefits, making it a valuable tool for both personal and professional use.
- Convenience: Print documents and photos directly from your tablet without needing a computer.
- Portability: Ideal for on-the-go printing needs, especially when traveling or working remotely.
- Efficiency: Quickly produce hard copies of important files, saving time and effort.
- Versatility: Print various types of content, including documents, photos, web pages, and emails.
- Cost-Effective: Reduce reliance on traditional printing methods, potentially saving on printing costs.
These benefits make printing from an Android tablet a practical solution for various printing needs.
1.1. How Does Printing From An Android Tablet Enhance Productivity?
Printing directly from your Android tablet can significantly enhance productivity in several ways:
- Streamlined Workflow: Eliminates the need to transfer files to a computer for printing, streamlining the workflow.
- Quick Access: Allows immediate printing of documents and images stored on the tablet.
- Remote Printing: Enables printing from anywhere with a Wi-Fi connection, enhancing remote work capabilities.
- Mobile Convenience: Provides a portable printing solution for professionals on the move.
- Reduced Downtime: Minimizes delays associated with traditional printing processes.
By integrating printing capabilities directly into your Android tablet, you can achieve a more efficient and productive workflow.
1.2. What Types Of Printers Are Compatible With Android Tablets?
Many types of printers are compatible with Android tablets, offering flexibility and convenience for users.
- Wi-Fi Printers: Connect wirelessly to your network, allowing easy printing from your tablet.
- Bluetooth Printers: Pair directly with your tablet via Bluetooth for seamless printing.
- Cloud-Ready Printers: Support cloud printing services like Google Cloud Print (although discontinued, alternative services are available).
- Mobile Printers: Compact and portable printers designed for on-the-go printing.
- All-in-One Printers: Combine printing, scanning, and copying functions in a single device.
Most modern printers are designed to be compatible with Android devices, ensuring a smooth and efficient printing experience.
2. How Do I Connect My Android Tablet To A Printer?
Connecting your Android tablet to a printer is a straightforward process that can be done via Wi-Fi, Bluetooth, or USB. Here’s how to do it:
- Wi-Fi Connection:
- Ensure your printer and Android tablet are connected to the same Wi-Fi network.
- Go to your tablet’s settings and find the “Printing” option.
- Select your printer from the list of available devices.
- Bluetooth Connection:
- Enable Bluetooth on both your printer and Android tablet.
- Pair the devices in the Bluetooth settings of your tablet.
- Select the printer from the list of paired devices.
- USB Connection:
- Connect your tablet to the printer using a USB cable.
- Install any necessary drivers or apps if prompted.
- Select the printer when prompted to print a document.
Once connected, you can easily print documents, photos, and other files directly from your Android tablet.
2.1. What Are The Steps To Connect Via Wi-Fi?
Connecting your Android tablet to a printer via Wi-Fi is a simple and convenient process.
- Ensure Wi-Fi Connection: Make sure both your Android tablet and printer are connected to the same Wi-Fi network.
- Access Printing Settings: On your Android tablet, go to “Settings” and then “Connections” or “Network & Internet.” Look for the “Printing” option.
- Add Printer: Tap on “Add Printer” to search for available printers on your network.
- Select Printer: Choose your printer from the list. If it’s not listed, you may need to manually add it by entering its IP address.
- Install Plugin (If Required): Your tablet may prompt you to install a printer service plugin. Follow the on-screen instructions to install it.
- Print: Open the document or photo you want to print and select the “Print” option from the app’s menu.
- Choose Printer: Select your connected printer from the list and adjust any print settings as needed.
- Print: Tap the “Print” button to send the document to the printer.
By following these steps, you can easily connect your Android tablet to a printer via Wi-Fi and start printing your documents and photos.
2.2. How Do I Connect Using Bluetooth?
Connecting your Android tablet to a printer using Bluetooth is a straightforward process.
- Enable Bluetooth: Turn on Bluetooth on both your Android tablet and your printer.
- Enter Pairing Mode: On your printer, activate the Bluetooth pairing mode. This usually involves pressing a button on the printer.
- Scan for Devices: On your Android tablet, go to Settings > Connections > Bluetooth and tap “Scan.”
- Select Printer: Choose your printer from the list of available devices.
- Pair Devices: You may be prompted to enter a PIN or confirm a pairing code. Follow the on-screen instructions.
- Connect: Once paired, your Android tablet will connect to the printer.
- Print: Open the document or photo you want to print, select the “Print” option, and choose your Bluetooth printer.
- Print: Tap the “Print” button to send the document to the printer.
Connecting via Bluetooth provides a wireless printing solution without needing a Wi-Fi network.
2.3. Can I Use A USB Cable To Connect?
Yes, you can use a USB cable to connect your Android tablet to a printer, although this method is less common due to the prevalence of wireless printing options.
- Connect the Cable: Plug the USB cable into your Android tablet and the printer.
- Install Drivers (If Required): Your tablet may prompt you to install drivers or a printer service plugin. Follow the on-screen instructions to install them.
- Select USB Printing: In your tablet’s settings, find the “Printing” option and select the USB-connected printer.
- Print: Open the document or photo you want to print, select the “Print” option, and choose the USB printer.
- Print: Tap the “Print” button to send the document to the printer.
Using a USB cable ensures a direct connection and can be useful if wireless options are unavailable or unreliable.
 Connecting Android Tablet to Printer
2.4. What If My Printer Isn’t Showing Up?
If your printer isn’t showing up on your Android tablet, there are several troubleshooting steps you can take:
- Check Wi-Fi Connection: Ensure both your tablet and printer are connected to the same Wi-Fi network.
- Printer Discovery: Make sure your printer is discoverable. Some printers have a setting that needs to be enabled for them to be visible on the network.
- Restart Devices: Restart both your Android tablet and printer to refresh their connections.
- Update Printer Drivers: Ensure your printer has the latest drivers installed. You can usually download these from the printer manufacturer’s website.
- Add Printer Manually: If the printer still doesn’t show up, try adding it manually by entering its IP address.
- Check Printer Service Plugin: Verify that the printer service plugin is installed and enabled on your tablet.
- Firewall Settings: Check your network’s firewall settings to ensure they are not blocking the printer.
- Contact Support: If all else fails, contact your printer manufacturer’s support for further assistance.
By following these steps, you can troubleshoot why your printer isn’t showing up and get it connected to your Android tablet.
3. How Do I Print A File From My Android Tablet?
Printing a file from your Android tablet is a simple process that can be done in a few steps.
- Open the File: Locate the file you want to print on your Android tablet. This could be a document, photo, or any other printable file.
- Access the Print Option: Open the file using an appropriate app. Look for the “Print” option in the app’s menu. This is usually found under the “File” menu or by tapping the three vertical dots in the corner of the screen.
- Select Printer: Choose the printer you want to use from the list of available printers.
- Adjust Print Settings: Customize the print settings according to your preferences. You can change the number of copies, page orientation, color settings, and paper size.
- Print: Tap the “Print” button to send the file to the printer.
By following these steps, you can easily print files from your Android tablet.
3.1. Printing From Google Drive
Printing from Google Drive on your Android tablet is a seamless process.
- Open Google Drive: Launch the Google Drive app on your Android tablet.
- Select File: Locate the file you want to print. This could be a document, spreadsheet, or presentation.
- Access Print Option: Tap the three vertical dots next to the file name to open the menu. Select “Print” from the options.
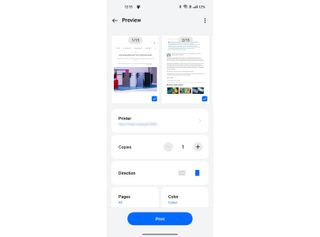
- Preview: A print preview screen will appear.
- Select Printer: Choose the printer you want to use from the dropdown menu.
- Adjust Settings: Customize the print settings according to your preferences. You can change the number of copies, page orientation, color settings, and paper size.
- Print: Tap the “Print” button to send the file to the printer.
By following these steps, you can easily print files directly from Google Drive on your Android tablet.
3.2. How To Print From Other Cloud Services?
Printing from other cloud services like Dropbox or OneDrive on your Android tablet involves a similar process to Google Drive.
- Open Cloud Service App: Launch the app for the cloud service you want to use (e.g., Dropbox, OneDrive).
- Select File: Locate the file you want to print.
- Access Print Option: Tap the three vertical dots next to the file name to open the menu. Look for the “Print” option. If there isn’t a direct print option, look for “Open With” and select a compatible app like Google Docs or Microsoft Word.
- Open With Compatible App: If you used “Open With,” the file will open in the selected app. From there, access the print option in the app’s menu.
- Preview: A print preview screen will appear.
- Select Printer: Choose the printer you want to use from the dropdown menu.
- Adjust Settings: Customize the print settings according to your preferences.
- Print: Tap the “Print” button to send the file to the printer.
Printing from other cloud services may require an extra step of opening the file with a compatible app, but the process is generally straightforward.
3.3. Printing Photos From The Gallery
Printing photos from the gallery on your Android tablet is a simple and direct process.
- Open Gallery App: Launch the Gallery app on your Android tablet.
- Select Photo: Locate the photo you want to print and tap to open it.
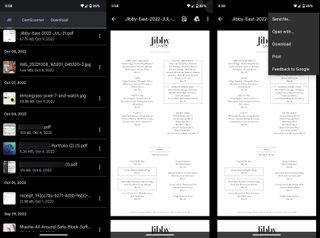
- Access Print Option: Look for the “Print” option. This is usually found under the “Share” menu or by tapping the three vertical dots in the corner of the screen.
- Preview: A print preview screen will appear.
- Select Printer: Choose the printer you want to use from the dropdown menu.
- Adjust Settings: Customize the print settings according to your preferences. You can change the paper size, orientation, and print quality.
- Print: Tap the “Print” button to send the photo to the printer.
By following these steps, you can easily print photos directly from the gallery on your Android tablet.
3.4. Printing Emails
Printing emails from your Android tablet is a useful feature for keeping hard copies of important correspondence.
- Open Email App: Launch your email app (e.g., Gmail, Outlook) on your Android tablet.
- Select Email: Locate the email you want to print and tap to open it.
- Access Print Option: Look for the “Print” option. In Gmail, this is usually found under the three vertical dots menu in the upper right corner. In Outlook, it may be under the “More Options” menu.
- Preview: A print preview screen will appear.
- Select Printer: Choose the printer you want to use from the dropdown menu.
- Adjust Settings: Customize the print settings according to your preferences.
- Print: Tap the “Print” button to send the email to the printer.
Printing emails ensures you have a physical record of important communications.
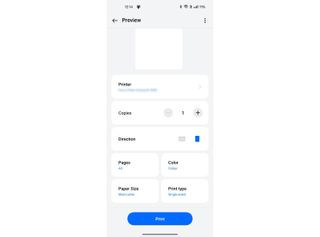 Android Print Preview Screen
3.5. How To Print Web Pages?
Printing web pages from your Android tablet is a convenient way to keep hard copies of important information or articles.
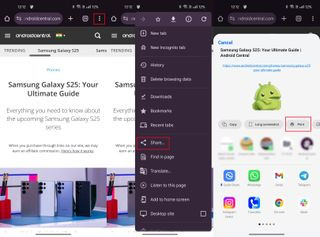
- Open Web Browser: Launch your web browser (e.g., Chrome, Firefox) on your Android tablet.
- Navigate to Web Page: Go to the web page you want to print.
- Access Print Option: Look for the “Print” option. In Chrome, this is usually found under the three vertical dots menu in the upper right corner. Select “Share” and then “Print.”
- Preview: A print preview screen will appear.
- Select Printer: Choose the printer you want to use from the dropdown menu.
- Adjust Settings: Customize the print settings according to your preferences. You can change the paper size, orientation, and whether to include headers and footers.
- Print: Tap the “Print” button to send the web page to the printer.
Printing web pages ensures you have a physical copy for reference.
4. Troubleshooting Common Printing Issues
Even with modern technology, printing from an Android tablet can sometimes present challenges. Here are some common issues and how to troubleshoot them:
- Printer Not Found: Ensure the printer and tablet are on the same Wi-Fi network. Restart both devices and try again.
- Print Job Stuck: Cancel the print job and try again. Check the printer’s queue to see if there are any other jobs blocking the current one.
- Poor Print Quality: Check the ink levels and print settings. Ensure you are using the correct paper type.
- Compatibility Issues: Make sure your printer is compatible with Android devices. Update the printer drivers or install a printer service plugin.
- Connection Problems: Verify that the Wi-Fi or Bluetooth connection is stable. Try connecting via USB if wireless options are unreliable.
- Incorrect Paper Size: Adjust the paper size settings in the print preview screen to match the paper loaded in the printer.
- Garbled Output: Update the printer drivers and ensure they are compatible with your Android tablet. Try printing a test page to diagnose the issue.
By addressing these common issues, you can maintain a smooth and efficient printing experience from your Android tablet.
4.1. What To Do If The Printer Is Not Responding?
If your printer is not responding when you try to print from your Android tablet, there are several troubleshooting steps you can take:
- Check Power: Ensure the printer is turned on and properly connected to a power source.
- Verify Connection: Make sure the printer and tablet are connected to the same Wi-Fi network or paired via Bluetooth.
- Restart Printer: Turn the printer off, wait a few seconds, and then turn it back on.
- Restart Tablet: Restart your Android tablet to refresh its connections.
- Check Printer Queue: Clear any pending print jobs in the printer queue that may be causing a blockage.
- Update Drivers: Ensure your printer has the latest drivers installed. You can usually download these from the printer manufacturer’s website.
- Run Diagnostics: Use the printer’s built-in diagnostic tools to identify any hardware or software issues.
- Contact Support: If the printer still does not respond, contact the printer manufacturer’s support for further assistance.
By following these steps, you can troubleshoot and resolve issues when your printer is not responding.
4.2. How To Fix Print Quality Issues?
Print quality issues can be frustrating, but there are several steps you can take to improve the output:
- Check Ink Levels: Ensure that your printer has sufficient ink or toner. Low ink levels can result in faded or streaky prints.
- Clean Print Heads: Use the printer’s built-in cleaning function to clean the print heads. Clogged print heads can cause poor print quality.
- Adjust Print Settings: Adjust the print settings to a higher quality. Select “Best” or “High Quality” in the print preferences.
- Use Correct Paper Type: Ensure you are using the correct paper type for your printer. Using the wrong paper can result in poor print quality.
- Check Paper Condition: Make sure the paper is not damp, wrinkled, or damaged. Poor paper condition can affect print quality.
- Update Drivers: Ensure your printer has the latest drivers installed. Outdated drivers can cause compatibility issues and poor print quality.
- Run Test Print: Print a test page to diagnose the issue. This can help identify whether the problem is with the printer, the ink, or the settings.
- Contact Support: If the print quality issues persist, contact the printer manufacturer’s support for further assistance.
By following these steps, you can troubleshoot and improve print quality issues when printing from your Android tablet.
4.3. Dealing With Compatibility Problems
Compatibility problems between your Android tablet and printer can occur, but there are ways to address them:
- Check Compatibility: Ensure your printer is compatible with Android devices. Refer to the printer’s documentation or the manufacturer’s website.
- Update Drivers: Ensure your printer has the latest drivers installed. Outdated drivers can cause compatibility issues.
- Install Printer Service Plugin: Install a printer service plugin on your Android tablet. These plugins provide additional compatibility and functionality.
- Use a Compatible App: Use a compatible app for printing. Some apps may work better with certain printers than others.
- Try a Different Connection Method: If you are using Wi-Fi, try connecting via Bluetooth or USB.
- Restart Devices: Restart both your Android tablet and printer to refresh their connections.
- Check Firmware: Ensure your printer has the latest firmware installed.
- Contact Support: If compatibility problems persist, contact the printer manufacturer’s support for further assistance.
By following these steps, you can troubleshoot and resolve compatibility problems between your Android tablet and printer.
 Printing Options on Android
4.4. How To Clear A Print Queue?
Clearing a print queue is essential when a print job is stuck or causing issues.
- Access Printer Settings: On your Android tablet, go to “Settings” and then “Connections” or “Network & Internet.” Look for the “Printing” option.
- Select Printer: Choose your connected printer from the list.
- Open Printer Queue: Look for an option to view the printer queue. This may be under “Options” or “Settings” for the printer.
- Cancel Jobs: Select the stuck print job and choose the “Cancel” option. Repeat this for any other jobs in the queue.
- Restart Printer: After clearing the queue, restart the printer to ensure all jobs are cleared.
- Restart Tablet: Restart your Android tablet to refresh its connection with the printer.
Clearing the print queue can help resolve issues and ensure smooth printing from your Android tablet.
5. Tips For Efficient Printing From An Android Tablet
To maximize efficiency when printing from your Android tablet, consider these tips:
- Use Cloud Printing: Take advantage of cloud printing services for remote printing and easy access to your files.
- Optimize Print Settings: Adjust print settings to reduce ink usage and save paper.
- Use Printer Apps: Install printer apps from the manufacturer for enhanced control and features.
- Schedule Printing: Schedule large print jobs for off-peak hours to avoid network congestion.
- Maintain Printer: Regularly clean and maintain your printer to ensure optimal performance.
- Use High-Quality Paper: Use high-quality paper for better print results and to prevent paper jams.
- Preview Before Printing: Always preview your documents before printing to catch any errors and save paper.
- Organize Files: Keep your files organized in folders for easy access and printing.
By following these tips, you can achieve efficient and cost-effective printing from your Android tablet.
5.1. Optimizing Print Settings For Best Results
Optimizing print settings is crucial for achieving the best results when printing from your Android tablet.
- Quality Settings: Choose the appropriate print quality setting. For documents, “Normal” or “Draft” may be sufficient, while photos and graphics benefit from “High Quality.”
- Color Settings: Select the correct color setting. “Grayscale” is ideal for documents, while “Color” is necessary for photos and graphics.
- Paper Size: Ensure the paper size setting matches the paper loaded in the printer.
- Orientation: Choose the correct orientation (portrait or landscape) for your document.
- Duplex Printing: Enable duplex printing (printing on both sides of the paper) to save paper.
- Resolution: Adjust the resolution settings for sharper images and clearer text.
- Ink Saving Mode: Use ink-saving mode for draft prints and documents to conserve ink.
- Custom Profiles: Create custom print profiles for different types of documents and photos to streamline the printing process.
By optimizing these settings, you can achieve the best possible print results from your Android tablet.
5.2. How To Save Ink And Paper?
Saving ink and paper is both cost-effective and environmentally friendly. Here are some tips to help you conserve resources when printing from your Android tablet:
- Use Draft Mode: Print draft copies of documents in “Draft” mode to use less ink.
- Print in Grayscale: Print documents in grayscale instead of color to save colored ink.
- Enable Duplex Printing: Print on both sides of the paper by enabling duplex printing.
- Reduce Margins: Reduce the margins in your documents to fit more content on each page.
- Use Smaller Font Size: Use a smaller font size to fit more text on each page.
- Preview Before Printing: Always preview your documents before printing to catch errors and avoid wasting paper.
- Print Only What You Need: Only print the pages or sections of a document that you need.
- Recycle Paper: Recycle used paper to reduce waste.
- Use Refilled Cartridges: Use refilled ink cartridges to save money and reduce waste.
- Optimize Images: Optimize images before printing to reduce their file size and ink consumption.
By implementing these strategies, you can save ink and paper while printing from your Android tablet.
5.3. Using Printer Apps For Enhanced Control
Printer apps from manufacturers like HP, Canon, and Epson can provide enhanced control and features when printing from your Android tablet.
- Remote Printing: Print documents and photos from anywhere using the printer app.
- Printer Status: Check the printer’s status, including ink levels, paper supply, and error messages.
- Custom Settings: Access advanced print settings and customize them to your preferences.
- Scanning: Use the printer app to scan documents and photos directly to your Android tablet.
- Maintenance: Perform maintenance tasks such as cleaning print heads and aligning cartridges.
- Firmware Updates: Update the printer’s firmware to ensure optimal performance and compatibility.
- Troubleshooting: Access troubleshooting guides and support resources within the app.
- Direct Printing: Print directly from other apps on your Android tablet using the printer app’s integration.
- Cloud Integration: Connect to cloud storage services like Google Drive and Dropbox for easy access to your files.
By using printer apps, you can enhance your printing experience and take full control of your printer’s features from your Android tablet.
 Android Print Option in Chrome
5.4. How To Print On The Go?
Printing on the go from your Android tablet is convenient with the right tools and strategies.
- Mobile Printers: Use a portable mobile printer that connects wirelessly to your Android tablet.
- Cloud Printing: Take advantage of cloud printing services like Google Cloud Print (though discontinued, find alternative services) to print from anywhere with an internet connection.
- Printer Apps: Install printer apps from manufacturers that offer remote printing capabilities.
- Wi-Fi Hotspots: Connect to public Wi-Fi hotspots to print from your Android tablet.
- Bluetooth Printing: Use Bluetooth to connect directly to a printer without needing a Wi-Fi network.
- Email Printing: Email documents to a printer that supports email printing.
- USB OTG: Use a USB OTG (On-The-Go) adapter to connect your Android tablet directly to a printer via USB.
- Printing Services: Utilize printing services at locations like libraries, hotels, and business centers.
- Portable Power: Carry a portable power bank to keep your printer and Android tablet charged on the go.
By using these tips, you can print documents and photos from your Android tablet wherever you are.
6. Exploring Advanced Printing Options
For users who require more advanced printing options from their Android tablets, there are several features and tools available.
- Custom Paper Sizes: Define custom paper sizes for printing non-standard documents and photos.
- Watermarks: Add watermarks to your prints for branding or security purposes.
- Booklet Printing: Create booklets and brochures by printing multiple pages on a single sheet of paper.
- Poster Printing: Print large posters by tiling multiple sheets of paper together.
- Color Management: Use color management settings to ensure accurate color reproduction.
- Image Adjustments: Adjust image settings such as brightness, contrast, and saturation before printing.
- Borderless Printing: Print photos and graphics without borders for a professional look.
- Print Preview: Use the print preview feature to see how your document will look before printing.
- Scheduled Printing: Schedule print jobs to occur at a later time.
By exploring these advanced printing options, you can enhance your printing capabilities and achieve professional results from your Android tablet.
6.1. Setting Up Custom Paper Sizes
Setting up custom paper sizes allows you to print on non-standard paper dimensions, providing flexibility for various printing needs.
- Access Printer Settings: On your Android tablet, go to “Settings” and then “Connections” or “Network & Internet.” Look for the “Printing” option.
- Select Printer: Choose your connected printer from the list.
- Open Printer Preferences: Look for an option to open the printer preferences or settings.
- Paper Size Settings: Navigate to the paper size settings. This may be under “Paper,” “Layout,” or “Advanced” settings.
- Add Custom Size: Look for an option to add a custom paper size. This may be labeled as “Custom,” “User Defined,” or “Add New Size.”
- Enter Dimensions: Enter the dimensions of your custom paper size in inches or millimeters.
- Save Settings: Save the custom paper size settings.
- Select Custom Size: When printing, select the custom paper size from the list of available sizes.
By setting up custom paper sizes, you can print on a variety of paper dimensions to meet your specific needs.
6.2. How To Add Watermarks To Prints?
Adding watermarks to prints can be useful for branding, security, or copyright protection.
- Use a Compatible App: Use a document editing or printing app that supports watermarks. Examples include Microsoft Word, Adobe Acrobat Reader, or specialized printing apps.
- Open Document: Open the document you want to print in the app.
- Access Watermark Settings: Look for the watermark settings. This may be under “Design,” “Layout,” or “Page Setup.”
- Add Watermark: Add a text or image watermark. You can customize the text, font, size, color, and position of the watermark. For images, you can adjust the size, transparency, and position.
- Apply Watermark: Apply the watermark to the document.
- Print Document: Print the document with the watermark.
Adding watermarks can help protect your documents and add a professional touch.
6.3. Creating Booklets And Brochures
Creating booklets and brochures involves printing multiple pages on a single sheet of paper and then folding it to create a booklet.
- Use a Compatible App: Use a document editing or printing app that supports booklet printing. Examples include Microsoft Word, Adobe InDesign, or specialized printing apps.
- Open Document: Open the document you want to print as a booklet in the app.
- Access Booklet Settings: Look for the booklet printing settings. This may be under “Layout,” “Page Setup,” or “Print Options.”
- Enable Booklet Printing: Enable booklet printing. The app will automatically arrange the pages in the correct order for folding.
- Adjust Settings: Adjust the settings, such as the number of pages per sheet and the binding margin.
- Print Document: Print the document as a booklet.
- Fold Document: Fold the printed sheets to create the booklet.
Creating booklets and brochures can be a cost-effective way to produce professional-looking materials.
6.4. Printing Large Posters With Tile Printing
Printing large posters with tile printing involves dividing a large image or document into multiple smaller sheets of paper that can be assembled to create a poster.
- Use a Compatible App: Use a printing app that supports tile printing. Examples include Posteriza, BlockPosters, or specialized printing apps.
- Open Image: Open the image you want to print as a poster in the app.
- Access Tile Printing Settings: Look for the tile printing settings. This may be under “Layout,” “Page Setup,” or “Print Options.”
- Adjust Settings: Adjust the settings, such as the number of sheets, the overlap between sheets, and the orientation.
- Print Document: Print the document as tiles.
- Assemble Poster: Assemble the printed sheets to create the poster.
Tile printing allows you to create large posters without needing a large-format printer.
7. Securing Your Printing Environment
Securing your printing environment is essential to protect sensitive information and prevent unauthorized access.
- Secure Wi-Fi: Use a secure Wi-Fi network with a strong password to prevent unauthorized access.
- Password Protection: Password protect your printer to prevent unauthorized use.
- Firmware Updates: Keep your printer’s firmware up to date to patch security vulnerabilities.
- Access Control: Restrict access to the printer to authorized users only.
- Secure Printing: Use secure printing features such as PIN-protected printing to prevent unauthorized access to printed documents.
- Data Encryption: Encrypt sensitive data before printing to protect it from interception.
- Physical Security: Secure the printer in a locked room or cabinet to prevent physical access.
- Audit Logs: Enable audit logs to track printer usage and identify suspicious activity.
- Document Shredding: Shred sensitive documents after printing to prevent unauthorized access to the information.
- Network Segmentation: Segment your network to isolate the printer from other devices and prevent lateral movement in case of a security breach.
By implementing these security measures, you can protect your printing environment and prevent unauthorized access to sensitive information.
7.1. Using Secure Wi-Fi Connections
Using secure Wi-Fi connections is crucial to protect your printing environment from unauthorized access.
- Strong Password: Use a strong, unique password for your Wi-Fi network.
- WPA3 Encryption: Use WPA3 encryption for your Wi-Fi network. This provides the strongest level of security.
- Hidden Network: Hide your Wi-Fi network’s SSID to prevent it from being broadcast.
- MAC Address Filtering: Enable MAC address filtering to restrict access to your Wi-Fi network to authorized devices only.
- Guest Network: Use a guest network for visitors to prevent them from accessing your main network.
- Firewall: Use a firewall to protect your network from unauthorized access.
- Regular Updates: Keep your Wi-Fi router’s firmware up to date to patch security vulnerabilities.
- Monitor Network: Monitor your network for suspicious activity.
- Disable WPS: Disable WPS (Wi-Fi Protected Setup) to prevent unauthorized access.
- Change Default Settings: Change the default settings on your Wi-Fi router, such as the administrator password.
By implementing these security measures, you can protect your Wi-Fi network and prevent unauthorized access to your printing environment.
7.2. Password Protecting Your Printer
Password protecting your printer adds an extra layer of security to prevent unauthorized use.
- Access Printer Settings: Access your printer’s settings through its control panel or web interface.
- Security Settings: Look for the security settings. This may be under “Security,” “Administration,” or “Network.”
- Set Password: Set a password for the printer. This may be for administrator access or for general use.
- Enable Password Protection: Enable password protection for the printer.
- Test Password: Test the password to ensure it works correctly.
- Store Password Securely: Store the password securely.
- Update Password Regularly: Update the password regularly to maintain security.
- Restrict Access: Restrict access to the printer settings to authorized users only.
By password protecting your printer, you can prevent unauthorized use and protect sensitive information.
7.3. Keeping Printer Firmware Updated
Keeping your printer’s firmware updated is essential for security and performance.
- Check for Updates: Check for firmware updates on your printer’s control panel or web interface.
- Download Updates: Download the latest firmware updates from the printer manufacturer’s website.
- Install Updates: Install the firmware updates on your printer.
- Follow Instructions: Follow the instructions carefully during the firmware update process.
- Restart Printer: Restart the printer after the firmware update is complete.
- Schedule Updates: Schedule regular firmware updates to maintain security and performance.
- Backup Settings: Backup your printer’s settings before performing a firmware update.
- Monitor Performance: Monitor the printer’s performance after the firmware update to ensure it is working correctly.
By keeping your printer’s firmware updated, you can protect it from security vulnerabilities and ensure optimal performance.
7.4. Secure Printing Options For Sensitive Documents
Secure printing options are essential for protecting sensitive documents from unauthorized access.
- PIN-Protected Printing: Use PIN-protected printing to require a PIN code to be entered at the printer before the document is printed.
- Encrypted Printing: Use encrypted printing to encrypt the data transmitted to the printer.
- Watermarks: Add watermarks to sensitive documents to indicate their confidentiality.
- Secure Erase: Use secure erase features to overwrite the printer’s memory after printing sensitive documents.
- **