
The world of 3D printing has opened up exciting possibilities for creativity and innovation, and for families looking to explore this technology together, the XYZPrinting da Vinci miniMaker 3D printer presents itself as a user-friendly option. We got hands-on with the da Vinci miniMaker to see if it lives up to the hype of being a fantastic entry-level Xyz 3d Printer for households. This review dives deep into our experience, testing its features and print quality to help you decide if this is the right 3D printer for your family.
Disclosure: XYZPrinting provided us with a loan da Vinci miniMaker for this review. Be assured, our opinions are entirely our own and based on our thorough testing.
Having kids who have grown up around the hum of 3D printers (thanks to their hobbyist dad building his own), we’ve seen firsthand the curiosity and engagement 3D printing sparks in young minds. From requesting prints to participating in basic 3D modeling, they’ve been peripherally involved. However, the intricacies of operating and maintaining traditional 3D printers have kept them from fully participating in the printing process itself. The da Vinci miniMaker promises to bridge that gap, offering a consumer-friendly XYZ 3D printer experience designed for younger users.
While XYZPrinting recommends independent operation for ages 14 and up, we found that with adult supervision, even younger children (my kids are 8 and almost 10) can actively participate. They can learn to prepare files and send them to the printer, making them part of the creative workflow, with adult oversight during the actual printing and maintenance. Thinking of it like a kitchen appliance – similar to how I’d supervise them using a toaster – responsible adult involvement ensures safe and proper use, particularly when it comes to cleaning, filament changes, and removing prints from the bed. The included print removal tool, in particular, is definitely for adult use only due to its sharpness.
With years of accumulated 3D printed items in our home, we have a solid benchmark for comparison. Our experience with various 3D printers allows us to critically assess the da Vinci miniMaker’s performance and identify its strengths and weaknesses.
Getting Started with the XYZ 3D Printer miniMaker
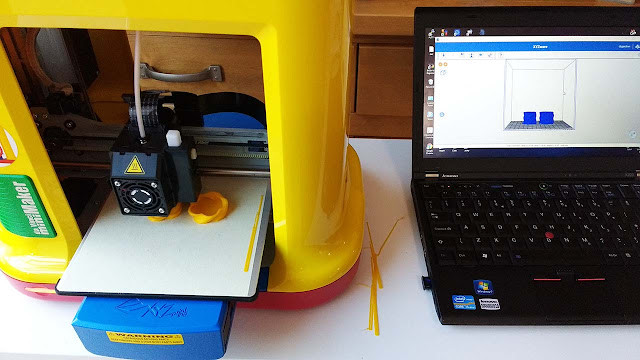
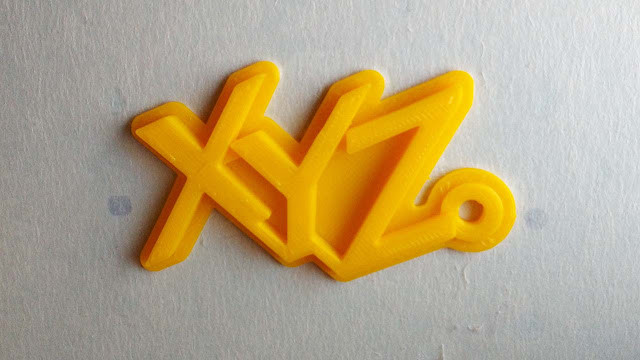
To kick off our testing, we opted for the pre-loaded XYZ logo keyring print. This provided a straightforward initial experience. The print quality was immediately noticeable and quite impressive for an entry-level XYZ 3D printer. It’s worth noting that the keyring model is relatively large, so be prepared for a longer print time for this initial sample.
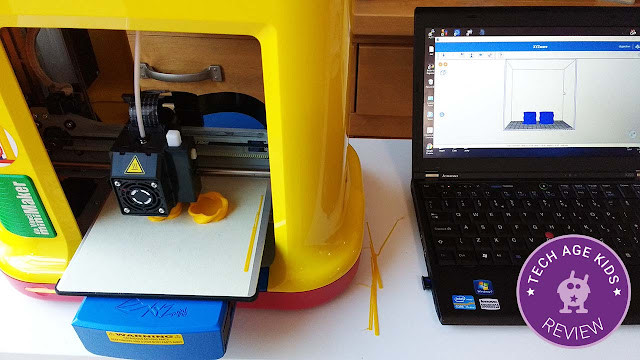 XYZprinting da Vinci miniMaker 3D printer head
Alt text: Close-up view of the XYZ 3D printer da Vinci miniMaker print head, showcasing its compact and user-friendly design.
Exploring 3D Printing Models for Your XYZ Printer
The included XYZWare software comes pre-loaded with sample 3D models, which is a great starting point for beginners. We highly recommend beginning with these to ensure a smooth first printing experience, eliminating any potential model-related issues.
XYZPrinting also offers an online model gallery, however, we found the selection somewhat limited in terms of printability and practicality. For a wider and more diverse range of 3D models, we turned to Thingiverse. This platform is a treasure trove of free 3D models, offered under various licenses, providing a vast library of printable objects for your XYZ 3D printer.
 XYZWare software interface on the XYZ 3D printer da Vinci miniMaker
Alt text: Screenshot of the XYZWare 3D printing software interface, highlighting its user-friendly layout and model preview features for XYZ 3D printers.
Assessing the Print Quality of this XYZ 3D Printer
The print quality delivered by the da Vinci miniMaker truly exceeded our initial expectations, especially considering its budget-friendly price point. We were genuinely impressed by the level of detail and finish achievable with this XYZ 3D printer.
Our first test print from Thingiverse was a low poly Pikachu. With yellow filament loaded, Pikachu seemed like the obvious choice! The overall print quality was excellent. We observed crisp details in areas like the paws, and the angled surfaces were remarkably clean. While we noted a couple of barely-there, unexpected ridges upon very close inspection, these were minor and wouldn’t be noticeable under normal viewing conditions.
 3D printed low poly Pikachu figure from the XYZ da Vinci miniMaker
Alt text: 3D printed XYZ logo keyring alongside a low poly Pikachu figure, showcasing the print quality achievable with the da Vinci miniMaker XYZ 3D printer.
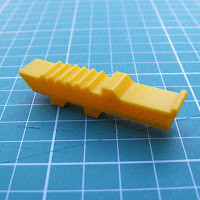
Next, we printed an alligator clip, a model we frequently print for testing purposes. Surprisingly, some parts of the alligator clip printed with greater precision and neatness on the miniMaker compared to our homemade delta printer. One area of the model suggested a need for slightly increased infill, but this is easily adjustable within the slicer software settings and not a printer limitation.
 3D printed alligator clip produced by the XYZ da Vinci miniMaker
Alt text: Close-up of a 3D printed alligator clip, demonstrating the detail and precision capabilities of the XYZ miniMaker 3D printer.
For a more challenging print, we chose a twisty pot. This is a personal favorite for demonstrating 3D printing at events, as its interactive nature is captivating. The twisty pot presents a precision challenge because one part nests within the other, requiring accurate dimensions. While some areas showed minor imperfections likely due to layer transitions, these were minimal. Achieving perfection would necessitate advanced slicer adjustments, but the print quality was more than adequate for fun, family-oriented 3D printing.
The XYZWare software simplifies printing multiple objects simultaneously. We loaded both the top and bottom parts of the twisty pot and printed them together. The result was impressive – the two parts twisted together smoothly, with a satisfying balance of firmness and fluidity. While movement was marginally smoother in certain orientations, it functioned correctly regardless of alignment. Upon close examination, some areas exhibited slight unevenness, likely where layers initiated and concluded, but overall, the outcome was excellent.
 Animated GIF of a 3D printed twisty fish skeleton from the XYZ miniMaker
Alt text: Animated GIF showcasing the flexible movement of a 3D printed fish skeleton, created with the XYZ da Vinci miniMaker, highlighting the printer’s ability to produce articulated prints.
Our next model was a wobbly fish skeleton, a single-piece print designed with intentional gaps for movement. A poorly calibrated printer would either fuse the segments solid or print them too loosely, causing breakage. The miniMaker handled this test admirably. The resulting fish was wonderfully wobbly and intact, demonstrating the printer’s precision and ability to handle intricate designs.
Pushing the printer further, we attempted a nested gear print. This type of model exemplifies the unique capabilities of 3D printing, creating objects with internal mechanisms that are difficult to manufacture using traditional methods. The gears print as a single, interconnected unit, designed to move freely after printing. Initially, the gears were slightly stiff, which is common, but they easily separated and loosened up with a little manipulation. This successful nested gear print underscores the miniMaker’s impressive precision and capability for intricate designs.
We did encounter one print failure. The XYZWare software helpfully detected a model issue and attempted an automatic repair. However, something went awry during this process. This experience highlights that when using downloaded models not specifically designed for the miniMaker, occasional failures can occur.
XYZWare Printing Software: User-Friendly but with Room for Improvement
The XYZWare software is generally user-friendly and straightforward to navigate, making it accessible for beginners. However, there’s definitely room for improvement in terms of responsiveness and user feedback. Running on our kids’ Windows laptops, we noticed it could be a little slow, with a lack of clear visual cues to indicate processing. This initially led to some uncertainty about whether clicks were registering. Once familiar with the software, you learn to be patient and trust that it is working, even if the feedback isn’t immediate.
One quirk we observed is that models seemed to print rotated 180 degrees. The test keyring printed upside down, and Pikachu faced backward. This wasn’t ideal for kids eager to watch the printing process unfold visually. Fortunately, the software allows for model rotation, which we utilized for subsequent prints. Scaling models and adding multiple models to a single print job is also easily accomplished. While tempting to maximize print volume, we recommend starting with smaller batches to avoid potential complications when learning.
The slicing software, which prepares 3D models for printing, performed commendably with various models downloaded from Thingiverse, even those not specifically optimized for this XYZ 3D printer.
The software provides valuable print information, including estimated filament usage and print time, allowing for better planning and resource management.
Removing 3D Prints from the Bed: Tips and Tricks
Removing completed 3D prints from the print bed can sometimes be challenging with certain 3D printers. With the miniMaker, we found that smaller objects were easily removed by hand. However, larger prints occasionally adhered more firmly to the bed.
The miniMaker includes adhesive tape squares to apply to the print bed surface. XYZPrinting recommends adding a layer of glue on top of the tape if ambient temperatures are below 25 degrees Celsius (which is typical indoors).
For most prints, we were able to detach them using just our fingernails. A removal tool is included, but its sharp edge makes it unsuitable for children to use. One half of our twisty pot proved particularly stubborn, but we managed to remove it without damaging the tape, demonstrating reasonable adhesion without being excessively difficult to remove prints.
PLA Filament: Proprietary but Child-Friendly and Quality
The da Vinci miniMaker uses proprietary PLA filament, a conscious design choice by XYZPrinting. The PLA filament provided is of good quality and specifically tested to be child-safe, a crucial factor for a family-oriented XYZ 3D printer. It’s important to note that you are restricted to using XYZPrinting filament cartridges designed for this specific printer range; generic PLA is not compatible. When comparing filament costs, ensure you are comparing against good quality PLA. Surprisingly, for us in the UK, the XYZPrinting filament refills are actually competitively priced, even cheaper than some of the good quality PLA we typically purchase. While cheaper PLA options exist, our past experiences with low-grade filament have often resulted in print failures and frustration, something families new to 3D printing should avoid.
The primary limitation is being confined to XYZPrinting’s color range. However, they offer a pleasing selection of solid and transparent colors, including gold and natural tones. We anticipate this color range will expand as the miniMaker’s popularity grows, which we believe is likely.
Restricting filament compatibility is a key factor enabling the miniMaker to be offered at such an accessible price point, as it simplifies the printer’s design and material handling requirements.
Ultimately, the real cost consideration is the filament cost per print. A 600g reel of XYZPrinting PLA priced at approximately $28 equates to 4.7 cents per gram. Our 5.8cm tall Pikachu model, weighing around 7g, would therefore cost roughly 33 cents in filament. A 600g reel goes a long way in terms of prints!
It’s also important to remember that 3D printing is inherently a slow process, so children are unlikely to rapidly consume vast quantities of filament.
Print Speed: Reasonable for Quality Output
3D printing is not a fast process. However, we were favorably impressed with the da Vinci miniMaker’s print speeds relative to the good print quality it consistently delivers. “Quick” is a relative term in 3D printing, so setting realistic expectations is key. Using the default “Good” quality setting:
- A 5.8cm Pikachu printed in approximately 1 hour.
- The XYZ keyring took about 1 hour.
- Both parts of the nesting twisty pot printed simultaneously in around 80 minutes.
These print times are вполне reasonable for the level of detail and quality produced by this XYZ 3D printer.
Noise Level: Quieter Than Expected
Initially, the novelty of a 3D printer often overshadows any noise it produces. However, over time, printer noise can become more noticeable. Having become accustomed to the near-constant hum of 3D printers in our home, I was pleasantly surprised by the miniMaker’s noise level.
It’s notably quieter than our other 3D printers. This isn’t to say it’s silent – you will definitely be aware it’s operating. However, compared to many 3D printers, the noise is relatively subdued and not particularly intrusive or unpleasant.
da Vinci mini vs. miniMaker: Considering the Alternatives
XYZprinting da Vinci mini 3D Printer ? @ Amazon
XYZPrinting also offers a similar model, the da Vinci mini. This version features an orange color scheme instead of the miniMaker’s brighter palette and includes Wi-Fi printing capabilities.
Interestingly, my children preferred the orange color of the da Vinci mini, perceiving it as more “tool-like.” Their only minor critique of the miniMaker was its brightly colored exterior. Wi-Fi connectivity is a genuinely useful feature, especially if you prefer not to have the 3D printer directly tethered to your computer. However, it’s worth noting that you can disconnect the miniMaker from your computer once the print job has been transmitted.
Tips for Gifting an XYZ 3D Printer: Christmas or Birthday Success
If you’re planning to gift a da Vinci miniMaker as a family Christmas or birthday present, some advance preparation can ensure a smoother and more enjoyable experience, particularly for younger children.
- Pre-download the XYZWare software: Creating an account is required, so handle this step beforehand to avoid delays on the day.
- Select and download initial 3D models: Choose a few models you’d like to print right away. The models mentioned in this review are good starting points, known to print reliably. Having models ready eliminates the sometimes surprisingly difficult task of choosing what to print first when faced with endless options!
- Load filament in advance: Follow the instructions to load the filament into the 3D printer before gifting. This makes it ready to print immediately. Note that once filament is loaded, the box lid cannot be fully closed, so consider partially disassembling for wrapping or using a creative presentation like a patterned tablecloth for a dramatic reveal!
- Consider a test print: Run a sample print of one of the pre-loaded models to confirm everything is working correctly before gifting.
- Manage expectations: On the day, explain that 3D printing is a slower, sometimes noisy, and not always perfect process. However, emphasize the immense fun and creative potential it offers!
Verdict: A Fantastic Entry-Level XYZ 3D Printer for Families
The XYZPrinting da Vinci miniMaker is, in our experience, an outstanding first XYZ 3D printer for families. Having worked with numerous 3D printers, we are well aware of the potential pitfalls and points of failure (and have experienced our share of failed prints over the years!).
In our extensive testing, the miniMaker simply worked, consistently and reliably. The XYZWare software’s STL file compatibility provides access to a vast library of free downloadable models and allows for design creation using various 3D modeling tools. While the miniMaker is excellent, we believe the slightly upgraded da Vinci mini version with Wi-Fi connectivity is worth the small extra investment for enhanced convenience.
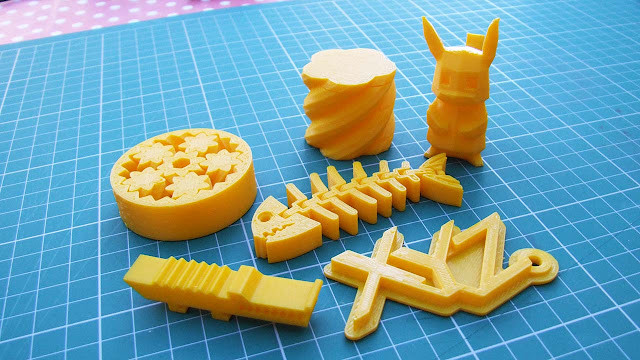 Collection of 3D printed items from the XYZ da Vinci miniMaker
Alt text: A collection of various colorful 3D printed objects created with the XYZ da Vinci miniMaker, showcasing the printer’s versatility and output quality.