Wireless Printing offers a convenient and efficient way to print documents without the hassle of cables. Foley Library at Gonzaga University provides this service through PaperCut, allowing students and faculty to easily print from their personal devices. This guide will walk you through the simple steps to utilize wireless printing at Foley Library.
To begin, access Foley Library’s Wireless Print portal powered by PaperCut. Please note that to log in and use this service, you need to be on campus or connected via VPN.
Log in to the PaperCut system using your Gonzaga username and password. This is the same username and password you use for your Gonzaga email account (Zagmail). Your username is the portion of your email address before the “@” symbol.
Once logged in, you will be directed to the PaperCut dashboard. On the left-hand side menu, locate and select Web Print. This option allows you to upload and submit documents for wireless printing.
Next, initiate the printing process by clicking on the Submit a Job button. This button is typically green and prominently displayed on the Web Print page.
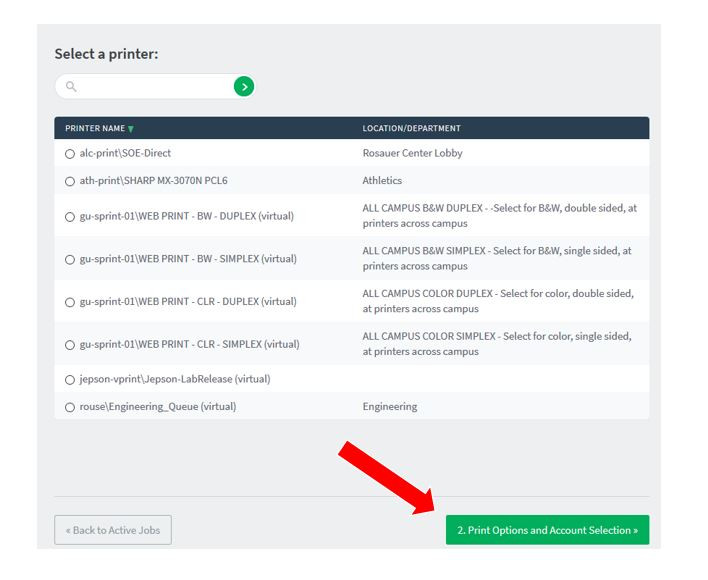
You will now need to choose your print queue. Select the appropriate queue based on your printing needs:
- BW DUPLEX: For black and white, double-sided prints.
- BW SIMPLEX: For black and white, single-sided prints.
- CLR DUPLEX: For color, double-sided prints.
- CLR SIMPLEX: For color, single-sided prints.
After selecting your desired print queue by clicking the circle button next to it, proceed to the next step by clicking Print Options and Account Selection.
 Print Options and Account Selection button on the Papercut interface, directing users to customize print settings after queue selection for wireless printing.
On the Print Options page, you can specify the number of copies you need. If you require more than one copy of your document, simply enter the desired number in the Copies box. Once you have set the number of copies, click Upload Documents.
To upload your document, click Upload from your computer to browse your files and select the document you wish to print. Alternatively, you can drag and drop your file directly into the grey designated area on the page.
Once your document is uploaded, finalize the process by clicking Upload & Complete in the right-hand corner of the screen.
After submitting your print job, you will see a Submitting or Held in Queue message in the PaperCut window. Your job is now ready to be released from any of the library printers. It’s worth noting that sometimes the status may remain as “submitting,” but your print job should still be available for release.
To release your print job and obtain your documents, go to any of the library printers and tap your Zagcard on the printer’s card reader. The cost of the print job will be charged to your Bulldog Bucks account.
Utilizing wireless printing at Foley Library through PaperCut offers a seamless and user-friendly experience. Follow these steps to easily print your documents from anywhere within the library or campus network.