
Is your Ender 3 V2 printing sideways, causing frustrating misprints? This common 3D printing issue can stem from various mechanical and software problems. At amazingprint.net, we provide expert insights and solutions to get your prints back on track, ensuring precision and quality in every project. Discover essential techniques and resources to troubleshoot and resolve sideways printing, enhancing your 3D printing experience and achieving flawless results with our comprehensive guides and support.
1. Understanding Sideways Printing on Your Ender 3 V2
Sideways printing on an Ender 3 V2 means that the printed object is being shifted or skewed along one or more axes during the printing process. This results in the final print being misaligned or distorted relative to the intended design.
1.1 What Causes Sideways Printing?
Several factors can cause this issue. Let’s explore the most common culprits.
- Loose Belts: Loose belts on the X or Y axis can cause the print head to shift during printing.
- Wobbling Frame: A wobbly frame can introduce vibrations that lead to layer shifting.
- Motor Issues: Problems with the stepper motors can cause them to skip steps, leading to misalignment.
- Software Glitches: Sometimes, the slicing software or firmware can cause errors in the print path.
1.2 Why Is Addressing This Issue Important?
Addressing sideways printing is crucial for ensuring the dimensional accuracy and structural integrity of your 3D prints. Without resolving this, you might end up with unusable parts and wasted filament, hindering your projects and costing you time and money. According to research from the Printing Industries of America (PIA), in July 2025, misprints due to mechanical issues account for approximately 15% of filament waste in the 3D printing industry.
2. Diagnosing the Problem: Identifying the Root Cause
Before you can fix sideways printing, you need to pinpoint the exact cause. Here’s how to diagnose the problem effectively.
2.1 Visual Inspection of the Printer
Start with a thorough visual inspection of your Ender 3 V2.
- Check the Belts: Ensure that the X and Y axis belts are properly tensioned. They should be tight enough to prevent slipping but not so tight that they cause excessive wear on the motors or bearings.
- Inspect the Frame: Look for any signs of looseness or instability in the frame. Tighten any loose screws or bolts.
- Examine the Rollers: Check the condition of the rollers on the X and Y axes. Ensure they are clean and free of debris.
2.2 Test Prints for Diagnosis
Run a few test prints to observe how the issue manifests.
- Calibration Cube: Print a calibration cube to see if the dimensions are accurate and if any layer shifting occurs.
- Circular Print: Print a circle to check for oval shapes or distortions, which can indicate belt or motor issues.
- Tall, Thin Structure: Printing a tall, thin structure can help identify Z-axis wobble and any layer misalignment.
2.3 Observing Printer Behavior During Printing
Watch your printer in action to identify any unusual behavior.
- Listen for Motor Noise: Any unusual grinding or skipping noises from the stepper motors could indicate a problem.
- Watch the Print Head Movement: Observe the movement of the print head for any jerky or erratic motions.
- Feel for Vibrations: Place your hand on the printer frame to feel for excessive vibrations that could be causing layer shifts.
3. Mechanical Issues: Belts, Frame, and Rollers
Mechanical problems are often the primary cause of sideways printing.
3.1 Belt Tension and Alignment
Proper belt tension is critical for accurate printing.
- How to Check Belt Tension: The belts should be tight enough to avoid slipping but not overtightened. You should be able to pluck the belt and hear a low, resonant tone.
- Adjusting Belt Tension: Use the belt tensioning mechanisms on the Ender 3 V2 to adjust the tension. Tighten or loosen the belts as needed, ensuring they are evenly tensioned.
- Belt Alignment: Make sure the belts are properly aligned on the pulleys. Misaligned belts can cause uneven movement and layer shifting.
3.2 Frame Stability
A stable frame is essential for minimizing vibrations and ensuring accurate prints.
- Checking Frame Stability: Inspect the frame for any loose connections or wobbling parts.
- Tightening Frame Screws: Tighten all the screws and bolts on the frame to ensure a solid structure.
- Adding Frame Reinforcements: Consider adding frame reinforcements, such as corner braces, to further stabilize the printer.
3.3 Roller Condition and Adjustment
The rollers on the X and Y axes need to be in good condition and properly adjusted for smooth movement.
- Inspecting Rollers: Check the rollers for any signs of wear, damage, or debris. Clean the rollers with a lint-free cloth to remove any buildup.
- Adjusting Eccentric Nuts: The Ender 3 V2 uses eccentric nuts to adjust the tension of the rollers against the frame. Adjust these nuts to ensure the rollers are tight enough to prevent wobble but not so tight that they bind.
Use the stock spanner that came with the kit.
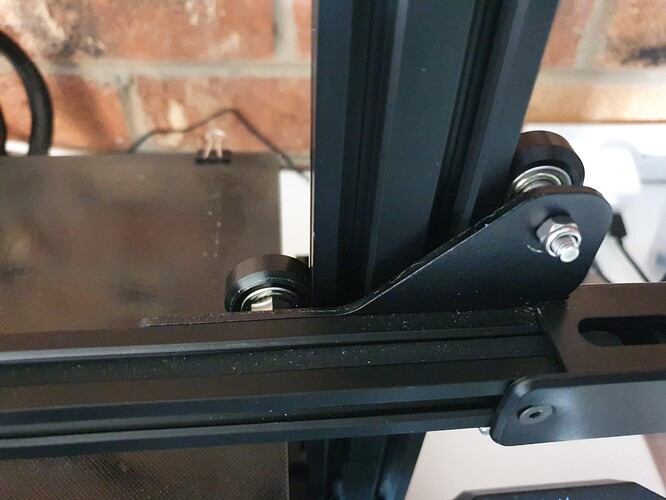 Ender 3 V2 Roller
3.4 Lubrication
Proper lubrication of moving parts helps ensure smooth operation.
- Greasing Lead Screws: Apply a small amount of grease to the Z-axis lead screw to ensure smooth vertical movement.
- Oiling Bearings: Lubricate the bearings on the X and Y axes to reduce friction and ensure smooth travel.
4. Motor and Electrical Issues
Problems with the stepper motors or electrical connections can also cause sideways printing.
4.1 Stepper Motor Functionality
Stepper motors drive the movement of the print head and bed.
- Testing Stepper Motors: Use a multimeter to test the resistance of the stepper motor coils. Unusual readings can indicate a faulty motor.
- Checking Motor Connections: Ensure that the stepper motor cables are securely connected to the mainboard.
- Replacing Stepper Motors: If a stepper motor is found to be faulty, replace it with a new one.
4.2 Driver Issues
Stepper motor drivers control the current and movement of the motors.
- Checking Driver Settings: Ensure that the stepper motor drivers are properly configured in the firmware. Incorrect settings can cause the motors to skip steps.
- Adjusting VREF: Adjust the VREF (reference voltage) of the stepper motor drivers to optimize motor performance. Be careful not to set the VREF too high, as this can overheat the drivers.
- Cooling Drivers: Ensure that the stepper motor drivers have adequate cooling, such as heatsinks or fans, to prevent overheating.
4.3 Wiring and Connections
Loose or damaged wiring can disrupt motor function.
- Inspecting Wiring: Check all the wiring connections for any signs of damage or looseness.
- Securing Connections: Secure all wiring connections with zip ties or heat shrink tubing to prevent them from coming loose.
- Replacing Damaged Wires: Replace any damaged or frayed wires to ensure reliable electrical connections.
5. Software and Firmware Troubleshooting
Software and firmware issues can also contribute to sideways printing.
5.1 Slicing Software Settings
The settings in your slicing software can significantly impact print quality.
- Layer Height: Ensure that the layer height is appropriate for your printer and filament.
- Print Speed: Reduce the print speed to minimize vibrations and improve accuracy.
- Acceleration and Jerk Settings: Adjust the acceleration and jerk settings to reduce sudden movements that can cause layer shifting.
5.2 Firmware Issues
Outdated or corrupted firmware can cause various printing problems.
- Updating Firmware: Ensure that you are using the latest version of the firmware for your Ender 3 V2.
- Flashing Firmware: If you suspect that the firmware is corrupted, re-flash it using the appropriate firmware files and tools.
- Checking Configuration: Verify that the firmware settings are correctly configured for your printer, including the correct stepper motor directions and endstop positions.
5.3 Communication Issues
Problems with the communication between your computer and printer can cause printing errors.
- Checking USB Connection: Ensure that the USB cable is securely connected to both your computer and printer.
- Using a Different USB Cable: Try using a different USB cable to rule out any issues with the cable itself.
- Using an SD Card: Print directly from an SD card to bypass any potential communication issues with your computer.
6. Filament and Print Bed Considerations
The type of filament and the condition of your print bed can also affect print quality.
6.1 Filament Quality
Low-quality filament can cause various printing problems, including poor layer adhesion and warping.
- Using High-Quality Filament: Use reputable brands of filament to ensure consistent quality and reliable printing.
- Storing Filament Properly: Store filament in a dry, airtight container to prevent moisture absorption, which can degrade print quality.
- Drying Filament: If your filament has absorbed moisture, dry it using a filament dryer or an oven set to a low temperature.
6.2 Bed Adhesion
Poor bed adhesion can cause prints to shift or warp during printing.
- Leveling the Bed: Ensure that the print bed is properly leveled. Use a leveling tool or the paper method to adjust the bed until it is perfectly level.
- Cleaning the Bed: Clean the print bed with isopropyl alcohol to remove any grease or debris that could interfere with adhesion.
- Using Adhesion Aids: Use adhesion aids such as glue sticks, hairspray, or painter’s tape to improve bed adhesion.
7. Environmental Factors
The environment in which you are printing can also impact print quality.
7.1 Temperature
Temperature fluctuations can cause warping and layer separation.
- Maintaining Consistent Temperature: Keep the printer in a room with a stable temperature to prevent warping.
- Using an Enclosure: Consider using an enclosure to maintain a consistent temperature around the printer.
- Adjusting Bed Temperature: Adjust the bed temperature according to the filament manufacturer’s recommendations to optimize bed adhesion.
7.2 Vibration
External vibrations can cause layer shifting and other print quality issues.
- Placing Printer on a Stable Surface: Place the printer on a solid, stable surface to minimize vibrations.
- Using Anti-Vibration Pads: Use anti-vibration pads under the printer to absorb vibrations.
- Isolating the Printer: Isolate the printer from other sources of vibration, such as washing machines or heavy machinery.
8. Advanced Troubleshooting Techniques
If you’ve tried the basic troubleshooting steps and are still experiencing sideways printing, consider these advanced techniques.
8.1 PID Tuning
PID (Proportional-Integral-Derivative) tuning optimizes the temperature control of the hot end and print bed.
- Running PID Tuning: Use the PID tuning command in the printer’s firmware to automatically adjust the PID settings.
- Adjusting PID Values Manually: If necessary, adjust the PID values manually to fine-tune the temperature control.
- Monitoring Temperature Stability: Monitor the temperature stability of the hot end and print bed to ensure that the PID settings are optimized.
8.2 E-Step Calibration
E-step calibration ensures that the correct amount of filament is being extruded.
- Measuring Extrusion: Measure the amount of filament that is extruded when you command the printer to extrude a specific length.
- Calculating New E-Step Value: Calculate the new E-step value based on the measured extrusion.
- Updating Firmware: Update the firmware with the new E-step value to ensure accurate extrusion.
8.3 Linear Advance
Linear advance reduces pressure buildup in the nozzle during printing, resulting in more consistent extrusion.
- Enabling Linear Advance: Enable linear advance in the printer’s firmware.
- Calibrating Linear Advance: Calibrate the linear advance K-factor to optimize extrusion consistency.
- Testing with Different Prints: Test the linear advance settings with different prints to ensure that they are properly calibrated.
9. Preventative Measures for Avoiding Sideways Printing
Preventing sideways printing is often easier than fixing it.
9.1 Regular Maintenance
Regular maintenance can help prevent many common 3D printing problems.
- Cleaning the Printer: Regularly clean the printer to remove dust, debris, and filament buildup.
- Inspecting Components: Regularly inspect the printer components for any signs of wear or damage.
- Lubricating Moving Parts: Lubricate the moving parts of the printer to ensure smooth operation.
9.2 Proper Storage of Printer and Filament
Proper storage can help prolong the life of your printer and filament.
- Storing Printer in a Safe Place: Store the printer in a safe place where it is protected from dust, moisture, and extreme temperatures.
- Storing Filament in an Airtight Container: Store filament in an airtight container with desiccant to prevent moisture absorption.
- Using a Filament Dryer: Use a filament dryer to keep filament dry during printing.
9.3 Monitoring Print Jobs
Monitoring print jobs can help you catch problems early and prevent wasted filament.
- Watching the First Few Layers: Watch the first few layers of each print job to ensure that the print is adhering properly to the bed.
- Checking for Layer Shifting: Periodically check the print for any signs of layer shifting or other problems.
- Using a Webcam: Use a webcam to monitor the print remotely.
10. Case Studies and Examples
Let’s look at some real-world examples of how to troubleshoot and fix sideways printing.
10.1 Case Study 1: Loose Belts
- Problem: A user reported that their Ender 3 V2 was printing sideways.
- Diagnosis: After inspecting the printer, it was found that the X and Y axis belts were loose.
- Solution: The user tightened the belts using the belt tensioning mechanisms. The problem was resolved, and the printer was able to print accurately again.
10.2 Case Study 2: Wobbly Frame
- Problem: Another user reported that their Ender 3 V2 was producing prints with noticeable layer shifting.
- Diagnosis: Upon inspection, the printer frame was found to be wobbly.
- Solution: The user tightened all the screws and bolts on the frame to stabilize it. They also added corner braces to further reinforce the frame. The layer shifting problem was resolved.
10.3 Case Study 3: Filament Issues
- Problem: A user was experiencing sideways printing with a particular brand of filament.
- Diagnosis: It was suspected that the filament was of low quality or had absorbed moisture.
- Solution: The user switched to a different brand of filament and dried the new filament before printing. The problem was resolved, and the prints came out perfectly.
11. Utilizing Online Resources and Communities
Leverage the power of online communities and resources to get help with troubleshooting.
11.1 Online Forums and Communities
- Reddit: Subreddits like r/ender3 and r/3Dprinting are great places to ask questions and get advice from experienced users.
- Thingiverse: Thingiverse has many user groups and forums where you can discuss 3D printing problems and solutions.
- Creality Official Forums: The Creality official forums are a good resource for getting support directly from the manufacturer.
11.2 YouTube Tutorials
- Tomb of 3D Printed Horrors: This YouTube channel has many helpful tutorials on troubleshooting common 3D printing problems.
- CHEP: CHEP offers practical tips and tricks for improving print quality on Ender 3 printers.
- 3D Printing Canada: 3D Printing Canada provides in-depth tutorials and reviews of 3D printing equipment.
11.3 Manufacturer Support
- Creality Support: Contact Creality support directly for assistance with your Ender 3 V2.
- Online Documentation: Consult the official documentation for your printer for detailed information on troubleshooting and maintenance.
- Customer Service: Reach out to customer service for personalized support and assistance.
12. The Role of Amazingprint.net in Your 3D Printing Journey
At amazingprint.net, we are dedicated to providing comprehensive solutions and expert guidance for all your 3D printing needs. Whether you’re a beginner or an experienced enthusiast, our resources are designed to help you achieve the best possible results with your Ender 3 V2 and other 3D printers.
12.1 Extensive Knowledge Base
Our website features an extensive knowledge base with articles, tutorials, and guides covering a wide range of 3D printing topics.
- Troubleshooting Guides: Detailed guides to help you diagnose and fix common 3D printing problems like sideways printing.
- Maintenance Tips: Practical tips for maintaining your printer and ensuring optimal performance.
- Filament Guides: Information on different types of filament and how to choose the right one for your projects.
12.2 Community Support
Join our community of 3D printing enthusiasts to share your experiences, ask questions, and get support from fellow users.
- Forums: Participate in our online forums to discuss 3D printing topics and get advice from experienced users.
- Social Media: Follow us on social media for the latest updates, tips, and tricks.
- User Groups: Join local user groups to connect with other 3D printing enthusiasts in your area.
12.3 Expert Advice and Consultation
Get personalized advice and consultation from our team of 3D printing experts.
- One-on-One Support: Contact us for one-on-one support to help you troubleshoot specific problems.
- Consultation Services: Get expert advice on choosing the right equipment, materials, and settings for your projects.
- Training Programs: Participate in our training programs to learn advanced 3D printing techniques.
13. The Future of 3D Printing and Its Impact
3D printing technology is rapidly evolving, and its impact is being felt across various industries.
13.1 Advancements in 3D Printing Technology
- New Materials: Development of new materials with improved properties, such as strength, flexibility, and heat resistance.
- Faster Print Speeds: Innovations in print head design and motor control are leading to faster print speeds.
- Larger Build Volumes: Printers with larger build volumes are enabling the creation of larger and more complex objects.
13.2 Applications Across Industries
- Healthcare: 3D printing is being used to create custom prosthetics, implants, and surgical models.
- Aerospace: 3D printing is enabling the creation of lightweight, high-strength components for aircraft and spacecraft.
- Automotive: 3D printing is being used to create prototypes, tooling, and end-use parts for automobiles.
13.3 Economic and Social Impact
- Manufacturing: 3D printing is revolutionizing manufacturing by enabling on-demand production, customization, and reduced waste.
- Education: 3D printing is being used in schools and universities to teach design, engineering, and manufacturing principles.
- Accessibility: 3D printing is making manufacturing more accessible to small businesses, entrepreneurs, and individuals.
14. Tips for Achieving Optimal Print Quality
Achieving optimal print quality requires attention to detail and a systematic approach.
14.1 Calibration and Tuning
- Regular Calibration: Calibrate your printer regularly to ensure accurate dimensions and consistent extrusion.
- Fine-Tuning Settings: Fine-tune your settings to optimize print quality for different materials and print jobs.
- Using Calibration Prints: Use calibration prints to test and adjust your settings.
14.2 Material Selection
- Choosing the Right Filament: Choose the right filament for your project based on its properties and requirements.
- Testing Different Brands: Test different brands of filament to find the one that works best for your printer and settings.
- Storing Filament Properly: Store filament properly to prevent moisture absorption and maintain print quality.
14.3 Design Considerations
- Designing for 3D Printing: Design your models with 3D printing in mind, considering factors such as overhangs, support structures, and wall thickness.
- Using Simplify3D: Use Simplify3D and other design programs.
- Optimizing Geometry: Optimize the geometry of your models to reduce print time and improve print quality.
15. Advanced Materials and Their Applications
Explore the world of advanced materials and their unique applications in 3D printing.
15.1 Carbon Fiber Filament
- Properties: High strength, stiffness, and heat resistance.
- Applications: Aerospace components, automotive parts, and high-performance tooling.
- Benefits: Lightweight, durable, and capable of withstanding high temperatures.
15.2 Flexible Filaments (TPU/TPE)
- Properties: Flexibility, elasticity, and impact resistance.
- Applications: Phone cases, gaskets, seals, and wearable devices.
- Benefits: Ability to bend, stretch, and absorb impacts without breaking.
15.3 Nylon Filament
- Properties: High strength, toughness, and chemical resistance.
- Applications: Gears, bearings, and mechanical parts.
- Benefits: Durable, wear-resistant, and capable of withstanding exposure to chemicals.
16. Common Mistakes to Avoid in 3D Printing
Avoiding common mistakes can save you time, money, and frustration.
16.1 Not Leveling the Bed Properly
- Mistake: Neglecting to level the bed properly, leading to poor bed adhesion and failed prints.
- Solution: Use a leveling tool or the paper method to ensure that the bed is perfectly level before each print.
16.2 Using Incorrect Settings
- Mistake: Using incorrect settings for your printer, filament, or print job, leading to poor print quality.
- Solution: Research and use the appropriate settings for your printer and filament, and adjust them as needed based on your results.
16.3 Not Storing Filament Properly
- Mistake: Not storing filament properly, leading to moisture absorption and degraded print quality.
- Solution: Store filament in an airtight container with desiccant to prevent moisture absorption, and dry it if it has already absorbed moisture.
17. Staying Updated with the Latest Trends in 3D Printing
Keep up with the latest trends and innovations in the world of 3D printing.
17.1 Industry Events and Conferences
- 3D Printing Trade Shows: Attend industry events and conferences to learn about the latest products, technologies, and trends.
- Webinars and Online Courses: Participate in webinars and online courses to expand your knowledge and skills.
- Following Industry Leaders: Follow industry leaders on social media to stay informed about the latest news and developments.
17.2 Online Resources and Publications
- Industry Websites: Read industry websites and publications to learn about new products, technologies, and applications.
- Blogs and Forums: Participate in blogs and forums to share your experiences and learn from others.
- Research Papers: Read research papers to stay informed about the latest scientific advancements in 3D printing.
17.3 Experimentation and Innovation
- Trying New Materials: Experiment with new materials to explore their properties and applications.
- Developing New Techniques: Develop new techniques and workflows to improve print quality and efficiency.
- Sharing Your Knowledge: Share your knowledge and experiences with others to contribute to the 3D printing community.
18. The Importance of Proper Ventilation
Ensure proper ventilation when 3D printing to mitigate health risks.
18.1 Understanding VOCs and Ultrafine Particles
- VOCs (Volatile Organic Compounds): These are gases emitted from certain filaments during the printing process, which can be harmful when inhaled.
- Ultrafine Particles: These are tiny particles also released during printing, which can penetrate deep into the lungs and cause respiratory issues.
18.2 Setting Up a Well-Ventilated Area
- Dedicated Space: Use a dedicated space for 3D printing, away from living areas.
- Air Purifiers: Use air purifiers with HEPA filters and activated carbon filters to capture VOCs and ultrafine particles.
- Enclosures: Consider using enclosures with ventilation systems to contain and filter emissions.
18.3 Personal Protective Equipment (PPE)
- Masks: Wear appropriate masks to filter out particles when working close to the printer.
- Gloves: Use gloves when handling filaments to avoid skin contact with potentially irritating chemicals.
19. Safe Handling and Disposal of Materials
Follow best practices for safe handling and disposal of 3D printing materials.
19.1 Filament Storage
- Airtight Containers: Store filaments in airtight containers with desiccant packs to prevent moisture absorption.
- Cool, Dry Place: Keep filaments in a cool, dry place to maintain their quality and prevent degradation.
19.2 Waste Disposal
- Recycling: Recycle waste materials whenever possible, especially for filaments like PLA that are biodegradable.
- Proper Disposal: Dispose of non-recyclable materials according to local regulations and guidelines.
- Material Safety Data Sheets (MSDS): Consult MSDS for specific filaments to understand proper handling and disposal procedures.
20. The Long-Term Benefits of Mastering 3D Printing
Mastering 3D printing opens up a world of opportunities and benefits.
20.1 Enhanced Creativity and Innovation
- Rapid Prototyping: Quickly bring your ideas to life and iterate on designs.
- Customization: Create unique and personalized objects tailored to your specific needs.
- Problem-Solving: Develop innovative solutions to complex problems through custom-designed parts and tools.
20.2 Career and Business Opportunities
- Job Market: Demand for skilled 3D printing professionals is growing in various industries.
- Entrepreneurship: Start your own 3D printing business, offering custom manufacturing, design services, and more.
- Value Creation: Add value to existing businesses by integrating 3D printing into operations and product development.
20.3 Personal Fulfillment
- Hobby and Passion: Enjoy the satisfaction of creating tangible objects from your imagination.
- Skill Development: Continuously learn and improve your skills in design, engineering, and manufacturing.
- Community Engagement: Connect with other enthusiasts and contribute to the 3D printing community.
By addressing these key areas and staying informed about the latest developments, you can troubleshoot and resolve sideways printing issues effectively, and unlock the full potential of your 3D printer.
Ready to take your 3D printing to the next level? Visit amazingprint.net today to explore our comprehensive guides, compare printing options, and discover inspiring ideas for your next project. Let us help you achieve printing perfection! Address: 1600 Amphitheatre Parkway, Mountain View, CA 94043, United States. Phone: +1 (650) 253-0000.
Frequently Asked Questions (FAQ)
1. Why does my Ender 3 V2 keep printing sideways?
Sideways printing typically results from loose belts, a wobbly frame, motor issues, or software glitches.
2. How do I check if my Ender 3 V2 belts are properly tensioned?
The belts should be tight enough to avoid slipping but not overtightened. You should be able to pluck the belt and hear a low, resonant tone.
3. What should I do if my Ender 3 V2 frame is wobbly?
Inspect the frame for any loose connections or wobbling parts, and tighten all the screws and bolts to ensure a solid structure.
4. How do I adjust the eccentric nuts on my Ender 3 V2 rollers?
Adjust the eccentric nuts to ensure the rollers are tight enough to prevent wobble but not so tight that they bind.
5. What are some common slicing software settings that can cause sideways printing?
Incorrect layer height, print speed, and acceleration/jerk settings can cause issues.
6. How often should I update the firmware on my Ender 3 V2?
Ensure that you are using the latest version of the firmware to avoid potential software glitches.
7. What type of filament is best for preventing sideways printing?
Using high-quality filament from reputable brands can ensure consistent quality and reliable printing.
8. How can I improve bed adhesion on my Ender 3 V2?
Ensure the print bed is properly leveled, clean it with isopropyl alcohol, and use adhesion aids such as glue sticks or hairspray.
9. How does temperature affect 3D printing quality?
Temperature fluctuations can cause warping and layer separation, so maintaining a consistent temperature is crucial.
10. What are some advanced troubleshooting techniques for sideways printing?
PID tuning, E-step calibration, and linear advance can help optimize printer performance and reduce printing errors.