
Are you struggling with locating your print screen photos? This guide will help you discover where those precious captures are stored, ensuring you never lose another screenshot, brought to you by amazingprint.net. We provide a solution so you will learn different methods and locations for finding your screenshots, along with practical tips to manage them effectively, offering insights into image capture, screen grab storage, and digital archiving.
1. Understanding the Print Screen Function
Where are print screen photos actually saved? The destination of your print screen photos hinges on the method you use to capture them. Let’s explore the common scenarios.
The print screen function varies depending on the operating system and method used to capture the screen. Understanding these nuances is crucial for locating your screenshots.
1.1. Print Screen (PrtScn) Key Alone
When you press the Print Screen key by itself, Windows captures an image of your entire screen and copies it to the clipboard. It’s like taking a mental snapshot and holding it in your short-term memory.
- Location: Clipboard (temporary storage)
- Action Required: You need to paste the image into an image editor (like Paint, Photoshop, or GIMP) and then save it as a file (e.g., .PNG, .JPG).
Think of the clipboard as a temporary holding area. The image remains there until you copy something else, so be sure to paste and save your screenshot promptly!
1.2. Alt + Print Screen
Pressing Alt + Print Screen captures only the active window (the one you’re currently working in). This is handy when you don’t want to capture your entire desktop.
- Location: Clipboard (temporary storage)
- Action Required: Similar to the Print Screen key alone, you need to paste the image into an image editor and save it.
This method is great for quickly grabbing a specific window without any extra clutter. Just remember to save it!
1.3. Windows Key + Print Screen
This combination is a game-changer! When you press the Windows key + Print Screen, Windows automatically captures a screenshot of your entire screen and saves it as a file.
- Location: Pictures > Screenshots folder
- File Name Format: Screenshot (#).png (where # is a sequential number)
This is the most convenient method because it bypasses the clipboard and saves the image directly to your hard drive.
1.4. Windows Key + Shift + S
This shortcut opens the Snip & Sketch tool (or Snipping Tool in older Windows versions), allowing you to select a specific area of your screen to capture.
- Location: Clipboard (temporary storage)
- Action Required: After capturing the snip, it appears in a Snip & Sketch window where you can annotate, save, or copy it to the clipboard.
This method provides the most flexibility, allowing you to capture exactly what you need.
2. Default Screenshot Locations in Windows
Where can you reliably find your print screen photos in Windows? Windows offers several default locations for storing screenshots, depending on the method you use. These locations can vary based on the version of Windows you’re using and any custom settings you’ve configured.
Knowing these default locations is the first step in your screenshot treasure hunt.
2.1. Pictures > Screenshots Folder
This is the most common default location for screenshots saved using the Windows Key + Print Screen method. You can find it by navigating to:
C:Users[Your Username]PicturesScreenshots
Replace [Your Username] with your actual Windows account name.
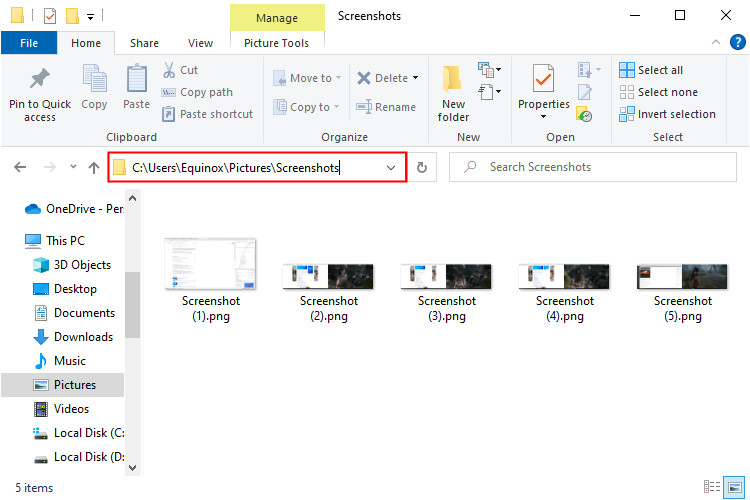 Default screenshot folder on Windows 10 and Windows 11
Alt Text: The default screenshot folder in Windows 10 and Windows 11, located in the Pictures library under the Screenshots subfolder.
2.2. Videos > Captures Folder (Xbox Game Bar)
If you use the Xbox Game Bar to capture screenshots (especially while gaming), they are typically saved in the Captures folder within your Videos library.
C:Users[Your Username]VideosCaptures
The Xbox Game Bar is a handy tool for capturing gameplay moments, and it has its own dedicated folder for storing those memories.
2.3. Clipboard (Temporary Storage)
As mentioned earlier, screenshots captured using the Print Screen key alone (or Alt + Print Screen) are stored temporarily in the clipboard. They are not saved as files automatically.
- Action Required: You must paste the image into an image editor (like Paint) and save it manually.
Don’t forget to paste and save your clipboard screenshots before they are overwritten!
2.4. Last Saved Location (Snipping Tool/Snip & Sketch)
The Snipping Tool and Snip & Sketch remember the last location where you saved a screenshot. This can be helpful if you’ve used these tools before.
- How to Find It: Take a new screenshot with the tool, and the “Save As” dialog will show you the last used folder.
These tools are smart enough to remember your preferences, making it easier to stay organized.
3. Finding Screenshots from the Xbox Game Bar
Where does the Xbox Game Bar save screenshots? The Xbox Game Bar is a built-in Windows feature for capturing gameplay footage and screenshots. Finding your screenshots from the Game Bar is straightforward.
The Xbox Game Bar provides a convenient way to capture and share your gaming moments.
3.1. Accessing the Gallery
- Press Windows Key + G to open the Xbox Game Bar.
- Click the Widgets button (it looks like a row of icons) on the Game Bar.
- Select “Gallery“.
Alt Text: Opening the Gallery in the Xbox Game Bar by clicking the Widgets button and selecting the Gallery option.
3.2. Opening the File Location
Once the Gallery is open:
- You can click the small folder icon to open File Explorer directly to the screenshot folder.
- Alternatively, you can select a screenshot or video and then click “Open File Location“.
Alt Text: The Game Bar gallery window showing a screenshot and the option to Open File Location.
3.3. Default Save Location
By default, Xbox Game Bar screenshots are saved to:
C:Users[Your Username]VideosCaptures
If you’re having trouble finding the Gallery, navigating directly to this folder is a reliable alternative.
4. Using Third-Party Screenshot Tools
Where do third-party apps store screenshots? Many third-party screenshot tools offer advanced features and customization options. However, this also means they might have their own unique save locations.
Third-party tools often provide more control over the screenshot process, but it’s important to know where they store your images.
4.1. Checking the Application Settings
The first step is to open the settings or preferences of your screenshot tool. Look for options related to:
- Save Location
- Output Folder
- File Destination
The exact wording will vary depending on the application, but these settings will tell you where your screenshots are being saved.
4.2. Common Default Locations
If you can’t find the settings, here are some common places to look:
- Documents Folder:
C:Users[Your Username]Documents - Pictures Folder:
C:Users[Your Username]Pictures - Application-Specific Folder: Some tools create their own folder within the Program Files directory.
4.3. Consulting the Documentation
If you’re still unsure, consult the application’s help documentation or website. They should provide clear instructions on how to configure the save location.
4.4. Popular Third-Party Tools
Some popular third-party screenshot tools include:
- Greenshot: Known for its annotation and editing features.
- Lightshot: A lightweight and easy-to-use tool.
- ShareX: A powerful and versatile tool with many advanced options.
- Snagit: A comprehensive screen capture and recording tool.
Each of these tools has its own default save location and configuration options, so be sure to check their respective settings.
5. Troubleshooting: When You Can’t Find Your Screenshots
What to do when your print screen photos are missing? Sometimes, despite your best efforts, you might struggle to locate your screenshots. Don’t worry, here are some troubleshooting steps you can take.
Losing screenshots can be frustrating, but with a systematic approach, you can often recover them.
5.1. Searching for Recently Modified Files
Windows File Explorer has a powerful search feature that can help you find recently modified files.
- Press Windows Key + E to open File Explorer.
- In the search bar, type
datemodified:today(ordatemodified:yesterdayif you took the screenshot yesterday).
 Searching for files and folders modified today in File Explorer
Alt Text: Searching for files and folders modified today in File Explorer using the datemodified:today search term.
This will display all files that have been modified on the specified date. Look for files with common screenshot file extensions like .PNG, .JPG, or .GIF.
5.2. Searching by File Name
If you remember part of the file name (e.g., “Screenshot,” “Snip”), you can search for files containing that name.
- Open File Explorer.
- In the search bar, type
name:screenshot(or whatever keyword you remember).
This will narrow down the search to files with the specified name.
5.3. Checking the Recycle Bin
Accidentally deleted your screenshot? Check the Recycle Bin!
- Open the Recycle Bin on your desktop.
- Search for recently deleted files with screenshot file extensions.
- If you find your screenshot, right-click it and select “Restore“.
5.4. Using File Recovery Software
If you’ve emptied the Recycle Bin, you can try using file recovery software to recover deleted screenshots. Some popular options include:
- Recuva: A free and easy-to-use file recovery tool.
- EaseUS Data Recovery Wizard: A more advanced tool with a higher success rate.
- Stellar Data Recovery: A professional-grade tool for complex data recovery scenarios.
These tools scan your hard drive for deleted files and attempt to recover them.
5.5. Checking Cloud Storage Services
Do you use cloud storage services like OneDrive, Google Drive, or Dropbox? Some of these services have automatic backup features that might include your screenshots.
- OneDrive: Check the OneDrive folder on your computer or the OneDrive website.
- Google Drive: Check the Google Drive folder on your computer or the Google Drive website.
- Dropbox: Check the Dropbox folder on your computer or the Dropbox website.
Cloud storage services can be a lifesaver when you accidentally delete or lose important files.
6. Customizing Screenshot Settings
Where can I change my print screen photo settings? Taking control of your screenshot settings can save you time and frustration in the long run. Here are some ways to customize your screenshot experience.
Customizing your screenshot settings allows you to tailor the process to your specific needs and preferences.
6.1. Changing the Default Save Location
Windows doesn’t offer a built-in way to change the default save location for the Windows Key + Print Screen method. However, you can use a workaround by creating a symbolic link.
- Create a new folder where you want to save your screenshots (e.g.,
D:MyScreenshots). - Move the existing Screenshots folder from
C:Users[Your Username]Picturesto another location (e.g.,C:Users[Your Username]PicturesScreenshots_Backup). - Open Command Prompt as an administrator.
- Type the following command and press Enter:
mklink /J "C:Users[Your Username]PicturesScreenshots" "D:MyScreenshots"
Replace "C:Users[Your Username]PicturesScreenshots" with the original Screenshots folder location and "D:MyScreenshots" with the new folder location.
This creates a symbolic link that redirects Windows to save screenshots to the new location.
6.2. Using the Registry Editor (Advanced)
Warning: Incorrectly editing the registry can cause serious problems. Back up your registry before proceeding.
- Press Windows Key + R, type
regedit, and press Enter. - Navigate to the following key:
HKEY_CURRENT_USERSoftwareMicrosoftWindowsCurrentVersionExplorerUser Shell Folders
- Look for the
{B7BEDE81-DF94-4682-A7D8-57A52620B86F}value (this represents the PicturesScreenshots folder). - Double-click the value and change the data to the desired save location.
- Restart your computer for the changes to take effect.
This method directly modifies the registry to change the default save location.
6.3. Customizing Snipping Tool/Snip & Sketch
The Snipping Tool and Snip & Sketch don’t have many customization options, but they do remember the last saved location.
- To change the save location: Simply save a screenshot to the desired folder, and the tool will remember it for future captures.
6.4. Configuring Third-Party Tools
Third-party screenshot tools usually offer extensive customization options, including:
- Default save location
- File name format
- File type
- Hotkeys
- Annotation tools
Explore the settings of your chosen tool to tailor it to your specific needs.
7. Best Practices for Managing Screenshots
How do I keep my print screen photos organized? Managing your screenshots effectively can save you time and prevent them from getting lost in the digital clutter. Here are some best practices to follow.
Organized screenshots are easier to find, use, and share.
7.1. Creating a Dedicated Folder Structure
Create a clear and logical folder structure to categorize your screenshots. For example:
- Projects: For screenshots related to specific projects.
- Tutorials: For screenshots used in tutorials or guides.
- Gaming: For screenshots from video games.
- Personal: For personal screenshots.
Within each category, you can create subfolders for further organization.
7.2. Using Descriptive File Names
Instead of relying on the default file names (e.g., “Screenshot (1).png”), use descriptive file names that reflect the content of the screenshot. For example:
ProjectAlpha_UI_Design.pngTutorial_Step3_SaveFile.pngGaming_BossFight_Victory.png
Descriptive file names make it much easier to find specific screenshots later on.
7.3. Tagging and Metadata
Add tags or metadata to your screenshots to further categorize and organize them. Windows allows you to add tags to files, which can be helpful for searching and filtering.
You can also use dedicated image management software like Adobe Lightroom or ACDSee to add more detailed metadata.
7.4. Regularly Backing Up Your Screenshots
Back up your screenshot folder to an external hard drive, cloud storage service, or network location. This protects you from data loss in case of hardware failure or other unforeseen events.
7.5. Deleting Unnecessary Screenshots
Regularly review your screenshot collection and delete any screenshots that are no longer needed. This helps to keep your folder organized and saves valuable storage space.
8. The Importance of High-Quality Printing for Screenshots
How can I print screen photos at a high quality? While screenshots are digital images, there may be times when you need to print them. Achieving high-quality prints from screenshots requires attention to detail.
High-quality prints ensure that your screenshots look their best when transferred to physical media.
8.1. Understanding Resolution and DPI
- Resolution: The number of pixels in an image (e.g., 1920×1080). Higher resolution images contain more detail.
- DPI (Dots Per Inch): The number of ink dots per inch of printed image. Higher DPI results in sharper, more detailed prints.
For high-quality prints, aim for a DPI of at least 300.
8.2. Resizing Screenshots for Printing
If your screenshot has a low resolution, simply increasing the DPI in your image editor will not improve the print quality. Instead, it will make the pixels larger, resulting in a blurry print.
- Resizing Up: Avoid resizing screenshots upwards, as this can introduce pixelation and artifacts.
- Resizing Down: Resizing screenshots downwards can improve print quality by reducing the amount of detail that needs to be rendered.
8.3. Choosing the Right Paper and Printer Settings
- Paper Type: Use high-quality photo paper for the best results.
- Printer Settings: Select the appropriate printer settings for the paper type you are using. Choose a high-quality print setting and enable any options for color correction or sharpening.
8.4. Professional Printing Services
For critical prints, consider using a professional printing service. They have the equipment and expertise to produce high-quality prints from digital images.
8.5. Alternatives To Print
If you are having trouble printing, or do not need to physically print the photo, consider these alternatives:
- Convert the screenshot to a PDF.
- Email the screenshot to yourself or a coworker.
- Keep the screenshot in a folder for future reference.
9. Utilizing Screenshots for Business Purposes
Where are print screen photos useful in business? Screenshots can be a valuable tool for businesses in various ways. They can be used for communication, documentation, training, and marketing.
Effective use of screenshots can improve communication, streamline processes, and enhance your brand image.
9.1. Communication and Collaboration
Screenshots can be used to quickly and easily communicate information to colleagues, clients, or customers.
- Bug Reporting: Capture screenshots of software bugs or errors and share them with developers.
- Feedback and Reviews: Use screenshots to provide feedback on designs, mockups, or websites.
- Instructions and Explanations: Create visual guides or instructions using screenshots.
9.2. Documentation and Training
Screenshots can be used to create clear and concise documentation for software, processes, or procedures.
- User Manuals: Include screenshots in user manuals to illustrate how to use software features.
- Training Materials: Create training materials with step-by-step instructions using screenshots.
- Knowledge Base Articles: Use screenshots to illustrate solutions to common problems in knowledge base articles.
9.3. Marketing and Sales
Screenshots can be used to showcase products, services, or features in marketing materials.
- Website and Social Media: Use screenshots to highlight key features or benefits of your products or services on your website and social media channels.
- Presentations and Webinars: Include screenshots in presentations and webinars to illustrate points and engage your audience.
- Case Studies: Use screenshots to showcase the results of your products or services in case studies.
9.4. Legal Compliance
Screenshots can be used as evidence in legal or compliance-related matters.
- Website Archiving: Capture screenshots of websites to document their content and appearance at a specific point in time.
- Contractual Agreements: Use screenshots to document the terms of contractual agreements.
- Intellectual Property Protection: Capture screenshots of your intellectual property to protect it from infringement.
10. The Future of Screenshot Technology
Where will the technology of print screen photos go? Screenshot technology is constantly evolving, with new features and capabilities being added all the time. Here are some trends to watch for in the future.
Staying informed about the latest developments in screenshot technology can help you take advantage of new opportunities and improve your workflow.
10.1. AI-Powered Screenshot Tools
Artificial intelligence (AI) is being integrated into screenshot tools to automate tasks and enhance functionality.
- Automatic Tagging and Categorization: AI can automatically tag and categorize screenshots based on their content.
- Smart Annotation and Editing: AI can suggest annotations and edits to improve the clarity and effectiveness of screenshots.
- Text Recognition (OCR): AI can extract text from screenshots using optical character recognition (OCR) technology.
10.2. Enhanced Collaboration Features
Screenshot tools are becoming more collaborative, with features that allow multiple users to work together on the same screenshot.
- Real-Time Collaboration: Multiple users can annotate, edit, and comment on screenshots in real-time.
- Version Control: Screenshot tools can track changes and revert to previous versions of screenshots.
- Integration with Collaboration Platforms: Screenshot tools are integrating with popular collaboration platforms like Slack, Microsoft Teams, and Asana.
10.3. Cloud-Based Screenshot Management
Cloud-based screenshot management platforms are becoming more popular, offering centralized storage, sharing, and collaboration features.
- Centralized Storage: Store all your screenshots in one secure location in the cloud.
- Easy Sharing: Share screenshots with colleagues, clients, or customers with a simple link.
- Advanced Search and Filtering: Quickly find the screenshots you need using advanced search and filtering tools.
10.4. Integration with Augmented Reality (AR)
Screenshot technology is being integrated with augmented reality (AR) to create immersive and interactive experiences.
- AR Annotations: Annotate real-world objects using screenshots and AR technology.
- AR Tutorials: Create interactive tutorials that guide users through real-world tasks using screenshots and AR overlays.
- AR Product Demonstrations: Showcase products in AR using screenshots and 3D models.
10.5. Security and Privacy Enhancements
Security and privacy are becoming increasingly important considerations for screenshot technology.
- Encryption: Encrypt screenshots to protect them from unauthorized access.
- Watermarking: Add watermarks to screenshots to protect your intellectual property.
- Data Loss Prevention (DLP): Implement DLP policies to prevent sensitive information from being captured in screenshots.
Do you want to streamline your business? Visit amazingprint.net today to discover a wealth of informative articles, compare printing options, and ignite your creativity for upcoming projects.
Address: 1600 Amphitheatre Parkway, Mountain View, CA 94043, United States
Phone: +1 (650) 253-0000
Frequently Asked Questions (FAQ)
1. Where are my screenshots saved by default in Windows 10/11?
The default location for screenshots taken with the Windows Key + Print Screen combination is the Pictures > Screenshots folder, typically located at C:Users[Your Username]PicturesScreenshots. Screenshots captured with the Print Screen key alone are saved to the clipboard.
2. How can I change the default save location for screenshots in Windows?
While there isn’t a direct setting, you can create a symbolic link or modify the registry to change the default save location. Be cautious when editing the registry, as incorrect changes can cause system issues.
3. Where do screenshots taken with the Xbox Game Bar go?
Screenshots taken with the Xbox Game Bar are typically saved in the Videos > Captures folder, located at C:Users[Your Username]VideosCaptures.
4. How can I find screenshots taken with a third-party tool?
Check the application settings of the third-party tool for the specified save location. Common locations include the Documents or Pictures folders, or an application-specific folder within Program Files.
5. What should I do if I can’t find my screenshots?
Try searching for recently modified files in File Explorer using the datemodified:today search term. Also, check the Recycle Bin for accidentally deleted screenshots.
6. How can I customize the file name format for screenshots?
Most third-party screenshot tools allow you to customize the file name format. Check the application settings for options related to file naming or output format.
7. What is the best way to organize my screenshots?
Create a dedicated folder structure with descriptive file names and tags or metadata. Regularly back up your screenshot folder and delete unnecessary screenshots to keep it organized.
8. How can I improve the print quality of screenshots?
Ensure that your screenshot has a high resolution, avoid resizing it upwards, and use high-quality photo paper and printer settings. Consider using a professional printing service for critical prints.
9. How can screenshots be used for business purposes?
Screenshots can be used for communication, documentation, training, marketing, and legal compliance. They can improve communication, streamline processes, and enhance your brand image.
10. What are some emerging trends in screenshot technology?
Emerging trends include AI-powered screenshot tools, enhanced collaboration features, cloud-based screenshot management, integration with augmented reality (AR), and security and privacy enhancements.