
In the digital age, capturing what’s on your screen, known as taking a screenshot or screen capture, has become an essential skill. Whether you’re sharing a funny online moment, creating a tutorial, or reporting a technical issue, screenshots are incredibly useful. Windows operating systems make this process straightforward with the Print Screen key. But where is the Print Screen button exactly, and how do you use it? This guide will walk you through everything you need to know about finding and using the Print Screen button on your desktop or laptop.
Locating the Print Screen Button on Your Keyboard
The first step to mastering screenshots is to find the Print Screen button. Its location can vary slightly depending on whether you are using a desktop or a laptop keyboard.
On Desktop Keyboards
For desktop computers, the Print Screen key is typically situated in the upper right-hand corner of your keyboard. Look for it in the section often grouped with keys like Scroll Lock and Pause Break, usually above the Insert, Home, Page Up, Delete, End, and Page Down keys.
You might find it labeled in a few different ways depending on your keyboard manufacturer. Common labels include:
- Print Screen
- PrintScreen
- PrtScn
- PrntScr
- PrtScr
- PRTSC
- Pr Sc
For simplicity, we’ll use PrtScr throughout this article to refer to all these variations.
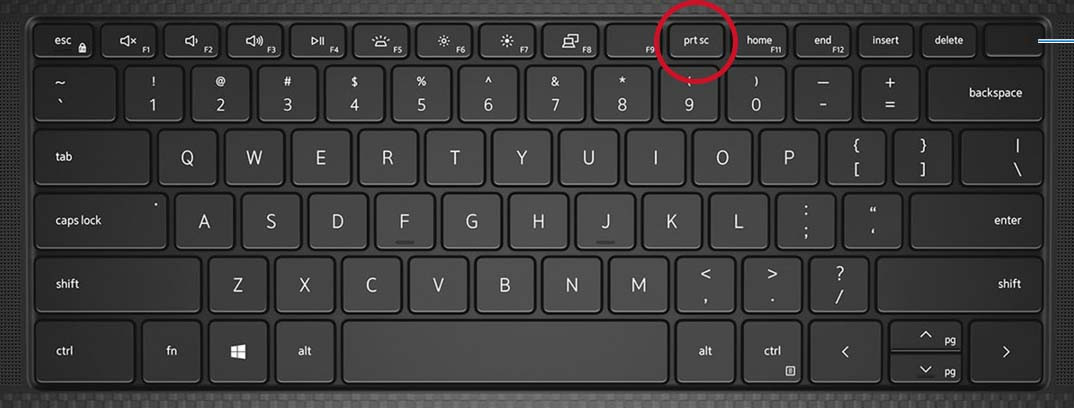 Illustration of the print screen key on Dell Precision 5550 mobile workstation keyboard
Figure 1: The Print Screen key highlighted on a Dell desktop keyboard, typically found in the upper right area.
It’s worth noting that some compact or specialized keyboards might deviate slightly. For example, certain Dell wireless keyboard models, like the KM3322W, may not have a dedicated PrtScr key. On these keyboards, you might need to use a combination like the Fn (Function) key + Insert key to perform the Print Screen function. Always refer to your keyboard’s manual if you are unsure.
On Laptop Keyboards
On laptop keyboards, space is often at a premium, which can affect key placement. The Print Screen key is commonly found within the Function key row (F1, F2, F3, etc.). You’ll need to look closely at the F-keys, often from F10 to F12, to find one that is also labeled as PrtScr or one of its variations.
Illustration of the print screen key on Dell Precision 5550 mobile workstation keyboard
Figure 2: Locating the Print Screen key on a Dell laptop keyboard, often integrated with the Function keys.
Often, laptop keyboards utilize the Fn key (Function key) to access secondary functions of certain keys. If the PrtScr function is shared with another key, you’ll typically need to press and hold the Fn key while pressing the PrtScr key to take a screenshot. In some cases, the PrtScr function might be the primary function, and you press PrtScr directly for a screenshot.
Some modern laptops feature capacitive or illuminated Function key rows. On these, pressing the Fn key might switch the displayed function on the keys. You might need to press Fn to illuminate the PrtScr function before you can use it. Again, checking your laptop’s user manual is the best way to confirm the exact method for your model.
Figure 3: Illustration of a laptop keyboard with a capacitive Function Key row, where the Fn key may be needed to access the Print Screen function.
Using the Print Screen Key in Windows 10 and Windows 11
Once you’ve located your Print Screen button, you can start capturing your screen. The way the Print Screen key works is consistent across Windows 10 and Windows 11, offering several options for different capture needs.
Capturing the Entire Screen
To take a screenshot of your entire screen, including all open windows and the taskbar, simply press the PrtScr key.
In some cases, particularly on tablets or when you want to automatically save the screenshot as a file, you can use the Windows logo key + PrtScr key combination. On tablets without a physical keyboard, you can usually achieve the same result by pressing the Windows logo button + Volume Down button simultaneously. When using these combinations, the full-screen screenshot is typically saved as a PNG file in the “Screenshots” folder within your “Pictures” library.
Capturing All Active Windows
If you only want to capture all currently active windows, but not the entire screen, simply press the PrtScr key. This will capture all windows that are currently open and place the screenshot on your clipboard.
Capturing a Single Active Window
To capture only a specific window, first, make sure that window is active by clicking on it. Then, press the Alt + PrtScr keys together. This will capture only the content of that specific active window and copy it to your clipboard.
Pasting and Utilizing Your Screenshot
After you’ve captured your screenshot using any of the methods above, the image is temporarily stored on your computer’s clipboard. To use or edit it, you need to paste it into an application.
For basic use, you can open applications like Microsoft Paint, Paint 3D, or any image editing software like Adobe Photoshop or GIMP. Once you have the application open, use the keyboard shortcut Ctrl + V (paste) to insert the screenshot into a new document. From there, you can edit, annotate, save, or share your screenshot as needed.
For more advanced screenshot options and editing tools directly within Windows, consider exploring the Snipping Tool or Snip & Sketch applications. These built-in tools offer more features like capturing specific regions of the screen, delayed screenshots, and basic annotation capabilities, providing more flexibility than the standard Print Screen key alone.