
Taking a screenshot on your Windows computer is a common task, whether you’re capturing an error message for tech support, saving a memorable moment from a game, or grabbing a quick visual for work. But after you hit that Print Screen button, or use a keyboard shortcut, have you ever wondered, “Where exactly did my screenshot go?”
Unlike your documents or downloaded files that you consciously save in specific folders, screenshots in Windows can be a bit elusive. The location isn’t always obvious, and it actually depends on the method you use to capture your screen. This guide will clarify the mystery and show you exactly where to find your screenshots in Windows 10 and Windows 11, no matter which method you prefer.
If You’re Using the Print Screen (PrtScn) Key Alone
The simplest way to take a screenshot is by pressing the Print Screen key (often labeled PrtScn or similar) on your keyboard. However, if you’re expecting to find a saved file immediately after pressing this key, you might be disappointed.
When you press Print Screen, Windows takes a snapshot of your entire screen and temporarily copies it to the clipboard. Think of the clipboard as a temporary storage space for copied data. This means the screenshot isn’t saved as a file yet; it’s just held in your computer’s memory, ready to be pasted.
To actually save this screenshot as an image file, you need to open an image editing program like Paint (which comes standard with Windows) or Paint 3D. Once you have Paint open, simply paste the screenshot from the clipboard by pressing Ctrl+V or right-clicking and selecting “Paste”. You’ll then see your screenshot within the Paint window, and from there, you can save it as a PNG, JPG, or other image file format to your desired location.
The same clipboard behavior applies if you use Alt+Print Screen to capture only the active window, or Windows Key+Shift+S to capture a specific rectangular area of your screen using the Snip & Sketch tool. These methods also copy the screenshot to the clipboard, requiring you to paste it into an image editor to save it permanently.
If You’re Using the Windows Key + Print Screen Shortcut
For a quicker screenshot saving process, Windows offers the Windows Key + Print Screen shortcut. Pressing these two keys simultaneously will not only capture your entire screen but also automatically save it as an image file.
Where do these automatically saved screenshots go? By default, Windows saves them to the Screenshots folder within your Pictures library. You can find this folder by navigating to:
C:Users[Your User Name]PicturesScreenshots
Remember to replace [Your User Name] with your actual Windows username.
Using Windows Key + Print Screen creates a full-screen screenshot and saves it as a PNG file named sequentially, like “Screenshot (1).png”, “Screenshot (2).png”, and so on. This is a very convenient method for quickly capturing and saving screenshots without needing extra steps.
This automatic saving behavior and default folder location also applies to similar shortcuts on some devices, such as Windows Key+Fn+Print Screen on older Surface devices, Power+Volume Down on certain tablets, and Windows Key+Volume Down on other tablets.
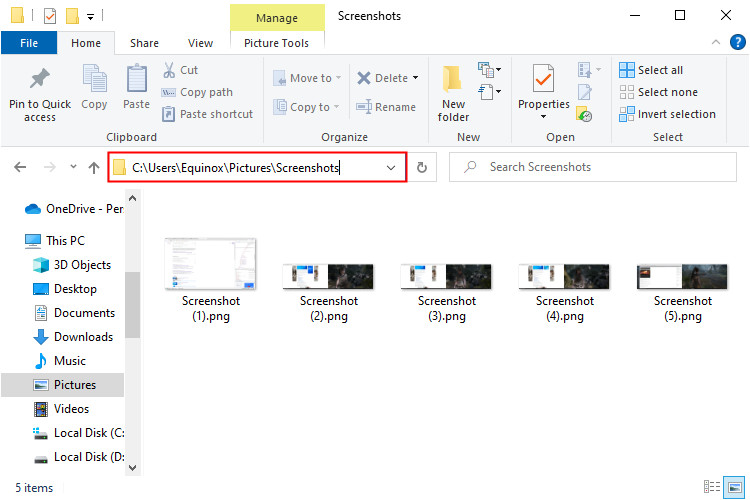 Default location of Screenshots folder in Windows File Explorer
It’s worth noting that you can change the default location of your Screenshots folder. If you’ve previously customized this using the Properties window for the Screenshots folder, Windows will save your Windows Key + Print Screen captures to your chosen custom location instead.
If You’re Using the Snipping Tool or Snip & Sketch
Windows includes built-in screenshot utilities like Snipping Tool (older versions) and Snip & Sketch (more recent versions, sometimes called “Snip & Sketch” or just “Snip”). These tools offer more control over the type of screenshot you take, allowing you to capture rectangular areas, free-form selections, windows, or the full screen.
When you use Snipping Tool or Snip & Sketch to take a screenshot, they typically don’t automatically save the image. Instead, they open the captured screenshot in their respective editing windows, giving you options to annotate, crop, and then save the screenshot.
The crucial point here is that you choose where to save the screenshot each time you use these tools. When you click the “Save” icon in Snipping Tool or Snip & Sketch, a “Save As” dialog box will appear, prompting you to select a location and filename for your screenshot.
If you’re unsure where you saved a previous screenshot taken with these tools, the easiest way to find out is to take a new screenshot with Snipping Tool or Snip & Sketch and click “Save”. The “Save As” dialog usually remembers the last location you saved to. Your missing screenshots might be in that same location. If not, it’s also worth checking your Documents or Pictures folders under “This PC” in File Explorer, as these are common default save locations.
If You’re Using the Xbox Game Bar for Screenshots
The Xbox Game Bar, accessed by pressing Windows Key + G, is primarily designed for gaming, but it includes a handy “Capture” feature that can take screenshots of games or any application window.
Screenshots taken using the Xbox Game Bar’s “Capture” tool are saved in a different location than the Print Screen or Windows Key + Print Screen methods. Game Bar screenshots are typically saved to the Captures folder within your Videos library:
C:Users[Your User Name]VideosCaptures
Again, replace [Your User Name] with your Windows username.
For easy access to your Game Bar screenshots, you don’t need to manually navigate to this folder. Simply open the Xbox Game Bar (Windows Key + G), click the Widgets menu button (it looks like a row of icons), and then select “Gallery”.
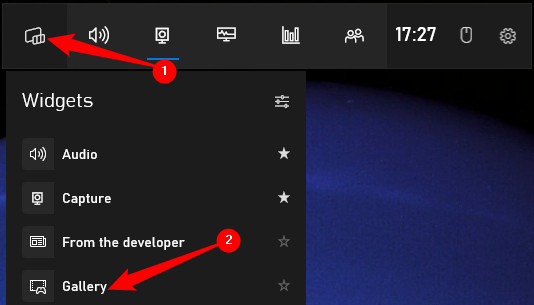 Accessing the Gallery within the Xbox Game Bar
The Gallery will display your recent game captures and screenshots. From the Gallery, you can click the small folder icon to directly open File Explorer to the Captures folder. Alternatively, you can select a specific screenshot or video and then click “Open File Location” to jump directly to that file’s folder.
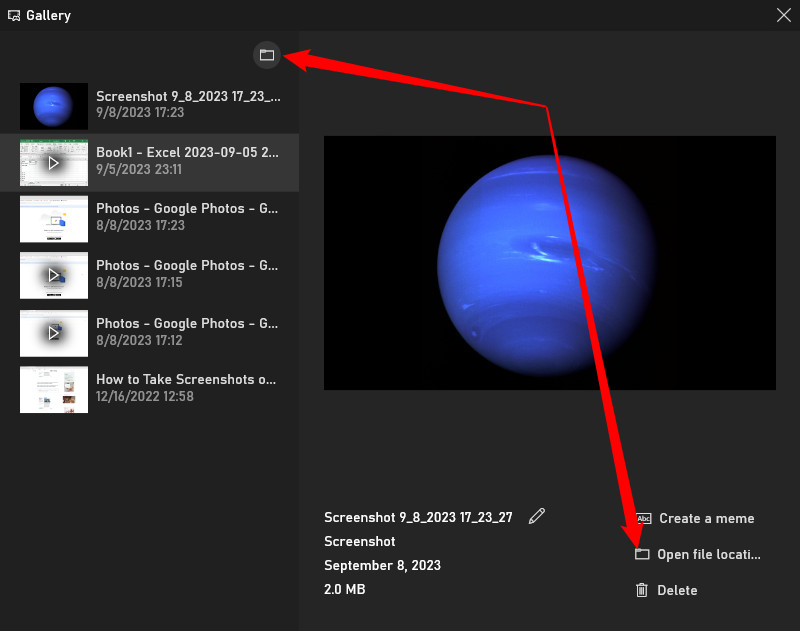 Opening the file location of a screenshot in the Game Bar Gallery
If You’re Using a Third-Party Screenshot Application
Many users prefer to use third-party screenshot tools for their enhanced features and customization options. Applications like Greenshot, ShareX, or Lightshot offer more advanced capture modes, annotation tools, and saving options compared to Windows’ built-in tools.
If you are using a third-party screenshot application, the location where your screenshots are saved will be determined by the settings of that specific application. Each tool has its own configuration options, usually found in its settings or preferences menu.
The best way to find out where your third-party screenshot tool saves images is to check its settings. Look for options related to “Output”, “Saving”, “Destination Folder”, or similar terms. Common default locations for these tools include your Documents folder or your Pictures folder, both accessible under “This PC” in File Explorer.
Still Can’t Find Your Screenshots? Try This Trick
If you’ve tried all the common locations and are still struggling to find your screenshots, there’s a useful file searching technique you can use. This method helps you locate recently created files, which should include your missing screenshot.
First, take a new screenshot using any method. Then, open File Explorer (by pressing Windows Key + E). In the File Explorer window, navigate to the drive or folder where you suspect your screenshots might be saved (you can start by searching your entire C: drive if unsure).
In the search bar in the top right corner of File Explorer, type the following command and press Enter:
datemodified:today
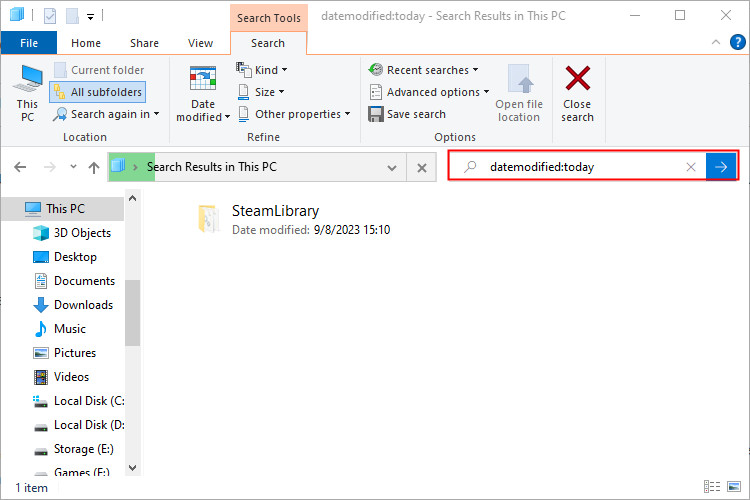 Searching for files modified today in File Explorer
This command instructs File Explorer to display all files and folders that have been modified today. The search results will populate with files created or changed recently. Look for your newly captured screenshot in the list. It will likely be named “Screenshot” or something similar, depending on the method you used.
Once you find your screenshot file in the search results, right-click on it and select “Open File Location” from the context menu. File Explorer will then open the folder where that screenshot is saved, and you’ll likely find your other missing screenshots in the same location.
Finding your screenshots in Windows doesn’t have to be a mystery. By understanding the different screenshot methods and their default save locations, you can quickly access and manage your screen captures whenever you need them.