Creating custom enclosures for your electronic projects, especially guitar pedals, can elevate your DIY game significantly. Tayda Electronics offers a fantastic Uv Printing service that allows you to add professional-looking graphics to your enclosures. This guide will walk you through the process of preparing your artwork using Adobe Illustrator for Tayda’s UV printing service, ensuring your designs come out exactly as envisioned. Illustrator is recommended for its compatibility with Roland VersaWorks printers used by Tayda, guaranteeing optimal results. This tutorial assumes you have a basic understanding of Adobe Illustrator, but we’ll also include helpful tips to enhance your design process.
Step 1 – Starting with the Correct Template
The foundation of a successful UV print is using the right template. Tayda Electronics provides templates in both Adobe Illustrator (.ai) and PDF formats, specifically tailored for each enclosure size they offer. You can find and download these templates directly from their website when you place your UV printing order:
https://www.taydaelectronics.com/hardware/enclosures/enclosure-uv-printing-service.html
Upon opening the template in Illustrator, you’ll notice it’s structured with three crucial layers: White, Color, and Gloss. Understanding these layers is key to UV printing:
- White Layer: This layer is for any elements you want printed in white ink. White ink in UV printing serves as a base, making colors on top more vibrant, especially on colored enclosures. It’s also used for standalone white designs.
- Color Layer: This is where all your colored artwork resides. Any design element in this layer will be printed in full color using the UV printing process.
- Gloss Layer: This layer controls the finish of your print. You can specify areas to be glossy or matte. Even an overall gloss or matte finish is defined within this layer.
The template itself presents a white artboard, representing the printable area on the enclosure. It’s crucial to keep your artwork within these boundaries. Printing outside this area is not possible and might lead to issues during the UV printing process. For best results, especially with Tayda’s enclosures which often have rounded corners, it’s advisable to keep your design slightly inside the template’s border.
Step 2 – Incorporating Your Drill Template for Enclosure Layout
Accurate drilling is essential for assembling your project after UV printing. Most pedal PCB designs come with a drill template. Your first step is to ensure you have a correctly scaled drill template matching your chosen enclosure size. Software like Photoshop or any image editing tool that allows for scaling drawings to real-world dimensions can be used for this purpose.
Enclosure dimensions are readily available:
- Tayda Electronics Website: Each enclosure listing on Tayda’s site includes dimensions in millimeters.
- Amplified Parts and Pedal Parts Plus: These sites also provide enclosure dimensions and sometimes offer templates in their “Customize an Enclosure” sections, detailing exact measurements.
Once your drill template is correctly sized, if it lacks a center marking, adding one (like a “+” sign) is beneficial. This center mark aids in aligning the template in Illustrator and allows for precise measurement of hole locations in Photoshop, which is crucial for creating an accurate drill template using Tayda’s Drill Tool. Using these measurements, you can utilize spreadsheet software like Excel with a pre-designed template to calculate and round hole positions, even accounting for powder coating thickness.
After preparing the drill template, import it into Illustrator and position it at the bottom of the White layer. Illustrator’s alignment tools will help you center the drill template image precisely within the workspace. This ensures that your graphics and drill holes are perfectly aligned on the final printed enclosure.
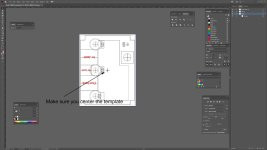 Drill template aligned in Illustrator, showing guides and center marking for accurate layout of enclosure features for UV printing.
Step 3 – Adding Guides for Centering Controls
Most electronic projects, especially guitar effects pedals, involve multiple controls like knobs, switches, and indicator LEDs on the enclosure’s face. Creating guides in Illustrator is vital for aligning these components with your artwork. Typically placed in the White layer (though the layer isn’t critical as long as they are clearly visible), these guides should accurately mark the positions of all controls. This step ensures that your graphic design harmoniously integrates with the physical components of your project, avoiding any awkward overlaps or misalignments after UV printing and assembly.
Step 4 – Representing Controls with Shapes
Visualizing the final assembled pedal is crucial during the design phase. To prevent your artwork from being obscured by knobs or switches, you need to block out space for all controls in your Illustrator design. Illustrator accurately displays the dimensions of shapes, so if you plan to use 15mm knobs, create 15mm circles using the ellipse tool to represent them on your artboard. This visual representation helps in assessing the layout – for instance, determining if a larger 28mm chicken head knob will fit without overlapping the enclosure edges or interfering with neighboring controls.
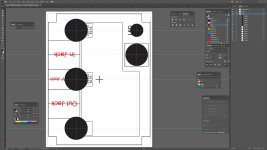 Illustrator artboard showing circles representing knob placements, aiding in design layout for UV printed enclosure.
Initially, these knob indicators can be placed in the “white” layer for layout purposes. However, for the final design, they should typically be moved to the top of the color layer, particularly if you are not aiming for an all-white enclosure design. This ensures that these placeholders are correctly layered with your main artwork for the UV printing process.
Step 5 – Ensuring Vector Format for Artwork
For UV printing, especially with Tayda’s service, your artwork must be in vector format. Vector graphics are scalable without loss of quality, crucial for the high-resolution output of UV printers. Whether you use stock art or original designs, ensure everything is in vector format (.ai, .eps, .svg). Raster images (.jpg, .gif, .png, etc.) need conversion to vector format before printing.
For example, if you incorporate a raster image like a logo or illustration, you’ll need to vectorize it in Illustrator. Illustrator’s Image Trace tool is perfect for this conversion.
Using the Image Trace panel (Window > Image Trace), you can convert raster images to vectors. Experiment with modes like “Low Fidelity Photo” or “High Fidelity Photo,” and adjust settings until you achieve the desired vectorized outcome. The right settings depend on the complexity and style of your original raster art.
Step 6 – Expanding and Refining Image Traces
After using Image Trace, it’s essential to “Expand” the traced object (Object > Expand). Expanding converts the trace into paths and fills, making each element editable.
 Illustrator interface showing image trace options for vectorizing artwork intended for UV printing on enclosures.
Once expanded, the image becomes a “Group” of editable paths. You can now refine it by deleting unwanted parts, like background whitespace, leaving only the essential vector artwork for UV printing. This cleanup ensures crisp and clean prints on your enclosures.
Step 7 – Sizing and Positioning Your Artwork
With your artwork in vector format and refined, the final step in Illustrator is to size and position it correctly on the template. Consider the enclosure’s orientation and ensure your design aligns as intended when printed and drilled. For some enclosure orientations, like landscape vs. portrait, you might need to rotate your entire design by 90 degrees within Illustrator to match Tayda’s printing and drilling setup.
At this stage, ensure all your design elements are in the correct layers – typically, artwork moves to the color layer (and white elements to the white layer). For designs requiring both color and white ink (common for vibrant graphics on colored enclosures), proper layer assignment is critical.
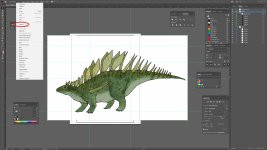
 Final artwork placement in Illustrator, sized and aligned within the template, ready for UV printing on a custom enclosure.
By following these steps, your artwork will be perfectly prepared for Tayda Electronics’ UV printing service. This process ensures that your custom enclosures not only function perfectly but also look professionally finished, showcasing your unique designs with vibrant UV printed graphics. UV printing offers durability and vibrant colors, making it an excellent choice for custom enclosures. With your design finalized in Illustrator and prepped according to this tutorial, you’re ready to upload your files to Tayda and bring your custom enclosure vision to life through high-quality UV printing.