
3D printing is an amazing technology, but it comes with its set of challenges. One common frustration, especially for users of Small 3d Printers, is when intricate, small parts detach from the print bed mid-print. Seeing a print job fail is never enjoyable, but luckily, there are often straightforward solutions to overcome these hurdles. This article focuses on a simple yet effective method to enhance bed adhesion specifically for those delicate, smaller prints, ensuring successful outcomes every time you use your small 3D printer.
The Problem with Small Parts and Bed Adhesion
When working with small, detailed parts, the surface area in contact with the print bed is naturally minimal. This reduced contact makes them more susceptible to warping or detaching, particularly during the initial layers when adhesion is crucial. While rafts and supports are common solutions, they can compromise the surface finish and add extra cleanup. Brims are helpful, but slicer software often applies them globally, not selectively per part on the build plate. Many resort to tapes, glues, or chemical adhesion promoters, but these can be messy and still don’t address the fundamental issue: insufficient surface area.
 20200428_152953
Image: A failed 3D print of small parts due to bed adhesion issues, highlighting a common challenge for small 3D printer users.
The Simple Solution: Expanding Surface Area in CAD for 3D Printing
The key to reliable bed adhesion for small 3D printer parts lies in increasing their base surface area without sacrificing surface quality or adding extensive support structures. The solution? A minor modification within your CAD software. By adding a thin, flush extension to the bottom of your 3D model, you create a larger footprint that firmly grips the bed during printing. This method avoids rafts, minimizes supports, and maintains the desired smooth bottom surface of your part.
Step-by-Step Guide: Adding a Base Extension in Onshape (and other CAD Software)
This example uses Onshape, a popular cloud-based CAD platform, but the principle applies to most 3D design software.
-
Open Your Design: Load your 3D model file into your CAD software. In this case, the design file for the small part needing improved adhesion.
-
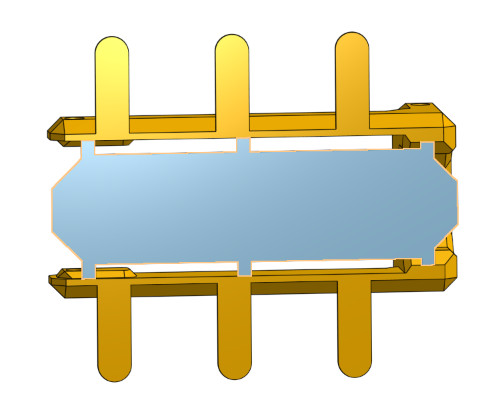
Create a Base Extension: Utilize your CAD software’s tools to create a new shape that is flush with the bottom surface of your part. The goal is to create a minimal, thin attachment that extends the base. Think of it as adding a very thin “skirt” directly attached to the bottom of your model.
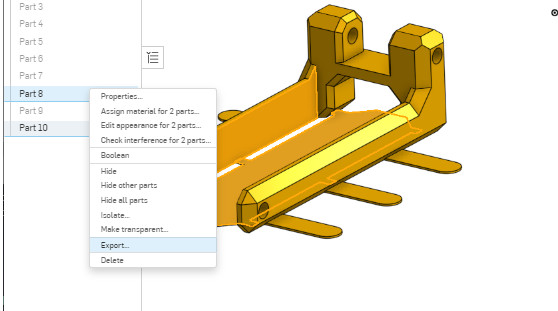
 Capture
Image: CAD software interface showing the selection of the original part and the newly created base extension for improved 3D print bed adhesion.
-
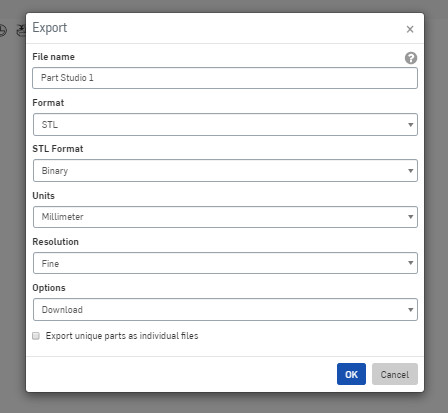
Ensure Parts are Joined for Export: When exporting your design for 3D printing, make sure that the base extension and the original part are exported as a single, joined file. In Onshape, this involves unchecking the “Download as separate parts” option during export, ensuring a unified STL or OBJ file.
 Capture3
Image: Screenshot from Onshape CAD software highlighting the export settings for a joined part, crucial for 3D printing the modified model.
 Capture4
Image: Further detail in Onshape export settings, emphasizing the option to export the selected parts as a single, unified file for 3D printing.
-
Slice and Print: Import the modified, joined file into your slicing software and prepare for printing as usual.
The Benefits: Clean Prints and Reliable Adhesion
The resulting base extension is incredibly thin – in this example, only 0.2mm, matching the first layer height. This minimal addition provides a significantly larger surface area for bed adhesion, preventing parts from detaching during the print process. Once printing is complete, this thin base is exceptionally easy to remove, leaving a clean, smooth bottom surface on your intended part, just as if it were printed directly on the bed.
…
 20200428_160021
Image: A successfully completed 3D print of small parts using the base extension technique, showcasing improved bed adhesion and print success.
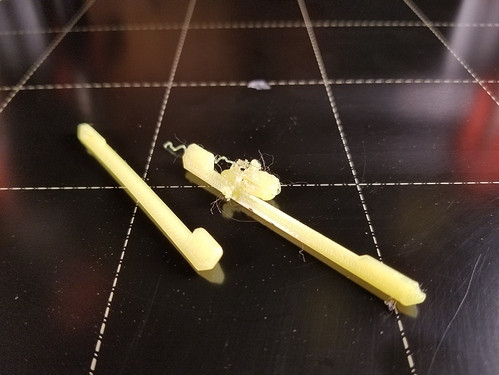
 20200428_155732
Image: Close-up of the thin, easily removable base extension after 3D printing, demonstrating the clean separation and minimal impact on the part’s surface.
This technique, while conceptually simple, offers a practical solution for a common 3D printing challenge, especially when using a small 3D printer to create detailed parts. It’s a valuable trick to have in your 3D printing toolkit.
Happy 3D printing! Experiment with this method and discover how it can improve the success rate of your prints, particularly for those intricate small designs.
If you’re interested in exploring Onshape for your 3D design projects, click below to learn more.
 image
imageImage: Onshape logo linking to their website, providing access to powerful CAD software for 3D design and small 3D printer projects.
For all your 3D printing needs, including a wide selection of small 3D printers and printing filaments, be sure to visit Digi-Key’s 3D printer and filament product pages.