Printing directly from your iPhone can significantly streamline your workflow, whether you’re handling important documents or just need a hard copy of a photo. With Apple’s AirPrint technology, setting up your printer to work with your iPhone is easier than you might think. This guide will walk you through the simple steps to get your printer connected to your iPhone and start printing wirelessly.
Before diving into the setup, there are a couple of things to ensure for a smooth process:
First, printer compatibility is key. AirPrint is Apple’s technology that allows for seamless wireless printing without the need for additional drivers. Make sure your printer supports AirPrint. You can usually find this information on the printer manufacturer’s website or in the printer’s manual. If you’re unsure, a quick search online for your printer model and “AirPrint compatibility” should give you the answer.
Second, network connection is crucial. Both your iPhone and your printer need to be on the same Wi-Fi network. This is how AirPrint enables them to communicate. Ensure your printer is connected to your Wi-Fi and that your iPhone is connected to the same network. Also, make sure both devices are within a reasonable range of your Wi-Fi router for a stable connection.
Once you’ve confirmed these prerequisites, you’re ready to print. Here’s how to setup and use AirPrint from your iPhone:
-
Find the Print Option: Open the document, photo, or webpage you wish to print from an app on your iPhone. Look for the Share icon (often a square with an arrow pointing upwards) or an Actions button (sometimes represented by three dots). Tap on this icon to reveal more options.
-
Access the Print Menu: Scroll through the options that appear after tapping the Share or Actions button until you find Print or the Print icon (a printer image). Tap on this to open the print settings.
-
Select Your Printer: In the Print Options screen, you’ll see “No Printer Selected” initially. Tap on this. Your iPhone will then search for available AirPrint-enabled printers on your Wi-Fi network. Choose your printer from the list. If your printer is correctly setup and on the same network, it should appear here.
-
Adjust Print Settings and Print: After selecting your printer, you can adjust settings like the number of copies, page range, and paper size, depending on the app and your printer’s capabilities. Once you’ve configured your desired settings, tap Print in the top right corner of the screen. Your print job will now be sent to the printer.
Managing Your Print Jobs
Need to check on a print job or cancel it? iPhone makes it easy to manage printing tasks in progress.
View a Print Job: While printing is in progress, you can quickly access the App Switcher (swipe up from the bottom of the screen and hold, or double-click the Home button on older iPhones). In the App Switcher, look for Print Center. Tapping on Print Center will show you the current print queue and status.
Cancel a Print Job: If you need to stop a print job, access the Print Center through the App Switcher as described above. In Print Center, you’ll see the print job listed. Simply tap Cancel Printing to stop the job.
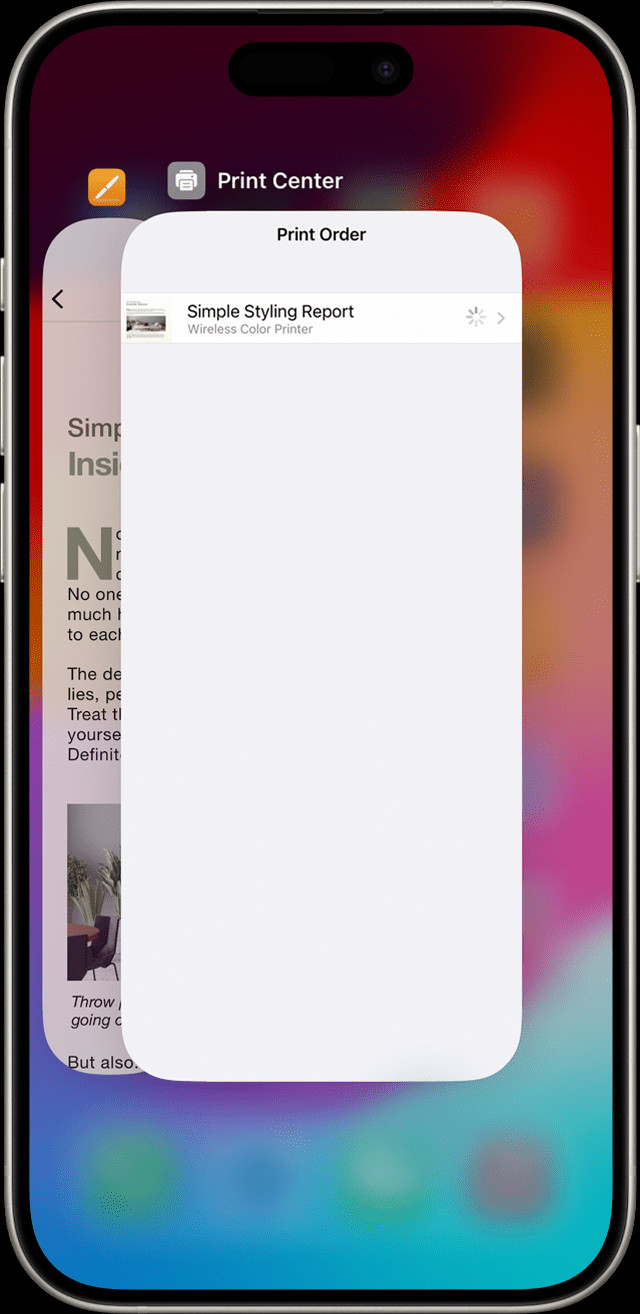 iPhone Print Center showing active print jobs for managing printing
AirPrint offers a convenient and efficient way to print from your iPhone without the hassle of cables or complex setups. By ensuring your printer is AirPrint-compatible and properly connected to your Wi-Fi, you can enjoy seamless wireless printing directly from your iPhone. Start printing effortlessly today!