
For anyone working extensively with Microsoft 365 applications on Windows, mastering keyboard shortcuts can significantly enhance productivity. Navigating the File menu, often referred to as the ‘Backstage view’, is a frequent task, and knowing the right shortcuts can save valuable time. This is especially true when it comes to printing documents efficiently. This guide will delve into the essential keyboard shortcuts within the Microsoft 365 File menu, with a particular focus on Printing Keyboard Shortcuts, empowering you to streamline your workflow and boost your overall efficiency. Whether you are looking to speed up your daily tasks or seeking accessibility alternatives to touchscreen and mouse interactions, understanding these shortcuts is a game-changer.
Understanding the File Menu in Microsoft 365
The File menu in Microsoft 365 applications is your central hub for managing files, accounts, and application settings. Accessible from any normal or editing view within applications like Word, Excel, PowerPoint, and Outlook, it provides a range of functions that operate behind the scenes. Think of it as the control panel for your documents and application environment.
Note: The keyboard shortcuts detailed in this article are based on the US keyboard layout. Users with different keyboard layouts may find that keys do not correspond exactly. Remember that a plus sign (+) indicates pressing keys simultaneously, while a comma (,) signifies pressing keys in sequence. To quickly locate a specific shortcut within this article, use Ctrl+F and type your search term.
Accessing the File Menu: The Gateway to Shortcuts
To begin utilizing printing keyboard shortcuts and other file management commands, you first need to open the File menu.
Shortcut: Alt + F
From any editing or viewing mode within your Microsoft 365 application, pressing Alt + F will instantly open the File menu. This action reveals a structured interface, often organized into pages or tabs, each containing related options. The specific pages available may vary slightly depending on the application you are using.
Navigating the File Menu with KeyTips: Your Visual Guide
Microsoft 365 employs a helpful system called KeyTips to guide you through menu navigation using the keyboard. Once the File menu is open, KeyTips appear as small boxes displaying letters, numbers, or combinations of both, overlaid on each page and option. These KeyTips act as visual cues, allowing you to activate commands and drill down into settings without needing to memorize complex shortcut sequences upfront.
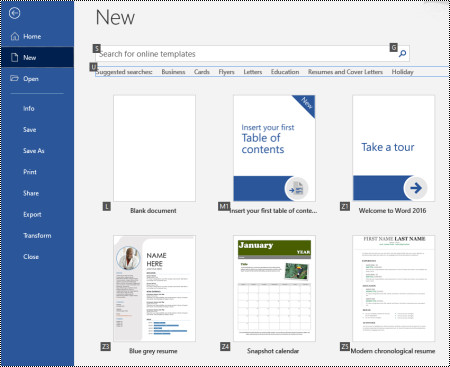 New page in the File menu of Word for Windows
Tip: If KeyTips are not visible after pressing Alt+F, simply press Alt again. Grayed-out KeyTips indicate unavailable options.
Using KeyTips to Navigate:
- Press Alt + F to open the File menu and activate KeyTips.
- Observe the KeyTips displayed on the page options.
- Press the key corresponding to the KeyTip of the page you want to open. For example, in Word, pressing N will open the New page.
- Once a page opens, a new set of KeyTips will appear for the options within that page.
- Press the key matching the KeyTip of the desired option. For instance, on the New page in Word, pressing S will take you to the Search field for online templates.
For screen reader users, navigating the File menu with KeyTips is also accessible. When you land on an option with a KeyTip, the screen reader will announce the option’s name followed by its full shortcut sequence. For example, upon reaching the Print button, Narrator might announce: “Print button, Alt, F, P, P.”
The tables below primarily use KeyTips to illustrate shortcuts within the File menu, with the initial row often showing the full shortcut sequence for accessing a specific page.
Frequently Used File Menu Shortcuts: Essential Commands at Your Fingertips
This table highlights the most common and essential shortcuts for navigating the File menu in Microsoft 365 applications. These shortcuts provide quick access to frequently used actions, significantly boosting your workflow efficiency.
| Action | Shortcut |
|---|---|
| Open the File menu | Alt + F |
| Within the File menu: | |
| Home Page: Access recent, pinned, and shared files, create new files from templates, and search for files – all in one central location. | H |
| New Page: Create a blank file or explore a wide range of templates to start your documents, spreadsheets, or presentations. | N |
| Save (Default): Quickly save your file using default settings. This option is available when AutoSave is disabled, giving you manual control over saving. | S |
| Save As: Open the Save As dialog box, allowing you to save your file with a new name, in a different location, or in a different file format. | A, 1 or A, O |
| Print Page: Access the print settings page to configure your printer options, paper size, orientation, and initiate the printing process. This is your gateway to printing keyboard shortcuts. | P |
| Exit File Menu: Return to the main editing or viewing area of your application, dismissing the File menu. | Esc |
Mastering Printing Keyboard Shortcuts: From File to Paper with Speed
Printing is a fundamental task, and Microsoft 365 provides several printing keyboard shortcuts within the File menu’s Print page to streamline this process. These shortcuts allow for precise control over printing options without relying on mouse clicks.
Accessing the Print Page:
Shortcut: Alt + F, P
This shortcut sequence opens the Print page within the File menu, providing access to all printing-related settings.
Printing Page Shortcuts:
| Action | Shortcut |
|---|---|
| Open Printer Menu: Select a different printer from your available options. | I |
| Open Printing Range Menu: Define which pages or slides to print (e.g., all pages, current page, custom range). | A |
| Set Printing Range by Page/Slide Numbers: Specify a custom range of pages or slides to print. | S |
| Set Page Orientation: Switch between portrait and landscape orientation for your printed output. | O |
| Set Paper Size: Choose the paper size for printing (e.g., Letter, A4, Legal). | L |
Quick Print Shortcut:
For the fastest route to printing with default settings, use this shortcut combination:
Shortcut: Ctrl + P, P
This instantly initiates the print command using your default printer and print settings, perfect for quickly printing a document without needing to adjust any options.
By combining Alt + F, P with the KeyTips on the Print page, or utilizing the Ctrl + P, P quick print shortcut, you can significantly accelerate your printing workflow within Microsoft 365 applications.
Shortcuts for Creating New Microsoft 365 Files: Starting Fresh with Ease
Need to quickly create a new document, spreadsheet, or presentation? The New page in the File menu offers shortcuts for creating files from templates or starting with a blank canvas.
Accessing the New Page:
Shortcut: Alt + F, N
This shortcut opens the New page, your starting point for creating new files.
New Page Shortcuts:
| Action | Shortcut |
|---|---|
| Create from Template List: Use a pre-designed template from the application’s built-in template library. | Z, then number (1-9) or letter (A-P), then C (e.g., Z, 1, C) |
| Search Online Templates: Find templates online by entering keywords in the search field. | S, type search words, then Enter |
| Predefined Template Searches: Access categories of templates through predefined search options. | U, then number (1-7) (e.g., U, 1) |
Quick New File Shortcut:
For the absolute fastest way to create a new blank file (or email in Outlook), use:
Shortcut: Ctrl + N
This instantly creates a new blank document, spreadsheet, presentation, or email, depending on the application you are currently using.
Shortcuts for Listing, Opening, and Searching for Files: Finding Your Documents Quickly
The Open page in the File menu provides shortcuts for accessing recent files, browsing file locations, and searching for specific documents, making file management more efficient.
Accessing the Open Page:
Shortcut: Alt + F, O
This shortcut opens the Open page, your hub for accessing existing files.
Open Page Shortcuts:
| Action | Shortcut |
|---|---|
| Search Recent Files: Find a file within your recently accessed documents by typing keywords. | R, E, type search words |
| Display Recent Files List: View a comprehensive list of your recently opened files. | R, Y, 2 |
| Display Recent Folders List: Access a list of folders you’ve recently used. | R, Y, 3 |
| Shared Files List: View files shared with you or files you have shared with others. | Y, 1 |
| Company OneDrive Files & Folders: Access files and folders stored on your organization’s OneDrive. | S, 1 |
| SharePoint Sites List: View SharePoint sites you use and follow. | S, 2 |
| Personal OneDrive Files & Folders: Access files and folders on your personal OneDrive account. | K |
| Local Device Files & Folders: Browse files and folders on your computer’s local storage. | C |
| Open Dialog Box: Open the standard Windows Open dialog box for browsing files and folders. | O |
| Recover Unsaved Documents: Open documents that were closed without saving (document recovery). | U, locate file, then Enter |
Quick Open File Shortcut:
To quickly open a file and see a list of recent documents, use:
Shortcut: Ctrl + O
This shortcut directly displays the Open page with a list of your recent files readily available.
Shortcuts for Saving and Renaming Microsoft 365 Files: Managing Your File Versions
Efficient file saving and renaming are crucial for document management. The File menu’s Save and Save As options, accessible from the editing view, offer keyboard shortcuts to streamline these tasks.
Accessing the Save/Save As Page:
Shortcut: Alt + F, A
This shortcut opens the Save or Save As page, depending on the current state of your file (new or previously saved).
Save/Save As Page Shortcuts:
| Action | Shortcut |
|---|---|
| Save (Default): Save the file with default settings (when AutoSave is off). | S |
| Add Cloud Location: Add a new cloud storage service (like OneDrive or SharePoint) as a save location. | A, A |
| Rename File: Rename the currently open file. | A, Y, 3 |
| Save Copy to Documents: Save a copy of the file to your “Documents” folder on your PC. | A, C, Y, 8, then Alt + A, Y, 5 |
| Open Save As Dialog Box: Open the Save As dialog to save with a different name or location. | A, 1 or A, O |
Quick Save Shortcut:
For the quickest file save, use:
Shortcut: Ctrl + S
This instantly saves your file with the current name and location.
Shortcuts for Exporting Files and Changing File Types: Versatility in File Formats
Need to create a PDF or XPS version of your document, or change the file type? The Export page in the File menu provides shortcuts for these file format conversion tasks.
Accessing the Export Page:
Shortcut: Alt + F, E
This shortcut opens the Export page, your gateway to file format options.
Export Page Shortcuts:
| Action | Shortcut |
|---|---|
| Create PDF/XPS: Create a PDF or XPS file from your Microsoft 365 document. | A |
| Change File Type: Convert your file to a different file format (e.g., .doc to .rtf, .xlsx to .csv). | C, choose file type, save |
| PowerPoint Handouts to Word: (PowerPoint only) Send presentation handouts to Microsoft Word. | H, A |
Shortcuts for File Information and Protection: Managing File Properties and Security
The Info page in the File menu provides shortcuts for accessing file properties, managing protection settings, and inspecting your documents.
Accessing the Info Page:
Shortcut: Alt + F, I
This shortcut opens the Info page, providing access to file-related information and settings.
Info Page Shortcuts:
| Action | Shortcut |
|---|---|
| Copy File Path: Copy the full file path to the clipboard. | C |
| Open File Location: Open the folder where the file is saved in File Explorer. | F |
| Protect Document Menu: Set restrictions on how others can modify your document (e.g., password protection, restrict editing). | P |
| Inspect Document: Check for hidden properties and personal information before sharing or publishing. | I, I |
Shortcuts for Transforming Word Documents to Web Pages: Leveraging Microsoft Sway
For Word users, the File menu offers a shortcut to transform documents into interactive web pages using Microsoft Sway.
Accessing the Transform to Web Page Dialog:
Shortcut: Alt + F, M
This shortcut opens the “Transform to Web Page” dialog, initiating the conversion process to Microsoft Sway.
Shortcuts for Accessing Your Microsoft 365 Account Info: Managing Your Profile and Updates
The Account (or Microsoft 365 Account in Outlook) page in the File menu provides shortcuts for managing your Microsoft 365 account, including profile picture changes and update management.
Accessing the Account Page:
Shortcut: Alt + F, D
This shortcut opens the Account or Microsoft 365 Account page.
Account Page Shortcuts:
| Action | Shortcut |
|---|---|
| Change Account Photo: Update your Microsoft 365 profile picture. | C |
| Sign Out: Sign out of your current Microsoft 365 account. | E |
| Switch User Account: Switch to a different Microsoft 365 user account. | S |
| Check for Updates: Check for and install available updates for your Microsoft 365 applications. | R, U |
Shortcuts for Accessing Your Outlook Email Account Info: Outlook-Specific Account Settings
In Outlook, the Account Information page in the File menu offers shortcuts for managing email account settings, setting up automatic replies, and more.
Accessing the Account Information Page (Outlook):
Shortcut: Alt + F, I
This shortcut opens the Account Information page within Outlook.
Account Information Page Shortcuts (Outlook):
| Action | Shortcut |
|---|---|
| Email Account Settings Menu: Access settings for your email account. | S |
| Automatic Replies (Out of Office): Open the dialog to set up automatic out-of-office replies. | O |
| Add New Account: Open the dialog for adding a new email account to Outlook. | D |
| Empty Deleted Items Folder: Permanently delete items in your Deleted Items folder. | T, Y |
| Rules and Alerts Dialog: Manage email rules and alerts for incoming and changed items. | R |
Shortcuts for Accessing Microsoft 365 App Settings and Options: Customizing Your Applications
The Options dialog box, accessible through the File menu, provides shortcuts for customizing various application settings, from spell checking to appearance themes.
Accessing the Options Dialog Box:
Shortcut: Alt + F, T
This shortcut opens the Options dialog box for the current Microsoft 365 application.
Options Dialog Box Shortcuts:
| Action | Shortcut |
|---|---|
| Outlook Play Sound Option: (Outlook only) Toggle the “Play a sound” option for received messages on or off. | M, Tab, P, Spacebar |
| Proofing Options: Access spelling and grammar checking settings. | P |
| Change Microsoft 365 Theme: Customize the visual theme of your Microsoft 365 applications (e.g., color scheme, dark mode). | G, Tab, T |
Shortcuts for Sending Feedback on Microsoft 365 Apps: Sharing Your Thoughts with Microsoft
Microsoft values user feedback. The Feedback page in the File menu provides shortcuts for sending positive or negative feedback and suggesting new features.
Accessing the Feedback Page:
Shortcut: Alt + F, K
This shortcut opens the Feedback page, where you can share your thoughts with Microsoft.
Feedback Page Shortcuts:
| Action | Shortcut |
|---|---|
| Send Positive Feedback (I Like Something): Open the form for sending positive feedback. | L |
| Send Negative Feedback (I Don’t Like Something): Open the form for negative feedback. | D |
| Suggest a Feature: Open the web page to suggest new features or improvements. | S |
Conclusion: Unlock Your Productivity Potential with File Menu Shortcuts
Mastering printing keyboard shortcuts and other File menu shortcuts in Microsoft 365 is a powerful way to enhance your efficiency and streamline your workflow. By utilizing these shortcuts, you can navigate menus, manage files, and execute commands with speed and precision, ultimately saving time and boosting your productivity. Start incorporating these shortcuts into your daily routine and experience the difference they can make in your Microsoft 365 experience. From quick printing to efficient file management, these keyboard shortcuts are valuable tools for any Microsoft 365 user.
See also
Make your content accessible to everyone
Keyboard shortcuts for Outlook
Use keyboard shortcuts to create PowerPoint presentations
Use keyboard shortcuts to deliver PowerPoint presentations
Technical support for customers with disabilities
Microsoft is committed to providing an inclusive experience for all users. If you have a disability or require accessibility assistance, please reach out to the Microsoft Disability Answer Desk for technical support. The Disability Answer Desk team is trained to assist with various assistive technologies and offers support in English, Spanish, French, and American Sign Language. Visit the Microsoft Disability Answer Desk site for contact information specific to your region.
For government, commercial, or enterprise users, please contact the enterprise Disability Answer Desk.