
Wireless printers offer convenience, but troubleshooting them can sometimes feel like navigating a maze. Unlike older wired printers where cable issues were often the culprit, wireless printers introduce network connectivity into the equation. If you’re facing difficulties connecting to your wireless printer, the first crucial step is to find your printer’s IP address. This guide will walk you through various methods to effectively use a Printer Ip Address Finder, enabling you to quickly resolve printer problems and get back to printing.
Why You Need Your Printer’s IP Address
Knowing your printer’s IP address is more than just a technicality; it’s essential for a couple of key reasons. Primarily, it’s your go-to tool for troubleshooting connection issues. When your printer suddenly becomes unreachable, the IP address helps you diagnose network-related problems. Secondly, the IP address is necessary when you want to establish a direct connection with your printer, such as when setting it up on a new device or configuring advanced network settings. Understanding how to use a printer IP address finder saves you considerable time and frustration in managing your printer.
Think of your printer’s IP address as its unique address within your local network. Just like your house has a street address, your printer has an IP address that allows devices on your network to locate and communicate with it. Often, printers are assigned dynamic IP addresses by your router, meaning this address can change periodically. This IP address change is a common reason for connection problems, making the ability to use a printer IP address finder even more critical.
Methods to Find Your Printer’s IP Address
There are several ways to find your printer’s IP address, depending on your printer model, computer operating system, and network setup. Here are some of the most common and effective methods to act as your printer IP address finder:
Method 1: Print a Network Configuration Page (Universal Method)
This is often the most straightforward and universally applicable method to find your printer’s IP address. Most printers, regardless of brand or type, have the capability to print a network configuration page directly from their control panel.
- Access your printer’s Control Panel: This is usually done via physical buttons on the printer itself or through a touchscreen interface.
- Navigate to Settings: Look for a “Settings,” “Setup,” or “Tools” menu option.
- Find Wireless or Network Settings: Within the settings menu, locate options related to “Wireless Settings,” “Network Settings,” or similar.
- Print a Network Configuration Page: The option to print a “Network Configuration Page,” “Network Setup Page,” or “Wireless Network Test Report” should be available. Select this option to print the page.
This printed page will contain detailed information about your printer’s network configuration, including its IP address, subnet mask, gateway, and other network details. Look for “IPv4 Address” or simply “IP Address” on the printed sheet.
Method 2: Using Your Computer (Windows & macOS)
You can also find your printer’s IP address through your computer’s operating system settings. The steps vary slightly between Windows and macOS.
On Windows
- Open Control Panel: Search for “Control Panel” in the Windows search bar and open it.
- Go to Hardware and Sound: Click on “Hardware and Sound.”
- Open Devices and Printers: Under “Devices and Printers,” click on “View devices and printers.”
- Right-click on your Printer: Locate your printer in the list of devices, right-click on it, and select “Properties” or “Printer properties.”
- Check Tabs for IP Address:
- Web Services Tab: If you see a “Web Services” tab among the properties, click on it. Your printer’s IP address might be listed there.
- Ports Tab: If there’s no “Web Services” tab or you don’t find the IP address there, look for the “Ports” tab. Select the port your printer is using (usually indicated as a TCP/IP port) and click “Configure Port.” The IP address should be displayed in the configuration settings.
On macOS
- Open System Settings: Click on the Apple menu in the top-left corner and select “System Settings” (or “System Preferences” in older macOS versions).
- Click on Printers & Scanners: Find and click on “Printers & Scanners.”
- Select Your Printer: Choose your printer from the list on the left.
- Find the IP Address: In the printer details on the right, look for “Location.” In many cases, the printer’s IP address will be listed under “Location.”
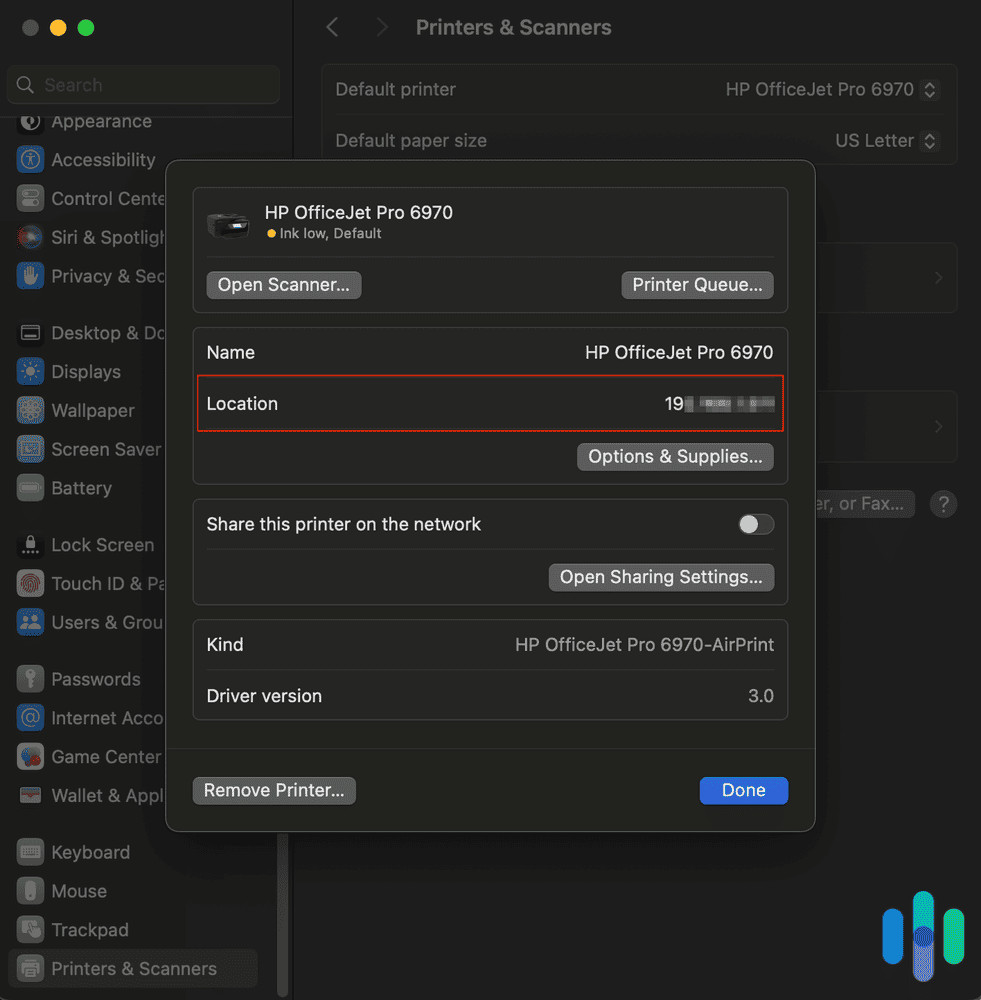 Printer IP address location on Mac
Method 3: Accessing Your Router’s Interface
Your router acts as the central management point for your network and keeps track of all connected devices, including their IP addresses. Accessing your router’s admin interface can be another effective printer IP address finder.
- Find Your Router’s IP Address: You’ll first need to know your router’s IP address. This is often
192.168.1.1or192.168.0.1. You can usually find this information in your router’s manual or by searching online for your router model. - Open a Web Browser: Open any web browser (like Chrome, Firefox, Safari, or Edge).
- Enter Router IP Address: Type your router’s IP address into the browser’s address bar and press Enter.
- Log in to Your Router: You’ll be prompted to enter your router’s username and password. These are usually printed on a sticker on your router itself. If you’ve changed them and forgotten, you may need to reset your router.
- Find DHCP Client Table or Client List: Once logged in, look for sections like “DHCP Client Table,” “Client List,” “Attached Devices,” or similar. The exact wording varies depending on your router’s manufacturer.
- Locate Your Printer: In the client list, find your printer. It might be listed by its name (if your printer broadcasts its name) or by a generic name like “unknown device.” The list will display the IP address assigned to each device.
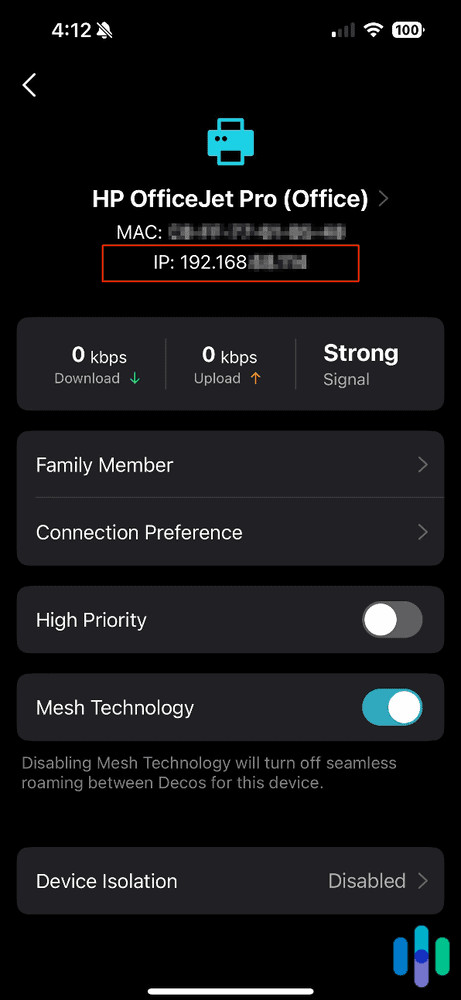 Finding the IP address of our printer from our Deco router app
Method 4: Command Prompt (Windows)
For more technically inclined users, the Command Prompt in Windows offers a quick way to discover device IP addresses on your network.
- Open Command Prompt: Press the Windows key, type “cmd,” and press Enter to open the Command Prompt.
- Type
netstat -r: In the Command Prompt window, typenetstat -rand press Enter. - Find Printer IP: This command displays the routing table of your computer, which includes a list of network destinations. While it doesn’t directly list device names, it shows IP addresses of connected devices, which can sometimes help you identify your printer’s IP if you recognize the IP address range of your network. You may need to cross-reference this with other methods if you have multiple devices.
Method 5: HP Printer Specific Method (HP Smart App/Website)
HP printers often offer dedicated tools for managing and configuring them. If you have an HP printer, the HP Smart app or website can serve as a printer IP address finder.
- Open HP Smart App or Website: Open the HP Smart application on your computer or mobile device, or go to hpsmart.com in a web browser.
- Select Printer Settings: Choose your printer from the app or website interface and navigate to “Printer Settings” or similar.
- Find Printer Reports or Tools: Look for options like “Printer Reports” or “Tools.”
- Click Network Configuration Report: Select “Network Configuration Report” or “Network Configuration Page.”
- Locate IPv4 Address: The printer will generate and print a network configuration page. Find the “IPv4 Address” section on the report; this is your printer’s IP address.
Method 6: CUPS Webpage (macOS – Advanced)
For macOS users who are comfortable with more advanced settings, the CUPS (Common Unix Printing System) webpage provides a detailed printer management interface.
- Open Terminal: Open the “Terminal” application. You can find it in the “Utilities” folder within “Applications.”
- Enable Web Interface: Type the command
cupsctl WebInterface=yesand press Enter. This enables the CUPS web interface. - Open Safari: Open the Safari web browser.
- Go to CUPS Webpage: In Safari’s address bar, type
localhost:631/printersand press Enter. - Find Printer and Location: You’ll see a list of printers. Click on your printer’s name. On the printer’s page, look for the “Location” section; the IP address should be listed there.
Method 7: Chromebook Settings
If you are using a Chromebook, you can find the printer’s IP address through the ChromeOS settings.
- Open Settings: Click on the clock in the bottom-right corner and then click the gear icon to open “Settings.”
- Click Advanced: Scroll down to the bottom of the Settings menu and click “Advanced.”
- Go to Printers: Under the “Printing” section, click on “Printers.”
- Save Available Printers: Select “Save printers available.”
- Set Up Printer: Under the list of “Saved printers,” right-click on your printer and select “Set up.”
- Access Printer Information: Continue through the setup prompts, clicking “Model,” “Label,” and “Add.” Eventually, under “Printer Information,” you should see your printer’s IP address listed.
Method 8: Canon Printer Menu
Canon printers, similar to HP, may have their own menu options directly on the printer to display network settings, including the IP address.
- Access Printer Menu: On your Canon printer’s control panel, navigate to “Settings” or “Setup.”
- Find Network Settings: Look for options like “Settings and Adjustments,” “Set or Adjust Menu,” or similar, and then find “Network Settings,” “Interface Setup,” or “TCP/IP.”
- Navigate to IPv4 Settings: Within the network settings, look for “TCP/IP” and then “IPv4 Settings.”
- Display IP Address: The printer should display a box or screen showing its IPv4 address, typically starting with
192.168.
What to Do With Your Printer’s IP Address
Once you’ve successfully used a printer IP address finder and obtained your printer’s IP address, you can utilize it for two primary purposes: resolving connection issues and connecting new devices.
Troubleshooting Connection Issues
A common reason why your wireless printer might stop working is a change in its IP address. Routers typically assign dynamic IP addresses, which can change when the printer is inactive, the router is rebooted, or the IP address lease expires. When the IP address changes, your computer loses track of the printer.
To prevent this, you can configure your printer to use a static IP address. A static IP address is a fixed, permanent address within your network, ensuring your computer can always find your printer at the same address.
How to set a static IP address (General Steps – consult your printer manual for specific instructions):
- Access Printer’s Network Settings: Typically through the printer’s control panel, navigate to “Network Settings” or “Wireless Settings.”
- IP Address Settings: Look for “IP Address Settings” or “IP Configuration.”
- Change from Dynamic (DHCP) to Static (Manual): Select the option to manually configure the IP address or change from DHCP to Static.
- Enter Static IP Details: You’ll need to enter:
- IP Address: Choose an IP address within your network range that is not already in use. (e.g., if your router is
192.168.1.1, you could choose192.168.1.200). - Subnet Mask: Usually
255.255.255.0. - Default Gateway: Your router’s IP address (e.g.,
192.168.1.1). - DNS Servers: You can use your router’s IP address or public DNS servers like Google’s (
8.8.8.8and8.8.4.4).
- IP Address: Choose an IP address within your network range that is not already in use. (e.g., if your router is
- Save Settings: Save the changes on your printer. You may need to restart your printer for the changes to take effect.
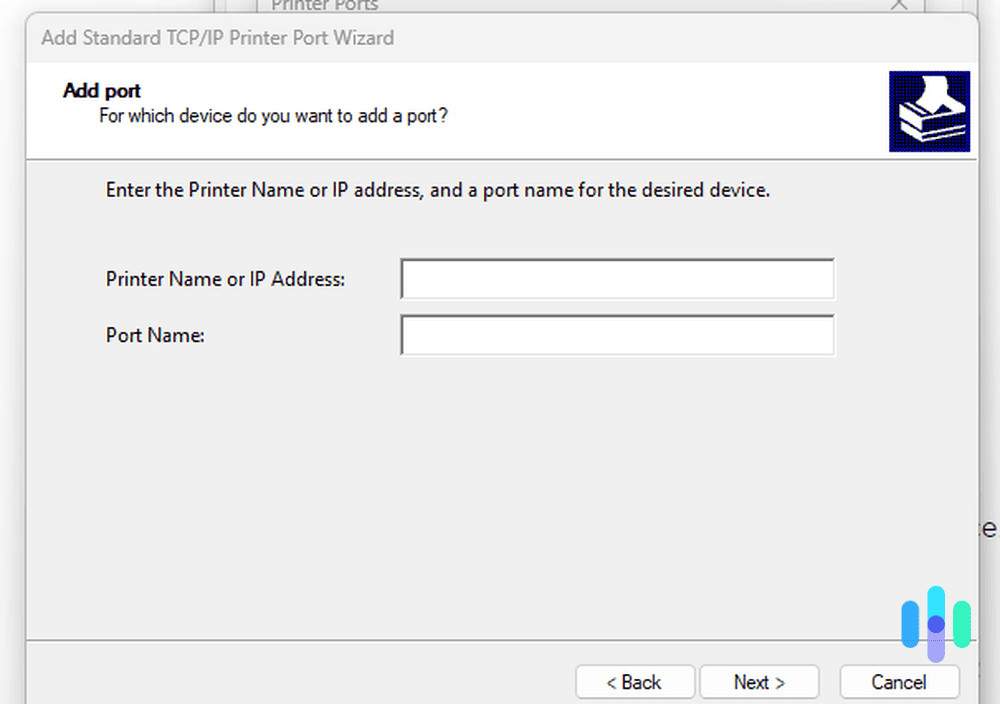 Add Standard TCP/IP Printer Port Wizard
Connecting New Devices to Your Printer
When you want to connect a new computer or device to your printer, you’ll often need to manually add the printer using its IP address.
How to connect a new device using the printer’s IP address (General Steps):
On Windows:
- Open Printers & Scanners: Go to “Settings” > “Devices” > “Printers & scanners.”
- Add Printer or Scanner: Click “Add a printer or scanner.”
- The printer that I want isn’t listed: If your printer isn’t automatically detected, click “The printer that I want isn’t listed.”
- Add a printer using a TCP/IP address or hostname: Select “Add a printer using a TCP/IP address or hostname” and click “Next.”
- Enter IP Address: Choose “TCP/IP Device” as the device type and enter your printer’s IP address in the “Hostname or IP address” field.
- Follow Prompts: Windows will attempt to detect the printer. Follow the on-screen prompts to complete the installation.
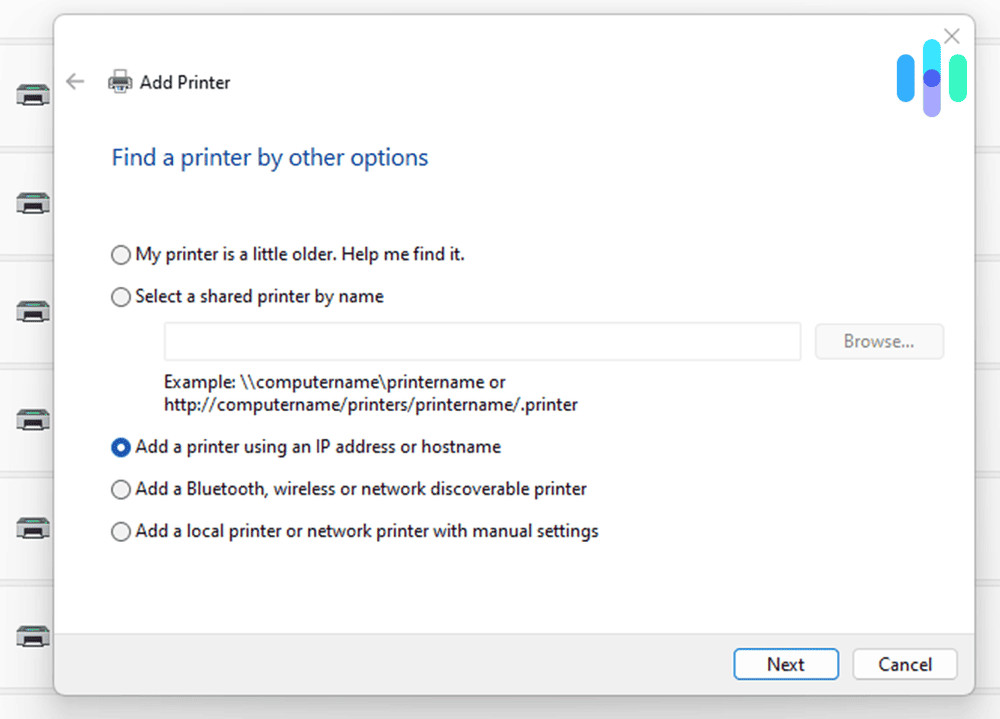 Add a printer using an IP address or hostname
On macOS:
- Open Printers & Scanners: Go to “System Settings” > “Printers & Scanners.”
- Add Printer, Scanner, or Fax…: Click the “Add Printer, Scanner, or Fax…” button (+ button).
- IP Tab: In the “Add Printer” window, click the “IP” icon or tab.
- Enter IP Address: Enter your printer’s IP address in the “Address” field. macOS will usually automatically detect the protocol and other settings.
- Add Printer: Click “Add” to add the printer.
Recap
Finding your printer’s IP address is a fundamental skill for anyone using a wireless printer. It’s your first line of defense when troubleshooting connection problems and essential for setting up your printer with new devices. By using the methods outlined in this guide, you can easily act as your own printer IP address finder and maintain seamless printing functionality. Whether you prefer printing a configuration page, using your computer’s settings, or accessing your router, you now have the knowledge to locate your printer’s IP address and effectively manage your printing experience.
FAQs
(This section can be expanded based on common questions related to printer IP addresses, if needed to meet length requirements and enhance helpfulness. For now, we will omit it to maintain length closer to the original and focus on the core content.)