Taking a snapshot of your computer screen, known as a screenshot or screen capture, is a fundamental skill for any Windows 10 user. Whether you need to share information, create tutorials, or simply save what’s on your screen, the Print Screen key is your go-to tool. In Windows, once you capture a screenshot, it’s automatically copied to your clipboard, ready to be used. Windows 10 offers several ways to use the Print Screen key, alone or in combination with other keys, to capture:
- The entire screen display
- All currently active windows
- Only the window you are actively using
Once captured, you can then paste the screenshot into various applications like documents, emails, or image editing software such as Paint. Alternatively, you can directly insert the screenshot as an image file into your desired destination. Let’s dive into the different methods of using the Print Screen key effectively on Windows 10.
Understanding the Print Screen Key and Its Functionality
The Print Screen key, often abbreviated as PrtScr or similar on your keyboard, is designed to capture what’s displayed on your screen. When you press the Print Screen key, Windows takes a snapshot of your screen and temporarily stores it on your clipboard. Think of the clipboard as an invisible temporary storage space for data you copy or cut. From the clipboard, you can then paste the screenshot into another application to view, edit, save, or share it.
Locating the Print Screen Key on Your Keyboard
The location of the Print Screen key can vary slightly depending on whether you are using a desktop or a laptop keyboard.
On desktop keyboards, you’ll typically find the Print Screen key in the upper right-hand corner section of your keyboard. Keep an eye out for labels such as PrintScreen, PrtScn, PrntScr, PrtScn, PrtScr, PrtSc, or similar abbreviations. For simplicity, we’ll use PrtScr throughout this guide to refer to all these variations.
It’s worth noting that some specialized keyboards might have slight differences. For example, the Dell Wireless Keyboard and Mouse combo, model KM3322W, requires you to press the Fn key along with the Insert key to perform the print screen function, as it doesn’t have a dedicated Print Screen button.
On laptop keyboards, the Print Screen key is commonly found within the Function Key row (F1 to F12). Often, you’ll need to press the Fn (Function) key in conjunction with the appropriate Function key, often F10, to activate the screenshot.
Laptops with capacitive or illuminated Function Key rows might require pressing the Fn key to switch the function of these keys. Once the Print Screen function is illuminated or active, you can press the PrtScr key along with other key combinations as described below to take your desired screenshot. If you’re unsure, always refer to your laptop’s user manual for specific instructions.
Figure 1: Location of Print Screen key on a desktop keyboard.
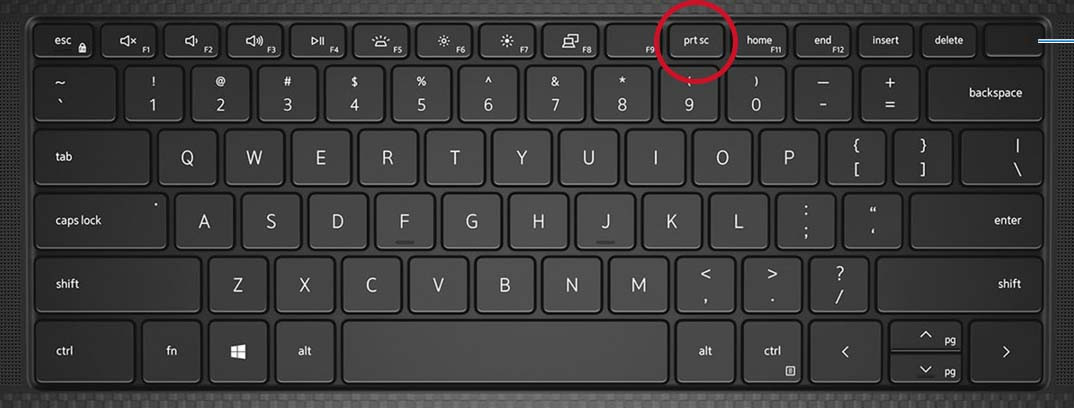 Print Screen Key Location on Desktop Keyboard
Figure 2: Print Screen Key on a Laptop Keyboard.
Print Screen Key Location on Desktop Keyboard
Figure 3: Laptop with Capacitive Function Keys.
Print Screen Key Location on Desktop Keyboard
Different Ways to Print Screen on Windows 10
Windows 10 provides several convenient methods to capture screenshots using the Print Screen key, catering to different needs. Here’s how to use each method effectively:
Capturing the Entire Screen
To take a screenshot of your entire display in Windows 10, simply press the PrtScr key. This action captures everything visible on your screen and copies it to the clipboard.
Alternatively, for a quicker way to save the full-screen screenshot directly as a file, press the Windows logo key + PrtScr keys simultaneously. On Windows tablets, you can achieve the same result by pressing the Windows logo button + the volume down button together. When you use these combinations, the screenshot is automatically saved as a PNG file in the “Screenshots” folder, which is located within your “Pictures” library. This is a handy shortcut for quickly saving screenshots without needing to paste them first.
Capturing All Active Windows
If you have multiple windows open and want to capture all of them in a single screenshot, just press the PrtScr key. Windows will capture the entire desktop, including all open windows, and place the image on your clipboard. You can then paste this into an image editor to crop or further manipulate the image if needed.
Capturing a Single Active Window
For capturing only the window you are currently working in, or the ‘active’ window, Windows 10 offers a specific key combination. First, ensure that the window you wish to capture is active by clicking on it. Then, press the Alt + PrtScr keys together. This command will capture only the active window and copy it to your clipboard, excluding any other open windows or background elements. This is particularly useful when you need to focus on a specific application window for your screenshot.
Pasting and Using Your Screenshot
Once you’ve captured your desired screenshot using any of the methods above, the next step is to use it. The screenshot is now on your clipboard, and to make it visible and usable, you need to paste it into an application.
For basic use, image editors like Microsoft Paint, which comes standard with Windows 10, are perfect. Open Paint (or your preferred image editor like Photoshop, GIMP, etc.), and then press Ctrl + V (paste shortcut) to paste the screenshot into a new document within the application.
From here, you can edit your screenshot – crop it, add annotations, highlight sections, or resize it as needed. After editing, you can save the screenshot in your desired image format (like JPEG, PNG, GIF, etc.) to a location on your computer. You can also paste the screenshot directly into other applications that support image pasting, such as email clients, word processors (like Microsoft Word), or presentation software (like PowerPoint). Simply navigate to where you want to insert the image in the target application and use Ctrl + V to paste.
Exploring More Advanced Screenshot Options with Snipping Tool
While the Print Screen key offers quick and easy screenshot capabilities, Windows 10 also includes a more advanced tool called the Snipping Tool. This tool provides greater flexibility and options for capturing screenshots.
With the Snipping Tool, you can capture:
- Free-form snips: Draw a freehand shape around an object.
- Rectangular snips: Drag the cursor to form a rectangle around an area.
- Window snips: Select a specific window to capture.
- Full-screen snips: Capture the entire screen, similar to the PrtScr key.
The Snipping Tool also offers features like delay capture, annotations, and different saving options. It’s an excellent alternative for more controlled and versatile screenshot capturing. To access the Snipping Tool, simply type “Snipping Tool” in the Windows search bar and select it from the results. For users seeking more advanced screen capture features beyond the basic Print Screen functionality, the Snipping Tool is well worth exploring.
Learn more about using the Snipping Tool
Conclusion
Mastering the Print Screen function on Windows 10 is a simple yet powerful way to enhance your productivity and communication. Whether you need to quickly capture your entire screen, active windows, or a specific window, Windows 10 provides you with the tools to do so efficiently. From basic captures with the PrtScr key to more advanced options with the Snipping Tool, understanding these methods will significantly improve your ability to share and save visual information directly from your computer screen. Start using these techniques today to streamline your workflow and make the most of Windows 10’s built-in screenshot capabilities.