It’s a common misunderstanding that 3D printers cache Print Files in the same way a computer might. However, when you send a print job to your printer, it’s actually transmitted as a 3MF archive. The printer then takes this archive and extracts the Gcode, which is the actual print file that dictates the printer’s movements. This crucial Gcode file is stored directly on your printer’s SD card. Importantly, these print files remain on the SD card indefinitely unless you manually delete them. This is a vital point to consider for privacy – regularly cleaning your SD card is advisable, especially if you’ve been printing sensitive or private designs.
You can directly access these print files stored on the SD card through your printer’s user interface. By navigating the file directory on the printer’s panel, you can select and initiate prints directly from either the Gcode or the original 3MF file. Keep in mind that choosing this method will often trigger automatic bed leveling, which you can typically bypass when printing directly from slicing software. For easier identification later, consider renaming your print file to something more descriptive than the default model name. You can achieve this by modifying the plate name in your slicing software before sending the file, which will then override the model name for the saved print file.
 image
image
For more hands-on print file management, you can physically remove the SD card and access its contents on your computer. While reliable, this method can be less convenient. Alternatively, most slicing software, like Bambu Studio or Orca, allows you to directly slice and save your print file onto the SD card. This provides a more streamlined workflow for preparing and transferring your print files.
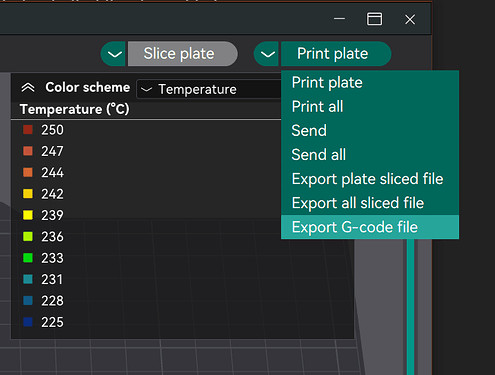
Within your slicing software, you’ll find options like “Send Gcode to file” which are useful to explore. Experiment with “Export placed sliced file” and “Gcode file” options to determine which best suits your workflow for saving print files to your SD card. Testing both will reveal which provides a more user-friendly experience for your needs.
While SD card support within the slicer has been available for some time on models like the X1, newer versions of Bambu Studio (version 1.9 and later) and updated firmware for printers like the P1 now offer direct SD card copy and manipulation capabilities. However, firmware stability can vary, so your experience with these features may depend on your specific printer and firmware version.
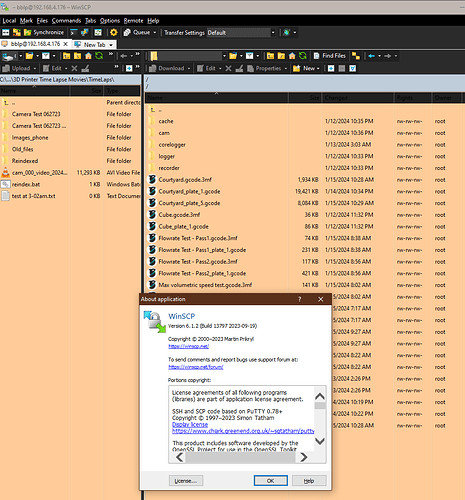
For users operating in a LAN-only environment, FTP (File Transfer Protocol) provides an excellent and versatile method for remotely managing print files on the SD card. Using FTP, you can access the SD card as if it were directly connected to your computer using readily available open-source FTP clients like FileZilla or WinSCP. This offers full control over your print files without needing to physically handle the SD card. While LAN-only mode disables cloud-based features, FTP offers advanced users a powerful way to manage their printers and print files. The Bambu Studio interface offers a more simplified experience, likely to reduce support requests from users unfamiliar with FTP, but for those with basic technical skills, setting up FTP access is straightforward and well-documented.
 image
image
As illustrated in this WinSCP example, FTP also grants easy access to time-lapse videos stored on the SD card. This is a significant advantage, allowing you to retrieve these videos without interrupting ongoing print jobs or interfering with Bambu Studio or Orca if they are currently in use. In summary, understanding how your 3D printer manages print files and utilizes SD card storage, along with exploring options like direct access, slicing to SD, and FTP, empowers you to efficiently manage your 3D printing workflow.