Want to bring your digital photos into the real world? Printing photos at home is easier than you might think, and there are several ways to achieve great results. Whether you’re aiming for standard prints or creating custom layouts, here’s a guide to help you Print A Photo effectively.
Using Image Editors for Precise Layouts
For those who need precise control over photo placement, especially when creating items like folded cards, image editors offer powerful tools. Software like Photoshop Elements, as described by experienced users, allows for layered printing.
Here’s how to print your photo using an image editor for a card layout:
- Prepare your Photo: Start by printing your photo to a PDF file directly from your photo application.
- Convert PDF to JPEG: Use Preview or a similar tool to convert each page of the PDF into individual JPEG images. This makes them easier to work with in an image editor.
- Create a Blank Canvas: Open your image editor and create a new blank image. Set the dimensions to 8.5 x 11 inches with a 300 dpi resolution for high-quality printing. Ensure it’s set to borderless if your printer supports it.
- Position Your Images: Place the front and back of your card (the first page JPEG) in the top left corner of your blank canvas. Then, place the inside pages (second page JPEG) in the lower left corner.
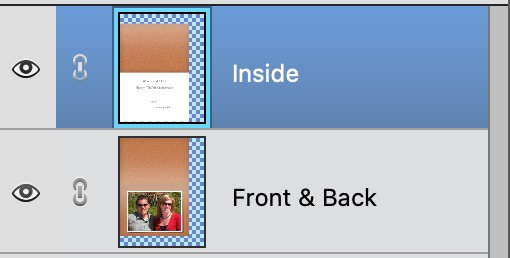 Photoshop Elements interface showing layers for card printing layout
- Print the First Side: Hide the layer with the second page (inside pages). Ensure only the first page layer (front and back) is visible. Print this layer.
- Print the Second Side: After printing the first side, carefully flip the paper end-over-end (crucially, do not flip it side-to-side). Hide the first page layer, unhide the second page layer, and then print again.
This method is perfect for creating a 5×7 inch folded card, ensuring accurate alignment on both sides of the paper.
Simple Printing with Office Programs
If you’re looking for a straightforward approach to print a photo, office programs like Word or PowerPoint (or their free equivalents) provide a user-friendly alternative. These programs allow you to easily position and resize images on a page.
Another quick method involves using a blank white image alongside your photo. This is useful if you simply want to fill a page partially with a photo and avoid resizing within more complex software.
Here’s how to print your photo using a blank image for layout:
- Create a Blank Image: If you need a blank white image, a simple trick is to duplicate the photo you want to print. Then, edit the duplicate by maximizing the exposure and highlights to 1 and minimizing contrast and black point to -1. Adjust the curves to make the image completely white.
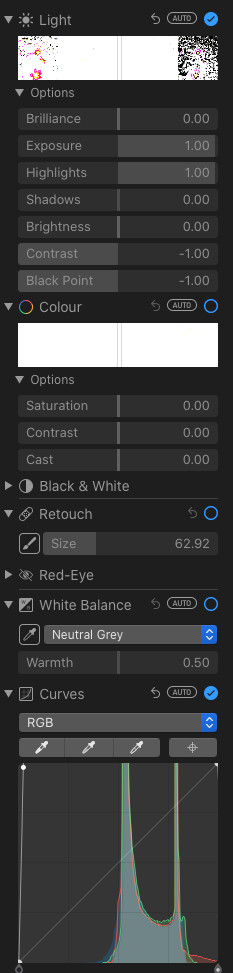 Image editing panel showing adjustments for creating a blank white image
- Insert into Document: Insert both your actual photo and the blank white image into a Word document or PowerPoint slide.
- Position Side-by-Side: Arrange the images side by side. You can resize and position them as needed to achieve your desired layout. If you only need to print one photo per page, simply position the photo where you want it and leave the rest of the page blank, or use a white image to fill unwanted areas.
- Print: Print the document. The office program handles the layout, making it easy to print your photo exactly where you want it on the page.
Whether you choose the precision of image editors or the simplicity of office programs, printing your photos at home is achievable. Experiment with these methods to find what works best for your needs and start enjoying your digital memories in print!