Last week, during a workshop with the Dufferin Piecemakers near Orangeville, one of the participants, Lynda, chose the charming “Dog Gone Cute” pattern to work on. You can admire her delightful dog blocks here. She was keen on incorporating a paw print block into the border. Today, I’m excited to share these bonus Paw Print border block instructions, perfect for enhancing your Dog Gone Cute quilt. These instructions are tailored for the Large Block quilt. My original Dog Gone Cute quilt can be viewed here. If you’re interested in making a Dog Gone Cute quilt, it’s available as a free pattern under the Quilt Alongs tab on my blog.
For those wanting to add the Paw Print Border Blocks, instead of the original strip cutting instructions for sashing and borders, please use the following cuts from your Background fabric:
- (2) strips at 10.5″ x 74.5”
- (2) strips at 10.5″ x 38.5”
- (3) strips at 2.5″ x 54.5”
To create the Paw Print Border Blocks as featured in the initial photo, cut the fabric amounts detailed in this chart.
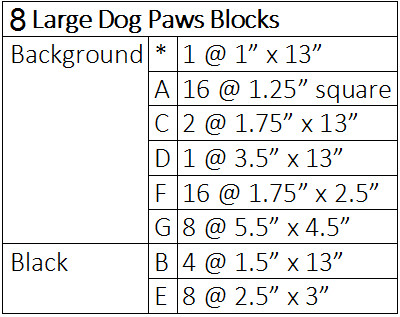 Fabric cutting chart for paw print dog quilt border blocks
Step-by-Step Guide to Create Paw Print Dog Border Blocks
Follow these simple steps to add a unique Paw Print Dog border to your quilt.
Step 1: Constructing the Strip Sets
Take 2 of the Black B strips and sew them between the Background C and * strips. Ensure you trim the end of the strip set to neaten it, then crosscut into 8 units, each 1.5″ wide.
Step 2: Creating Additional Strip Sets
Next, use the Background D strips and sew them between the 2 remaining Black B strips. Again, trim the end of this strip set and crosscut to get 8 units, each 1.5″ wide.
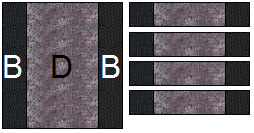 Diagram for steps 1 and 2 of paw print dog quilt block construction
Step 3: Assembling the Paw “Pads”
Position the Background A squares onto the corners of the Black E rectangles, with right sides together. Sew along the diagonal line as indicated in red. Trim the seam allowance to 1/4″ and press the seam open. Then, sew the Background F rectangles onto each side of this unit. Repeat this process to make 8 paw “pad” units.
Step 4: Combining the Paw Elements
Sew together the units you created in the previous steps as illustrated in the diagram. You will need to make 8 of these combined paw print units.
Step 5: Adding Background Rectangles to Paw Units
Take a Background G rectangle and sew one onto opposing sides of each paw unit. Then, sew these units into a column, as shown in the following image. Create 2 of these paw print columns.
Step 6: Attaching Bottom Background Strips
Sew a Background strip measuring 10.5” x 38.5” to the bottom of each Paw Print Border Block column. Make 2 of these completed Paw Print Border Blocks.
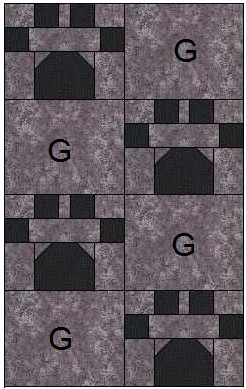 Diagram for step 6 showing addition of background strip to paw print dog border
Step 7: Assembling the Quilt with Paw Print Dog Borders
Finally, sew the Paw Print Borders to the sides of your quilt center. To finish your quilt, sew the Background borders measuring 10.5” x 74.5” onto the top and bottom.
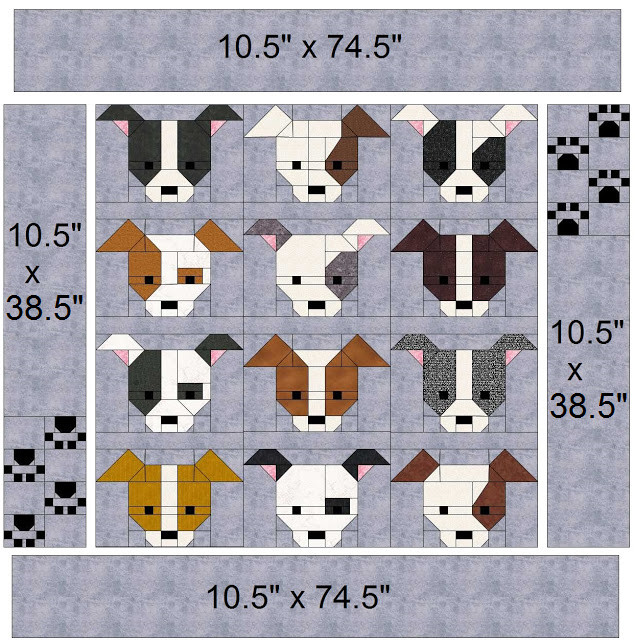 Diagram for step 7 showing final paw print dog quilt border assembly
I trust you’ll find joy in this Paw Print tutorial. If you create your own Dog Gone Cute quilt, please share your creation using the hashtag #DogGoneCuteQAL on social media!
Keep On Quilting On!
Follow Sew Fresh Quilts on Bloglovin
To stay updated with Sew Fresh Quilts via email, subscribe here…