Are you unable to find the Microsoft Print To Pdf Printer option on your Windows 11 system? Many users encounter situations where the Microsoft Print to PDF feature disappears or malfunctions after upgrading to Windows 11 or due to other system glitches. If you’re wondering, “Can I reinstall Microsoft Print to PDF printer?”, this guide from amazingprint.net will provide you with comprehensive solutions to get it back up and running.
Microsoft Print to PDF is a valuable built-in Windows tool that functions as a virtual printer. It allows you to create PDF documents directly from any application that supports printing, such as Microsoft Office suite, web browsers, and more. However, when the Microsoft Print to PDF printer is missing or not working correctly, it can disrupt your workflow. Fortunately, reinstalling or adding it back to your Windows 11 system is usually straightforward.
“Microsoft Print to PDF disappeared as an option when I upgraded to Windows 11. Can I install Microsoft Print to PDF on Windows 11? Please help.” – A user query from answers.microsoft.com
The answer is a resounding yes! You can definitely reinstall the Microsoft Print to PDF printer on Windows 11. Whether it’s missing, not functioning, or seems corrupted, there are several methods to restore this essential feature. Let’s explore five effective ways to add or reinstall Microsoft Print to PDF on your Windows 11 machine.
![]() How to Fix PDF Icons Turned Transparent on Windows 11/10
How to Fix PDF Icons Turned Transparent on Windows 11/10
Methods to Add and Install Microsoft Print to PDF on Windows 11
If you’re looking to add or reinstall the Microsoft Print to PDF printer on Windows 11, here are five proven methods you can follow:
Method 1: Enabling Microsoft Print to PDF in Windows Features
The first step is to ensure that Microsoft Print to PDF is enabled within Windows Features. This built-in setting can sometimes be disabled, causing the printer to disappear. Here’s how to check and enable it:
Step 1: Press the Win + R keys simultaneously to open the Run dialog box. Type optionalfeatures.exe and press Enter. This will open the Windows Features window.
Step 2: In the Windows Features window, scroll down the list and locate the Microsoft Print to PDF option. Make sure the checkbox next to it is selected. If it’s not checked, click the box to select it, and then click OK.
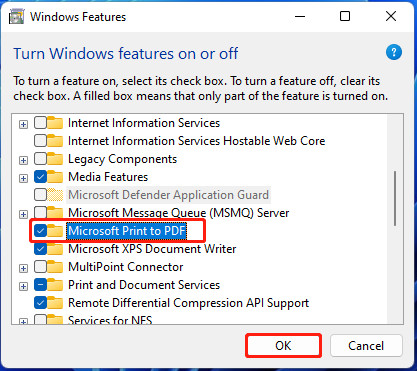 Enable Microsoft Print to PDF in Windows Features
Step 3: Restart your computer. Windows will then automatically install or enable the Microsoft Print to PDF feature during the startup process.
Method 2: Adding Microsoft Print to PDF Printer Through Settings
Another simple approach to add the Microsoft Print to PDF printer is through the Windows 11 Settings app. This method has been reported as effective by many users. Here are the steps:
Step 1: Click on the Windows search bar and type “printer”. Select Printers & scanners from the search results.
Step 2: In the Printers & scanners settings window, click the Add device button. After a short search, if the printer isn’t automatically detected, click the Add manually button next to “The printer that I want isn’t listed”.
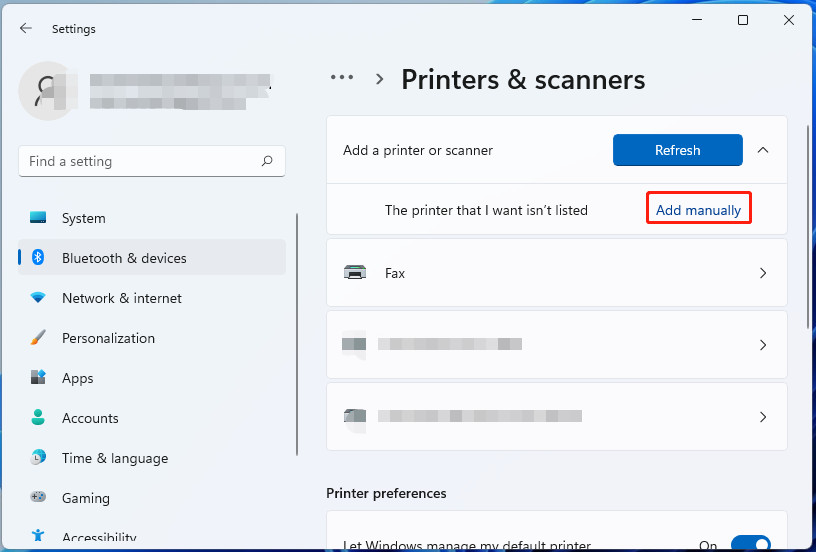 Add printer manually in Windows 11 Settings
Step 3: In the “Add Printer” dialog, choose the option Add a local printer or network printer with manual settings and click Next.
Step 4: On the “Choose a port” screen, select Use an existing port and then choose PORTPROMPT: (Local Port) from the dropdown menu. Click Next. If PORTPROMPT is not available, select PDF (Local Port).
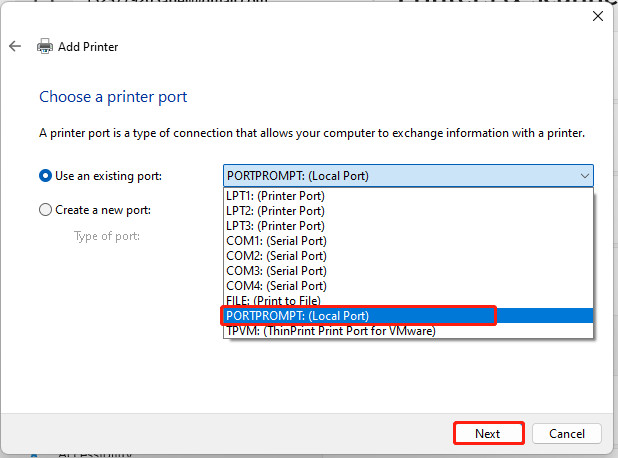 Select PORTPROMPT (Local Port) for Microsoft Print to PDF
Step 5: In the “Install the printer driver” window, select Microsoft in the Manufacturer pane and then choose Microsoft Print to PDF in the Printers pane. Click Next.
Note: If Microsoft Print to PDF is not listed, click Windows Update. Allow Windows to search for and update the driver list. Once updated, you should find the Microsoft Print to PDF option. Select it and click Next.
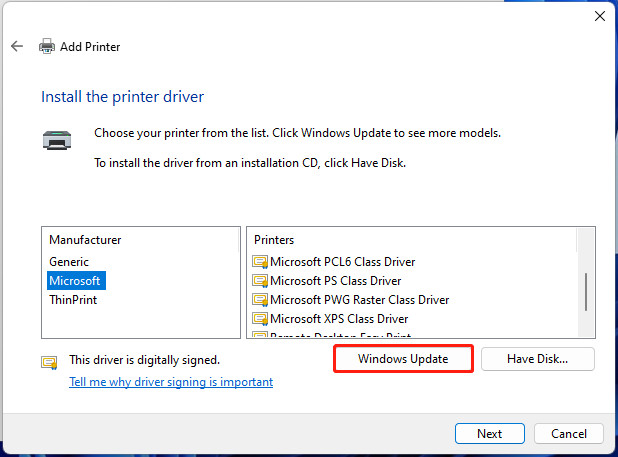 Click Windows Update to find Microsoft Print to PDF driver
Step 6: You can either keep the default printer name or enter a new name for the Microsoft PDF Printer. Click Next, and then click Finish to complete the printer installation.
Method 3: Reinstalling Microsoft PDF Printer Driver via Device Manager
Device Manager provides another way to reinstall the Microsoft PDF printer. This method involves uninstalling the existing driver (if present) and allowing Windows to reinstall it.
Step 1: Right-click on the Windows Start button or press Win + X to open the context menu. Select Device Manager from the list.
Step 2: In Device Manager, expand the Print queues category. Right-click on Microsoft Print to PDF (if it’s listed) and select Uninstall device. Follow any on-screen prompts to uninstall the driver.
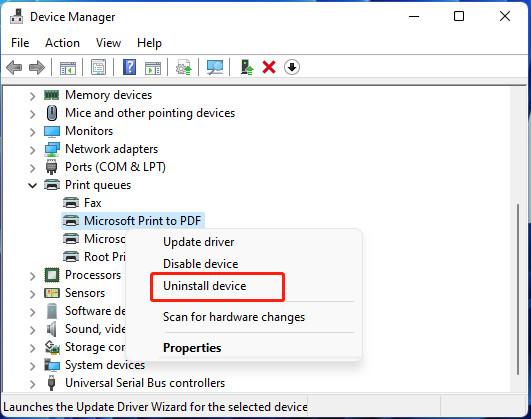 Uninstall Microsoft Print to PDF driver in Device Manager
Step 3: Restart your computer. Upon restarting, Windows should automatically detect and reinstall the default Microsoft Print to PDF printer driver.
Method 4: Using PowerShell to Reinstall Microsoft Print to PDF
PowerShell, a powerful command-line tool in Windows, can also be used to reinstall Microsoft Print to PDF. This method uses a specific command to enable the feature.
Step 1: Type “powershell” in the Windows search bar. Right-click on Windows PowerShell from the results and select Run as administrator. Click Yes if prompted by User Account Control.
Step 2: In the PowerShell window, type or paste the following command and press Enter:
Enable-WindowsOptionalFeature -online -FeatureName Printing-PrintToPDFServices-Features -All
This command instructs Windows to enable the Microsoft Print to PDF feature.
Method 5: Reinstalling Microsoft Print to PDF with Command Prompt (CMD)
Similar to PowerShell, Command Prompt can also be used to reinstall Microsoft Print to PDF using DISM (Deployment Image Servicing and Management) commands.
Step 1: Press Win + R to open the Run dialog box. Type cmd and then press Ctrl + Shift + Enter to open Command Prompt as an administrator. Click Yes if prompted by User Account Control.
Step 2: In the elevated Command Prompt window, type the following command and press Enter:
dism /Online /Enable-Feature /FeatureName:"Printing-PrintToPDFServices-Features"
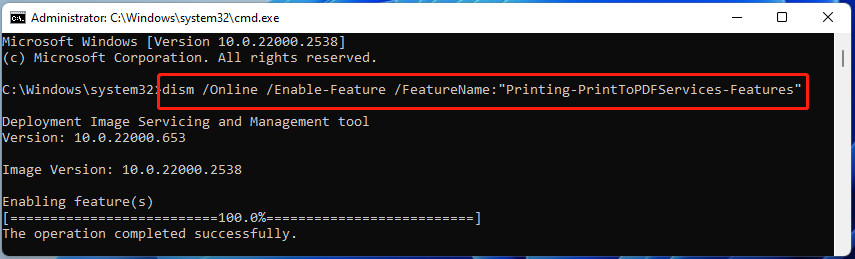 Reinstall Microsoft Print to PDF using CMD
After executing the command, the DISM tool will attempt to enable and install the Microsoft Print to PDF feature.
![Why Is Adobe Acrobat So Slow & How to Fix It? [Answered]](https://amazingprint.net/wp-content/uploads/2025/03/adobe-acrobat-very-slow-fix-thumbnail.jpg) Why Is Adobe Acrobat So Slow & How to Fix It? [Answered]
Why Is Adobe Acrobat So Slow & How to Fix It? [Answered]
Alternative to Microsoft Print to PDF on Windows 11
If, for any reason, you are still unable to get Microsoft Print to PDF working after trying these methods, you might consider using an alternative PDF printer. MiniTool PDF Editor is an excellent option that provides robust PDF printing capabilities and much more.
MiniTool PDF Editor allows you to easily print PDF files, customize page ranges, sizes, and layouts. To print, simply press Ctrl + P to open the Print window, adjust your settings, and click Print.
MiniTool PDF Editor – Download Now
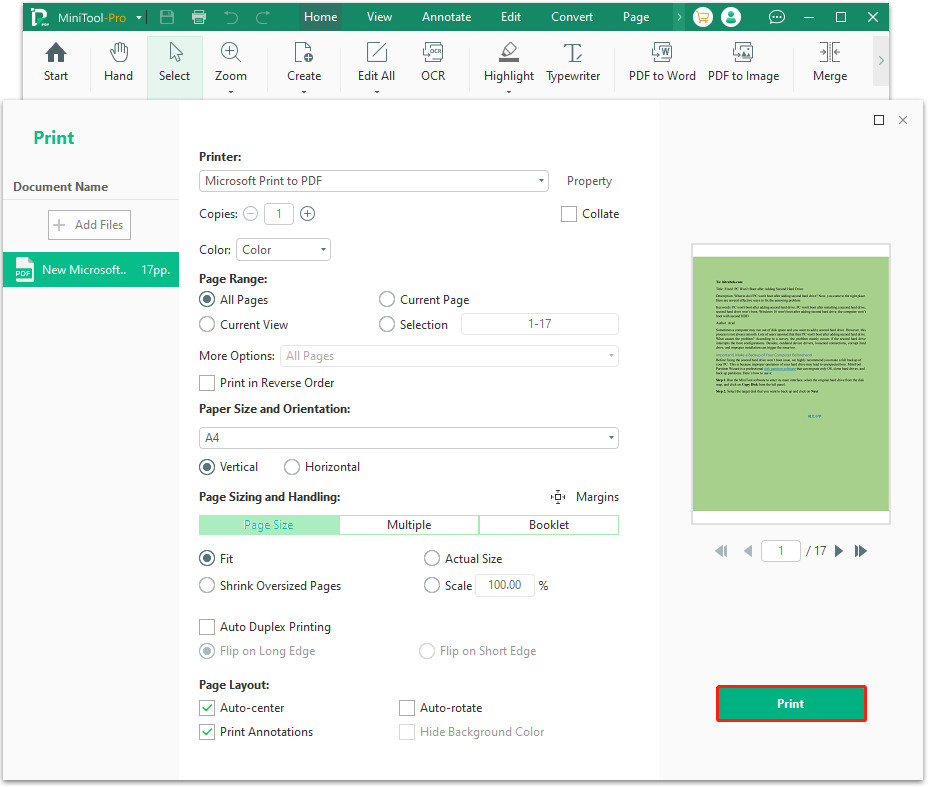 MiniTool PDF Editor as an alternative to Microsoft Print to PDF
Beyond printing, MiniTool PDF Editor is also a comprehensive PDF solution. It can convert PDFs to various formats (including Microsoft Edge PDF), edit secured PDFs, password protect documents, and offers features like PDF merging, splitting, annotation, and OCR. If you need a versatile PDF tool, MiniTool PDF Editor is a strong contender.
Bottom Line
Reinstalling the Microsoft Print to PDF printer on Windows 11 is usually a solvable issue. By following these five methods – using Windows Features, Settings, Device Manager, PowerShell, or CMD – you should be able to restore this functionality. If you encounter persistent issues, exploring alternatives like MiniTool PDF Editor can ensure you have a reliable way to create and manage PDF documents.