
Every creative journey thrives on exploration, and sometimes, venturing into uncharted artistic territories leads to the most rewarding discoveries. As a content creator for amazingprint.net, I’m always eager to delve into innovative techniques that bridge the gap between traditional and modern art forms. Recently, I experimented with Laser Printer Transfer Paper, a method that has truly expanded my creative toolkit.
Like many artists in the digital age, my workflow often begins on a screen. I love the precision and flexibility of digital drawing, but I also crave the tactile experience and unique textures of traditional mediums. The challenge I often faced was seamlessly transferring my digital sketches onto physical surfaces without losing the crispness of the lines or having them disappear under layers of paint. Traditional transfer methods often require the initial drawing to be painted over, sacrificing the delicate linework I aimed to preserve.
This is where the magic of laser printer transfer paper comes into play. In essence, this technique involves using matte medium to transfer a laser-printed image onto a chosen surface. The matte medium acts as a bonding agent, adhering the laser printer ink to the surface as it dries. Once dry, the paper backing is gently removed with water, revealing the transferred image beautifully embedded onto your canvas.
 Close-up shot of laser printer transfer paper application, highlighting the detailed lines being transferred.
Unlike other transfer techniques where the drawing is merely a preliminary step to be covered by paint, laser printer transfer paper allows your initial linework to remain prominent, sitting gracefully atop or beneath layers of color. This opens up exciting possibilities for mixed media art and for artists who value the integrity of their original sketches.
My introduction to laser printer transfers dates back to my early crafting days, but it was only recently that I considered its potential for fine art. While brainstorming ways to transfer a detailed digital sketch for a new piece, the idea resurfaced, and I decided to explore its artistic applications more seriously.
The internet is rich with tutorials and videos demonstrating the process, and resources like Art Star Philly and YouTube videos (like this demonstration) offer excellent visual guides. My aim here isn’t to replicate these tutorials, but rather to share my personal experience and insights as I navigate this technique, highlighting my successes and learning curves as I refine my own process.
To align with my typical digital workflow, I began by creating a finished drawing on my iPad. The beauty of laser printer transfer paper is its ability to preserve this digital detail in a traditional art piece.
Remember, for this technique to work, your image needs to be printed using a laser printer, not an inkjet. Also, because the transfer process involves placing the printed side down, ensure you flip your image horizontally before printing.
I opted to trim the transfer paper edges organically. This is a helpful tip because any white paper areas will be rubbed away during the process, but the paper’s edge can sometimes leave a slight raised line where the matte medium accumulates. An irregular edge helps this blend more seamlessly into your artwork.
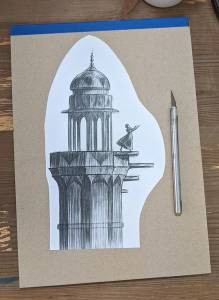 Image showing the digital drawing flipped and printed on laser printer transfer paper with organic edges.
For this particular piece, I used an ultra-deep cradled board. Preparation is key, so I first sealed the board with gloss medium to prevent Support Induced Discoloration, followed by gesso, and finally, a base color layer.
Now, for the transfer itself. I generously applied matte medium to both the printed side of the paper and the prepared board. This ensures good contact and coverage. While some instructions recommend heavy gel medium, I found that regular matte medium works just as effectively, and likely, most acrylic mediums would be suitable.
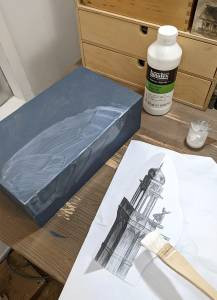 Image showing matte medium being applied to the laser print before transfer.
Carefully placing the image face down onto the board, I used a firm card to smooth out the paper, working from the center outwards to eliminate air bubbles and remove excess medium.
While ideally, you should allow the matte medium to dry overnight for the strongest bond, impatience got the better of me, and I proceeded after just a few hours. Though matte medium dries relatively quickly, a longer drying time significantly improves the adhesion.
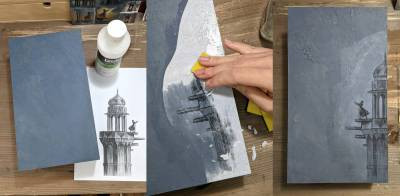
Once the medium is dry to the touch, the paper removal process begins. Using a sponge cloth, I thoroughly dampened the entire paper area with water.
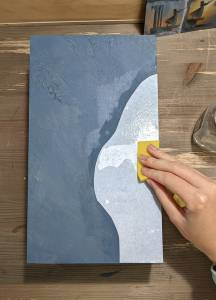 Image showing the artist wetting the paper backing to begin the removal process.
Working patiently in small sections, I gently began to rub away the paper, adding more water as needed to keep it saturated. The paper came off relatively easily once wet, but it did so in layers, requiring several passes to remove completely.
The final paper layer proved to be the trickiest and most delicate. Because I hadn’t waited for optimal drying time, the transferred print was not as firmly bonded and was prone to lifting – a lesson learned! For this last layer, I switched to using my fingertips, working with extra caution to avoid damaging the transferred image.
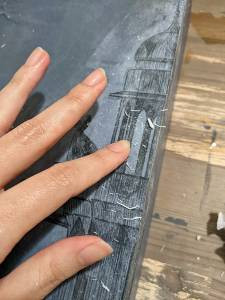 Image showing the delicate removal of the final paper layer, revealing the transferred image.
Despite my carefulness, some areas did lift slightly where I was a bit too vigorous with the sponge. However, for this particular piece, it added a touch of desirable distressed texture. Had I allowed for a longer drying time, this lifting would likely have been minimized, though a slight degree of lifting can be a characteristic of the technique.
With the paper fully removed, the transfer was complete! A faint outline from the paper’s edge, caused by the pooled matte medium, was still slightly visible. I addressed this by lightly sanding the edges with fine-grit sandpaper to achieve a smooth, even surface.
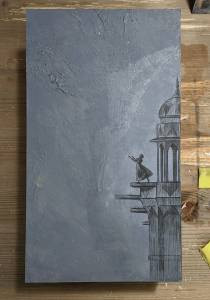 Image showing the completed laser print transfer with crisp lines and subtle texture.
Following sanding, I sealed the entire transfer with another coat of matte medium. This step is crucial to lock in the transferred image and prevent any further lifting or damage during subsequent painting stages.
For this piece, I proceeded to paint over portions of the transfer using translucent glazes. However, the beauty of laser printer transfer paper is that it allowed me to retain a significant amount of the original linework from my initial digital drawing, providing a detailed foundation for my painting. The process shots below illustrate how I built upon the transferred drawing.
The intricate detail provided by the transfer meant that I needed to do relatively minimal additional drawing to unify the piece. Looking at the close-up, you can see how I enhanced highlights on the building and introduced a warm glow around the figure with touches of orange. Because the transfer had already established much of the shading, I could concentrate on adding simple yet expressive marks on top.
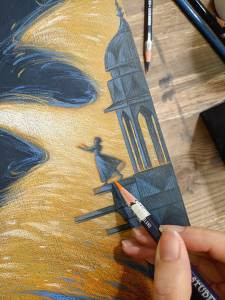 Close-up image showcasing the painted details layered over the laser print transfer lines, highlighting the preserved linework.
I am absolutely thrilled with the outcome of this experiment! Achieving this balance between detailed shading, value, and crisp lines has long been a personal artistic goal, and laser printer transfer paper proved to be the perfect method. Its potential is vast, and I’m just beginning to explore the possibilities this technique offers.
This artwork served as a testing ground for several techniques beyond just the transfer method. There were even moments where I thought I had irrevocably damaged the piece, requiring some creative problem-solving to rescue it – but that’s a story for another time! For now, I’m excited to share the finished piece, “Dawn,” which was featured in Outre Gallery’s Vanguard show.
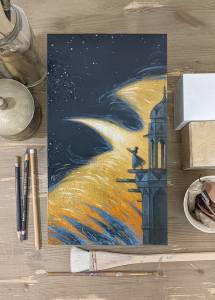 The final artwork "Dawn" showcasing the successful integration of laser print transfer and mixed media techniques.
Dawn (2023) Mixed media on cradled panel 30cm (h) x 17cm (w) x 9cm (d)
