
Taking a screenshot, also known as a screen capture, is a fundamental skill for any Windows 10 user. Whether you need to share an error message with tech support, showcase your gaming achievements, or simply save a visual record of your screen, knowing How To Take A Print Screen On Windows 10 is essential. This guide will walk you through the various methods of capturing your screen in Windows 10 using the Print Screen key, ensuring you can quickly and easily grab exactly what you need.
Understanding the Print Screen Key: Your Screenshotting Tool
The Print Screen key, often labeled as PrtScn, PrntScr, Print Screen, or similar variations, is your primary tool for taking screenshots on Windows computers. This key allows you to capture a snapshot of your display and copy it to your clipboard. From there, you can paste the screenshot into various applications for editing, saving, or sharing.
Locating the Print Screen Key
Where is this magical key located on your keyboard? It depends on whether you are using a desktop or a laptop.
-
Desktop Keyboards: Typically, you’ll find the Print Screen key in the upper right-hand corner of your keyboard, often near the F12 key and the Scroll Lock key.
-
Laptop Keyboards: On laptops, the Print Screen key is commonly found within the Function key row (F1 to F12). You might need to press the Fn (Function) key in combination with the Print Screen key (often F10 or Insert) to activate the screenshot function. Some laptops may label the Print Screen function directly on a Function key, while others might require you to identify it by a small “PrtScn” label, possibly in a secondary color, indicating it’s accessed via the Fn key.
Figure 1: Illustration of the print screen key on a Dell KM5221W wireless keyboard
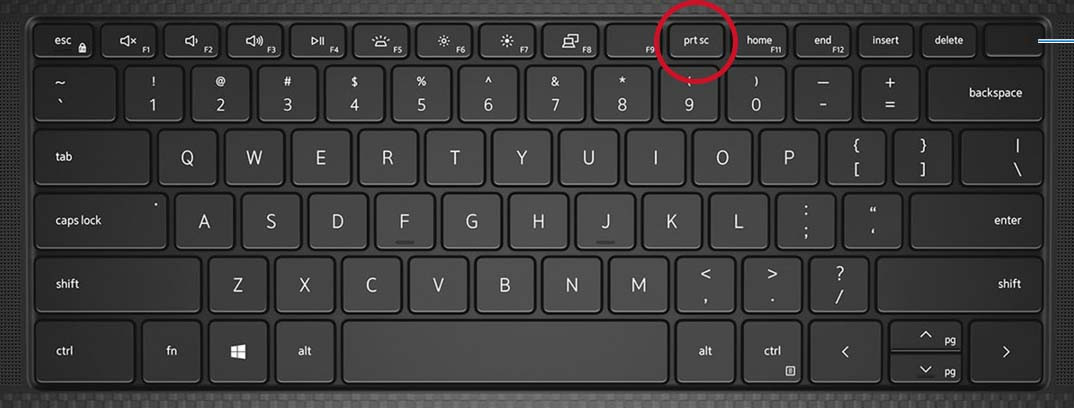 Illustration of the print screen key on Dell Precision 5550 mobile workstation keyboard
Figure 2: Illustration of the print screen key on a Dell Precision 5550 mobile workstation keyboard
Illustration of the print screen key on Dell Precision 5550 mobile workstation keyboard
Figure 3: Illustration of a laptop with a capacitive Function Key row
Alt text: Image of a laptop keyboard with illuminated capacitive function keys, indicating the Print Screen function may be accessed by switching function modes.
Different Ways to Take a Screenshot on Windows 10
Windows 10 offers several ways to use the Print Screen key, allowing you to capture different parts of your screen depending on your needs.
Capturing the Entire Screen
To capture a screenshot of your entire screen, including everything visible on your monitor(s):
- Press the Print Screen (PrtScn) key. This will copy the entire screen to your clipboard.
- For saving directly as a file: Press the Windows logo key + Print Screen (PrtScn) keys simultaneously. This method captures the entire screen and automatically saves it as a PNG file in the “Screenshots” folder within your Pictures library. If you are using a tablet, you can achieve the same result by pressing the Windows logo button + volume down button together.
Capturing All Active Windows
If you have multiple windows open and want to capture all of them in a single screenshot:
- Simply press the Print Screen (PrtScn) key. Windows will capture all currently active windows and copy them to your clipboard. You can then paste this image to see all open applications in your screenshot.
Capturing a Single Active Window
Sometimes, you only need to capture a specific window, such as a browser window or a document. To capture only the currently active window:
- Press the Alt + Print Screen (PrtScn) keys together. First, make sure the window you want to capture is active (selected). Then, press and hold the Alt key while pressing the Print Screen key. This will capture only the active window and place it on your clipboard.
Pasting and Using Your Screenshots
Once you’ve captured your screenshot using any of the methods above, the image is temporarily stored on your clipboard. To use or save it, you need to paste it into an application.
- Open an image editor: Popular choices include Microsoft Paint (pre-installed on Windows), Paint 3D, or more advanced software like Adobe Photoshop or GIMP. You can also paste screenshots directly into applications like Microsoft Word, email clients, or messaging apps.
- Paste the screenshot: In your chosen application, use the keyboard shortcut Ctrl + V (paste). The screenshot will appear in the document or image editor, ready for you to edit, save, or share as needed.
While the Print Screen key provides quick and easy screenshot capabilities, Windows 10 also offers more advanced tools like the Snipping Tool and Snip & Sketch for more complex captures and annotations. However, mastering the Print Screen key is a fundamental step in efficiently capturing and sharing information from your screen.