
When working with extensive spreadsheets in Excel, you often need to print only a specific portion of your data rather than the entire worksheet. This is where the “Print Area” feature becomes incredibly useful. By defining a print area, you ensure that only the selected cells are printed, saving paper and preventing unnecessary information from being included in your hard copies. This guide will walk you through How To Set Print Area In Excel, add to it, and clear it, ensuring you print exactly what you need, every time.
Setting a Print Area in Excel
Defining a print area is straightforward and can significantly streamline your workflow when you frequently print specific sections of your Excel sheets. Here’s how to set it up:
-
Select the Cells: Begin by identifying the exact range of cells you want to include in your printout. Click and drag your cursor to select this range on your worksheet.
Tip: To select multiple, non-adjacent areas for printing, press and hold the Ctrl key while selecting each range. Each selected range will be treated as a separate print area and will print on its own page.
-
Navigate to the Print Area Options: Once your desired cells are selected, go to the Page Layout tab on the Excel ribbon. In the Page Setup group, you will find the Print Area dropdown menu. Click on it.
-
Set the Print Area: From the Print Area dropdown menu, select Set Print Area. Excel will now recognize the selected cells as the designated print area for this worksheet.
 Setting Print Area in Excel: Navigate to the Page Layout tab, then the Page Setup group, and click 'Print Area' followed by 'Set Print Area' to define your print selection.
Important Note: The print area you define is saved with your Excel workbook. This means that every time you open this workbook, the print area will be retained until you change or clear it.
Expanding Your Print Area: How to Add Cells
Sometimes, after setting a print area, you might need to include additional, adjacent cells. Excel allows you to easily expand your existing print area without having to redefine it completely. Here’s how to add cells:
-
Select the Additional Cells: On your worksheet, select the new cells you wish to add to the current print area. It’s crucial to note that you can only add cells that are adjacent to the existing print area. If you select non-adjacent cells, Excel will create a new, separate print area.
-
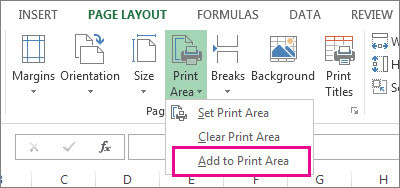
Access the Add to Print Area Option: Go back to the Page Layout tab, Page Setup group, and click on the Print Area dropdown menu again.
-
Add to Print Area: Select Add to Print Area from the dropdown options. The newly selected adjacent cells will now be incorporated into your existing print area.
Setting Print Area in Excel: Navigate to the Page Layout tab, then the Page Setup group, and click 'Print Area' followed by 'Set Print Area' to define your print selection.
Remember that, similar to setting the initial print area, any additions are also saved with your workbook.
Clearing a Print Area in Excel: Resetting Your Print Settings
If you need to print the entire worksheet again or want to remove the defined print areas, you can easily clear them. Clearing the print area resets the print settings to include the entire worksheet. Here’s the process:
-
Select Any Cell on the Worksheet: Ensure that you have selected any cell within the worksheet for which you want to clear the print area.
-
Navigate to Clear Print Area: Go to the Page Layout tab, Page Setup group, and click on the Print Area dropdown menu.
-
Clear Print Area: Select Clear Print Area. This action will remove all defined print areas from the current worksheet, reverting it back to printing the entire sheet.
Important Note: Clearing the print area is a worksheet-specific action. If you have multiple print areas set across different worksheets in your workbook, you will need to clear them individually for each sheet. Furthermore, if you have multiple print areas within a single worksheet, clearing the print area will remove all of them at once.
Previewing Print Areas: Ensure Your Excel Sheet Prints Exactly as Expected
To ensure that your defined print areas are set up correctly and will print as expected, Excel offers a handy preview feature called Page Break Preview. This view visually displays the boundaries of your print areas and how they will be divided into pages.
-
Access Page Break Preview: To access this view, navigate to the View tab on the Excel ribbon. In the Workbook Views group, click on Page Break Preview.
-
Review Print Area Boundaries: In Page Break Preview, you will see blue lines outlining your print areas and page breaks. You can adjust these boundaries directly in this view if needed, ensuring your printouts are perfectly formatted.
By using Page Break Preview, you can avoid printing errors and ensure that your Excel sheets print exactly as you intend, with only the necessary data included.
Conclusion
Mastering how to set print area in excel is a fundamental skill for anyone who regularly works with spreadsheets and needs to print specific data ranges. Whether you are creating reports, presentations, or simply need a hard copy of a portion of your data, the Print Area feature offers a flexible and efficient solution. By following these steps to set, add to, and clear print areas, and utilizing the Page Break Preview, you can take full control over your Excel printouts and enhance your productivity.