Excel is a powerful tool for data management and analysis, but when it comes to printing, you might not always need the entire worksheet. Sometimes, focusing on a specific section of your data is more efficient and professional. That’s where the “Print Area” feature in Excel comes in handy. This guide will show you exactly How To Set A Print Area In Excel, allowing you to print only the essential parts of your spreadsheet.
By defining a print area, you designate specific cells or ranges that Excel will print, ignoring the rest of your worksheet. This is perfect for reports, summaries, or when you want to share only a portion of your data without unnecessary clutter. You can even set multiple print areas on a single sheet, each printing on a separate page. Let’s dive into the steps to master this useful Excel function.
Setting a Print Area in Excel: Step-by-Step
Setting a print area in Excel is a straightforward process. Follow these simple steps to define exactly what you want to print:
-
Select the Cells: Begin by selecting the specific cells on your worksheet that you want to include in your print area. This could be a single range of cells or multiple ranges.
Tip: To select multiple, non-adjacent ranges for your print area, press and hold the Ctrl key while clicking and dragging to select each range. Each selected range will be treated as a separate print area and will print on its own page.
-
Navigate to the Page Layout Tab: In the Excel ribbon at the top, click on the Page Layout tab. This tab contains all the tools you need to control the page setup and printing options for your worksheet.
-
Set the Print Area: Within the Page Setup group on the Page Layout tab, you’ll find the Print Area dropdown menu. Click on Print Area, and then select Set Print Area from the options.
 Add to Print Area
Alt Text: Set Print Area option highlighted in the Print Area dropdown menu under Page Setup group on the Page Layout tab in Excel.
Excel will now save this defined print area with your workbook. Whenever you go to print this worksheet, only the area you’ve set will be printed.
To visually confirm your print area and see page breaks, navigate to View in the ribbon, and in the Workbook Views group, click Page Break Preview. This view clearly outlines your print area(s).
Expanding Your Print Area: Adding More Cells
Need to include more data in your printout? You can easily expand an existing print area by adding adjacent cells. Here’s how:
-
Select Additional Cells: On your worksheet, select the new cells that you want to add to your current print area.
Important Note: You can only add cells that are directly adjacent to an existing print area to expand it. If you select non-adjacent cells, Excel will create a new, separate print area instead.
-
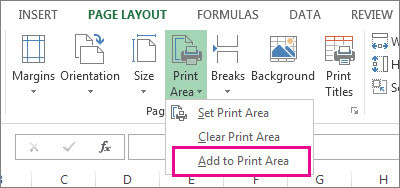
Add to Print Area: Go back to the Page Layout tab, Page Setup group, and click on the Print Area dropdown menu again. This time, choose Add to Print Area.
Excel will extend your existing print area to include the newly selected adjacent cells. Remember to save your workbook to keep the updated print area.
Clearing a Print Area to Print the Entire Sheet
If you no longer need a defined print area and want to print the entire worksheet again, you can easily clear the print area settings.
-
Select Any Cell on the Worksheet: Simply click on any cell within the worksheet where you want to remove the print area.
-
Clear Print Area: Go to the Page Layout tab, Page Setup group, and click on the Print Area dropdown menu. Select Clear Print Area.
Clearing the print area will remove all defined print areas from the current worksheet, reverting it back to printing the entire sheet.
By mastering the “Set Print Area” feature in Excel, you gain greater control over your printed output, ensuring you only print what’s necessary and present your data in the most effective way. This simple yet powerful tool can save you paper, ink, and time, making your Excel experience more efficient.