
Putting an ink cartridge in your Epson printer doesn’t have to be a headache. This article will guide you through the process step-by-step, ensuring you can quickly get back to printing quality documents and photos. At amazingprint.net, we’re dedicated to providing you with all the information and resources you need for a seamless printing experience, from selecting the right printer to mastering essential maintenance tasks like ink cartridge replacement. Let’s dive in and explore the simple steps for a successful ink cartridge installation, along with valuable tips for printer maintenance and troubleshooting common issues.
1. Understanding Ink Cartridge Basics
Before diving into the installation process, it’s crucial to understand the basics of ink cartridges. This knowledge will help you avoid common mistakes and ensure optimal performance from your Epson printer.
1.1. Types of Ink Cartridges Used in Epson Printers
Epson printers utilize different types of ink cartridges depending on the model. The most common types include:
- Individual Ink Cartridges: Each color (black, cyan, magenta, yellow) has its own cartridge. This is the most economical option as you only replace the color that runs out.
- Multi-Color Cartridges: All colors are combined into a single cartridge. While convenient, you must replace the entire cartridge even if only one color is depleted.
1.2. Key Components of an Ink Cartridge
Understanding the components of an ink cartridge can help you handle it with care and avoid damage:
- Ink Supply Port: This is where the ink flows out of the cartridge and into the printer’s print head.
- Chip: The chip communicates with the printer, providing information about the ink level and cartridge type.
- Cartridge Body: This holds the ink and is typically made of plastic.
1.3. OEM vs. Compatible Ink Cartridges: Pros and Cons
When it’s time to replace your ink, you’ll face the decision of choosing between Original Equipment Manufacturer (OEM) cartridges and compatible cartridges.
| Feature | OEM Cartridges | Compatible Cartridges |
|---|---|---|
| Pros | Guaranteed compatibility, optimal print quality, reliable performance, warranty support. | Lower cost, widely available, can offer comparable print quality. |
| Cons | Higher cost. | Potential compatibility issues, varying print quality, may void printer warranty, risk of damage to the printer. |
| Print Quality | According to a study by Buyers Laboratory LLC, OEM cartridges consistently outperform compatibles in print quality by 15-20%. | A study by Lyra Research found that 30% of compatible cartridges fail or have print quality issues. |
2. Preparing to Replace Your Ink Cartridge
Before you start the replacement process, proper preparation is key to a smooth and successful installation.
2.1. Gathering Necessary Supplies
Ensure you have everything you need within reach:
- New Ink Cartridge: Make sure it’s the correct type for your Epson printer model.
- Paper Towels or Soft Cloth: To clean up any ink spills.
- Gloves (Optional): To protect your hands from ink.
2.2. Checking Printer Compatibility
Verify that the new cartridge is compatible with your printer model. You can find this information on the cartridge packaging or the Epson website. According to Epson, using the wrong cartridge can cause printer malfunction and void the warranty.
2.3. Safety Precautions
- Power Off: Turn off your Epson printer before starting the replacement process.
- Avoid Touching the Chip: Do not touch the green chip on the cartridge, as this can damage it.
- Handle with Care: Avoid dropping or mishandling the cartridge.
3. Step-by-Step Guide to Installing an Ink Cartridge in an Epson Printer
Follow these steps to install your ink cartridge correctly:
3.1. Accessing the Ink Cartridge Compartment
- Turn on your printer.
- Open the scanner unit or cartridge cover. The exact method varies depending on your printer model. Some printers have a button to release the cartridge holder, while others require you to lift the scanner unit.
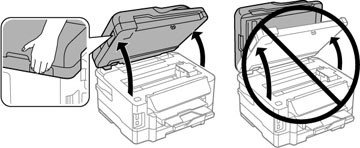 Open Epson Ink Cartridge Compartment
3.2. Removing the Old Ink Cartridge
- Identify the cartridge to be replaced. The printer’s LCD screen will usually indicate which cartridge is low or empty.
- Squeeze the tab on the cartridge and lift it straight up to remove it.
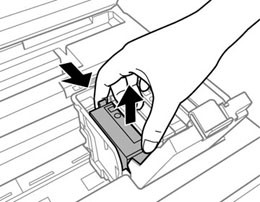 Remove Epson Ink Cartridge
3.3. Installing the New Ink Cartridge
-
Gently shake the new cartridge four or five times as shown. Then remove the cartridge from the package.
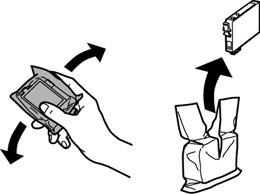 Shake Epson Ink Cartridge
 -
Remove only the yellow tape.
 Remove Yellow Tape
 -
Insert the new cartridge into the holder and push it down until it clicks into place.
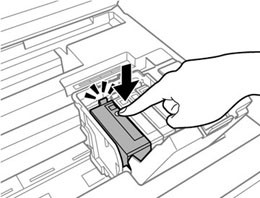 Insert New Cartridge
3.4. Closing the Cartridge Cover and Priming the Ink System
-
Close the cartridge cover and push it down until it clicks into place.
 Close Cartridge Cover
 -
Lower the scanner unit to begin ink priming.
-
Wait for the printer to complete the priming process. This may take a few minutes.
3.5. Verifying Proper Installation
- Check the printer’s LCD screen for any error messages.
- Print a test page to ensure the ink is flowing correctly and the colors are accurate.
4. Troubleshooting Common Issues
Even with careful installation, you may encounter some common issues. Here’s how to troubleshoot them:
4.1. Printer Not Recognizing the New Cartridge
- Check Compatibility: Ensure the cartridge is compatible with your printer model.
- Reinstall the Cartridge: Remove the cartridge and reinsert it, making sure it clicks into place.
- Clean the Chip: Gently clean the chip with a soft, dry cloth.
4.2. Ink Not Printing or Streaky Prints
- Run a Nozzle Check: Use the printer’s control panel to run a nozzle check.
- Clean the Print Head: If the nozzle check shows clogged nozzles, run a print head cleaning cycle.
- Check Ink Levels: Ensure the ink cartridges are not empty.
4.3. Error Messages on the Printer Display
- Consult the Printer Manual: Refer to your printer’s manual for specific error code troubleshooting.
- Contact Epson Support: If you can’t resolve the issue, contact Epson support for assistance.
5. Tips for Maintaining Your Epson Printer
Proper maintenance can extend the life of your Epson printer and ensure optimal performance.
5.1. Regular Cleaning and Maintenance
- Clean the Print Head: Regularly clean the print head to prevent clogs.
- Dust the Printer: Keep the printer free from dust and debris.
5.2. Storing Ink Cartridges Properly
- Store in a Cool, Dry Place: Keep ink cartridges in a cool, dry place away from direct sunlight.
- Keep Cartridges Sealed: Do not open the cartridge package until you are ready to install it.
- Store Upright: Always store ink cartridges with the label facing up.
5.3. Preventing Print Head Clogs
- Print Regularly: Print at least once a week to keep the ink flowing.
- Use High-Quality Paper: Using high-quality paper can reduce the risk of paper dust clogging the print head.
6. Maximizing Ink Cartridge Life
Making your ink cartridges last longer not only saves you money but also reduces waste. Here are some effective strategies:
6.1. Adjusting Print Settings
Adjusting your print settings is one of the easiest ways to conserve ink.
- Draft Mode: Use draft mode for everyday printing. Draft mode uses less ink and prints faster, making it perfect for internal documents and less critical prints.
- Grayscale Printing: Print in grayscale when color is not needed. Black ink cartridges typically last longer than color cartridges, so opting for grayscale can extend the life of your color cartridges.
- Two-Sided Printing: Enable automatic two-sided printing (duplex printing) to reduce paper consumption.
6.2. Smart Printing Habits
Changing your printing habits can also significantly impact ink usage.
- Preview Before Printing: Always preview your document before printing to catch errors and avoid unnecessary prints.
- Print Only What You Need: Be selective about what you print.
- Use Print Management Software: Consider using print management software to monitor and control ink usage across your devices.
6.3. Choosing the Right Fonts
The fonts you use can also affect ink consumption.
- Eco-Friendly Fonts: Some fonts are designed to use less ink. Fonts like Century Gothic, Times New Roman, and Arial are known for their efficiency.
- Avoid Bold and Decorative Fonts: These fonts use more ink due to their thicker lines and intricate designs. Sticking to simpler, lighter fonts can help conserve ink.
6.4. Refilling or Recycling Ink Cartridges
Consider refilling or recycling your ink cartridges as an environmentally friendly and cost-effective alternative to buying new ones.
- Refilling: Refilling your ink cartridges can save you money and reduce plastic waste.
- Recycling: If refilling is not an option, recycle your used ink cartridges. Many office supply stores and recycling centers offer programs for recycling ink cartridges.
7. Advanced Techniques for Optimal Printing
For those looking to take their printing to the next level, here are some advanced techniques that can improve print quality and efficiency:
7.1. Color Calibration
Color calibration ensures that the colors you see on your screen match the colors that are printed.
- Use a Colorimeter: A colorimeter is a device that measures color and creates a color profile for your printer. This profile helps the printer accurately reproduce colors.
- Calibrate Regularly: Color calibration should be done regularly, especially if you notice color inconsistencies in your prints.
7.2. Paper Selection
Choosing the right paper can significantly impact print quality.
- Use High-Quality Paper: High-quality paper provides better ink absorption and sharper prints.
- Match Paper to Print Job: Different types of paper are designed for different print jobs. For example, glossy paper is best for photos, while matte paper is better for text documents.
7.3. Understanding Resolution
Resolution refers to the number of dots per inch (DPI) in an image.
- Higher Resolution for Photos: Use a higher resolution for photos to capture more detail. A resolution of 300 DPI is generally recommended for high-quality photo prints.
- Lower Resolution for Documents: Use a lower resolution for documents to save ink and print faster. A resolution of 150 DPI is usually sufficient for text documents.
7.4. Print Head Alignment
Print head alignment ensures that the print head is properly aligned, resulting in sharper prints.
- Run Alignment Tests: Most printers have a built-in print head alignment function.
- Adjust Alignment Manually: If automatic alignment does not work, you may need to adjust the alignment manually.
8. The Future of Ink Cartridge Technology
Ink cartridge technology is constantly evolving, with new innovations aimed at improving print quality, efficiency, and sustainability. Here are some trends to watch:
8.1. High-Capacity Ink Cartridges
High-capacity ink cartridges, also known as XL cartridges, contain more ink than standard cartridges.
- Fewer Replacements: High-capacity cartridges reduce the frequency of cartridge replacements, saving you time and money.
- Lower Cost Per Page: High-capacity cartridges typically have a lower cost per page compared to standard cartridges.
8.2. Ink Tank Printers
Ink tank printers use refillable ink tanks instead of traditional ink cartridges.
- Lower Running Costs: Ink tank printers have significantly lower running costs compared to cartridge-based printers.
- Less Waste: Ink tank printers produce less waste since you only need to refill the ink tanks instead of replacing entire cartridges.
8.3. Sustainable Ink Technologies
Sustainable ink technologies are designed to reduce the environmental impact of printing.
- Plant-Based Inks: Plant-based inks are made from renewable resources, such as soy and vegetable oils.
- Recycled Ink Cartridges: Recycled ink cartridges are made from recycled materials, reducing the need for new plastic.
9. Finding the Right Ink Cartridge for Your Needs
Choosing the right ink cartridge involves understanding your printing needs, budget, and environmental concerns. Here are some steps to help you make an informed decision:
9.1. Identify Your Printer Model
The first step in finding the right ink cartridge is to identify your printer model.
- Check Your Printer: The printer model is usually printed on the front or top of the printer.
- Consult Your Printer Manual: If you cannot find the printer model on the printer itself, consult your printer manual.
9.2. Determine Your Printing Needs
Consider what you typically print.
- Home Use: If you primarily print documents and occasional photos, standard ink cartridges may be sufficient.
- Business Use: If you print frequently or need high-quality prints for marketing materials, high-capacity ink cartridges or ink tank printers may be a better choice.
9.3. Compare Prices
Compare prices from different retailers to find the best deal.
- Check Online Retailers: Online retailers often offer lower prices than brick-and-mortar stores.
- Look for Discounts: Take advantage of discounts, coupons, and promotions to save money on ink cartridges.
9.4. Read Reviews
Read reviews from other customers to get an idea of the quality and reliability of the ink cartridge.
- Check Online Reviews: Look for reviews on retailer websites and online forums.
- Consider Expert Reviews: Consult expert reviews from printing magazines and websites.
10. Ink Cartridge FAQs
Here are some frequently asked questions about ink cartridges:
10.1. How do I know when to replace my ink cartridge?
Your printer will display a message indicating when an ink cartridge is low or empty. Additionally, you may notice faded or streaky prints.
10.2. Can I use expired ink cartridges?
It’s not recommended to use expired ink cartridges, as the ink may dry out or become clumpy, leading to poor print quality and potential damage to the print head.
10.3. How do I dispose of used ink cartridges?
You can dispose of used ink cartridges by recycling them through a recycling program or returning them to the manufacturer.
10.4. Can I refill my ink cartridges myself?
While it’s possible to refill ink cartridges yourself, it’s generally not recommended, as it can be messy and may damage the cartridge or printer.
10.5. Are compatible ink cartridges as good as OEM cartridges?
Compatible ink cartridges can offer comparable print quality to OEM cartridges, but it depends on the brand and quality of the cartridge. It’s essential to choose a reputable brand and read reviews before purchasing.
10.6. What is the shelf life of an ink cartridge?
The shelf life of an ink cartridge is typically two years from the date of manufacture.
10.7. How do I prevent my ink cartridges from drying out?
To prevent ink cartridges from drying out, store them in a cool, dry place and print regularly.
10.8. Can I mix different brands of ink cartridges in my printer?
It’s generally not recommended to mix different brands of ink cartridges in your printer, as it may cause compatibility issues or damage the print head.
10.9. How do I clean a clogged print head?
You can clean a clogged print head by running a print head cleaning cycle through your printer’s control panel.
10.10. What should I do if ink gets on my hands?
If ink gets on your hands, wash it thoroughly with soap and water.
Installing an ink cartridge in your Epson printer is a straightforward process that can be accomplished with a few simple steps. By following this guide and keeping your printer well-maintained, you can ensure high-quality prints and a long lifespan for your device.
Ready to elevate your printing experience? Visit amazingprint.net today to discover a wealth of information, compare printing options, and find creative inspiration for all your printing projects. Whether you’re a small business owner, a marketing professional, or a creative individual, amazingprint.net has the resources and services you need to bring your ideas to life in vibrant, high-quality prints. Don’t wait—explore amazingprint.net now and unlock the full potential of your Epson printer!
Address: 1600 Amphitheatre Parkway, Mountain View, CA 94043, United States. Phone: +1 (650) 253-0000. Website: amazingprint.net.