
Capturing what’s on your computer screen, also known as taking a screenshot or screen capture, is a fundamental skill for anyone using Windows. Whether you need to share information, create tutorials, or simply save a visual record of your screen, the Print Screen key is your go-to tool. In Windows, using the Print Screen key, often abbreviated as PrtScr, allows you to quickly copy an image of your screen to the clipboard. From there, you can paste it into various applications, save it as a file, or edit it further. This guide will walk you through everything you need to know about How To Print Screen On Windows, ensuring you master this essential function.
Understanding the Print Screen Key on Your Keyboard
Before diving into the different methods of capturing your screen, it’s important to locate and understand the Print Screen key on your keyboard. Its position and label can vary slightly depending on whether you are using a desktop or laptop computer.
Locating the Print Screen Key
On desktop keyboards, the Print Screen key is usually found in the upper right-hand corner, often near the function keys (F12) and the scroll lock and pause/break keys. You’ll typically see it labeled as Print Screen, PrtScn, PrntScr, PrtSc, PrntScrn, or a similar abbreviation. For simplicity, we’ll use PrtScr throughout this guide to refer to all these variations.
Laptop keyboards often integrate the Print Screen function with the Function keys (F1-F12). In most cases, you’ll find the PrtScr function assigned to one of the Function keys, commonly F10. To activate the Print Screen function on laptops, you usually need to press and hold the Fn (Function) key while simultaneously pressing the designated PrtScr key.
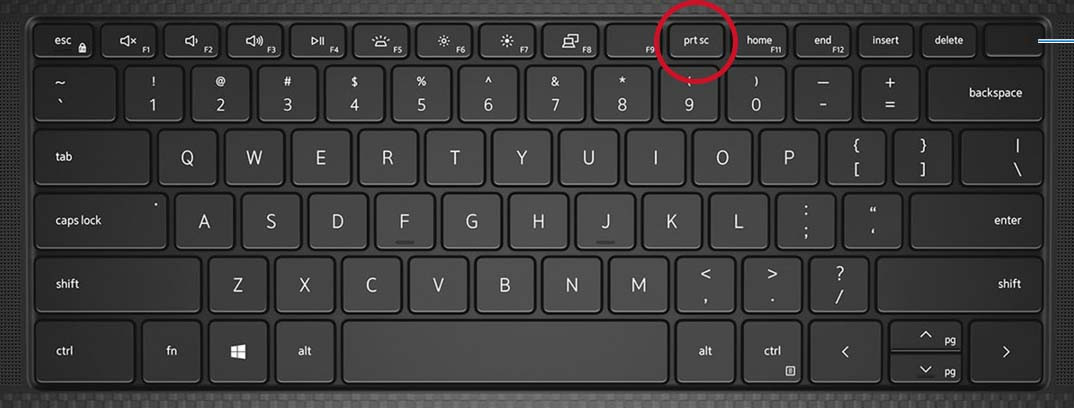 Illustration of the print screen key on Dell Precision 5550 mobile workstation keyboard
Figure 1: Location of the Print Screen key on a Dell Precision laptop keyboard example.
Some compact laptop keyboards might not have a dedicated Print Screen key at all. In such cases, the Print Screen function may be combined with the Insert key. You would then press and hold Fn and press Insert to perform a print screen. Always refer to your laptop’s user manual for the most accurate information if you are unsure.
Variations in Print Screen Key Labels and Functions
While the core function remains the same, the label and method of activation for the Print Screen key can differ:
- Full Label vs. Abbreviations: As mentioned, you might encounter variations like “Print Screen,” “PrtScn,” “PrntScr,” etc. They all serve the same purpose.
- Function Key Integration: Especially on laptops, the Print Screen function is frequently integrated with a Function key, requiring the use of the Fn key.
- Dedicated vs. Shared Key: Some keyboards have a dedicated Print Screen key, while others share it with another function, like Insert.
Understanding these variations will help you quickly identify and use the Print Screen key on your specific Windows device.
Different Ways to Print Screen on Windows
Windows offers several ways to utilize the Print Screen key, allowing you to capture different parts of your screen depending on your needs. Here are the primary methods:
1. Capture the Entire Screen
To capture a screenshot of your entire screen, including all open windows and applications, simply press the PrtScr key.
For some laptops and tablets, you might need to press the Windows logo key + PrtScr keys simultaneously. On tablets specifically, an alternative method is to press the Windows logo button + volume down button together. When using the Windows logo key + PrtScr combination, the screen will often dim briefly, and the screenshot is automatically saved as a file in the Screenshots folder within your Pictures library.
2. Capture All Active Windows
If you want to capture all currently active windows, press the PrtScr key alone. This method captures all windows that are open and visible on your screen as a single image.
3. Capture a Single Active Window
To capture only the window you are currently working in and have selected, press the Alt + PrtScr keys together. This is useful when you only need to capture a specific application window without the rest of your desktop environment.
4. Using the Snipping Tool for More Control
For more advanced screenshot options, Windows includes the Snipping Tool. This built-in utility allows you to capture specific portions of your screen, free-form selections, or window captures with more precision. To access the Snipping Tool, type “Snipping Tool” in the Windows search bar and open the application.
With the Snipping Tool, you can choose from different modes:
- Free-form Snip: Draw a freehand shape around the area you want to capture.
- Rectangular Snip: Drag the cursor to form a rectangle around the desired area.
- Window Snip: Select a specific window to capture.
- Full-screen Snip: Captures the entire screen, similar to the basic PrtScr function.
The Snipping Tool also offers features like delay timers and annotation tools, making it a more versatile option for screenshots.
5. Utilizing the Windows Game Bar for Screenshots and Screen Recording
For users who also game on Windows, the Xbox Game Bar (now simply called Game Bar) provides another way to take screenshots, especially during gameplay. Press Windows key + G to open the Game Bar. From there, you can find the capture controls to take screenshots or even record screen videos. This tool is optimized for capturing game content but can also be used for regular applications.
Working with Your Screenshots: Pasting, Editing, and Saving
Once you’ve captured a screenshot using any of the Print Screen methods, the image is temporarily copied to your clipboard. To use or save the screenshot, you need to paste it into an application.
Pasting Screenshots
To paste your screenshot, open an application that supports image pasting, such as:
- Microsoft Paint: A basic image editor included with Windows.
- Paint 3D: A more advanced version of Paint with 3D capabilities, also pre-installed on Windows.
- Image editing software: Adobe Photoshop, GIMP, etc.
- Document editors: Microsoft Word, Google Docs, etc.
- Email clients: Outlook, Gmail in a browser, etc.
- Messaging apps: Many messaging apps allow pasting images directly into chats.
In your chosen application, use the keyboard shortcut Ctrl + V (or right-click and select “Paste”) to insert the screenshot.
Editing and Saving Screenshots
After pasting the screenshot into an image editor like Paint or Paint 3D, you can:
- Crop: Remove unwanted parts of the screenshot.
- Annotate: Add text, arrows, or drawings to highlight specific areas.
- Resize: Change the dimensions of the image.
- Save: Save the edited screenshot as an image file (e.g., PNG, JPG) to your computer.
Illustration of the print screen key on Dell Precision 5550 mobile workstation keyboard
Figure 2: Example of a laptop keyboard with a capacitive Function Key row, where the Print Screen function may require using the Fn key.
By mastering how to print screen on Windows, you gain a valuable skill for capturing and sharing information effectively. Experiment with the different methods described to find the ones that best suit your needs, from quick full-screen captures to more refined selections using the Snipping Tool.