
Capturing your screen, often referred to as taking a screenshot or screen capture, is a fundamental skill for anyone using a computer. Whether you need to share something visually, create a tutorial, or simply save what you see, knowing how to print screen is essential. On Dell laptops, this process is straightforward, but there are several methods to capture exactly what you need. This guide will walk you through everything you need to know about how to print screen on your Dell laptop, ensuring you can capture your screen effectively and efficiently.
Understanding the Print Screen Key and its Functionality
The Print Screen key on your Dell laptop is the gateway to capturing what’s displayed on your screen. When you press this key, either alone or in combination with other keys, Windows takes a snapshot of your screen and temporarily saves it to your clipboard. Think of the clipboard as a temporary storage space for data you copy or cut. From there, you can paste the screenshot into various applications to save, edit, or share it.
Depending on the keys you press in combination with the Print Screen key, you can capture different parts of your screen:
- Entire Screen: Captures everything visible on your display.
- All Active Windows: Captures all windows that are currently open and running.
- Current Active Window: Captures only the window you are currently working in and have selected.
Once captured, the screenshot is ready to be pasted into an application like Microsoft Paint, image editing software, documents, emails, or any program that supports image pasting. Alternatively, many applications also allow you to directly insert screenshots as image files.
Locating the Print Screen Key on Your Dell Laptop
Finding the Print Screen key is the first step. Its location can vary slightly depending on whether you are using a Dell desktop or laptop keyboard.
Desktop Keyboards:
On most standard desktop keyboards, the Print Screen key is typically situated in the upper right-hand corner, often near the function keys (F1-F12) and the number pad. The key might be labeled in several ways, including:
- Print Screen
- PrtScn
- PrntScrn
- PrntScr
- PrtScn
- PrtScr
- PrtSc
For simplicity, we will use PrtScr throughout this guide to represent any of these variations.
Laptop Keyboards:
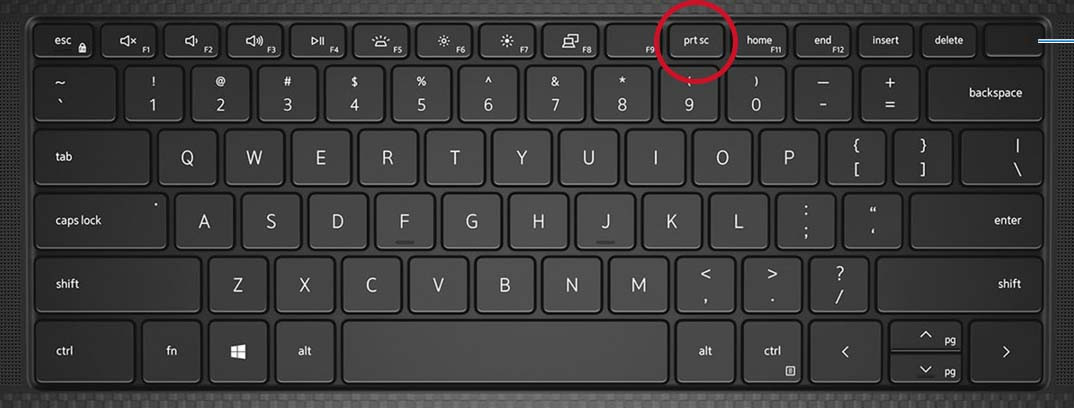
On Dell laptops, the Print Screen key is commonly found on the Function key row (F1, F2, F3, etc.). Often, it shares a key with another function, usually F10. To activate the Print Screen function, you will typically need to press and hold the Fn (Function) key, located near the bottom left of the keyboard, and then press the PrtScr key simultaneously.
Some Dell laptop models, particularly those with capacitive or illuminated function key rows, might require you to press the Fn key once to switch the function keys to their secondary functions (like Print Screen). Look for the illuminated PrtScr label on one of the function keys after pressing the Fn key. Once illuminated, you can press the PrtScr key along with any other required keys to take your screenshot. If you are unsure, consult your Dell laptop’s user manual for specific instructions related to your model.
Special Cases:
It’s worth noting that some compact Dell laptop keyboards might not have a dedicated Print Screen key. In such cases, the Print Screen function is often combined with the Insert key. You would then press and hold the Fn key and press the Insert key to perform a print screen. Also, the Dell Wireless Keyboard and Mouse combo, model KM3322W, is a specific example where you need to use Fn + Insert for print screen functionality.
Figure 1: Location of the Print Screen key on a Dell KM5221W wireless keyboard.
 Print Screen Key Location on Dell KM5221W Wireless Keyboard
Figure 2: Print Screen key on a Dell Precision 5550 mobile workstation keyboard.
Print Screen Key Location on Dell KM5221W Wireless Keyboard
Figure 3: Example of a laptop with a capacitive Function Key row.
[No Image Provided in Original Article – Consider adding a relevant image if available]
The exact method for using the Print Screen key can also vary slightly depending on your Windows operating system. Let’s explore the methods for Windows 10 and Windows 11.
How to Print Screen on Dell Laptop in Windows 10 and Windows 11
Windows 10 and Windows 11 offer similar methods for capturing screenshots using the Print Screen key. Here’s a breakdown of the different ways to capture your screen:
1. Capture the Entire Screen and Save as a File:
For a quick way to capture your entire screen and automatically save it as a file, use the following shortcut:
- Press the Windows logo key + PrtScr keys simultaneously.
- On Dell tablets, you can press the Windows logo button + the volume down button together.
After using this shortcut, your screen will briefly dim, and the screenshot will be automatically saved as a PNG file in the “Screenshots” folder within your “Pictures” library. This is the fastest method to take and save full-screen captures without needing to paste them into another application first.
2. Capture the Entire Screen to Clipboard (for Pasting):
If you need to paste the screenshot into an application for editing or sharing, simply press the PrtScr key by itself (or Fn + PrtScr on some laptops). This action captures the entire screen and copies it to your clipboard. You won’t see any visual confirmation, but the screenshot is now ready to be pasted.
3. Capture All Active Windows to Clipboard:
To capture all currently open windows, press the PrtScr key. This method is similar to capturing the entire screen, but in some cases, it might behave slightly differently depending on your system configuration and how windows are layered. It’s generally safer to use the “Capture the Entire Screen” method if you want to ensure you get everything visible.
4. Capture a Single Active Window to Clipboard:
To capture only the specific window you are currently working in (e.g., a browser window, application window), follow these steps:
- Click on the window you want to capture to make it the active window.
- Press and hold the Alt key and then press the PrtScr key simultaneously (Alt + PrtScr).
This will capture only the content of the active window and copy it to your clipboard, excluding the rest of your screen.
Pasting and Using Your Screenshots
Once you’ve captured your desired screenshot using any of the methods above (except for the Windows Key + PrtScr method which saves directly to a file), the next step is to use it. The screenshot is temporarily stored on your clipboard, so you need to paste it into an application to view, edit, save, or share it.
Here’s how to paste your screenshot:
-
Open an Application: Launch an application where you want to use the screenshot. Common choices include:
- Microsoft Paint: A basic image editing program included with Windows.
- Paint 3D: A more advanced version of Paint, also included with Windows.
- Adobe Photoshop or GIMP: Professional image editing software (if you have them).
- Microsoft Word or other document editors: To insert the screenshot into a document.
- Email clients: To paste the screenshot directly into an email.
- Messaging apps: To share the screenshot in a chat.
-
Paste the Screenshot: In the application, use the keyboard shortcut Ctrl + V (press and hold the Ctrl key and then press the V key). This will paste the screenshot from your clipboard into the application.
-
Edit and Save (Optional): Once pasted, you can use the application’s tools to edit the screenshot (e.g., crop, annotate, add text). If you want to save the screenshot permanently, use the application’s “Save” or “Save As” option and choose a file format (like PNG or JPG) and a location to save the file.
Advanced Screenshot Options: Using the Snipping Tool
For more control and advanced screenshot options, Windows provides a built-in tool called the Snipping Tool (and its more modern replacement, Snip & Sketch in newer Windows 10 versions and Snipping Tool in Windows 11, which combines features of both).
The Snipping Tool allows you to capture screenshots in various modes:
- Free-form Snip: Draw a freehand shape around the area you want to capture.
- Rectangular Snip: Drag a rectangle to select a specific area to capture.
- Window Snip: Capture a single window of your choice.
- Full-screen Snip: Capture the entire screen (similar to the PrtScr key).
The Snipping Tool also offers features like delayed snip (to capture menus or pop-ups) and annotation tools to mark up your screenshots. To access the Snipping Tool, search for “Snipping Tool” in the Windows search bar and open the application.
Link to Snipping Tool Support Page
Conclusion
Knowing how to print screen on your Dell laptop is a valuable skill that enhances your productivity and communication. Whether you need to quickly capture your entire screen, a specific window, or a custom region, Windows and your Dell laptop provide you with multiple methods to achieve this. From the simple Print Screen key shortcuts to the more advanced Snipping Tool, you have the tools at your disposal to capture and share your screen effectively. Master these techniques, and you’ll be able to visually communicate and document information with ease on your Dell laptop.
