In today’s digital age, capturing what’s on your screen is an indispensable skill. Whether you’re preserving important information, sharing a funny online moment, or documenting technical issues, knowing how to print screen on your computer is essential. This guide will walk you through various methods to take screenshots on both Windows and Mac operating systems, ensuring you can capture your screen with ease and efficiency.
Understanding Print Screen: What It Is and Why It Matters
The term “print screen,” often shortened to “screenshot” or “screen capture,” refers to the process of taking a digital image of your computer screen’s display. This image captures everything visible on your screen at that moment, allowing you to save and share it as a picture file.
Why is mastering the print screen function so important? Consider these scenarios:
- Preserving Information: Capture online receipts, important chat conversations, or error messages before they disappear.
- Creating Tutorials and Guides: Visually demonstrate steps in software or online processes for easier understanding.
- Sharing Visual Information: Quickly share what you’re seeing on your screen with colleagues, friends, or tech support.
- Documenting Issues: Capture error messages or glitches to effectively communicate problems to technical support teams.
- Evidence Collection: As highlighted in the original article, screenshots can be crucial for documenting cyberbullying or online harassment.
Knowing how to print screen is a fundamental digital literacy skill that empowers you to navigate and interact with the digital world more effectively. Let’s explore the different methods available on Windows and Mac computers.
Print Screen on Windows: Step-by-Step Methods
Windows offers several built-in tools and keyboard shortcuts to capture your screen. Here are the most common and effective methods:
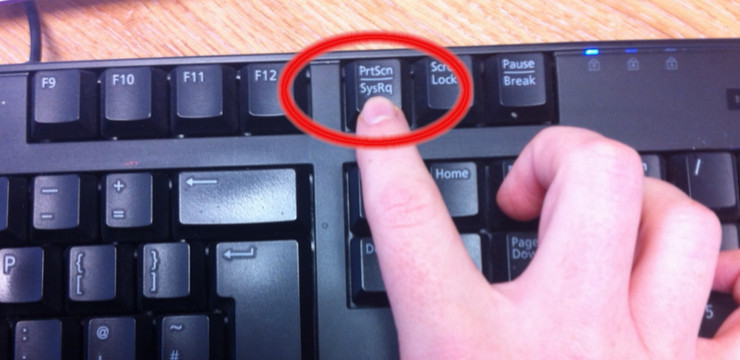
Using the PrtScn Key (Full Screen Capture)
The simplest method for taking a screenshot of your entire screen is using the PrtScn key. This key is usually located in the top right area of your keyboard, often near the F12 key and Scroll Lock. It might be labeled as “PrtScn,” “Print Screen,” “PrntScrn,” or similar variations.
Here’s how to use it:
-
Press the PrtScn key. When you press this key, Windows takes a snapshot of your entire screen and copies it to the clipboard, which is a temporary storage area in your computer’s memory.
-
Open an image editing program. The screenshot is now in your clipboard, but it’s not yet saved as a file. You need to paste it into an application to view, edit, and save it. Popular choices include:
- Paint: A basic image editor included with Windows.
- Paint 3D: A more advanced version of Paint, also pre-installed on many Windows versions.
- Word: Microsoft Word can also be used to paste and save screenshots.
- Any image editing software: Photoshop, GIMP, etc. will also work.
-
Paste the screenshot. In your chosen program, use the paste command. You can do this by:
- Right-clicking in the document or image area and selecting “Paste.”
- Using the keyboard shortcut Ctrl + V.
 Pasting Print Screen in Paint
 -
Edit and Save. Once pasted, you can edit the screenshot (crop, annotate, etc.) within the program and then save it as an image file (JPEG, PNG, GIF, etc.) to your desired location.
Alt + PrtScn (Active Window Capture)
If you only want to capture the currently active window (the window you are currently working in), use the Alt + PrtScn keyboard shortcut.
- Ensure the window you want to capture is active. Click on the window to make sure it’s the one currently in focus.
- Press and hold the Alt key, then press the PrtScn key. This combination captures only the active window and copies it to the clipboard.
- Paste, edit, and save as described in the “PrtScn Key (Full Screen Capture)” section above.
This method is useful when you need to screenshot a specific program window without capturing the entire desktop.
Snipping Tool (Selective Capture & Editing)
For more control over your screenshots and built-in editing features, Windows offers the Snipping Tool. This program allows you to capture specific portions of your screen and provides basic annotation tools.
-
Open Snipping Tool. You can find it by:
- Typing “Snipping Tool” in the Windows search bar (located in the taskbar).
- Finding it in the Windows Accessories folder in the Start Menu.
-
Choose your Snip type. In the Snipping Tool interface, click on “Mode” (in older versions) or “New” (in newer versions) to select the type of screenshot you want to take:
- Free-form Snip: Draw a freehand shape around the area you want to capture.
- Rectangular Snip: Drag a rectangle to select the area. This is the most commonly used mode.
- Window Snip: Capture a specific window by clicking on it.
- Full-screen Snip: Captures the entire screen (similar to the PrtScn key).
-
Select the area to capture. Once you’ve chosen your snip type, your screen will dim slightly, and you can use your mouse to select the area you want to screenshot.
-
Edit your snip (optional). The captured screenshot will open in the Snipping Tool window. Here, you can use the pen and highlighter tools to annotate the image.
-
Save your snip. Click the “Save Snip” button (disk icon) to save the screenshot as an image file.
Windows Key + Shift + S (Snip & Sketch – Modern Tool)
For Windows 10 and later versions, Microsoft introduced Snip & Sketch, a more modern and versatile screenshot tool that is intended to replace the Snipping Tool. It offers similar functionality with some enhanced features.
- Press Windows Key + Shift + S simultaneously. The screen will dim, and your cursor will change to a crosshair.
- Select the area to capture. Use your mouse to drag a rectangle around the portion of the screen you want to capture.
- The screenshot is copied to your clipboard. A notification will also appear in the bottom right corner of your screen. Click on this notification to open the Snip & Sketch tool for editing and saving.
- Edit and Save. In the Snip & Sketch window, you can annotate, crop, and then save the screenshot as an image file.
Snip & Sketch is a quick and efficient way to take selective screenshots and offers a streamlined user experience.
Print Screen on Mac: Simple Techniques
macOS also provides several straightforward methods for capturing screenshots. Here are the primary ways to print screen on a Mac:
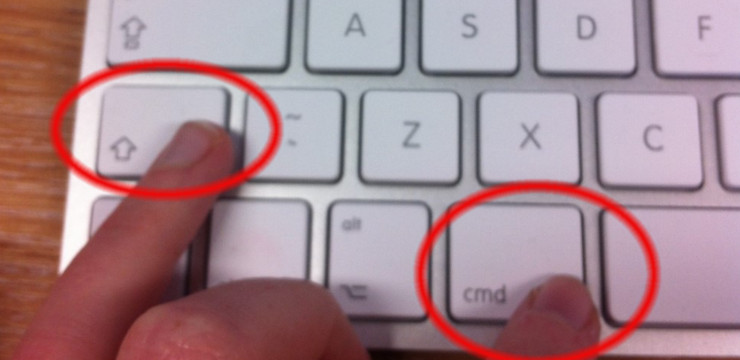
Command + Shift + 3 (Full Screen to File)
The quickest way to capture your entire Mac screen and save it directly as a file is using the Command + Shift + 3 keyboard shortcut.
- Press and hold the Command (⌘) and Shift keys, then press the 3 key.
- Screenshot saved to Desktop. macOS automatically takes a screenshot of your entire screen and saves it as a PNG file on your desktop. The file name will typically start with “Screenshot” followed by the date and time.
 Mac Screenshot Command
Command + Shift + 4 (Selected Area to File)
To capture only a specific portion of your screen and save it as a file, use the Command + Shift + 4 shortcut.
- Press and hold the Command (⌘) and Shift keys, then press the 4 key. Your cursor will change to a crosshair.
- Drag to select the area. Click and drag your mouse cursor to create a rectangular selection box around the area you want to capture.
- Release the mouse button. macOS takes a screenshot of the selected area and saves it as a PNG file on your desktop.
Command + Shift + 5 (Screenshot Toolbar – Versatile Options)
For more advanced screenshot options and screen recording capabilities, macOS offers the Screenshot Toolbar, accessible via the Command + Shift + 5 shortcut.
-
Press Command + Shift + 5. This opens the Screenshot Toolbar at the bottom of your screen.
-
Choose your capture type. The toolbar provides several buttons:
- Capture Entire Screen: Takes a screenshot of the entire screen (similar to Command + Shift + 3).
- Capture Selected Window: Allows you to click on a specific window to capture it.
- Capture Selected Portion: Lets you drag to select a rectangular area (similar to Command + Shift + 4).
- Record Entire Screen: Starts recording a video of your entire screen.
- Record Selected Portion: Starts recording a video of a selected area of your screen.
-
Configure Options. The “Options” menu on the toolbar allows you to:
- Choose where to save the screenshot (Desktop, Documents, Clipboard, etc.).
- Set a timer before taking the screenshot.
- Choose whether to show the mouse pointer in the screenshot.
-
Capture or Record. Click “Capture” or “Record” on the toolbar, depending on your chosen option. Screenshots are saved as files, and screen recordings are saved as MOV video files.
Grab Utility (Alternative Method)
Similar to Windows’ Snipping Tool, macOS has a utility called Grab (in older macOS versions) or Screenshot (in newer versions, essentially the same as the Command+Shift+5 toolbar). While the keyboard shortcuts are generally more convenient, you can use this application for more control.
- Open Grab or Screenshot. Find it in the Utilities folder within your Applications folder, or use Spotlight search (Command + Spacebar) and type “Grab” or “Screenshot”.
- Choose Capture Type. In the menu bar, click “Capture” and select from options like:
- Selection: Drag to select an area (similar to Command + Shift + 4).
- Window: Capture a specific window.
- Screen: Capture the entire screen (similar to Command + Shift + 3).
- Timed Screen: Capture the entire screen after a delay.
- Take the screenshot. Follow the prompts based on your chosen capture type.
- Save. The screenshot will open in a new window. Go to File > Save to save it as a TIFF file (Grab’s default format, but you can choose other formats).
Troubleshooting Print Screen Issues
While print screen functionality is generally reliable, you might occasionally encounter issues. Here are some common troubleshooting steps:
- Check your keyboard: Ensure the PrtScn key (or relevant keys on Mac) is not physically stuck or malfunctioning. Try gently cleaning around the key.
- Restart your computer: A simple restart often resolves temporary software glitches that might be interfering with the print screen function.
- Check for software conflicts: Rarely, certain third-party applications might interfere with system shortcuts. Try closing recently installed or running applications to see if the issue resolves.
- Update keyboard drivers (Windows): Outdated keyboard drivers can sometimes cause issues. In Windows Device Manager, update your keyboard drivers.
- Consult your device manual: For laptops, especially, some manufacturers might have specific key combinations or software for screenshots. Refer to your laptop’s user manual.
Conclusion
Mastering how to print screen on your computer is a fundamental skill that enhances your digital productivity and communication. Whether you’re using Windows or macOS, you have a range of built-in tools and shortcuts at your disposal. From quickly capturing your entire screen to selecting specific areas and adding annotations, these methods empower you to visually capture and share information effortlessly. Practice these techniques to become proficient in taking screenshots and streamline your digital tasks.