
Printing a booklet can feel daunting, but with the right approach, you can achieve professional-looking results right from your home or office, with the help of printing services at amazingprint.net. This guide provides actionable steps and valuable insights to help you master the art of booklet printing, ensuring your brochures, event programs, or marketing materials look polished and professional. Let’s explore some innovative printing solutions and design ideas for all your printing needs, with a focus on quality and visual impact, offering a comprehensive suite of services including graphic design, prepress, and large format printing.
1. What Is Booklet Printing and Why Is It Important?
Booklet printing refers to the process of creating small books or pamphlets, often used for marketing, informational, or promotional purposes. It’s a cost-effective way to present detailed information in a visually appealing and organized format.
Importance of Booklet Printing
- Cost-Effectiveness: Booklet printing offers an economical solution for distributing comprehensive information.
- Professional Appearance: Well-designed booklets enhance your brand’s credibility and professionalism.
- Versatility: Booklets can be used for various purposes, from product catalogs to event programs.
- Portability: Their compact size makes them easy to carry and distribute.
- Engagement: Booklets provide a tactile experience that digital media cannot replicate, increasing engagement and retention.
According to Printing Industries of America
According to research from the Printing Industries of America (PIA), high-quality print materials like booklets can increase brand recall by up to 70% compared to digital ads. Booklet printing is very important.
2. What Are the Key Considerations Before Printing a Booklet?
Before diving into the printing process, it’s essential to consider several key factors to ensure a successful outcome. Planning ahead can save time, reduce costs, and improve the overall quality of your booklet.
Defining Your Objective
What is the purpose of your booklet?
Clearly defining the objective of your booklet is the first step. Understanding the purpose helps in making informed decisions about design, content, and printing options. For example, a marketing booklet will differ significantly from an instructional manual in terms of layout and messaging.
Target Audience
Who is your intended audience?
Identifying your target audience will influence the tone, language, and visual style of your booklet. Consider their preferences, demographics, and level of familiarity with the subject matter. This ensures that your booklet resonates with the audience and effectively communicates your message.
Content Preparation
Have you organized your content logically?
Organizing your content in a logical and coherent manner is crucial for readability and engagement. Create an outline to structure your information, ensuring a smooth flow from one section to the next. Use headings, subheadings, and bullet points to break up text and highlight key points.
Design and Layout
Is your design visually appealing and consistent with your brand?
A well-designed layout enhances the visual appeal of your booklet and reinforces your brand identity. Use a consistent color scheme, typography, and imagery that aligns with your brand guidelines. Ensure that the design is clean, uncluttered, and easy to navigate.
Paper Quality and Size
What type of paper is best for your booklet?
Selecting the right paper quality and size is essential for achieving the desired look and feel. Consider factors such as weight, finish, and opacity. Glossy paper is suitable for vibrant images, while matte paper is better for text-heavy content. The size of the booklet should be practical and appropriate for its intended use.
Printing Method
Which printing method is most suitable for your needs?
Choosing the right printing method depends on factors such as budget, quantity, and quality requirements. Digital printing is ideal for short runs and personalized content, while offset printing is more cost-effective for large quantities. Understanding the pros and cons of each method will help you make an informed decision.
Budget
What is your budget for the printing project?
Establishing a budget early on will help you prioritize your options and avoid overspending. Consider all costs, including design, printing, and binding. Compare quotes from different printers to find the best value for your money.
Timeline
What is your deadline for completing the booklet?
Setting a realistic timeline ensures that you have enough time to complete each stage of the process, from content creation to printing and delivery. Account for potential delays and allow for revisions.
3. What Types of Paper Are Best for Booklet Printing?
Selecting the right paper is crucial for the overall look and feel of your booklet. Different paper types offer varying levels of quality, durability, and aesthetic appeal. Here’s a guide to help you choose the best paper for your project.
Coated Paper
Coated paper has a smooth surface due to a clay coating, which enhances the vibrancy of colors and provides a professional finish. It’s an excellent choice for booklets with high-quality images and graphics.
- Gloss Coated: This paper has a shiny finish that makes colors pop and images appear sharper. It’s ideal for marketing materials and product catalogs.
- Matte Coated: Matte paper has a non-glossy finish that reduces glare and provides a more subdued look. It’s suitable for text-heavy booklets and brochures.
- Satin Coated: Satin paper offers a balance between gloss and matte, providing a smooth finish with moderate sheen. It’s a versatile option for various booklet types.
Uncoated Paper
Uncoated paper has a natural, textured surface that is ideal for text-heavy documents and projects that require a more tactile feel. It’s a great choice for booklets that need to be written on or have a more organic look.
- Text Stock: This high-quality uncoated paper is available in various weights and finishes. It’s often used for premium booklets and stationery.
- Bond Paper: Bond paper is a standard, economical option suitable for everyday printing. It’s commonly used for internal documents and low-cost booklets.
- Recycled Paper: Environmentally friendly, recycled paper offers a sustainable alternative without sacrificing quality. It’s available in both coated and uncoated varieties.
Specialty Paper
Specialty papers can add a unique touch to your booklet, enhancing its visual appeal and creating a memorable impression.
- Linen Paper: Linen paper has a subtle, textured surface that adds a touch of elegance to your booklet. It’s often used for invitations and high-end marketing materials.
- Metallic Paper: Metallic paper has a shimmering finish that catches the light and adds a luxurious look to your booklet. It’s ideal for special events and promotional materials.
- Kraft Paper: Kraft paper is a brown, rustic paper that provides a natural, earthy feel. It’s suitable for eco-friendly and artisanal projects.
Paper Weight
Paper weight is measured in pounds (lbs) or grams per square meter (gsm). The higher the weight, the thicker and more durable the paper.
- 20 lb Bond / 75 gsm: Lightweight paper suitable for everyday printing.
- 28 lb Bond / 105 gsm: A step up in quality, ideal for important documents.
- 80 lb Text / 118 gsm: A popular choice for booklet pages, offering a good balance of quality and cost.
- 100 lb Text / 148 gsm: Premium paper for high-end booklets and brochures.
- 80 lb Cover / 216 gsm: Sturdy paper for booklet covers, providing durability and a professional look.
- 100 lb Cover / 270 gsm: Heavyweight paper for premium covers, offering a luxurious feel.
Paper Selection Tips
- Consider the purpose of your booklet: Marketing materials may benefit from glossy coated paper, while instructional manuals may be better suited to matte uncoated paper.
- Think about your budget: Economical options like bond paper can be suitable for low-cost projects, while specialty papers can elevate high-end booklets.
- Request samples: Before making a final decision, request paper samples from your printer to see and feel the different options.
- Check printer compatibility: Ensure that your chosen paper is compatible with your printer to avoid printing issues.
4. What Are the Different Types of Binding for Booklets?
The type of binding you choose can significantly impact the durability, appearance, and functionality of your booklet. Here are some of the most common binding methods:
Saddle Stitch Binding
Saddle stitch binding is a simple and cost-effective method where folded sheets are stapled through the spine. It’s ideal for booklets with a low page count (typically up to 64 pages).
- Pros:
- Low cost
- Quick turnaround
- Lays relatively flat
- Cons:
- Limited page count
- Not suitable for thick booklets
- Spine cannot be printed on
Perfect Binding
Perfect binding involves gluing the edges of the pages together to create a smooth spine. This method is suitable for booklets with a higher page count (typically over 60 pages).
- Pros:
- Professional appearance
- Printable spine
- Durable
- Cons:
- Higher cost
- Longer production time
- Booklet does not lay completely flat
Wire-O Binding
Wire-O binding, also known as spiral binding, uses metal or plastic loops to hold the pages together. This method allows the booklet to lay flat and turn pages easily.
- Pros:
- Lays flat
- Pages turn easily
- Durable
- Cons:
- Higher cost
- Spine cannot be printed on
- Less professional appearance
Comb Binding
Comb binding uses a plastic comb to hold the pages together. It’s a cost-effective option for reports, manuals, and other documents that need to be easily updated.
- Pros:
- Low cost
- Easy to update pages
- Lays relatively flat
- Cons:
- Less durable
- Spine cannot be printed on
- Less professional appearance
Case Binding
Case binding is the most durable and professional binding method. It involves sewing the pages together and attaching them to a hard cover. This method is ideal for high-end books and documents that need to last for many years.
- Pros:
- Extremely durable
- Professional appearance
- Suitable for long-term use
- Cons:
- High cost
- Longer production time
- Less flexible
Binding Selection Tips
- Consider the page count: Saddle stitch is best for low page counts, while perfect binding is better for higher page counts.
- Think about the budget: Saddle stitch and comb binding are the most economical options, while case binding is the most expensive.
- Evaluate the intended use: Wire-O binding is ideal for documents that need to lay flat, while case binding is best for long-term durability.
- Consult with your printer: Your printer can provide valuable advice on the best binding method for your specific project.
5. How Do I Set Up a Booklet in Microsoft Word?
Microsoft Word offers a convenient feature for creating booklets by automatically arranging pages in the correct order for printing and folding. Here’s how to set up a booklet in Word:
Step 1: Open Microsoft Word
Launch Microsoft Word and open the document you want to format as a booklet.
Step 2: Access Page Setup
Go to the Layout tab and click on the Page Setup dialog launch icon in the bottom-right corner.
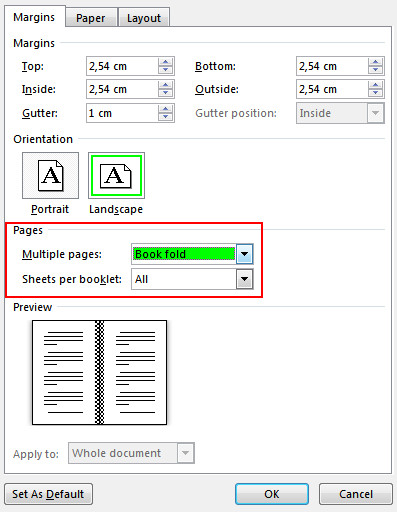 On the Margins tab under Pages, change the setting for Multiple pages: into Book fold. Orientation changes to Landscape.
Step 3: Configure Margins
In the Page Setup dialog box, select the Margins tab. Under Multiple pages, choose Book fold from the dropdown menu. Notice that the orientation automatically changes to Landscape.
Step 4: Adjust Gutter
Increase the value of the Gutter to reserve space on the inside fold for binding. The gutter margin adds extra space between the pages to accommodate the fold.
Step 5: Select Paper Size
Go to the Paper tab and select the desired Paper size. The final size of your booklet will be one-half the width of the paper size. For example, using 8.5 x 11 inch paper will result in a booklet that is 5.5 x 8.5 inches.
Step 6: Add Borders (Optional)
To add borders to each page, go to the Layout tab of the Page Setup window and select Borders. Customize the border style, color, and width as desired.
Step 7: Finalize Setup
Click OK to apply the settings. If your document already has content, Word will automatically format the text. You may need to manually adjust images and tables to fit the new layout.
Tips for Using Book Fold in Word
- Split Long Documents: For lengthy documents, consider splitting them into multiple booklets. Under Sheets per booklet, choose the number of pages to print per booklet.
- Add Page Numbers: Include page numbers in the header or footer for easy navigation. Go to Insert > Page Number to add and format page numbers.
- Review and Adjust: After formatting, carefully review each page to ensure that all elements are correctly aligned and that the text flows smoothly.
6. How Do I Print a Booklet on a Home Printer?
Printing a booklet on a home printer requires careful attention to settings and paper handling. Here’s a step-by-step guide to help you achieve professional-looking results:
Step 1: Prepare Your Document
Ensure that your document is correctly formatted with the appropriate margins and page order. Follow the steps outlined in the previous section to set up your booklet in Microsoft Word or your preferred software.
Step 2: Access Print Settings
Go to File > Print to open the print settings dialog box.
Step 3: Select Printer
Choose your home printer from the list of available printers.
Step 4: Configure Print Settings
Adjust the print settings to ensure proper booklet printing:
- Print on Both Sides: If your printer supports automatic duplex printing (printing on both sides), select this option. Choose Flip pages on short edge to prevent the second side from printing upside down.
- Manual Duplex Printing: If your printer does not support automatic duplex printing, select Manually Print on Both Sides. You will need to feed the pages back into the printer after the first side is printed. Follow your printer’s instructions to avoid printing pages upside down.
- Page Range: If you are printing a long document in sections, specify the page range for each section.
- Collate: Ensure that the collate option is selected to print the pages in the correct order.
Step 5: Print the Booklet
Click Print to start the printing process. If you are using manual duplex printing, follow the prompts to reload the paper and print the second side.
Step 6: Fold and Assemble
Once the printing is complete, carefully fold the pages in half to create the booklet. Use a bone folder or similar tool to create a crisp, even fold.
Step 7: Secure the Binding
Use a long-reach stapler to staple the pages together along the spine. For a more professional look, consider using a binding machine or taking the booklet to a local print shop for binding.
Tips for Printing Booklets at Home
- Test Print: Before printing the entire booklet, print a test page to check the alignment and print quality.
- Use High-Quality Paper: Use high-quality paper to improve the look and feel of your booklet.
- Clean Your Printer: Regularly clean your printer to prevent streaks and smudges.
- Monitor Ink Levels: Ensure that your ink cartridges are full to avoid running out of ink mid-print.
- Consider Professional Printing: For large quantities or high-quality results, consider using a professional printing service.
7. What Are the Common Mistakes to Avoid When Printing Booklets?
Printing booklets can be complex, and avoiding common mistakes is crucial for achieving professional-looking results. Here are some pitfalls to watch out for:
Incorrect Page Order
One of the most common mistakes is printing pages in the wrong order. Double-check your document layout and print settings to ensure that the pages are arranged correctly for folding and binding.
Improper Margins and Gutter
Insufficient margins or an improperly sized gutter can result in text being cut off or difficult to read. Ensure that your margins are large enough to accommodate the binding and that the gutter is wide enough to allow for comfortable reading.
Low-Resolution Images
Using low-resolution images can result in blurry or pixelated prints. Always use high-resolution images (300 DPI or higher) to ensure sharp and clear prints.
Inconsistent Formatting
Inconsistent formatting can make your booklet look unprofessional. Use consistent fonts, font sizes, and spacing throughout the document.
Poor Paper Quality
Using low-quality paper can detract from the overall look and feel of your booklet. Choose a paper type that is appropriate for the content and intended use.
Ignoring Bleed
If your design includes elements that extend to the edge of the page, you need to include bleed. Bleed is the extra space that extends beyond the trim line, ensuring that there are no white edges after cutting.
Incorrect Color Settings
Using the wrong color settings can result in colors that look different from what you see on your screen. Use CMYK color mode for print projects to ensure accurate color reproduction.
Neglecting Proofreading
Failing to proofread your document can result in embarrassing errors. Always proofread your content carefully before printing.
Overlooking Printer Settings
Overlooking important printer settings, such as duplex printing and paper type, can lead to printing errors. Double-check your printer settings before starting the print job.
Insufficient Test Prints
Not doing enough test prints can result in costly mistakes. Always print a few test pages to check the layout, colors, and print quality before printing the entire booklet.
8. What Design Tips Can Enhance My Booklet?
A well-designed booklet can capture attention, communicate effectively, and leave a lasting impression. Here are some design tips to enhance your booklet:
Use a Clear and Concise Layout
A clean and organized layout makes it easy for readers to navigate your booklet. Use headings, subheadings, and bullet points to break up text and highlight key points.
Choose the Right Typography
Select fonts that are easy to read and consistent with your brand. Use a combination of serif and sans-serif fonts for headings and body text to create visual interest.
Incorporate High-Quality Images
Use high-resolution images that are relevant to your content. Images can help to illustrate your message and make your booklet more visually appealing.
Use Color Strategically
Use color to create visual interest and reinforce your brand identity. Use a consistent color scheme throughout the booklet.
Create a Visual Hierarchy
Use different font sizes, weights, and colors to create a visual hierarchy that guides the reader through the content.
Use White Space
White space (also known as negative space) is the empty space around text and images. Use white space to create a clean and uncluttered look.
Include a Call to Action
Tell your readers what you want them to do after reading your booklet. Include a clear and concise call to action, such as “Visit our website” or “Call us today.”
Keep It Consistent
Maintain a consistent look and feel throughout the booklet. Use the same fonts, colors, and layout on every page.
Consider Your Audience
Design your booklet with your target audience in mind. Use language and visuals that resonate with their interests and preferences.
Get Feedback
Before printing your booklet, get feedback from others. Ask them to review the design and content and provide suggestions for improvement.
9. How Can Amazingprint.net Help With My Booklet Printing Needs?
Amazingprint.net is your go-to resource for high-quality and affordable booklet printing solutions. We offer a comprehensive range of services to meet all your printing needs, from design to delivery.
Comprehensive Services
- Custom Design: Our team of experienced designers can help you create a visually stunning and effective booklet design that aligns with your brand.
- High-Quality Printing: We use state-of-the-art printing technology to ensure sharp, vibrant, and professional-looking prints.
- Wide Range of Paper Options: Choose from a variety of paper types, weights, and finishes to achieve the perfect look and feel for your booklet.
- Multiple Binding Options: We offer a range of binding options, including saddle stitch, perfect binding, wire-O binding, and more.
- Fast Turnaround: We understand the importance of deadlines and offer fast turnaround times without compromising on quality.
- Competitive Pricing: We offer competitive pricing to fit your budget, without sacrificing quality or service.
- Online Ordering: Our easy-to-use online ordering system makes it simple to upload your files, select your options, and place your order.
- Customer Support: Our dedicated customer support team is available to answer your questions and assist you with your printing needs.
Benefits of Choosing Amazingprint.net
- Expertise: We have years of experience in the printing industry and can provide valuable advice and guidance to help you achieve the best results.
- Quality: We are committed to providing the highest quality printing services, using the latest technology and premium materials.
- Convenience: Our online ordering system and fast turnaround times make it easy to get your booklets printed quickly and efficiently.
- Affordability: We offer competitive pricing to fit your budget, without sacrificing quality or service.
- Customization: We offer a wide range of customization options to ensure that your booklets meet your specific needs and requirements.
How to Get Started
- Visit our website: Go to amazingprint.net to explore our booklet printing services.
- Upload your files: Upload your design files and specify your printing options.
- Get a quote: Get an instant quote for your project.
- Place your order: Place your order and let us take care of the rest.
- Receive your booklets: Receive your professionally printed booklets quickly and efficiently.
Address: 1600 Amphitheatre Parkway, Mountain View, CA 94043, United States. Phone: +1 (650) 253-0000. Website: amazingprint.net.
10. What Are the Latest Trends in Booklet Printing?
Staying up-to-date with the latest trends in booklet printing can help you create materials that are modern, engaging, and effective. Here are some of the current trends in the industry:
Sustainable Printing
With increasing environmental awareness, sustainable printing practices are becoming more popular. This includes using recycled paper, soy-based inks, and eco-friendly printing processes.
Minimalist Design
Minimalist designs are characterized by clean lines, simple typography, and plenty of white space. This style is effective for conveying a message in a clear and concise manner.
Bold Typography
Bold typography is used to create a strong visual impact and draw attention to key messages. This trend involves using large, eye-catching fonts that stand out on the page.
Custom Die Cutting
Custom die cutting involves cutting paper into unique shapes and designs. This technique can be used to create booklets that are visually interesting and memorable.
Embossing and Debossing
Embossing and debossing are techniques that create raised or recessed images on the paper. These techniques add a tactile element to your booklet and enhance its visual appeal.
Soft Touch Coating
Soft touch coating is a matte finish that feels soft and velvety to the touch. This coating adds a luxurious feel to your booklet and makes it more appealing to handle.
Interactive Elements
Interactive elements, such as QR codes and augmented reality (AR), can be used to engage readers and provide additional information. These elements can link to videos, websites, and other online resources.
Personalization
Personalization involves tailoring the content of your booklet to individual readers. This can be done using variable data printing (VDP), which allows you to customize text and images for each recipient.
Digital Printing
Digital printing is becoming more popular due to its ability to produce high-quality prints in small quantities. This method is ideal for personalized booklets and short-run projects.
Table: Current Trends in Booklet Printing
| Trend | Description | Benefits |
|---|---|---|
| Sustainable Printing | Using recycled paper, soy-based inks, and eco-friendly processes. | Reduces environmental impact, appeals to eco-conscious consumers. |
| Minimalist Design | Clean lines, simple typography, and plenty of white space. | Conveys messages clearly, creates a modern and uncluttered look. |
| Bold Typography | Large, eye-catching fonts that stand out on the page. | Creates a strong visual impact, draws attention to key messages. |
| Custom Die Cutting | Cutting paper into unique shapes and designs. | Creates visually interesting and memorable booklets. |
| Embossing/Debossing | Creating raised or recessed images on the paper. | Adds a tactile element, enhances visual appeal. |
| Soft Touch Coating | Matte finish that feels soft and velvety to the touch. | Adds a luxurious feel, makes booklets more appealing to handle. |
| Interactive Elements | QR codes and augmented reality (AR) linking to online resources. | Engages readers, provides additional information. |
| Personalization | Tailoring content to individual readers using variable data printing (VDP). | Creates a more personal connection, increases engagement. |
| Digital Printing | Producing high-quality prints in small quantities. | Ideal for personalized booklets and short-run projects. |
By incorporating these trends into your booklet printing projects, you can create materials that are visually appealing, engaging, and effective.
5 Intentions for “How to Print Out a Booklet”
- Step-by-step guide: Users want a clear, actionable guide on how to print a booklet using specific software like Microsoft Word.
- Troubleshooting: Users seek solutions to common printing problems, such as incorrect page order or formatting issues.
- Best practices: Users look for design and printing tips to achieve professional-looking booklets.
- Software comparison: Users want to compare different software options for creating and printing booklets.
- Cost-effective solutions: Users are searching for ways to print booklets at home or find affordable printing services.
FAQ
Q1: What is the best paper weight for booklet printing?
The best paper weight for booklet printing depends on the type of booklet and its intended use. For the inside pages, 80 lb Text (118 gsm) to 100 lb Text (148 gsm) is a popular choice as it balances quality and cost. For the cover, 80 lb Cover (216 gsm) to 100 lb Cover (270 gsm) is recommended for durability and a professional look.
Q2: How do I set up a booklet in Microsoft Word?
To set up a booklet in Microsoft Word, go to Layout > Page Setup, select the Margins tab, and change Multiple pages to Book fold. Adjust the Gutter to reserve space for binding and select the Paper size.
Q3: Can I print a booklet on a home printer?
Yes, you can print a booklet on a home printer if it supports duplex printing (printing on both sides). In the print settings, choose Print on Both Sides and Flip pages on short edge. If your printer doesn’t support duplex printing, you’ll need to manually print on both sides by feeding the pages back into the printer.
Q4: What is saddle stitch binding?
Saddle stitch binding is a simple and cost-effective method where folded sheets are stapled through the spine. It’s ideal for booklets with a low page count, typically up to 64 pages.
Q5: What is perfect binding?
Perfect binding involves gluing the edges of the pages together to create a smooth spine. This method is suitable for booklets with a higher page count, typically over 60 pages.
Q6: How do I avoid printing pages upside down when printing a booklet?
To avoid printing pages upside down, choose the correct duplex printing option in your printer settings. Select Flip pages on short edge if your printer supports this option. If printing manually, follow your printer’s instructions for reloading the paper.
Q7: What is bleed in booklet printing?
Bleed is the extra space that extends beyond the trim line. It ensures that there are no white edges after cutting the booklet. If your design includes elements that extend to the edge of the page, you need to include bleed.
Q8: How can I make my booklet look more professional?
To make your booklet look more professional, use high-quality paper, consistent formatting, high-resolution images, and a clean, well-organized layout. Consider using a professional binding method and proofread your content carefully.
Q9: What are some common mistakes to avoid when printing booklets?
Some common mistakes to avoid include incorrect page order, improper margins, low-resolution images, inconsistent formatting, poor paper quality, and neglecting proofreading.
Q10: How can Amazingprint.net help with my booklet printing needs?
Amazingprint.net offers a comprehensive range of booklet printing services, including custom design, high-quality printing, a wide range of paper options, multiple binding options, fast turnaround times, and competitive pricing. We also provide expert advice and dedicated customer support to ensure you achieve the best results.
Ready to create a booklet that stands out? Visit amazingprint.net today to explore our services and discover how we can help you bring your vision to life. From innovative design ideas to high-quality printing solutions, we’re here to make your project a success. Explore printing services, graphic design tips, and the latest trends to elevate your project. Get started now!