Are you looking for an easy way to print multiple pictures on one page using your Mac? You absolutely can, and it’s simpler than you might think. This guide from amazingprint.net will walk you through the process using Preview, your Mac’s built-in image viewer, and explore alternative methods for more advanced layouts. Get ready to maximize your print efficiency and create stunning photo collages right from your Mac!
1. Why Print Multiple Pictures on One Page on a Mac?
Printing multiple images on a single page offers various benefits for both personal and professional use. It’s an excellent way to conserve paper, reduce printing costs, and create visually appealing layouts for photos, documents, and presentations.
1.1. Saving Paper and Reducing Costs
One of the primary reasons to print multiple images on one page is to save paper. By consolidating several images onto a single sheet, you reduce the amount of paper used, leading to lower printing costs and a smaller environmental footprint. This is particularly useful for businesses and individuals who frequently print documents or photos. According to the Environmental Paper Network, reducing paper consumption is a key step in promoting sustainable practices.
1.2. Creating Photo Collages and Compilations
Printing multiple pictures on one page is also perfect for creating photo collages and compilations. Whether you want to create a memory-filled scrapbook page or a professional presentation, this method allows you to arrange and display multiple images in a visually appealing format. Software like Adobe Photoshop and online tools offer templates and customization options to enhance your collages.
1.3. Improving Efficiency for Business and Personal Use
In a business setting, printing multiple images on one page can improve efficiency. For example, real estate agents can print multiple property photos on a single sheet for client handouts. Similarly, designers can create sample sheets with various design options. For personal use, you can easily print contact sheets, photo indexes, or even create custom greeting cards.
1.4. Exploring Layout Options
Printing multiple images on one page allows for greater flexibility in layout and design. You can experiment with different arrangements, sizes, and orientations to create the perfect visual presentation. This is especially useful for creative projects where visual impact is essential. Applications like Pages and Microsoft Word also offer layout tools to help you achieve the desired effect.
1.5. Cost Savings in the Long Run
While the immediate benefit is paper saving, the long-term cost savings can be significant. Fewer printing supplies mean less frequent purchases of paper and ink, contributing to a more sustainable and budget-friendly printing routine. This is particularly important for small businesses looking to minimize operational costs.
2. Printing Multiple Images Using Preview on Mac
The Preview application on macOS offers a straightforward way to print multiple images on a single page without needing additional software. Here’s how you can do it:
2.1. Opening Images in Preview
- Select Images: Locate the images you want to print. You can select multiple images by holding down the Command key and clicking on each image.
- Open with Preview: Right-click on the selected images, choose Open With, and select Preview. This will open all the selected images in a single Preview window.
 Opening multiple images in Preview on Mac, showing the 'Open With' option
2.2. Accessing the Print Menu
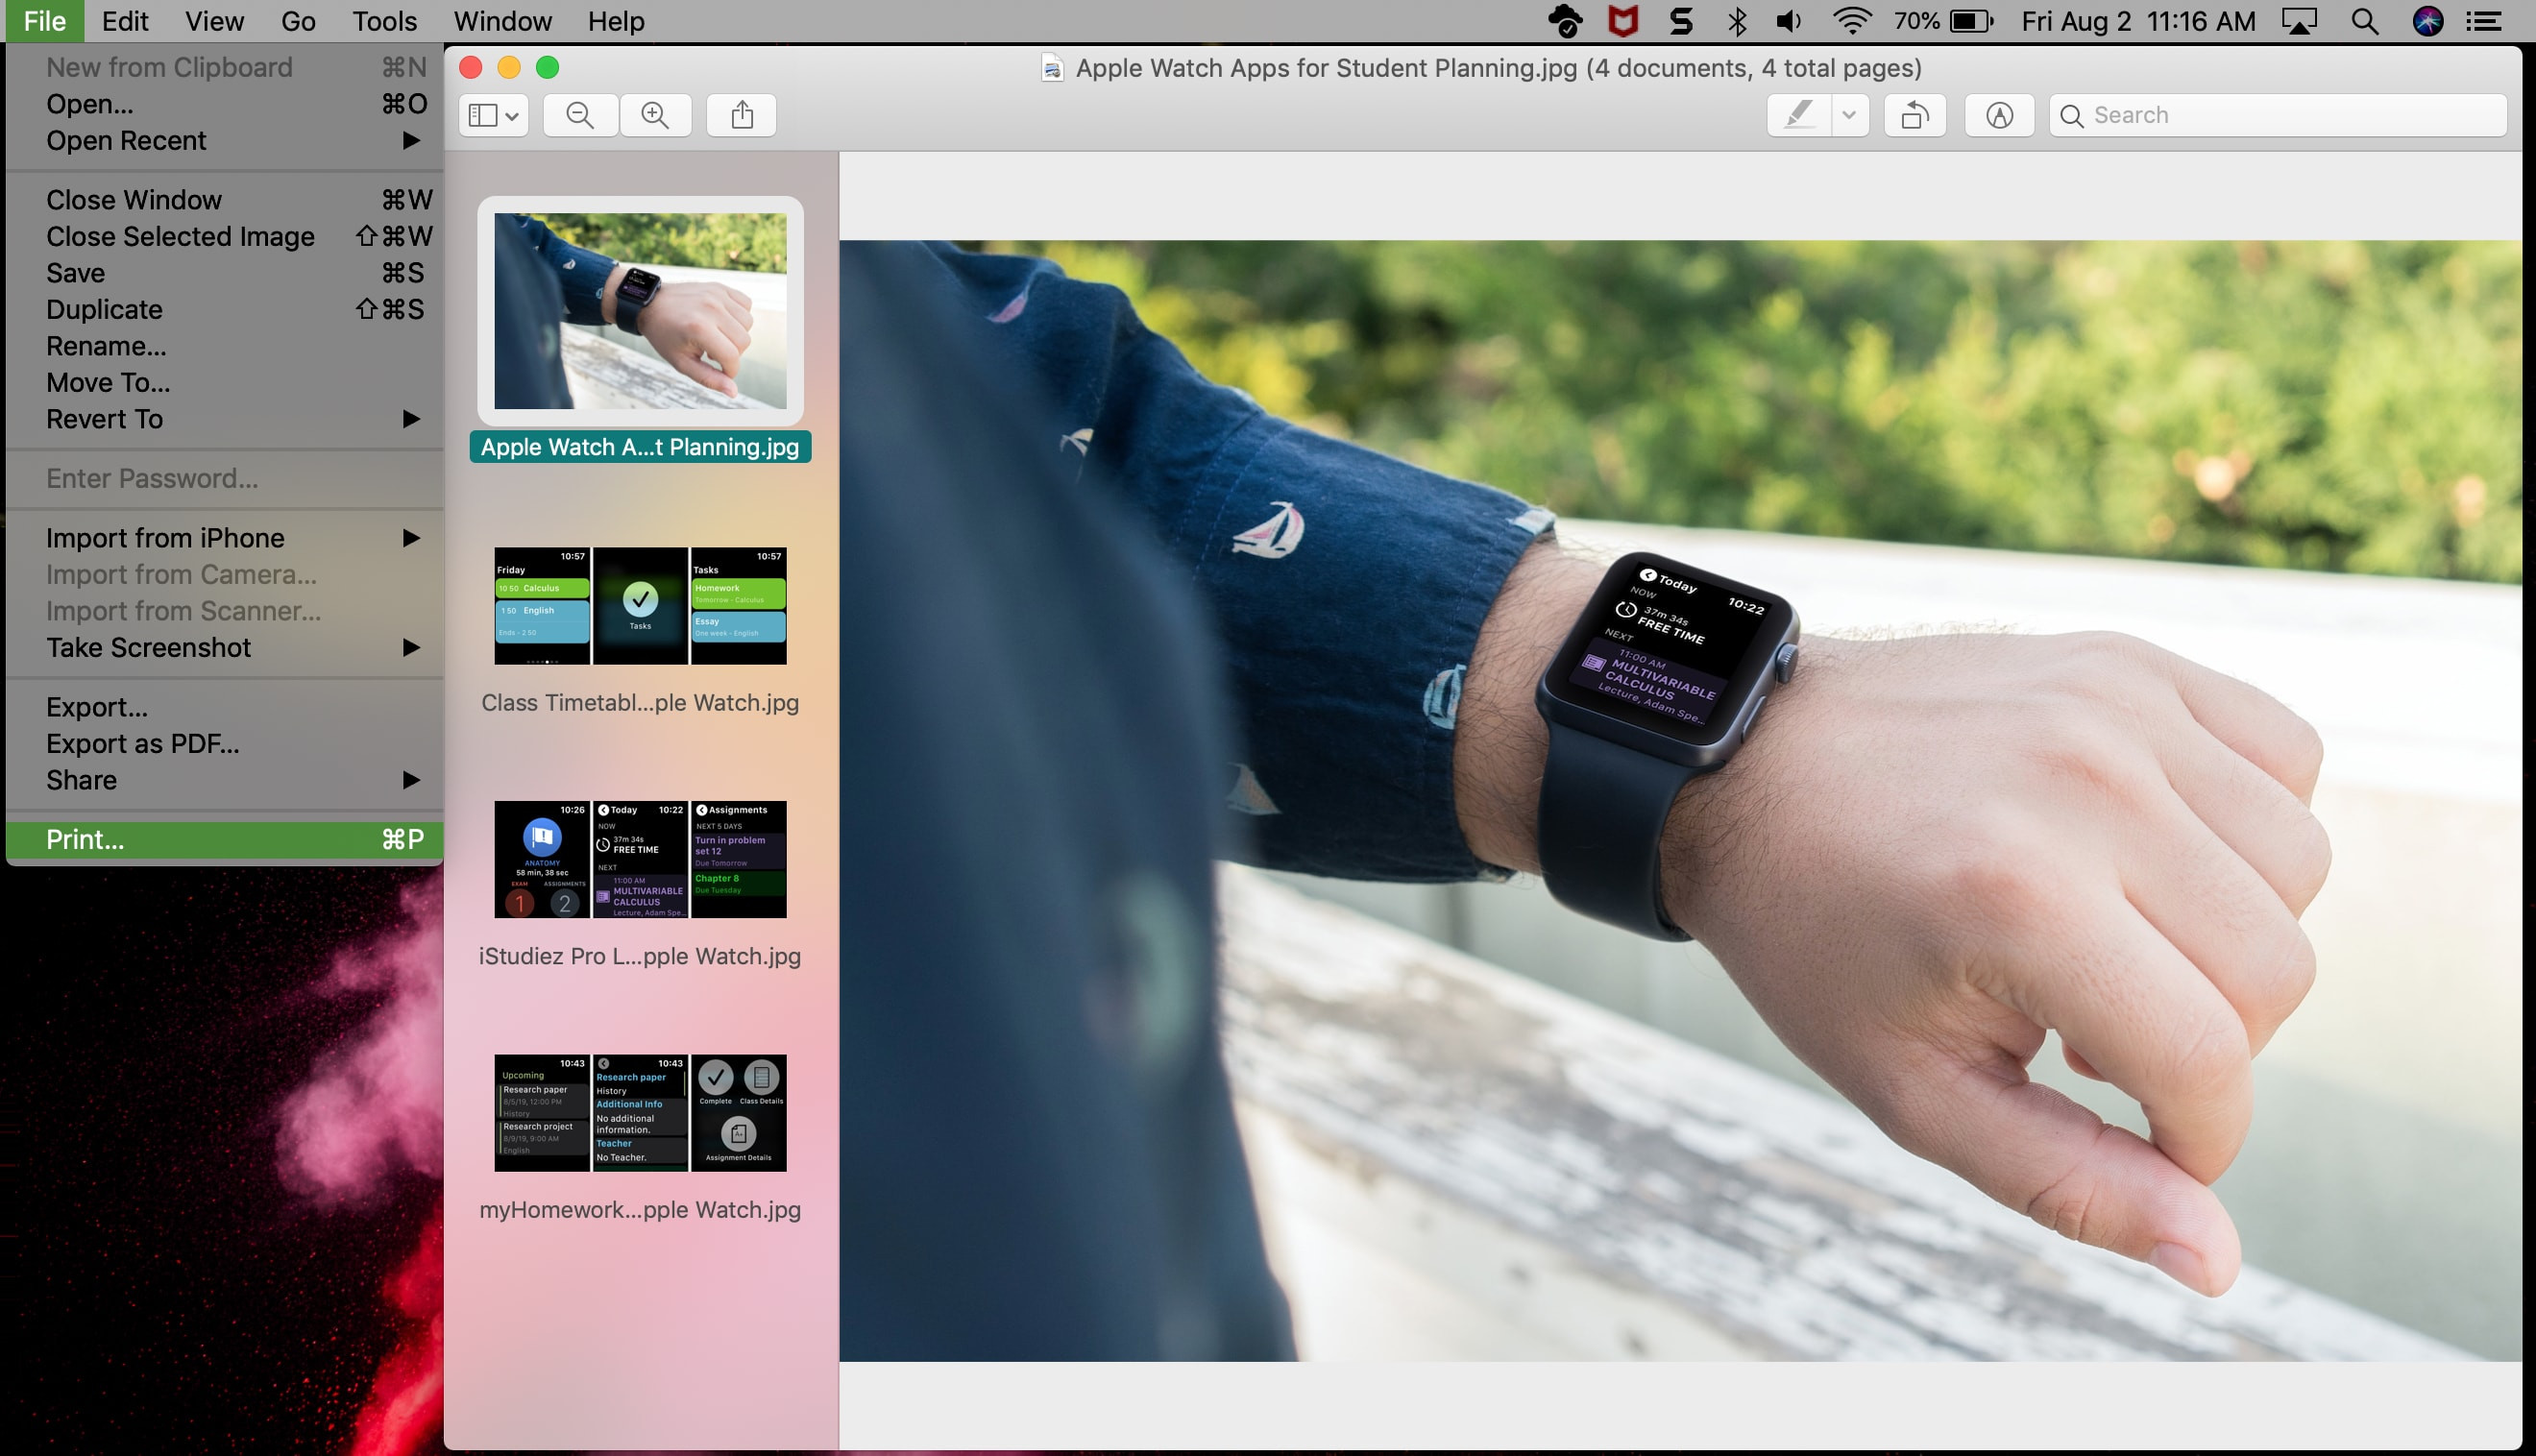
- Go to File: In the Preview application, click on File in the menu bar at the top of the screen.
- Select Print: Choose Print from the dropdown menu. This will open the Print dialog box.
2.3. Configuring the Print Layout
- Show Details: If the Print dialog box is in its simplified form, click the Show Details button at the bottom.
- Select Layout: In the expanded Print dialog box, find the dropdown menu (usually set to Preview) and select Layout.
- Pages per Sheet: Use the Pages per Sheet dropdown menu to choose the number of images you want to print on each page. Options range from 1 to 16, allowing you to customize the layout according to your needs.
2.4. Adjusting Layout Direction
- Layout Direction: Choose the layout direction by clicking one of the four options available. This setting determines the order in which the images are arranged on the page.
2.5. Additional Settings
- Borders: You can add a border around each image by checking the Border option. This can help separate the images visually.
- Reverse Page Orientation: This option reverses the order of the images on the page.
- Flip Horizontally: This option flips the images horizontally.
2.6. Previewing and Printing
- Preview: The preview area at the top left of the Print dialog box shows how the images will be arranged on the page. Adjust the settings until you achieve the desired layout.
- Print: Once you are satisfied with the preview, click the Print button to print the images.
2.7. Real-World Example
For instance, if you have 20 images and want to print them with four images per page, select 4 from the Pages per Sheet dropdown menu. Preview will automatically arrange the images accordingly, creating five pages with four images each.
3. Alternative Methods for Printing Multiple Pictures on One Page Mac
While Preview is convenient for basic layouts, you might need more advanced features for complex arrangements. Here are some alternative methods to consider:
3.1. Using Pages
Pages is a versatile word processing and page layout application included with macOS. It offers greater control over image placement and formatting.
- Open Pages: Launch the Pages application.
- Create a New Document: Choose a blank document or a template that suits your needs.
- Insert Images: Drag and drop the images onto the page or use the Insert > Choose option to add them.
- Arrange Images: Resize and arrange the images as desired. Pages allows you to precisely position images and add text, shapes, and other design elements.
- Print: Once you are satisfied with the layout, go to File > Print and print the document.
3.2. Using Microsoft Word
Microsoft Word is another popular option for creating custom layouts with multiple images.
- Open Word: Launch Microsoft Word.
- Create a New Document: Open a new blank document.
- Insert Images: Go to Insert > Pictures > Picture from File to insert your images.
- Arrange Images: Resize and move the images to create your desired layout. Word offers various alignment and formatting options to help you arrange the images precisely.
- Print: Go to File > Print to print the document.
3.3. Using Adobe Photoshop
Adobe Photoshop provides the most advanced features for creating complex photo layouts and collages.
- Open Photoshop: Launch Adobe Photoshop.
- Create a New Document: Go to File > New to create a new document with the desired dimensions.
- Place Images: Go to File > Place Embedded to place your images into the document.
- Arrange Images: Resize, rotate, and arrange the images as needed. Photoshop offers powerful tools for editing and enhancing your images.
- Print: Go to File > Print to print the document.
3.4. Online Collage Makers
Numerous online collage makers allow you to create custom layouts and print them directly from your web browser. Some popular options include Canva, Fotor, and PicMonkey.
- Visit a Collage Maker Website: Go to Canva, Fotor, or PicMonkey.
- Choose a Template: Select a collage template that fits your needs.
- Upload Images: Upload your images to the website.
- Arrange Images: Drag and drop the images into the template and customize the layout as desired.
- Print: Once you are satisfied with the layout, download the collage and print it from your computer or print directly from the website if the option is available.
3.5. Professional Printing Services
For high-quality prints and custom layouts, consider using a professional printing service like amazingprint.net. Professional services offer a wide range of options, including custom sizes, paper types, and finishes.
- Visit amazingprint.net: Go to the amazingprint.net website.
- Upload Your Images: Upload your images and specify your desired layout and print settings.
- Place Your Order: Place your order and wait for your prints to arrive.
4. Optimizing Your Images for Printing
To ensure your printed images look their best, it’s important to optimize them before printing. Here are some tips:
4.1. Image Resolution
- High Resolution: Use high-resolution images to avoid pixelation and blurry prints. Aim for at least 300 DPI (dots per inch) for the best results. According to printing industry standards, 300 DPI is the optimal resolution for high-quality prints.
4.2. Color Mode
- CMYK: Convert your images to CMYK (cyan, magenta, yellow, and key/black) color mode for accurate color reproduction. Most printers use CMYK, and converting your images beforehand ensures that the colors are printed as intended.
4.3. Image Size
- Appropriate Size: Resize your images to the appropriate dimensions for printing. Avoid stretching or compressing images, as this can reduce their quality.
4.4. File Format
- JPEG or TIFF: Save your images as JPEG or TIFF files. JPEG is suitable for most photos, while TIFF is preferred for high-quality images that require minimal compression.
4.5. Color Calibration
- Calibrate Your Monitor: Calibrate your monitor to ensure accurate color representation. A calibrated monitor displays colors accurately, allowing you to make informed decisions when editing your images.
5. Common Printing Issues and How to Resolve Them
Even with the best preparation, printing issues can sometimes arise. Here are some common problems and how to fix them:
5.1. Blurry Prints
- Resolution: Ensure your images have a high enough resolution (300 DPI).
- Focus: Check that your images are in focus.
- Printer Settings: Verify that your printer settings are set to the highest quality.
5.2. Color Accuracy
- CMYK Conversion: Convert your images to CMYK color mode.
- Monitor Calibration: Calibrate your monitor.
- Printer Settings: Check your printer settings to ensure the correct color profile is selected.
5.3. Paper Jams
- Paper Type: Use the correct type of paper for your printer.
- Paper Condition: Ensure the paper is not damaged or damp.
- Printer Maintenance: Clean your printer regularly to remove dust and debris.
5.4. Ink Issues
- Ink Levels: Check your ink levels and replace cartridges if necessary.
- Ink Compatibility: Use ink cartridges that are compatible with your printer.
- Print Head Cleaning: Clean the print heads to remove any clogs.
5.5. Alignment Problems
- Printer Alignment: Perform a printer alignment to ensure the print heads are properly aligned.
- Paper Alignment: Make sure the paper is loaded correctly in the printer tray.
6. Advanced Tips and Tricks for Printing Multiple Pictures on One Page Mac
For those looking to take their printing skills to the next level, here are some advanced tips and tricks:
6.1. Creating Custom Templates
- Save Time: Create custom templates in Pages, Word, or Photoshop to save time and ensure consistency.
- Personalization: Design templates that reflect your personal or business style.
6.2. Using Grids and Guides
- Precision: Use grids and guides in layout applications to precisely align and position your images.
- Consistency: Ensure consistent spacing and alignment across all your prints.
6.3. Adding Text and Graphics
- Enhancement: Enhance your layouts by adding text, captions, and graphics.
- Branding: Incorporate your brand elements into your prints for a professional look.
6.4. Experimenting with Different Paper Types
- Visual Appeal: Experiment with different paper types, such as glossy, matte, or textured paper, to enhance the visual appeal of your prints.
- Durability: Choose paper types that are suitable for your specific needs, such as archival paper for long-lasting prints.
6.5. Utilizing Print Preview
- Accuracy: Always use the print preview feature to ensure your layout looks exactly as you intend before printing.
- Corrections: Make any necessary adjustments to avoid wasting paper and ink.
7. How to Choose the Right Printing Method for Your Needs
Selecting the appropriate printing method is critical for achieving the desired results. Consider these factors when making your choice:
7.1. Print Quality
- Professional Prints: For professional-quality prints, consider using a high-resolution printer or a professional printing service like amazingprint.net.
- Everyday Prints: For everyday prints, a standard inkjet or laser printer may suffice.
7.2. Cost
- Budget-Friendly: If cost is a concern, printing with Preview or Word can be budget-friendly options.
- Investment: Professional printing services may be more expensive but offer superior quality and customization options.
7.3. Volume
- Small Volumes: For small print volumes, using your home printer is often the most convenient option.
- Large Volumes: For large print volumes, consider using a professional printing service to save time and money.
7.4. Complexity
- Simple Layouts: For simple layouts, Preview is a quick and easy solution.
- Complex Layouts: For complex layouts, use applications like Pages, Word, or Photoshop.
7.5. Turnaround Time
- Immediate Results: If you need immediate results, printing at home is the fastest option.
- Flexible Timing: Professional printing services may require more turnaround time but offer high-quality results.
8. The Future of Printing Technology
The printing industry is continually evolving, with new technologies and innovations emerging regularly. Here are some trends to watch:
8.1. 3D Printing
- Innovation: 3D printing is revolutionizing manufacturing, healthcare, and other industries, allowing for the creation of complex objects from digital designs.
- Customization: Offers unparalleled customization options and the ability to create prototypes and end-use products.
8.2. Sustainable Printing
- Eco-Friendly: Sustainable printing practices are becoming increasingly important, with a focus on reducing waste, using eco-friendly inks, and promoting responsible forestry.
- Environmental Responsibility: Using recycled paper and plant-based inks is gaining popularity.
8.3. Digital Printing
- Efficiency: Digital printing technologies are becoming more advanced, offering faster printing speeds, improved quality, and greater flexibility.
- On-Demand Printing: Enables on-demand printing, reducing the need for large print runs and minimizing waste.
8.4. Smart Printers
- Connectivity: Smart printers are equipped with advanced features such as wireless connectivity, mobile printing, and cloud integration.
- Accessibility: Enhances convenience and accessibility, allowing you to print from anywhere.
8.5. Personalized Printing
- Customization: Personalized printing is gaining traction, allowing for the creation of customized products such as photo books, greeting cards, and marketing materials.
- Engagement: Increases customer engagement and loyalty through tailored experiences.
9. Optimizing Your Workflow with Amazingprint.net
To optimize your printing workflow and achieve the best results, consider using amazingprint.net for your printing needs. Here’s how:
9.1. Comprehensive Information
- Guidance: Access detailed guides and tutorials on various printing techniques and technologies.
- Expertise: Leverage the expertise of printing professionals to make informed decisions.
9.2. Easy Comparison of Printing Options
- Informed Decisions: Compare different printing options, including digital printing, offset printing, and large format printing, to find the best solution for your needs.
- Cost Analysis: Analyze the costs and benefits of each option to maximize your budget.
9.3. Inspiration for Creative Projects
- Innovative Ideas: Discover innovative ideas and inspiration for your creative projects.
- Design Tips: Get tips on designing eye-catching layouts and selecting the right materials.
9.4. Wide Range of Services
- Versatility: Choose from a wide range of printing services, including business cards, brochures, posters, and banners.
- Customization: Customize your prints with various options, such as paper types, finishes, and sizes.
9.5. Expert Support
- Assistance: Receive expert support and guidance from the amazingprint.net team.
- Solutions: Get help with troubleshooting printing issues and optimizing your workflow.
10. FAQs About Printing Multiple Pictures on One Page Mac
Here are some frequently asked questions about printing multiple pictures on one page using a Mac:
10.1. Can I print different sizes of images on the same page?
Yes, you can. Using applications like Pages, Word, or Photoshop, you can resize and arrange images of different sizes on the same page.
10.2. How do I ensure the images are aligned correctly?
Use grids and guides in layout applications to precisely align and position your images. This ensures consistent spacing and alignment across all your prints.
10.3. What is the best resolution for printing multiple images on one page?
Aim for a resolution of at least 300 DPI for the best results. This ensures that your images are sharp and clear when printed.
10.4. Can I add borders to the images when printing multiple pictures on one page?
Yes, you can add borders to the images by using the border option in Preview or by adding borders in layout applications like Pages, Word, or Photoshop.
10.5. How do I save paper when printing multiple pictures on one page?
By printing multiple images on one page, you reduce the amount of paper used. This is an excellent way to conserve paper and reduce printing costs.
10.6. What is CMYK color mode, and why is it important for printing?
CMYK (cyan, magenta, yellow, and key/black) is a color mode used by most printers. Converting your images to CMYK ensures that the colors are printed accurately.
10.7. Can I print multiple pictures on one page using my iPhone or iPad?
Yes, you can. You can use AirPrint to print directly from your iPhone or iPad. Some apps also allow you to create collages and print them on one page.
10.8. What are some alternatives to using Preview for printing multiple pictures on one page?
Alternatives include using Pages, Microsoft Word, Adobe Photoshop, online collage makers, or professional printing services like amazingprint.net.
10.9. How do I calibrate my monitor for accurate color representation?
You can use a monitor calibration tool or software to calibrate your monitor. This ensures that the colors displayed on your monitor are accurate, allowing you to make informed decisions when editing your images.
10.10. How do I clean my printer to prevent printing issues?
Refer to your printer’s manual for instructions on how to clean it. Regular cleaning can help prevent issues such as blurry prints, paper jams, and ink problems.
Printing multiple pictures on one page on a Mac is a simple and efficient way to save paper, create collages, and improve productivity. Whether you use Preview, Pages, Word, Photoshop, or a professional printing service like amazingprint.net, you can achieve high-quality prints that meet your needs. Remember to optimize your images, choose the right printing method, and troubleshoot any common issues to ensure the best results. Explore amazingprint.net today for more information, services, and inspiration for your next printing project! You can visit us at 1600 Amphitheatre Parkway, Mountain View, CA 94043, United States or call us at +1 (650) 253-0000. Visit our website amazingprint.net for more details.