
Printing from your Cricut machine opens up a world of creative possibilities, allowing you to create custom stickers, invitations, and more. At amazingprint.net, we’re here to guide you through every step of the process, ensuring you achieve professional-quality results. Discover the ease and versatility of Cricut’s print then cut feature and elevate your crafting projects today.
1. Which Cricut Machines Support Print Then Cut?
The Print Then Cut feature is compatible with several Cricut machines, making it accessible to a wide range of users. According to Cricut, the following machines support Print Then Cut:
- Cricut Maker 3
- Cricut Explore 3
- Cricut Maker
- Cricut Explore Air 2
- Cricut Explore Air
These machines are equipped with sensors that can accurately read the registration marks printed around your design, ensuring precise cuts every time. Using a compatible machine is the first step in mastering the Print Then Cut technique.
2. What Exactly Is Cricut Print Then Cut?
Print Then Cut is a unique operation type within Cricut’s Design Space software that bridges the gap between your home printer and your Cricut cutting machine. Cricut defines it as a process where you first print your designs using your inkjet printer and then use your Cricut machine to precisely cut around those printed images.
The benefits of using Print Then Cut include:
- Accurate Sizing: Ensures your printed items are cut to the exact dimensions you need.
- Extensive Design Library: Access to a vast library of images and fonts within Design Space to create unique designs.
- Material Thickness: Ability to cut through specific material thicknesses, providing versatility in your projects.
When you print your design, you’ll notice black scanner bars at the corners or around your images. These markings are essential for the Cricut machine’s scanner, which uses them to determine the precise placement of your images on the cutting mat.
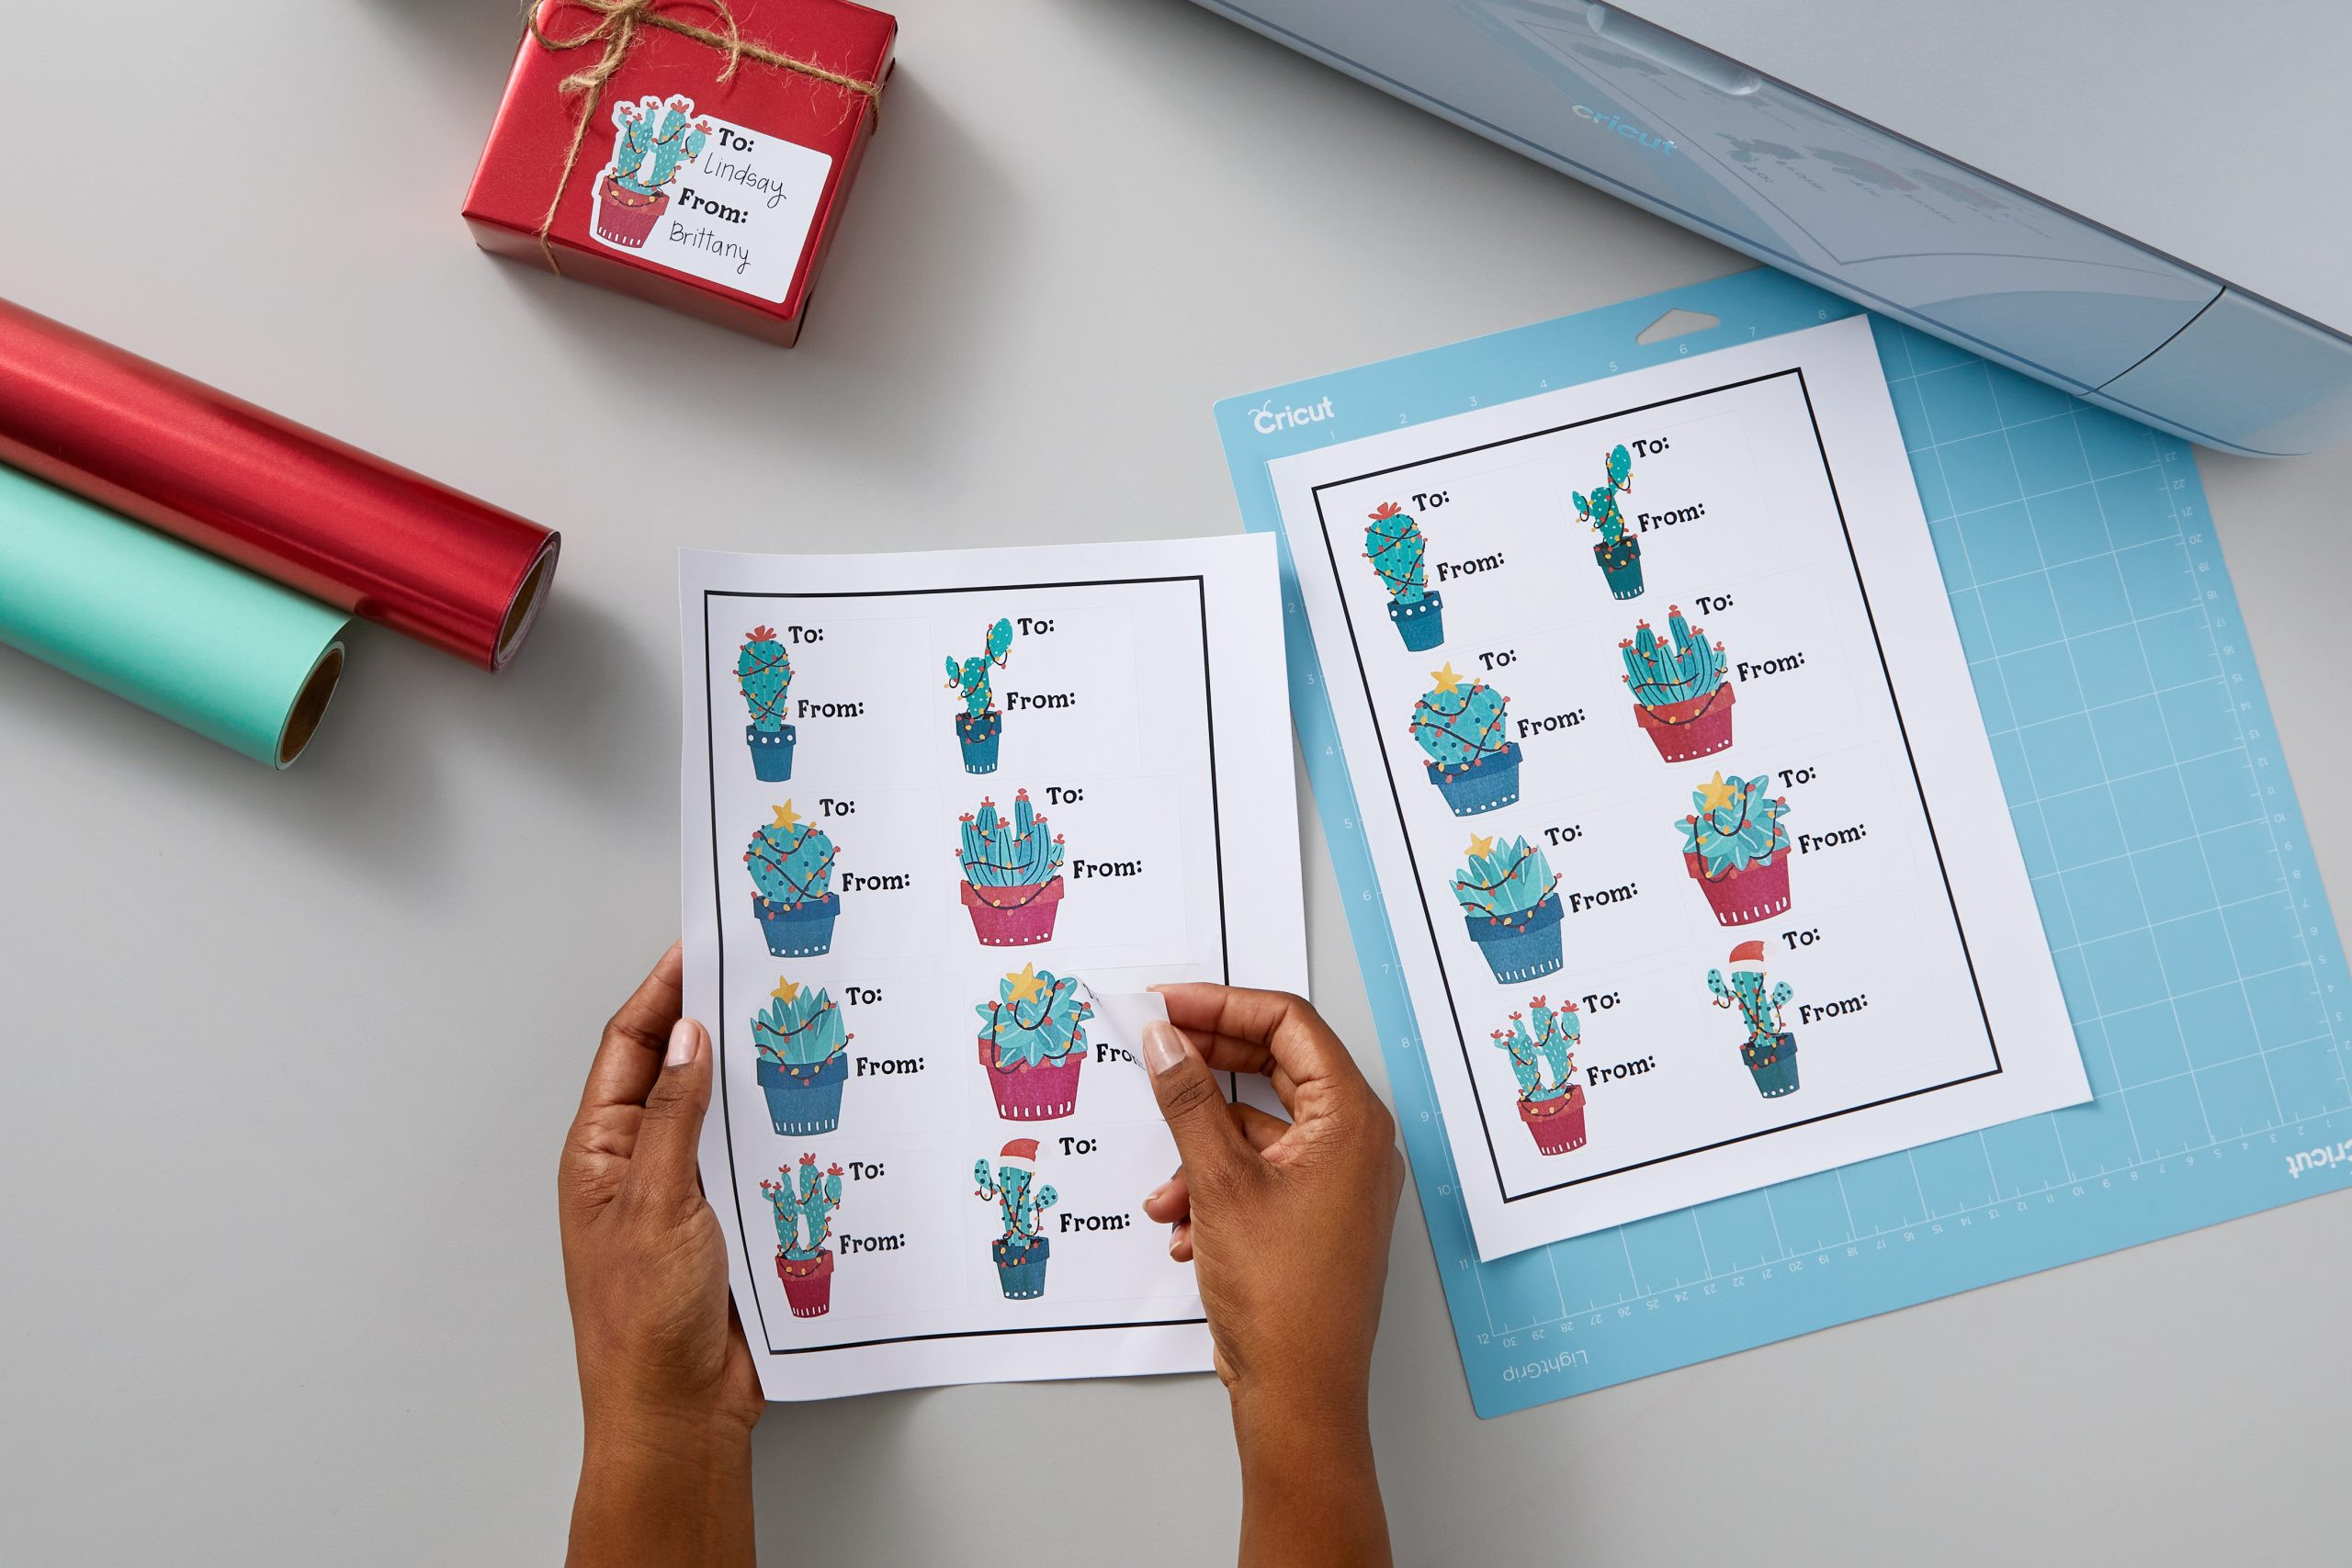 Print then cut Cricut how to do
3. What Essential Tools Do I Need To Start Printing With My Cricut?
To get started with Print Then Cut, you’ll need a few essential tools and materials. Here’s a comprehensive list to ensure you’re fully prepared:
- Compatible Cricut Machine: Ensure your machine is on the list of compatible models mentioned above.
- Inkjet Printer: Cricut recommends using an inkjet printer rather than a laser printer for best results.
- Printable Materials: Choose from a variety of materials such as white cardstock, printable sticker paper, printable vinyl, and printable clear sticker paper.
- Design Space Software: Access Design Space on a compatible device to create and format your designs.
- LightGrip Cutting Mat: Use the blue LightGrip cutting mat to hold your material securely in place during cutting.
Having these tools on hand will set you up for a successful Print Then Cut experience, allowing you to explore a wide range of creative projects.
4. Which Devices Can I Use With Cricut Print Then Cut?
Currently, the Print Then Cut feature has some limitations regarding device compatibility. While you can design and save Print Then Cut projects using the Android app, you’ll need to use Design Space on a Windows/Mac computer or an iOS device to actually print and cut these projects.
This ensures that you have access to the full functionality and features necessary for accurate printing and cutting. Keep this in mind when planning your projects to avoid any last-minute device compatibility issues.
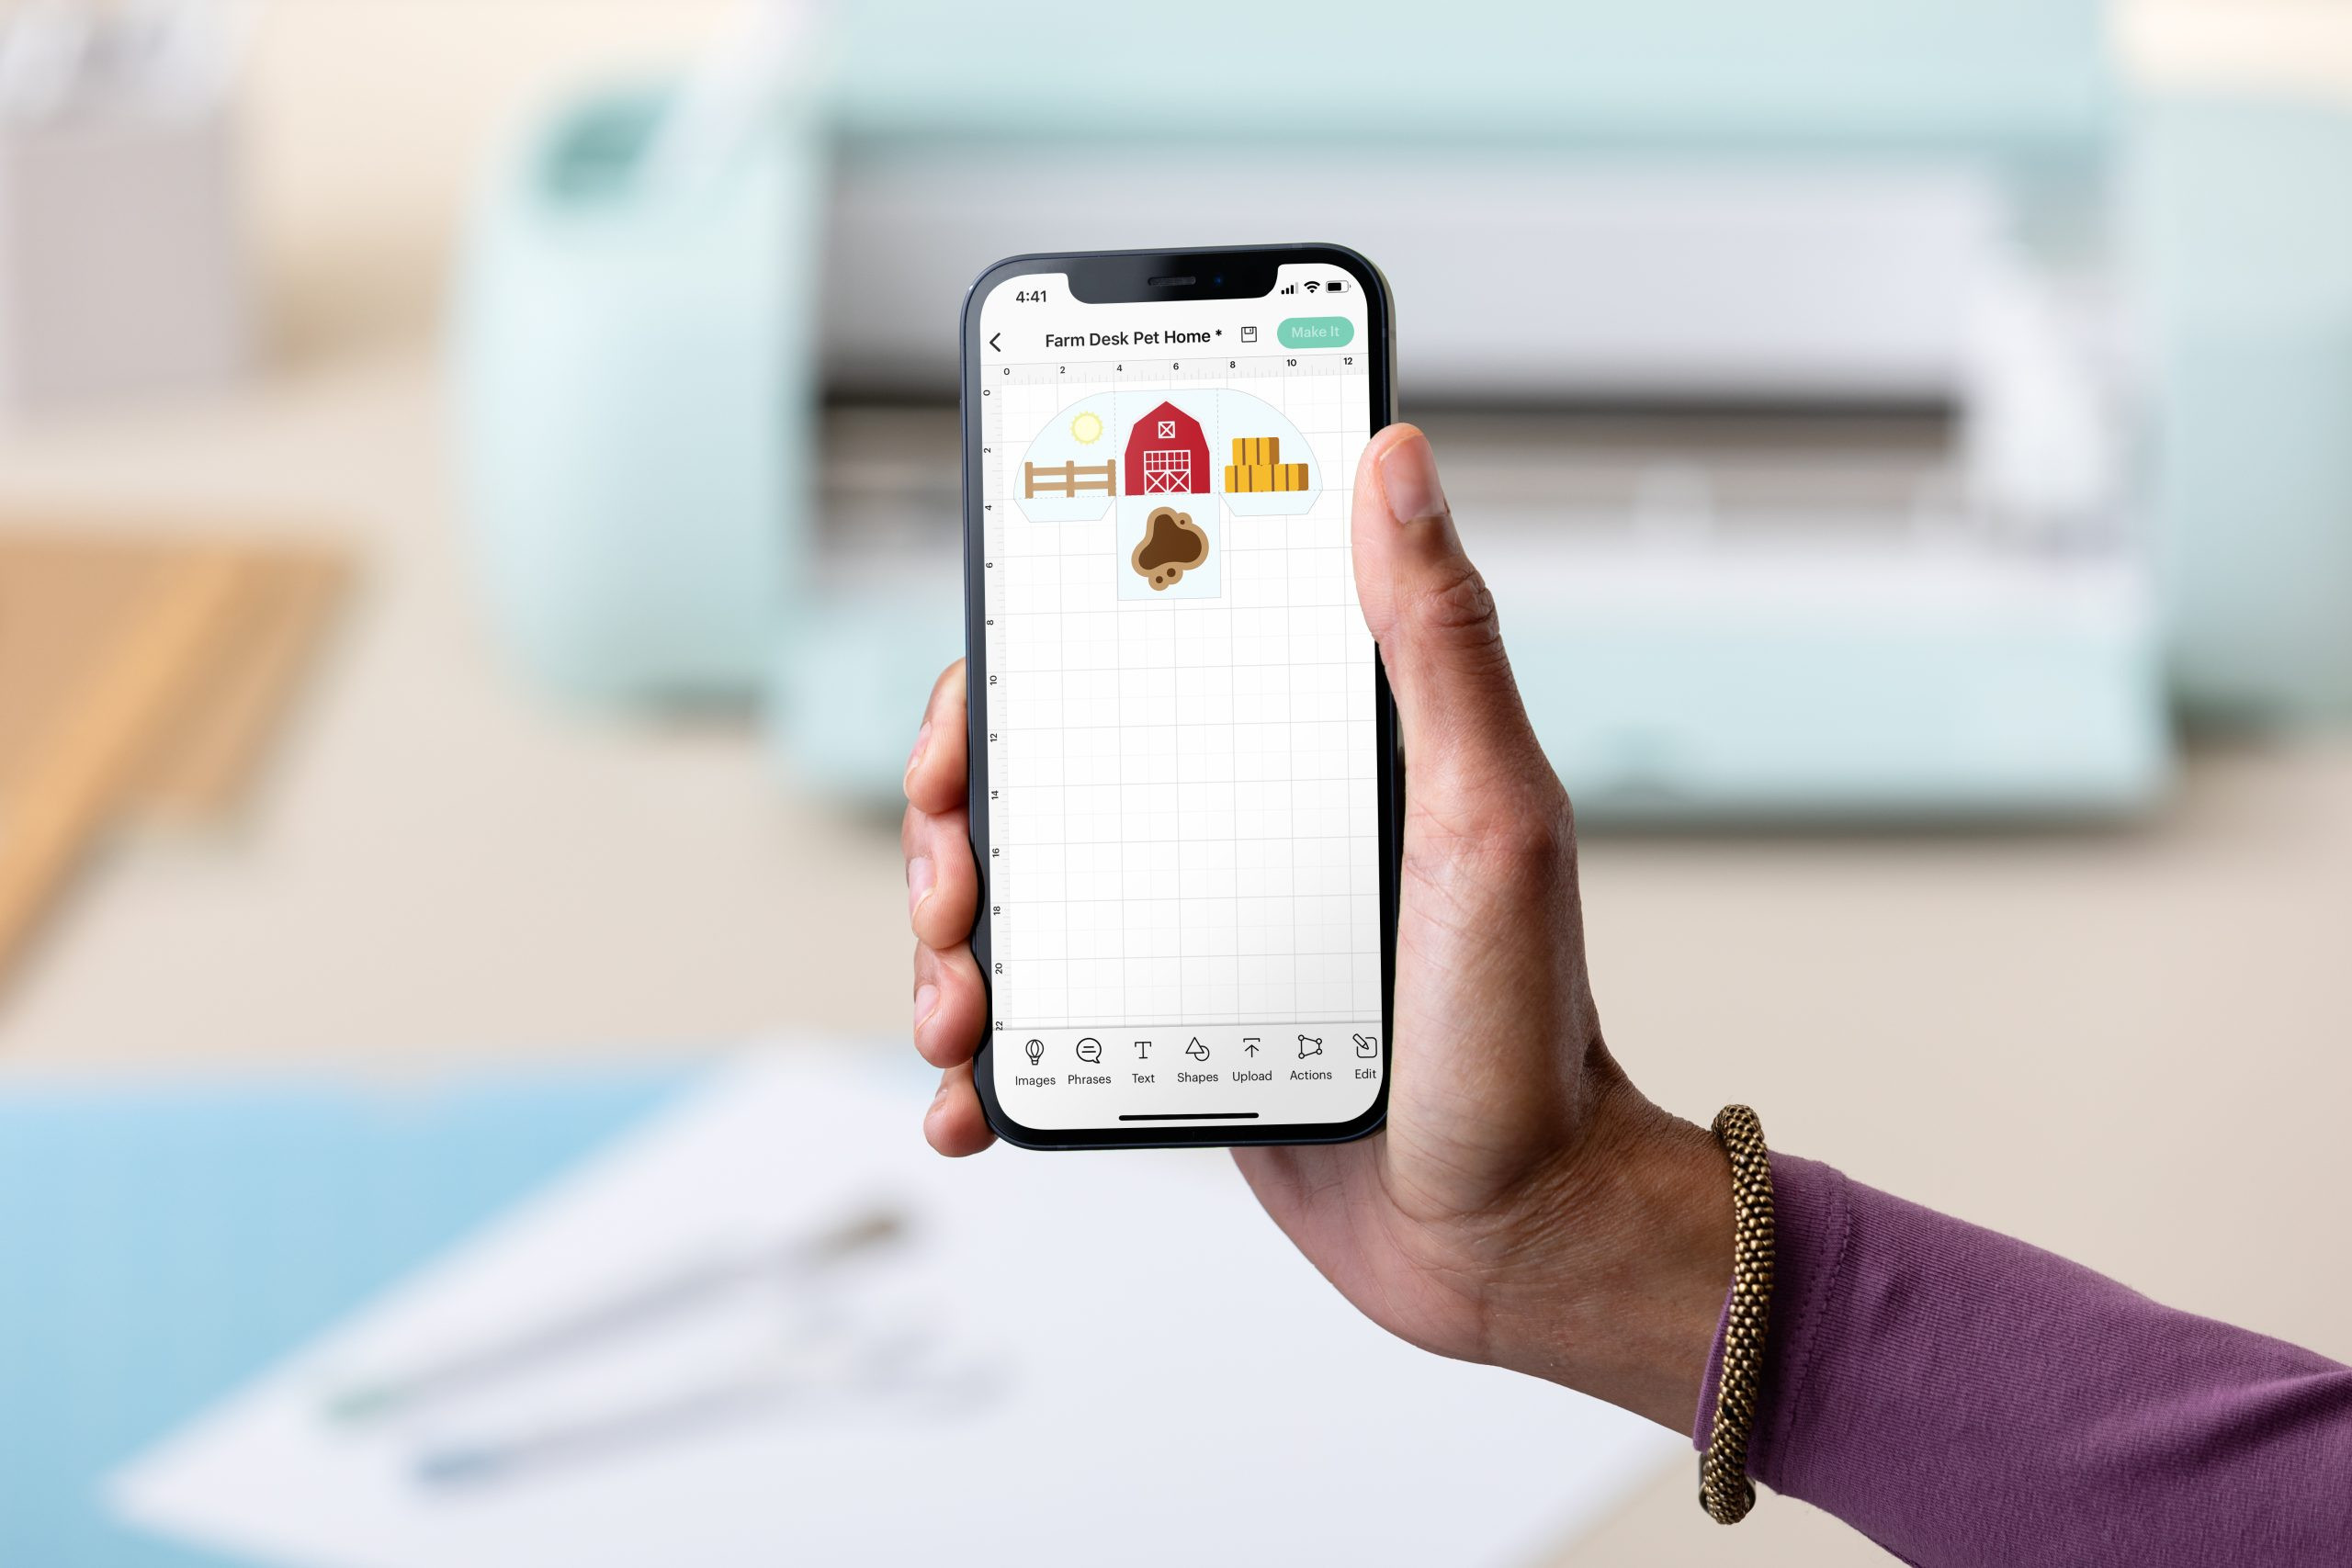 Cricut Print then cut which devices
5. How Do I Locate Print Then Cut Images In Design Space?
Finding Print Then Cut images in Design Space is straightforward. Follow these steps to easily locate compatible designs:
- Open Design Space: Start a new project in Design Space.
- Select ‘Images’: Click on the ‘Images’ option in the menu.
- Filter Options: You’ll see a filter menu on the screen.
- Choose ‘Operation Type’: In the filter menu, select ‘Operation Type.’
- Tick ‘Print Then Cut’: Check the ‘Print Then Cut’ option to display only compatible images.
This will filter the image library to show you designs that are specifically designed for the Print Then Cut feature, making it easier to find the perfect images for your project.
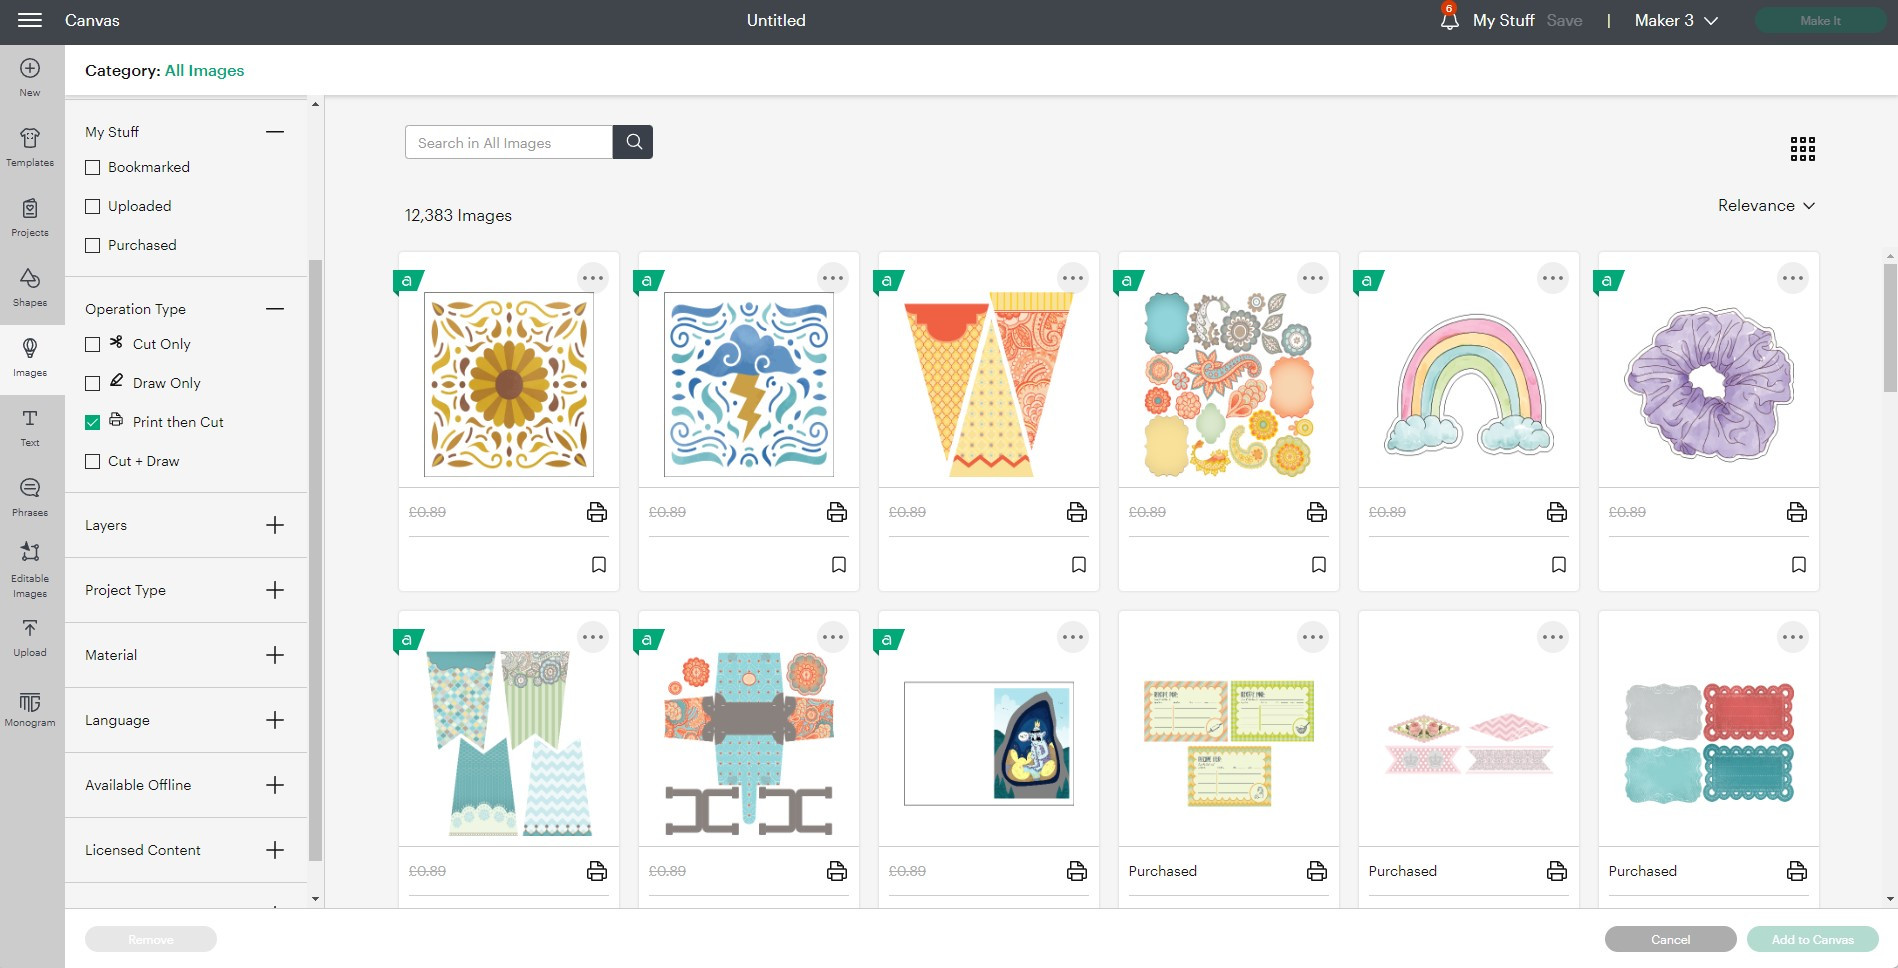 How to find print then cut images in Cricut Design Space
6. Can I Create My Own Print Then Cut Images?
Yes, you can absolutely create your own Print Then Cut images in Design Space. This allows you to personalize your projects and bring your unique ideas to life. Here’s how to do it:
- Select a Cut Image: Choose any cut image from the Design Space library and add it to your canvas.
- Create a Background Layer: If your image doesn’t have a background layer, use the offset tool in the edit bar to create one. Adjust the distance of the offset layer to your liking.
- Apply the Offset: Click ‘Apply’ to create the offset layer.
- Flatten the Layers: Select all the layers and use the ‘Flatten’ tool in the bottom right-hand corner (or actions menu). This merges all layers together, turning the image into a ‘Print Then Cut’ layer.
If you need to make changes, simply unflatten the layers, make your adjustments, and then flatten them again before clicking ‘Make it.’ This process gives you full control over your designs, allowing for endless customization.
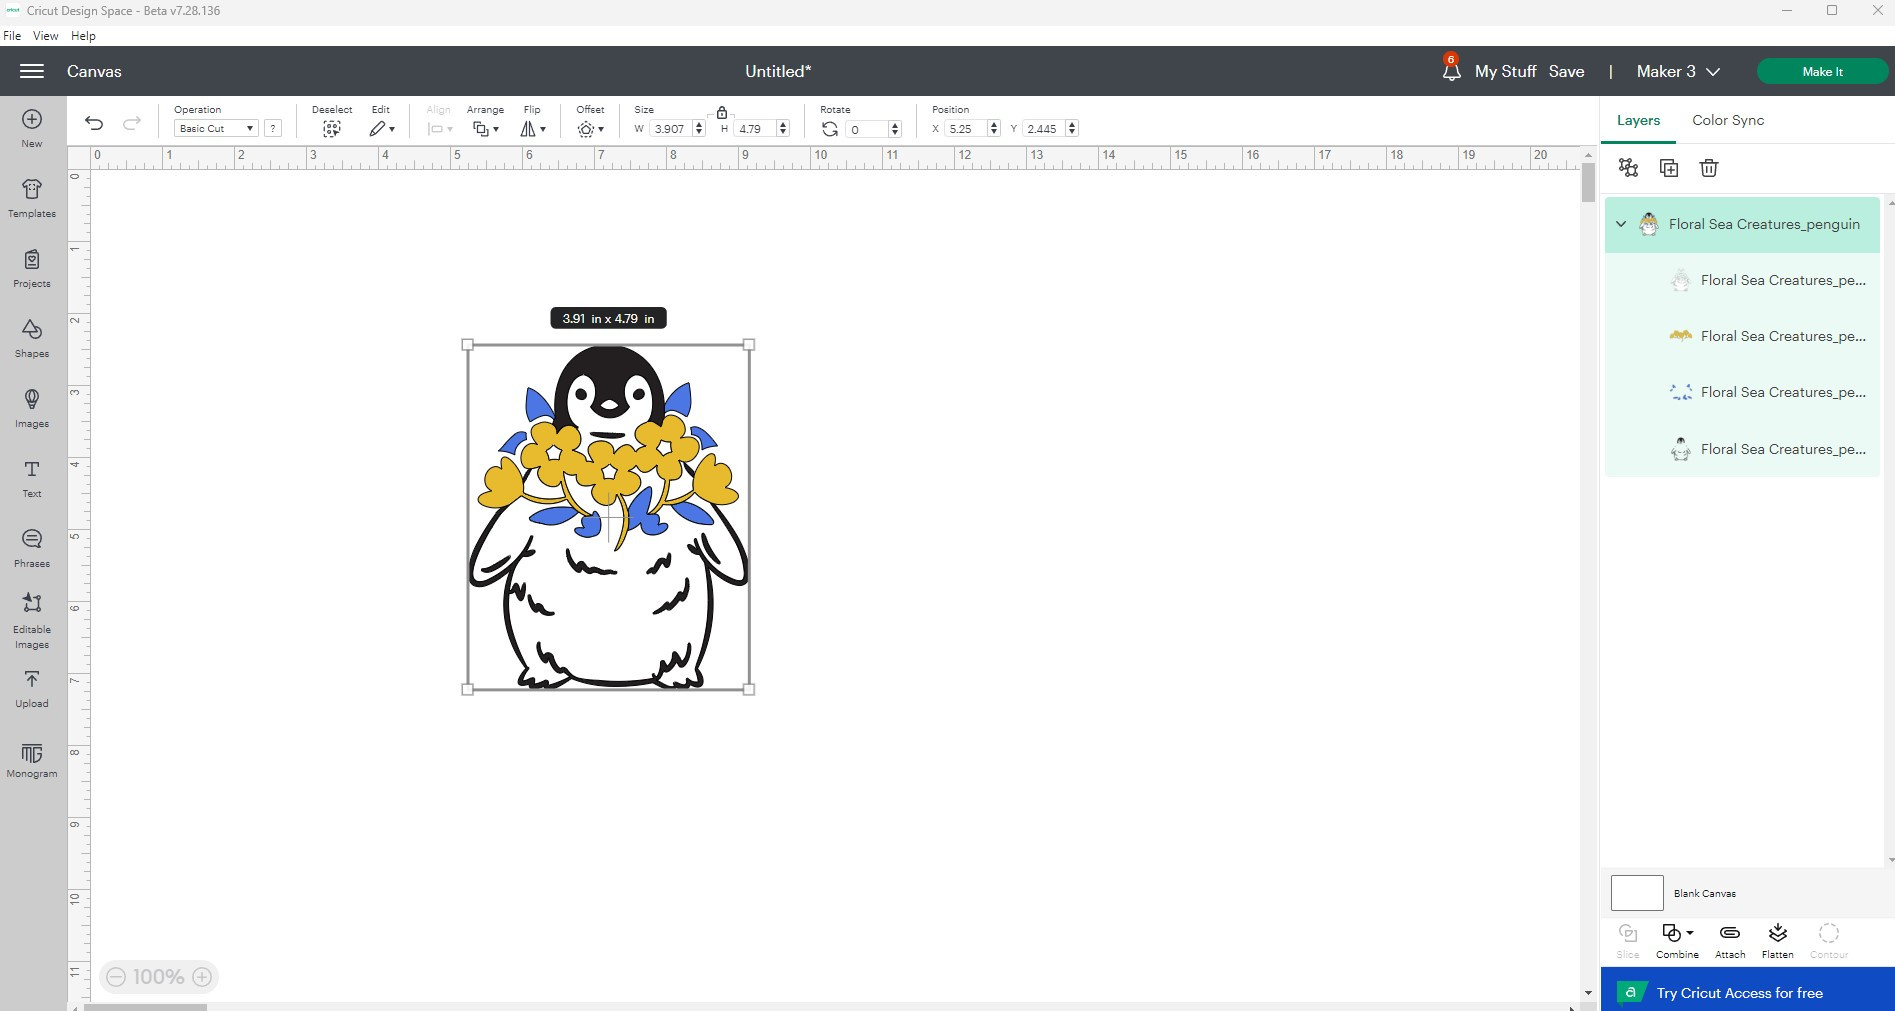 How to make your own print then cut image in Design Space
7. How Do I Adjust The Material Size In Design Space?
Adjusting the material size in Design Space is crucial for ensuring your designs print and cut correctly. Here’s how to change your material size settings:
- Open Settings: Go to the top left menu in Design Space and select ‘Settings’ from the dropdown.
- Click ‘Load Type’: In the Design Space settings, click on ‘Load Type.’
- Select Material Size: Choose the correct material size from the ‘Print Then Cut Page Size’ dropdown.
With the correct material size selected, your Cricut machine will accurately print and cut your designs, resulting in professional-looking projects every time.
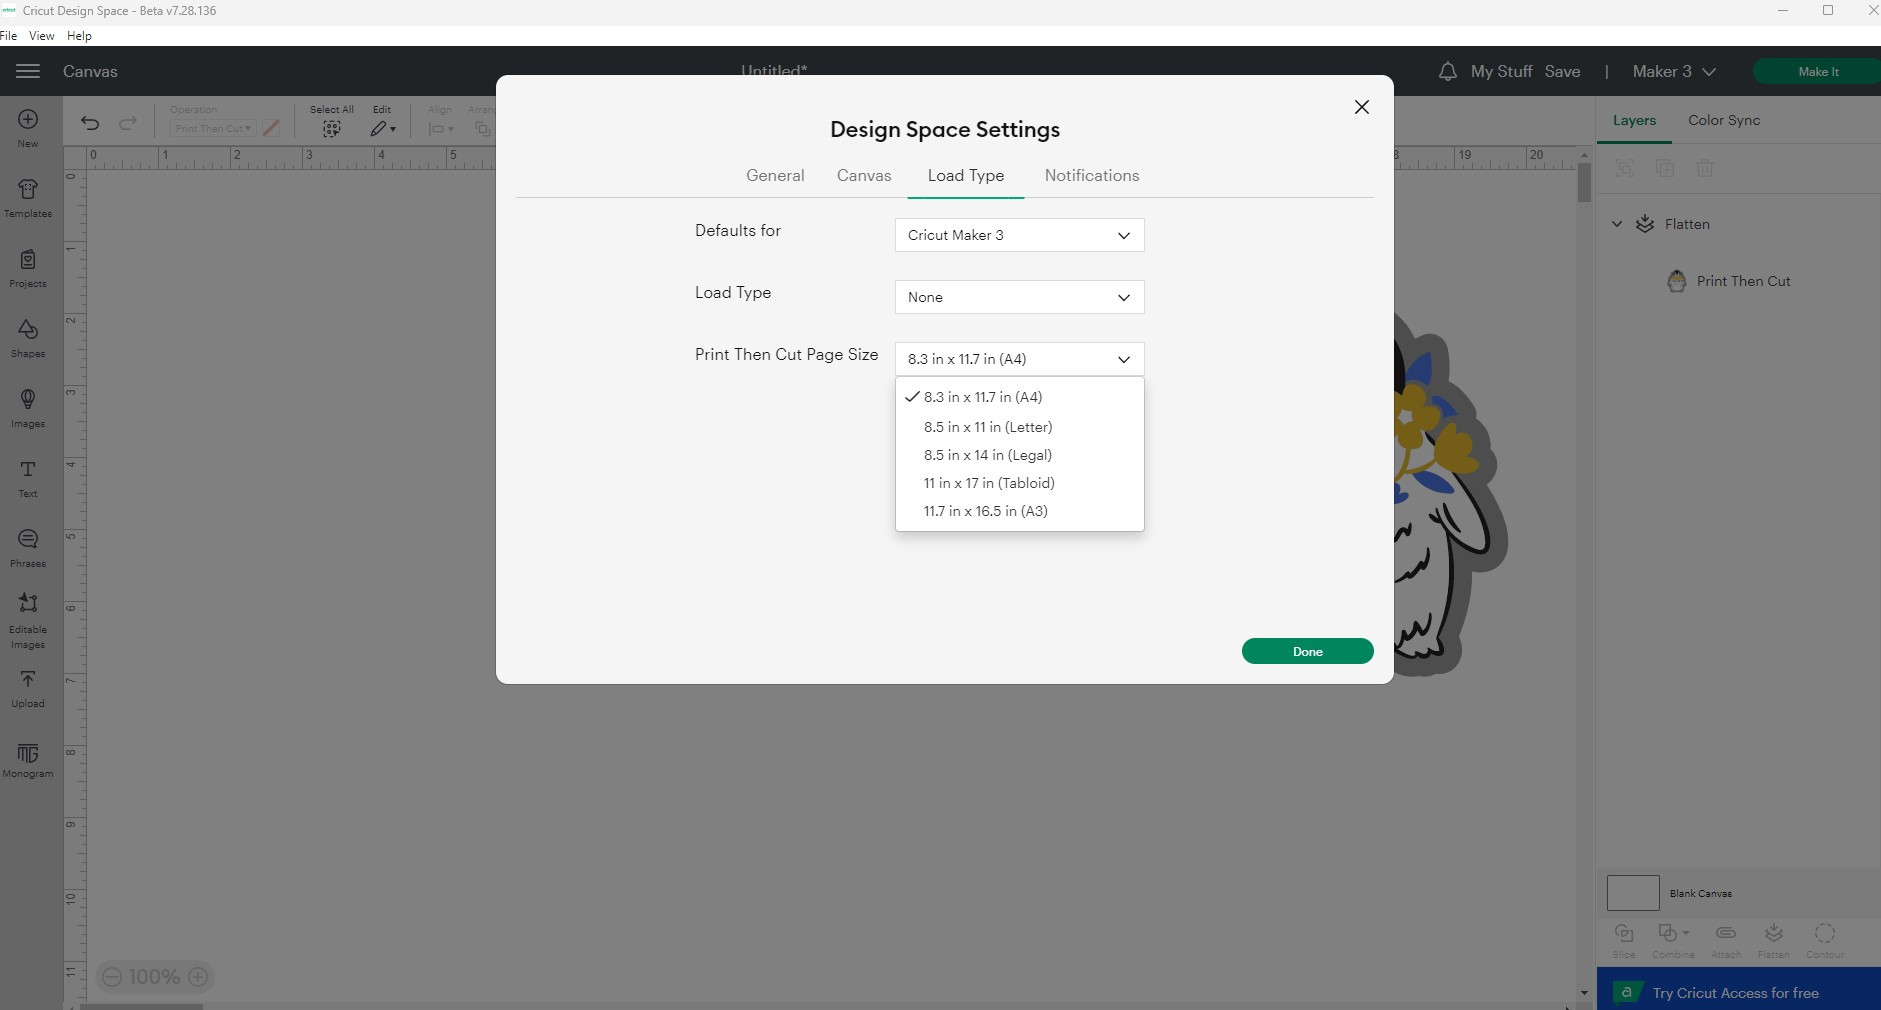 Changing Print then Cut materials size in Design Space
8. Why Is White Cardstock Recommended For Print Then Cut?
White cardstock is highly recommended for Print Then Cut projects due to its reflective properties and compatibility with Cricut machines. According to Cricut, reflective materials, colored materials, or materials with patterns can interfere with the cut sensor marks being read by the machine.
While Cricut Maker and Cricut Maker 3 can handle light to medium-colored papers, it’s generally best to use white materials for optimal results with Cricut Explore and Cricut Explore 3. This ensures that the machine accurately detects the registration marks and cuts precisely around your designs.
9. Why Do My Printed Colors Differ From What I See In Design Space?
Color discrepancies between your printed item and what you see in Design Space can be frustrating. To ensure color accuracy, it’s essential to select the correct printer settings. Here’s how:
- Send to Printer: After the mat preview stage, click the ‘Send to Printer’ button.
- System Dialogue: Always tick the ‘Use System Dialogue’ option. This opens your printer settings in a new dialogue box.
- Adjust Printer Settings: Tailor the print settings to match the material and quality type you are using. Ensure options like ‘Fit onto page’ are not selected, as this can change the size of your images.
Experiment with different settings to find what works best for your material, and make notes for future reference. This will help you achieve consistent and accurate colors in your Print Then Cut projects.
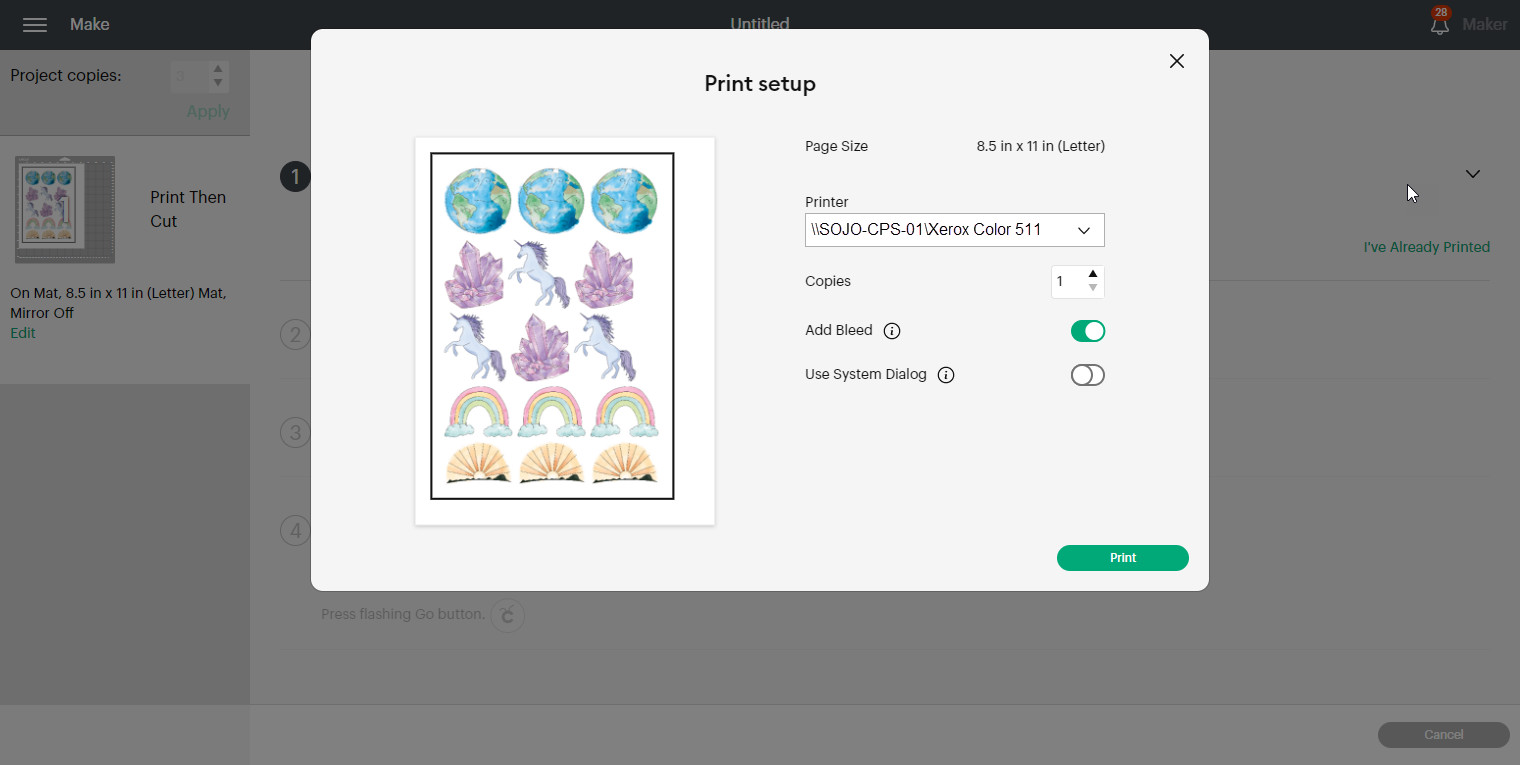 Use System Dialogue for Print then cut in Cricut Design Space
10. Which Material Settings Should I Choose For Sticker Sheets?
For creating sticker sheets with your Cricut machine, selecting the correct material settings is crucial. Cricut offers a range of printable materials specifically designed for this purpose, including:
- Printable Sticker Paper
- Printable Vinyl
- Printable Clear Sticker Paper
Each of these materials has its own specific settings in the material dropdown menu. Selecting the appropriate setting will ensure that your Cricut machine cuts the sticker sheets accurately and cleanly, giving you professional-quality results every time.
11. Why Is Calibrating My Cricut Machine Important For Print Then Cut?
Calibrating your Cricut machine is essential for ensuring that it cuts precisely along the edges of your printed images. Cricut provides step-by-step instructions for calibrating each compatible device, which you can find here.
Calibration ensures that your machine accurately reads the registration marks on your printed designs, resulting in clean, precise cuts. Taking the time to calibrate your machine can significantly improve the quality of your Print Then Cut projects.
12. Maximizing Your Cricut Print Then Cut Projects: Advanced Tips
Beyond the basics, there are several advanced tips and tricks you can use to enhance your Cricut Print Then Cut projects. These include optimizing your designs, choosing the right materials, and fine-tuning your printer settings.
12.1. Optimizing Your Designs
- High-Resolution Images: Always use high-resolution images for printing. This ensures that your printed designs are clear and sharp.
- Bleed: Add a bleed to your designs to prevent white edges after cutting. This is especially important for designs with edge-to-edge color.
- Simplify Complex Designs: Simplify complex designs to ensure clean cuts. Too many intricate details can cause the machine to struggle.
12.2. Choosing the Right Materials
- Material Compatibility: Ensure that your chosen material is compatible with your printer and Cricut machine. Test different materials to find what works best for your projects.
- Thickness: Consider the thickness of your material. Thicker materials may require more pressure and multiple passes for a clean cut.
- Adhesive Quality: For stickers and labels, choose materials with high-quality adhesive to ensure they stick well and last long.
12.3. Fine-Tuning Printer Settings
- Print Quality: Set your printer to the highest quality setting for the best results. This ensures that your printed designs have vibrant colors and sharp details.
- Paper Type: Select the correct paper type in your printer settings. This helps the printer adjust its ink distribution for optimal results.
- Color Profiles: Use the correct color profiles to ensure accurate color reproduction. Experiment with different profiles to find what works best for your printer and materials.
13. Creative Project Ideas Using Cricut Print Then Cut
The Cricut Print Then Cut feature opens up a world of creative possibilities. Here are some inspiring project ideas to get you started:
- Custom Stickers: Create personalized stickers for planners, laptops, and more. Design your own unique graphics or use pre-made images from Design Space.
- Invitations and Cards: Design and print custom invitations for birthdays, weddings, and other special events. Add personal touches with unique fonts and graphics.
- Labels: Create custom labels for organizing your home, office, or craft supplies. Use different colors and fonts to easily identify items.
- Bookmarks: Design and print custom bookmarks for yourself or as gifts. Add inspirational quotes, fun graphics, or personalized messages.
- Gift Tags: Create custom gift tags for birthdays, holidays, and other occasions. Add a personal touch with unique designs and messages.
- Magnets: Print your favorite photos or designs on printable magnet sheets to create custom magnets for your fridge or office.
- Iron-On Transfers: Design and print custom iron-on transfers for t-shirts, tote bags, and other fabric items. Use different colors and fonts to create unique apparel.
- Cake Toppers: Design and print custom cake toppers for birthdays, weddings, and other celebrations. Add a personal touch with unique designs and messages.
By exploring these project ideas, you can fully leverage the capabilities of the Cricut Print Then Cut feature and create stunning, personalized items.
14. Troubleshooting Common Print Then Cut Issues
Even with careful preparation, you may encounter some common issues when using the Print Then Cut feature. Here are some troubleshooting tips to help you resolve them:
- Machine Not Reading Registration Marks: Ensure that your material is clean and free of debris. Calibrate your machine and try adjusting the lighting in your workspace.
- Inaccurate Cuts: Calibrate your machine and ensure that your design is properly aligned in Design Space. Check your material settings and adjust as needed.
- Color Discrepancies: Adjust your printer settings and use the correct color profiles. Experiment with different settings to find what works best for your printer and materials.
- Material Slipping on Mat: Use a clean and sticky cutting mat. If your mat is old or worn, consider replacing it.
- Ink Smudging: Allow the ink to dry completely before cutting. Use a sealant or laminate to protect the printed surface.
- Software Glitches: Ensure that you are using the latest version of Design Space. Restart your computer and try again.
By addressing these common issues, you can ensure a smooth and successful Print Then Cut experience.
15. How To Maintain Your Printer For Optimal Print Then Cut Results
Maintaining your printer is crucial for achieving optimal Print Then Cut results. Regular maintenance ensures that your printer produces high-quality prints with accurate colors and sharp details. Here are some essential maintenance tips:
- Clean Print Heads: Regularly clean the print heads to prevent clogs and ensure consistent ink flow. Follow your printer’s instructions for cleaning the print heads.
- Replace Ink Cartridges: Replace ink cartridges when they are low or empty. Use high-quality ink cartridges recommended by your printer manufacturer for best results.
- Update Printer Drivers: Keep your printer drivers up to date to ensure compatibility with your computer and Design Space. Check your printer manufacturer’s website for the latest drivers.
- Clean Printer Exterior: Regularly clean the exterior of your printer to remove dust and debris. Use a soft, dry cloth to wipe down the surfaces.
- Run Test Prints: Periodically run test prints to check the quality of your prints. Use the test prints to identify any issues with color accuracy, sharpness, or ink flow.
- Store Printer Properly: Store your printer in a clean, dry environment. Avoid exposing it to extreme temperatures or humidity.
By following these maintenance tips, you can keep your printer in excellent condition and ensure that it consistently produces high-quality prints for your Print Then Cut projects.
16. Exploring Advanced Design Techniques For Print Then Cut
To take your Print Then Cut projects to the next level, consider exploring advanced design techniques. These techniques can help you create more intricate and visually appealing designs. Here are some ideas to get you started:
- Layering: Layer different images and shapes to create depth and dimension in your designs. Use different colors and textures to add visual interest.
- Contouring: Use the contour tool in Design Space to hide or remove unwanted parts of your images. This allows you to customize your designs and create unique effects.
- Knockout Designs: Create knockout designs by overlapping text and images. This technique creates a visually striking effect by “knocking out” the background behind the text.
- Foil Accents: Add foil accents to your designs using foil transfer sheets and a laminator. This creates a luxurious and eye-catching effect.
- Watercolors: Incorporate watercolor effects into your designs by using watercolor brushes in your design software. This adds a soft and artistic touch to your projects.
- Hand-Lettering: Add hand-lettered elements to your designs for a personal and unique touch. Use a tablet and stylus to create custom lettering and incorporate it into your designs.
- 3D Effects: Create 3D effects by adding shadows and highlights to your images. This adds depth and dimension to your designs and makes them stand out.
By experimenting with these advanced design techniques, you can create Print Then Cut projects that are truly unique and impressive.
17. Understanding Copyright And Licensing For Print Then Cut Designs
When creating Print Then Cut designs, it’s essential to understand copyright and licensing laws. Using copyrighted images or designs without permission can lead to legal issues. Here are some key points to keep in mind:
- Copyright: Copyright protects original works of authorship, including images, designs, and text. Copyright owners have the exclusive right to reproduce, distribute, and display their work.
- Fair Use: Fair use allows you to use copyrighted material for certain purposes, such as criticism, commentary, news reporting, teaching, scholarship, and research. However, fair use is a complex legal doctrine, and it’s essential to understand its limitations.
- Licensing: Licensing allows you to use copyrighted material with permission from the copyright owner. Licenses can be free or paid, and they may have specific terms and conditions.
- Public Domain: Public domain works are not protected by copyright and can be used freely. However, it’s essential to verify that a work is truly in the public domain before using it.
- Creative Commons: Creative Commons licenses allow creators to share their work with others while retaining certain rights. There are different types of Creative Commons licenses, each with its own terms and conditions.
To avoid copyright issues, use your own original designs, obtain permission from the copyright owner, or use public domain or Creative Commons licensed works. Always check the terms and conditions of any license before using copyrighted material.
18. Print Then Cut With Cricut: FAQs
To further assist you with your Print Then Cut endeavors, here are some frequently asked questions:
- Can I use any printer for Print Then Cut?
It is recommended to use an inkjet printer for the best results. Laser printers may not be compatible with the Print Then Cut feature.
- What type of paper should I use for Print Then Cut?
White cardstock is the most recommended option because it’s highly reflective and compatible with Cricut machines.
- Why is my Cricut not cutting accurately?
Calibrate your Cricut machine and ensure that the design is properly aligned in Design Space. Adjust material settings as needed.
- How do I prevent ink smudging after printing?
Allow the ink to dry completely before cutting. Use a sealant or laminate to protect the printed surface.
- Can I use colored paper for Print Then Cut?
Cricut Maker and Cricut Maker 3 can print then cut on light to medium-colored papers. However, it’s generally best to use white materials for optimal results with Cricut Explore and Cricut Explore 3.
- What is the maximum size I can print then cut with Cricut?
The maximum size for Print Then Cut is 8.5″ x 11″ or A4, but always check Design Space for the most accurate dimensions.
- Why is my Cricut machine not reading the registration marks?
Ensure that your material is clean and free of debris. Calibrate your machine and try adjusting the lighting in your workspace.
- What should I do if my material is slipping on the mat?
Use a clean and sticky cutting mat. If your mat is old or worn, consider replacing it.
- How do I create a bleed in Design Space?
In the “Send to Printer” settings, there is an option to add bleed. This will add a small border around your design to ensure that there are no white edges after cutting.
- Can I use Print Then Cut for iron-on transfers?
Yes, you can use Print Then Cut for iron-on transfers. Design and print custom iron-on transfers for t-shirts, tote bags, and other fabric items.
19. Share Your Creations With Us
We’d love to see what you create using the Print Then Cut feature. Share your projects with us on social media by tagging @amazingprint.net on Instagram and TikTok. You can also share your projects with our community on Design Space by publishing them live.
20. Elevate Your Crafting With Amazingprint.net
Ready to take your Cricut crafting to the next level? Visit amazingprint.net for a wealth of information, inspiration, and resources. Explore our comprehensive guides, compare printing options, and discover innovative ideas to bring your creative visions to life. Whether you’re a seasoned crafter or just starting out, amazingprint.net is your go-to destination for all things printing.
Looking for reliable and high-quality printing solutions? Contact us today:
- Address: 1600 Amphitheatre Parkway, Mountain View, CA 94043, United States
- Phone: +1 (650) 253-0000
- Website: amazingprint.net
Let amazingprint.net help you transform your ideas into stunning realities.