
Printing double-sided, or duplex printing, on your MacBook is a great way to save paper and reduce your environmental footprint. While macOS generally makes this process straightforward, you might encounter situations where the option seems missing or doesn’t work as expected. This guide provides a comprehensive walkthrough on how to print double-sided on your MacBook, covering various methods and troubleshooting tips to ensure a smooth printing experience.
Understanding Double-Sided Printing on macOS
Generally, printing double-sided on a MacBook is a simple feature integrated into the print dialog. When you go to print a document, you should typically find a “Two-Sided” or “Duplex” option readily available. However, issues can arise due to printer driver configurations, printer compatibility, or even the application you are using. This article will explore common scenarios and solutions to get you printing on both sides of the page effortlessly.
Method 1: Using the Standard Print Dialog Option
The most common and easiest way to enable double-sided printing is directly through the print dialog box when you are about to print a document from any application.
-
Open your document and press Cmd + P (or go to File > Print) to open the print dialog box.
-
Locate the “Two-SSided” or “Duplex” option. In many applications, this option is readily visible in the main print dialog window, often next to the “Copies” setting.
-
Select the “Two-Sided” checkbox or choose the duplex printing option from the dropdown menu if available. It might be labeled as “Long-edge binding” or “Short-edge binding,” depending on how you want the pages to be oriented for double-sided printing.
-
Click “Print” to start your double-sided printing job.
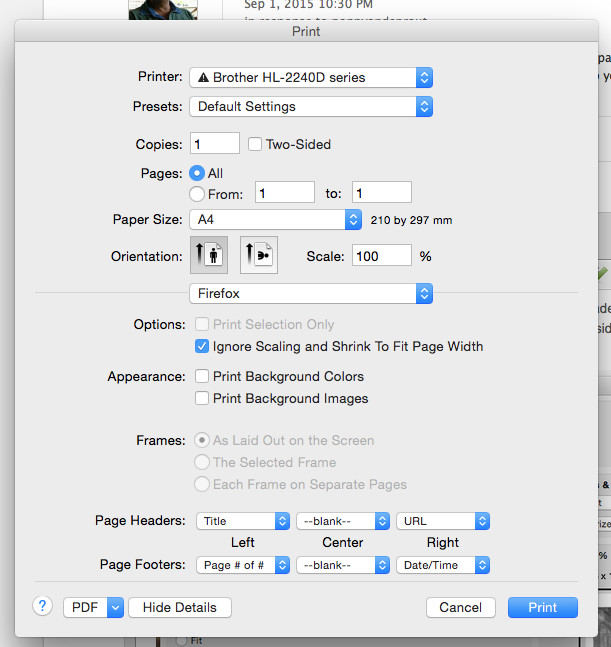 Two-Sided option in Firefox print dialog
This image shows the standard “Two-Sided” option clearly visible in the print dialog when printing from Firefox on macOS.
If you find the “Two-Sided” option greyed out or missing, proceed to the next methods for more advanced troubleshooting.
Method 2: Resetting the Printing System and Re-adding Your Printer
Sometimes, corrupted printer settings or incorrect driver installations can cause the double-sided printing option to disappear. Resetting the printing system and re-adding your printer with the correct drivers can often resolve this issue.
-
Go to “System Preferences”. You can find this by clicking the Apple icon in the top-left corner of your screen and selecting “System Preferences.”
-
Open “Printers & Scanners”.
-
Right-click (or Ctrl-click) in the left-hand pane where your printers are listed. If you don’t see the printer list, make sure you are in the “Printers & Scanners” settings.
-
Click “Reset printing system…”. A warning message will appear. Confirm that you want to reset the printing system. This will remove all printers from your list.
-
Click the “+” button to add a new printer.
-
Select your printer from the list. Your printer should appear if it’s connected to your network or via USB.
-
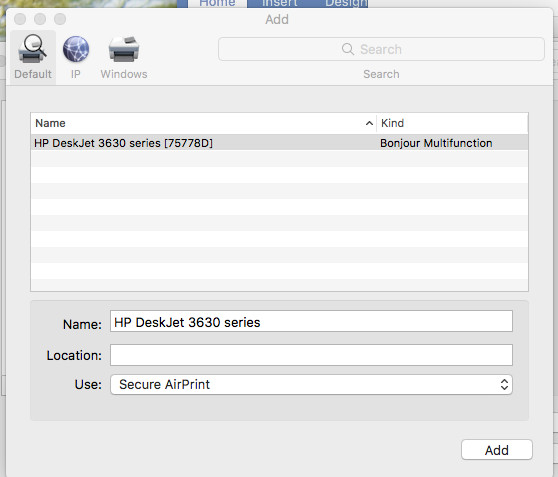
Important: Pay attention to the “Use” field. Instead of automatically selecting “Secure AirPrint” or a similar default option, click on the “Use” dropdown menu.
 Click the "Use" field in Add Printer dialog
This image highlights the “Use” dropdown menu in the Add Printer dialog, emphasizing the importance of selecting the correct driver.
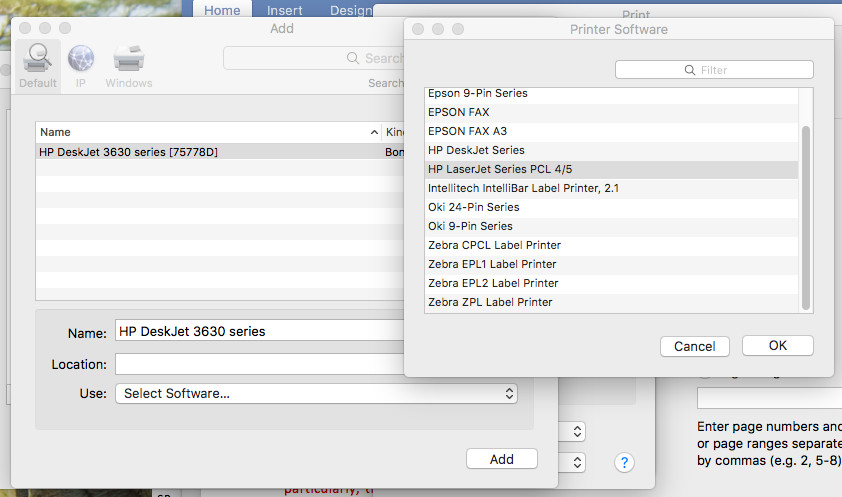
- Choose the original software/driver for your printer. Look for your printer manufacturer’s name (e.g., Epson, HP, Brother) in the list. Select the driver that explicitly mentions your printer model and potentially “duplex” or “two-sided” capabilities. It’s crucial to select the full feature driver provided by the manufacturer rather than a generic AirPrint driver to ensure all printer functionalities are available.
 Select original printer software with duplex support
This image shows the “Use” dropdown menu expanded, displaying a list of drivers. Users should select the driver specific to their printer model to ensure duplex printing functionality.
- Click “Add”.
 Click "Add" to add the printer
This image shows the “Add” button in the bottom right corner of the Add Printer dialog, which finalizes the printer setup process.
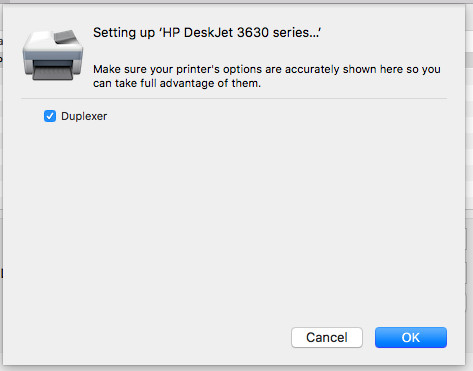
- Check for Duplexer Option (if applicable). After adding the printer, you might see a window pop up with options for your printer. Look for a checkbox labeled “Duplexer” or something similar that indicates double-sided printing capability. Make sure this option is checked if your printer has a duplex unit.
 Check "Duplexer" option if available
This image illustrates a printer configuration window where a “Duplexer” option can be checked to enable double-sided printing. This step is crucial for informing macOS about the printer’s duplex capabilities.
- Try printing again. Open a document and go to the print dialog (Cmd + P). The “Two-Sided” option should now be available and functional.
Method 3: Enabling Duplex in Printer Options & Supplies
Another way to ensure double-sided printing is enabled is to check the printer’s Options & Supplies settings within System Preferences. This method is particularly useful if you are using a Safari browser or want to set duplex printing as a default option.
-
Go to “System Preferences” > “Printers & Scanners”.
-
Select your printer from the left-hand list.
-
Click “Options & Supplies…”
-
Click the “Options” tab in the new window that appears.
-
Look for “Duplex Unit” or “Two-Sided Printing”. If you see this option, make sure it is enabled or checked. The exact wording may vary depending on your printer model and driver.
-
Check the “Duplex” box or enable the two-sided printing feature if it’s not already enabled.
-
Click “OK” or “Apply” to save the changes.
-
Try printing again. The double-sided printing option should now be consistently available in your print dialogs.
Method 4: Using CUPS Web Interface (Advanced)
For more advanced users or in cases where the above methods don’t work, you can try enabling duplex printing through the CUPS (Common Unix Printing System) web interface. CUPS is the underlying printing system used by macOS.
-
Open Terminal. You can find Terminal in Applications > Utilities > Terminal.
-
Enable the CUPS web interface by typing the following command and pressing Enter:
sudo cupsctl WebInterface=yesYou will be prompted to enter your administrator password.
-
Open your web browser and go to
http://localhost:631in the address bar. This will open the CUPS web interface. -
Click on the “Printers” tab.
-
Select your printer from the list of printers.
-
From the “Administration” dropdown menu, select “Set Default Options”. You might need to log in with your Mac username and password again at this point.
-
Look for options related to “Duplex” or “Two-Sided Printing”. The exact location and wording will vary depending on your printer driver. It might be under a section like “Printer Features” or “Duplex Options.”
-
If you find a “Duplex Unit” option, ensure it is set to “Installed” or “Yes”.
-
Click “Set Default Options” at the bottom of the page to save your changes.
-
Disable the CUPS web interface for security by typing the following command in Terminal and pressing Enter:
sudo cupsctl WebInterface=no -
Try printing again. Check if the double-sided printing option is now available.
Troubleshooting Common Double-Sided Printing Issues
“Two-Sided Option Greyed Out”:
- Driver Issue: Most commonly, this indicates an issue with your printer driver. Ensure you are using the correct, full-feature driver from your printer manufacturer’s website, not a generic driver like AirPrint. Try Method 2 to reinstall with the correct driver.
- Printer Capability: Double-check that your printer model actually supports automatic duplex printing. Some printers, especially older or budget models, may not have this feature. Refer to your printer’s manual or the manufacturer’s website.
Application-Specific Problems (e.g., Adobe Acrobat):
- Some applications, like older versions of Adobe Acrobat, might have their own print dialogs that don’t directly expose the macOS double-sided printing options. In such cases, look for printer-specific settings within the application’s print dialog, or try printing from a different application to confirm if the issue is application-specific. As some users noted, even in Adobe products, clicking the “Printer…” button in the print dialog might reveal more printer-specific options, including duplex settings.
Older macOS Versions:
- While macOS generally supports duplex printing, very old versions might have compatibility issues with newer printers or drivers. Consider updating your macOS if possible, or check for driver compatibility information for your specific macOS version and printer model.
Ensuring Printer Compatibility
Before troubleshooting, always ensure that your printer model is actually capable of automatic double-sided printing. Check your printer’s specifications on the manufacturer’s website or in the product manual. If your printer does support duplex printing, the issue is likely related to software configuration, drivers, or settings within macOS, which the methods outlined above should help resolve.
By following these methods, you should be able to successfully enable and use double-sided printing on your MacBook, saving paper and making your printing more efficient. Remember to always use the correct printer drivers and check your printer’s capabilities to ensure a seamless printing experience.