Printing double-sided, or duplex printing, on your Mac is a fantastic way to save paper and reduce your environmental footprint. While macOS is generally user-friendly, sometimes enabling this feature can be less than straightforward. Are you struggling to find the double-sided printing option, or is it stubbornly greyed out? You’re not alone. Many Mac users encounter this issue, but thankfully, there are several solutions to get you printing on both sides of the page.
This comprehensive guide will walk you through various methods to enable double-sided printing on your Mac, ensuring you can efficiently and effectively utilize this paper-saving feature. We’ll cover everything from basic settings checks to more advanced troubleshooting steps, so you can get back to eco-friendly printing in no time.
Understanding Double-Sided Printing on Your Mac
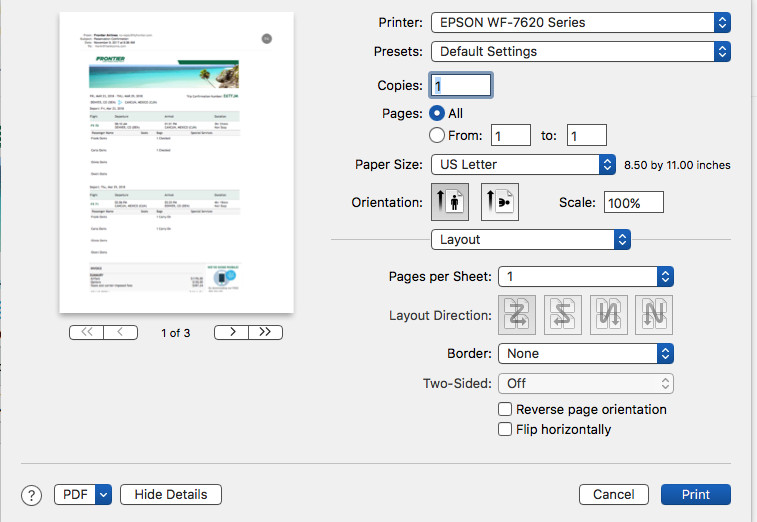
Before diving into troubleshooting, let’s clarify what double-sided printing entails on macOS. When you send a document to print from your Mac, the print dialog box should offer a “Two-Sided” or “Duplex” option. This feature, when enabled, instructs your printer to automatically print on both sides of the paper.
The availability and functionality of this option depend on a few key factors:
- Printer Capability: First and foremost, your printer hardware must support duplex printing. Not all printers come with this feature. Check your printer’s specifications to confirm if it’s capable of double-sided printing.
- Printer Driver: The software that allows your Mac to communicate with your printer, the printer driver, plays a crucial role. An incorrect or outdated driver can lead to features like duplex printing being unavailable or malfunctioning.
- macOS Settings: Your Mac’s system settings for printers and scanners must be correctly configured to recognize and enable duplex printing for your connected printer.
- Application Settings: In some cases, the application you are printing from (like Adobe Acrobat or Microsoft Word) might have its own print settings that could override system defaults.
If the “Two-Sided” option is missing or greyed out in your print dialog, it indicates an issue with one or more of these factors. Let’s explore the solutions.
Troubleshooting the Greyed Out Double-Sided Printing Option
Many users have reported encountering a frustrating situation where the double-sided printing option is greyed out, preventing them from selecting it. Here are several proven methods to address this issue, progressing from simple checks to more advanced solutions.
1. Verify Printer Duplex Capability and Driver Installation
The most basic step is to ensure your printer actually supports double-sided printing. Consult your printer’s manual or the manufacturer’s website to confirm this feature is available.
Once you’ve confirmed your printer’s capability, the next crucial step is to verify you have the correct printer driver installed on your Mac. Sometimes, macOS might automatically install a generic driver, such as “AirPrint,” which may not fully support all your printer’s features, including duplex printing.
To check and potentially change your driver:
- Go to System Preferences from the Apple menu.
- Click on Printers & Scanners.
- Select your printer from the left-hand list.
- Look at the “Kind” description. If it mentions “AirPrint,” you might be using a generic driver.
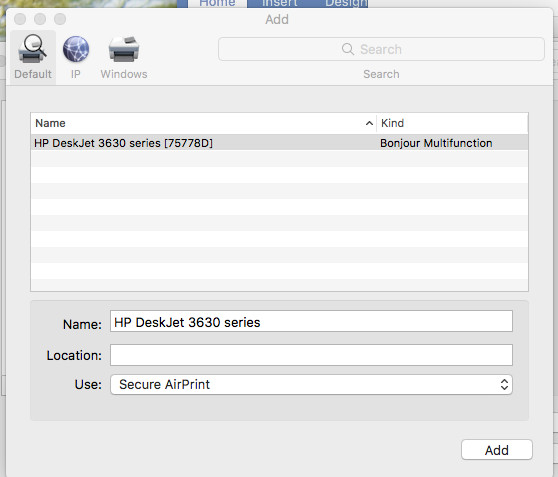 Selecting the correct printer driver from the 'Use' dropdown menu in macOS printer settings to enable double-sided printing
To switch to the manufacturer’s specific driver:
- Click the “-“ button to remove your printer.
- Click the “+” button to add it back.
- In the “Add Printer” dialog, ignore the “Use” default setting (which might be “Secure AirPrint”).
- Click on the “Use” dropdown menu.
- Select the original software for your printer (e.g., Epson, HP, Brother). You might see several options; look for one that explicitly mentions “driver” or your printer model name without “AirPrint.” Experiment with different drivers from your printer manufacturer listed if necessary, especially if one indicates “CUPS” which often offers more features.
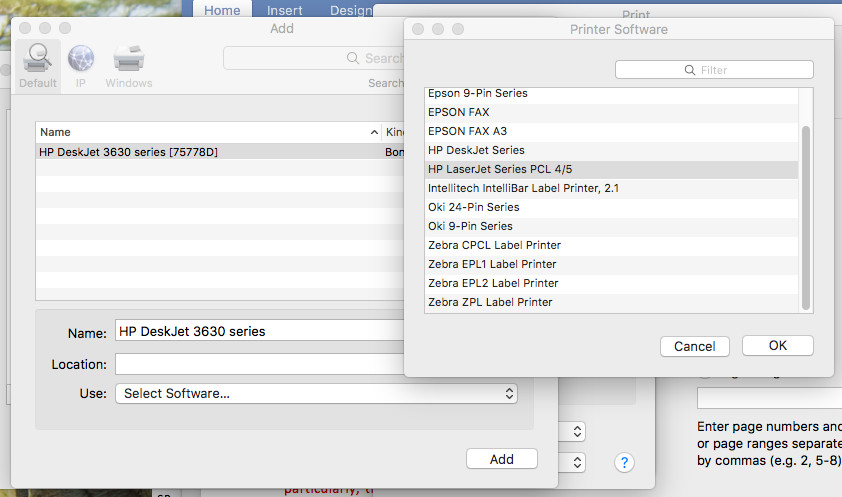 Choosing the original printer software driver from the 'Use' dropdown menu in macOS printer settings
- Click Add.
- After adding the printer, you might be prompted to select installable options. Look for a “Duplexer” option or something similar and ensure it is checked or enabled. This step is critical as it tells macOS that your printer has the hardware for double-sided printing.
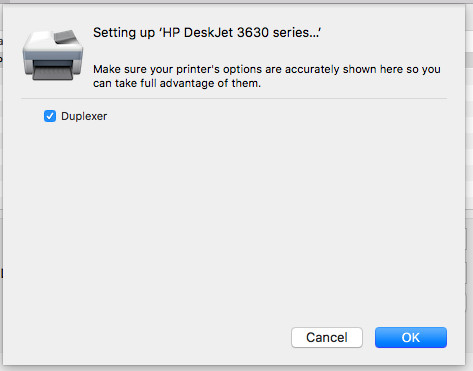 Checking the duplexer option during printer driver setup on macOS
- Try printing again and check if the “Two-Sided” option is now available and selectable.
2. Resetting the Printing System
Sometimes, corrupted printer settings or configurations within macOS can cause printing issues, including the double-sided option being greyed out. Resetting the printing system can often resolve these problems by clearing out old configurations and allowing you to start fresh.
Caution: Resetting the printing system will remove all your configured printers. You will need to re-add them.
To reset the printing system:
- Go to System Preferences and then to Printers & Scanners.
- In the left printer list, hover over any printer title and right-click (or Control-click).
- Select “Reset printing system…” from the context menu.
- You will be prompted to confirm the reset. Click “Reset”.
- After the reset, click the “+” button to add your printer again, following the steps in method 1 to ensure you select the correct driver (not AirPrint).
3. Enabling Duplex via CUPS (Common Unix Printing System)
For more advanced users, or if the standard methods haven’t worked, you can try enabling duplex printing through the CUPS web interface. CUPS is the underlying printing system in macOS, and accessing its settings directly can sometimes unlock hidden or misconfigured features.
To use CUPS:
-
Open Terminal (Applications > Utilities > Terminal).
-
Type the following command and press Enter to enable the CUPS web interface:
sudo cupsctl WebInterface=yesYou will be prompted for your administrator password. Enter it and press Enter.
-
Open your web browser (like Safari or Chrome) and go to the address:
http://localhost:631 -
This will open the CUPS web interface. Click on the “Printers” tab.
-
Select your printer from the list.
-
From the dropdown menu labeled “Administration”, choose “Set Default Options”. You might need to log in again with your Mac username and password.
-
Look for options related to “Duplex” or “Two-Sided Printing”. The exact wording will vary depending on your printer model.
-
You might find options like “Duplex Unit” with choices like “Installed” or “Not Installed.” Select “Installed” or enable any duplex-related options.
-
Click “Set Default Options” to save your changes.
-
Go back to Terminal and disable the CUPS web interface for security reasons by typing:
sudo cupsctl WebInterface=no
4. Check Printer Options and Supplies in System Preferences
Some printer drivers offer specific configuration options within the “Printers & Scanners” settings. These options might include enabling the duplex unit.
To check these settings:
- Go to System Preferences > Printers & Scanners.
- Select your printer.
- Click on “Options & Supplies…”.
- In the “Options” tab (or sometimes “Driver” or “Configuration”), look for any settings related to “Duplex,” “Two-Sided Printing,” or “Duplexer.”
- Ensure any duplex-related options are enabled or checked.
 Checking for duplex options in printer Options & Supplies settings on macOS
5. Application-Specific Print Settings
As mentioned earlier, some applications, particularly professional software like Adobe Acrobat or InDesign, may have their own print dialogs and settings. If you are having trouble printing double-sided from a specific application, explore its print settings more deeply.
For example, in Adobe Acrobat:
- In the Print dialog, look for a “Printer…” button at the bottom left.
- Clicking “Printer…” often opens the standard macOS print dialog, where you should find the “Two-Sided” option under the “Layout” settings (as mentioned in one of the forum replies).
If you don’t see the two-sided option directly in the main print dialog, looking for a “Printer…” or “Advanced Settings” button to access the system’s print settings is a good approach within applications like Adobe products.
General Tips for Reliable Double-Sided Printing
Beyond troubleshooting the greyed-out option, here are some general tips to ensure smooth double-sided printing on your Mac:
- Keep macOS and Printer Drivers Updated: Regularly update your macOS to the latest version and ensure you are using the most recent drivers for your printer from the manufacturer’s website.
- Restart Printer and Mac: A simple restart of both your printer and your Mac can often resolve temporary glitches that might be affecting printing features.
- Consult Printer Manual: Your printer’s manual is a valuable resource. It can provide printer-specific instructions on enabling duplex printing and troubleshooting any related issues.
Conclusion
Enabling double-sided printing on your Mac should be a straightforward process, but when the option is unavailable, it can be frustrating. By following the steps outlined in this guide, from checking basic settings to more advanced troubleshooting, you should be able to resolve the issue and start enjoying the paper-saving benefits of duplex printing. Remember to verify your printer’s capabilities, ensure you have the correct drivers installed, and explore both system-wide and application-specific print settings. With a little persistence, you can get your Mac and printer working together to print efficiently and sustainably.