Double-sided printing, also known as duplex printing, is a great way to save paper and reduce your environmental footprint. It can also make your documents look more professional and compact. However, finding the double-sided printing option can sometimes be a little tricky, especially if you’re new to macOS or using different applications. This guide will walk you through how to easily print double-sided on your Mac, ensuring you can efficiently utilize this helpful feature.
Navigating print settings can vary slightly depending on the application you are using. While the core functionality remains consistent across macOS, understanding where to look for the double-sided option within different print dialog boxes is key. Often, the setting is not immediately visible and requires expanding the print dialog to reveal advanced options. Let’s explore where to find this setting and troubleshoot common issues you might encounter.
To enable double-sided printing, start by opening the document you wish to print and accessing the print dialog. This is usually done by pressing Command + P or navigating to File > Print in the application’s menu. The initial print dialog box may appear simplified, showing basic options like printer selection and number of copies. To access the double-sided printing setting, you need to expand this view to see more detailed options.
Look for a dropdown menu, often labeled with the name of the application you are using (like “Microsoft Word,” “Preview,” “Pages,” or “Safari”), located near the center of the print dialog box. This dropdown is actually a menu of menus, offering access to various print settings categories. Click on this menu to reveal a list of options.
Within this dropdown menu, locate and select “Layout.” Choosing “Layout” will display a new set of options, including settings for page layout, orientation, and importantly, the “Two-Sided” printing option.
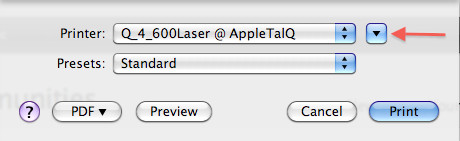 macOS print dialog regular view showing the Preview menu expanded to reveal other print options
Once you’ve selected “Layout,” you should see a “Two-Sided” option. This is typically presented as a dropdown menu itself. Click on the “Two-Sided” dropdown to choose your desired double-sided printing setting. Common options include:
- Off: Disables double-sided printing (single-sided printing).
- Long-edge binding (or Booklet style): Prints double-sided, flipping pages along the long edge, suitable for documents you read like a book.
- Short-edge binding (or Flip over): Prints double-sided, flipping pages along the short edge, often used for calendars or documents flipped like a notepad.
Select the appropriate two-sided option for your document. After choosing your two-sided printing preference, you may want to explore other layout options available in this menu, such as pages per sheet or document orientation.
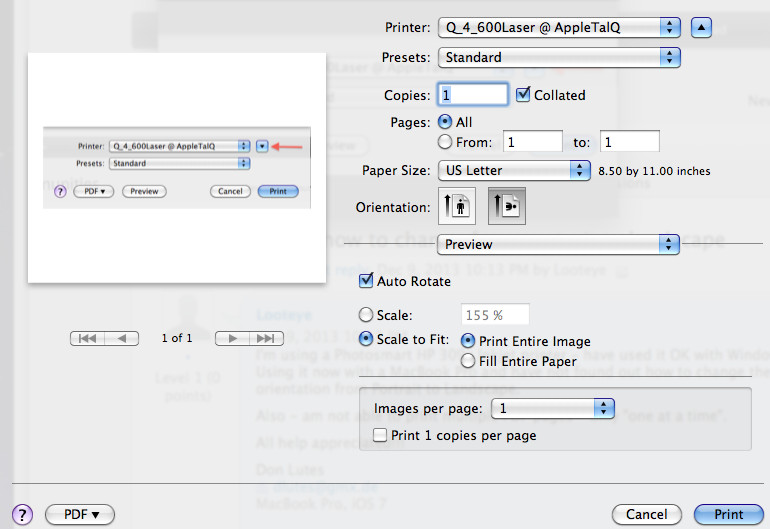 expanded macOS print dialog showing Layout menu with options for double-sided printing and other layout settings
If you are unable to find the “Two-Sided” option even after expanding the print dialog and navigating to the “Layout” menu, there are a couple of troubleshooting steps you can take.
Firstly, ensure you are using the correct printer driver. Sometimes, if you’ve accidentally installed your printer using an “AirPrint” driver, you might not have access to the full range of features, including double-sided printing. “AirPrint” drivers are simpler and offer basic functionality but may lack advanced options found in manufacturer-specific drivers.
To check and reinstall your printer driver, follow these steps:
- Remove Printer: Go to
System Settings(orSystem Preferencesin older macOS versions) >Printers & Scanners. Select your printer from the list and click the “–” (minus) button to remove it. - Reboot: Restart your Mac.
- Add Printer: After rebooting, go back to
System Settings>Printers & Scannersand click the “+” (plus) button to add your printer again. - Choose Driver: When adding the printer, ensure you select the specific driver for your printer model, ideally downloaded from the manufacturer’s website (e.g., HP, Epson, Canon). Avoid automatically selecting an “AirPrint” option if a specific driver is available.
Reinstalling the correct driver often resolves issues with missing print options. After reinstalling, check the print dialog again to see if the “Two-Sided” option now appears under the “Layout” menu.
By following these steps, you should be able to easily locate and enable double-sided printing on your Mac. Remember to look for the “Layout” option within the print dialog’s dropdown menu and ensure you are using the correct printer drivers for full functionality. Enjoy saving paper and printing more efficiently!