
Creating booklets in Microsoft Word is simpler than you might think, thanks to built-in features designed to format your documents for booklet printing. Whether you’re preparing materials for a presentation, a small event, or even embarking on a DIY book project, Word’s booklet layout options streamline the process. This guide will walk you through setting up your Word document and print settings to achieve a professional-looking booklet.
Setting Up Your Document for Booklet Printing in Word
Before you dive into writing, adjusting your document layout to the Book Fold setting is crucial. This ensures that pages are arranged correctly for folding and binding, saving you from potential formatting headaches later on. Here’s how to prepare your document:
-
Access Page Setup: Navigate to the Layout tab on the Word ribbon. In the bottom-right corner of the Page Setup group, you’ll find a small arrow – click this to launch the Page Setup dialog box.
-
Choose Book Fold Layout: In the Page Setup dialog, go to the Margins tab. Look for the Multiple pages dropdown menu and select Book fold. Notice that upon selecting this option, the Orientation automatically switches to Landscape, which is essential for booklet formatting.
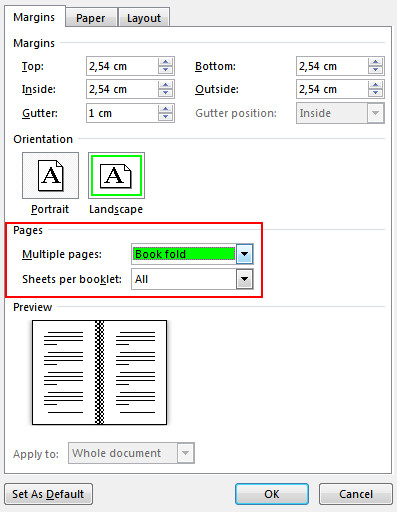 On the Margins tab under Pages, change the setting for Multiple pages: into Book fold. Orientation changes to Landscape.
 -
Specify Sheets Per Booklet (Optional): For larger documents, consider breaking them down into smaller booklets for easier handling and binding. The Sheets per booklet option allows you to specify how many pages should be included in each booklet. This is particularly useful for extensive projects that might become unwieldy if printed as a single booklet.
-
Adjust Gutter for Binding: The Gutter margin provides extra space along the inside fold of each page, accommodating the binding process. Increase the gutter value to ensure that text isn’t lost in the fold and that your booklet is easy to read after binding.
-
Select Paper Size: Switch to the Paper tab in the Page Setup dialog and choose your desired Paper size. Keep in mind that the final booklet size will be half the width of the paper size you select. For example, using standard Letter size paper (8.5 x 11 inches) will result in a booklet that is 5.5 x 8.5 inches when folded.
Tip: To enhance the visual appeal of your booklet, you can add page borders. In the Page Setup window, navigate to the Layout tab and select Borders to customize page borders.
-
Apply Settings: Click OK to apply all the booklet layout settings. If you already have content in your document, Word will automatically reformat it to fit the booklet layout. However, you might need to manually adjust images, tables, or other objects to ensure they are properly positioned within the new layout.
Printing Your Booklet from Word
Once your document is formatted for booklet printing, the next step is to print it. The print settings are crucial to ensure that your booklet prints correctly, especially regarding double-sided printing. Here’s how to proceed:
Automatic Double-Sided Printing
If your printer supports automatic duplex printing (printing on both sides automatically), follow these steps for efficient booklet printing:
-
Go to Print Settings: Click on File in the Word ribbon and then select Print to access the print settings.
-
Enable Double-Sided Printing: In the print settings panel, find the option for printing on one side (it might be labeled as Print One Sided by default). Change this setting to Print on Both Sides.
-
Choose Flip on Short Edge: When printing booklets, it’s essential that the second side of each sheet isn’t printed upside down. Select the Flip pages on short edge option to ensure correct orientation for booklet folding.
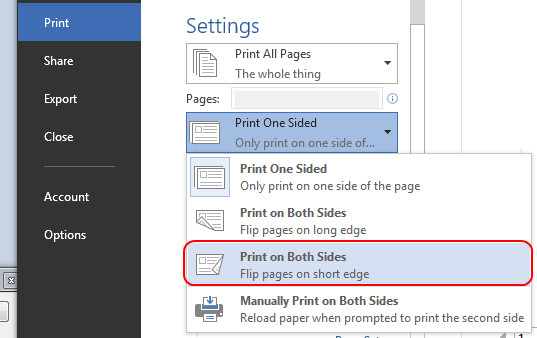 Under Settings, change Print One Sided to Print on Both Sides.
 -
Print Your Booklet: Confirm your printer settings and click Print. Your printer will automatically print your booklet on both sides of the paper in the correct page order for folding.
Manual Double-Sided Printing
If your printer does not support automatic double-sided printing, you can still print your booklet manually:
-
Select Manual Print on Both Sides: In the print settings, instead of choosing “Print on Both Sides,” select Manually Print on Both Sides.
-
Print First Side: Word will print the first side of all pages. After the first side is printed, you will receive a prompt instructing you to reload the paper to print the second side.
-
Reload Paper and Print Second Side: Carefully follow the instructions provided by Word and your printer to reload the printed pages correctly into the paper tray. The orientation in which you reload the paper is crucial to prevent the second side from printing upside down. In most cases, you’ll need to flip the sheets on the short edge.
-
Print Second Side: Once the paper is reloaded correctly, resume the print job to print the second side.
Tip: For a more professional touch, consider adding page numbers to your booklet. You can insert page numbers in the header or footer of your Word document. Explore Word’s header and footer options under the Insert tab for customization.
Printing booklets in Word is an efficient way to create organized and professional documents for various purposes. By understanding the layout and print settings, you can easily transform your Word documents into neatly bound booklets.