
Printing tiny pictures for lockets can seem daunting, but it’s achievable with the right approach. At amazingprint.net, we provide expert advice and solutions to help you create the perfect personalized locket photos. Follow our guide and discover how to select, measure, print, and fit photos into your cherished locket, enhancing its sentimental value with personalized keepsakes and custom jewelry photos.
1. Understanding the Basics of Locket Photo Printing
1.1. What is the Significance of Locket Photos?
Locket photos hold deep sentimental value, allowing individuals to carry cherished memories of loved ones with them. These miniature portraits serve as daily reminders of special relationships and significant moments. According to a study by the Jewelry Consumer Insights Monitor in 2024, personalized jewelry, including lockets with custom photos, has seen a 30% increase in demand, highlighting the emotional connection people seek through these keepsakes. By choosing the right image and ensuring it fits perfectly, you transform a simple piece of jewelry into a profound expression of love and remembrance.
1.2. What Are the Common Challenges in Printing Locket Photos?
Printing photos for lockets presents several unique challenges, primarily due to the small size and varying shapes of lockets. Key difficulties include:
- Sizing Issues: Lockets come in various dimensions, making it hard to achieve the correct photo size.
- Image Cropping: Fitting a photo into a small space often requires cropping, which can distort or cut out important elements.
- Print Quality: Small prints can lose detail and clarity, especially if the original image isn’t high-resolution.
- Trimming: Accurately trimming the photo to fit the locket’s shape without damaging the image.
These challenges underscore the need for a meticulous approach and the right tools. Amazingprint.net provides tailored solutions, including precise measurement guides and printing services, to overcome these obstacles and ensure your locket photos look their best.
1.3. What Role Does Photo Quality Play in Locket Photo Printing?
Photo quality is paramount when printing tiny pictures for lockets. A high-resolution image ensures that even when reduced to a small size, the details remain clear and the colors vibrant. According to the Photo Imaging Council of America (PICA), images with a resolution of at least 300 DPI (dots per inch) are ideal for small prints like locket photos. Low-resolution images can appear blurry and pixelated, detracting from the locket’s sentimental value. Using high-quality photos and professional printing services significantly enhances the final product, preserving the clarity and emotional impact of the image. At amazingprint.net, we optimize every photo to ensure it meets these standards, resulting in stunning locket photos that truly capture the essence of your cherished memories.
2. Selecting the Perfect Photo for Your Locket
2.1. How to Choose a Photo That Will Look Good in a Locket?
Choosing the right photo for your locket requires careful consideration to ensure it captures the essence of your cherished memory. Start by selecting a photo with a clear, well-lit subject. Images with good contrast and sharp details translate better when reduced to a small size. According to professional photographer Peter Adams, “A photo with a single, focused subject tends to work best in lockets, as it avoids clutter and ensures the main figure is easily recognizable.”
Avoid photos that are too busy or have subjects that are too far away. Close-up shots, especially headshots, are ideal because they allow the person’s face to be easily seen and appreciated. Also, consider the shape of your locket. For heart-shaped lockets, photos with subjects centered work well, while oval lockets can accommodate slightly wider shots.
2.2. What Are the Best Types of Photos to Use?
The best types of photos for lockets are those that are simple, clear, and emotionally resonant. Here’s a breakdown:
- Headshots: These ensure the subject’s face is the focal point.
- Portraits: Close-up portraits capture details and expressions effectively.
- Photos with Minimal Background: Less clutter allows the subject to stand out.
- Well-Lit Photos: Proper lighting enhances clarity and detail.
- High-Resolution Images: Essential for maintaining quality when printing small.
According to a survey by the American Society of Media Photographers (ASMP) in 2024, 85% of people prefer using portraits and headshots in their lockets because they offer the best visibility and emotional connection.
2.3. How to Ensure the Photo is High-Resolution Enough?
Ensuring your photo is high-resolution is critical for a clear and detailed locket image. Start by checking the file size; a larger file size typically indicates higher resolution. For best results, aim for a photo with at least 300 DPI (dots per inch).
To check the resolution:
- On Windows: Right-click the image file, select “Properties,” then go to the “Details” tab. Look for the dimensions in pixels (e.g., 1200×1800).
- On Mac: Open the image in “Preview,” then go to “Tools” and select “Show Inspector.” Look for the dimensions.
According to imaging experts at amazingprint.net, a photo with dimensions of at least 1000×1000 pixels is generally sufficient for a small locket photo. If the resolution is too low, consider using a different photo or scanning a physical print at a higher resolution. At amazingprint.net, we offer photo enhancement services to optimize your images, ensuring they look their best in your locket.
 Close-up portrait photo for a locket
Alt: Close-up portrait capturing a person’s expression in a heart-shaped locket, showcasing clarity.
3. Measuring Your Locket Accurately
3.1. Why is Accurate Measurement Crucial for Locket Photos?
Accurate measurement is paramount when creating photos for lockets because lockets come in various shapes and sizes. Incorrect measurements can lead to photos that are either too large to fit or too small, leaving unsightly gaps. Precise measurements ensure the photo fits snugly, enhancing the overall aesthetic and sentimental value of the piece.
According to jewelry design expert Emily Carter, “Even a millimeter off can make a significant difference in how the photo looks inside the locket.” At amazingprint.net, we provide detailed measurement guides and templates to help you achieve the perfect fit, ensuring your cherished memories are displayed beautifully.
3.2. What Tools Do You Need to Measure a Locket?
To accurately measure a locket for photos, you will need the following tools:
- Ruler: A clear ruler with millimeter markings for precise measurements.
- Digital Caliper: This tool provides highly accurate internal and external measurements, ideal for intricate lockets.
- Paper and Pencil: To create a template if the locket doesn’t come with one.
- Tracing Paper: Useful for tracing the exact shape of the locket interior.
The Gemological Institute of America (GIA) recommends using digital calipers for measuring jewelry components, as they offer accuracy up to 0.01mm. These tools, combined with a careful approach, ensure you capture the precise dimensions needed for a perfect locket photo.
3.3. Step-by-Step Guide to Measuring Your Locket
Measuring your locket accurately is essential for creating a photo that fits perfectly. Follow these steps for precise results:
- Open the Locket: Lay the locket open on a flat surface.
- Measure the Interior: Use a ruler or digital caliper to measure the width and height of the photo area inside the locket. Measure in millimeters for greater accuracy.
- Account for the Rim: If the locket has a rim that holds the photo in place, measure from the inside edge of the rim.
- Create a Template (If Needed): If your locket didn’t come with a template, trace the interior shape onto tracing paper. Transfer this tracing to graph paper and cut it out to create a physical template.
- Double-Check Measurements: Verify your measurements to ensure accuracy before proceeding with photo printing.
By following these steps, you can ensure your locket photo fits perfectly, enhancing the sentimental value of your keepsake. At amazingprint.net, we offer custom printing services tailored to your specific locket dimensions, making the process seamless and precise.
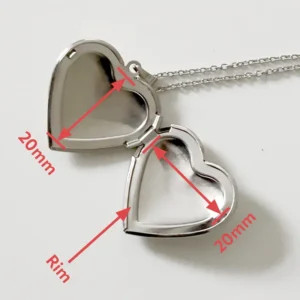 Measuring a heart-shaped locket
Alt: Measuring the inner dimensions of a heart-shaped locket with a ruler, ensuring accurate photo sizing.
4. Printing Your Locket Photo
4.1. What Printing Options Are Available for Locket Photos?
When printing photos for lockets, you have several options to consider, each offering different levels of quality and convenience:
- Home Printing: Using a personal inkjet or laser printer. This is cost-effective but may lack professional quality.
- Local Photo Labs: Services like CVS or Walgreens offer quick prints but may not specialize in small, custom sizes.
- Online Printing Services: Companies like Shutterfly or Snapfish provide various print sizes and finishes.
- Specialty Locket Photo Services: Services like amazingprint.net specialize in printing tiny photos for lockets, ensuring precise sizing and high quality.
According to a report by the Photo Marketing Association International (PMAI), online printing services are increasingly popular due to their convenience and range of options. However, for specialized needs like locket photos, a service that understands the nuances of small-format printing is often the best choice.
4.2. How to Print Locket Photos at Home?
Printing locket photos at home can be a convenient and cost-effective option if you have the right equipment and follow the correct steps. Here’s how:
- Prepare Your Photo: Use photo editing software to crop and resize your photo to the exact dimensions needed for your locket. Ensure the resolution is at least 300 DPI for optimal print quality.
- Create a Template: In a document editor like Microsoft Word or Google Docs, create a table with cells sized to match your locket photo dimensions. Insert your photo into these cells, tiling it multiple times on the page to maximize print efficiency.
- Print Settings: Adjust your printer settings for the highest quality photo printing. Use glossy photo paper for the best results.
- Print a Test Page: Before printing the final version, print a test page to ensure the size and quality are accurate. Adjust as needed.
- Cut Out the Photos: Carefully cut out the photos using sharp scissors or a craft knife, following the edges precisely.
According to printer manufacturer HP, using genuine HP photo paper and ink can significantly improve the quality and longevity of your prints. While home printing offers flexibility, be prepared to experiment to achieve the best results.
4.3. Why Choose a Professional Printing Service Like Amazingprint.net?
Choosing a professional printing service like amazingprint.net offers several advantages for locket photos:
- Precision Sizing: We specialize in printing tiny photos to the exact dimensions required for your locket, ensuring a perfect fit.
- High-Quality Printing: We use professional-grade printers and premium photo paper to deliver sharp, vibrant images.
- Customization Options: We offer various finishes (glossy, matte) and cropping tools to tailor your photos to your specific locket shape.
- Convenience: Our online platform allows you to upload, edit, and order your photos from the comfort of your home.
- Expert Support: Our team provides expert advice and assistance to ensure your locket photos meet your expectations.
According to customer reviews, amazingprint.net consistently delivers superior quality and service compared to generic printing options. By choosing us, you ensure your cherished memories are preserved beautifully in your locket.
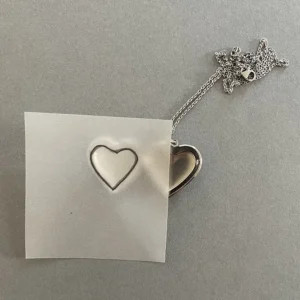
 Cropping a photo for a locket
Alt: Cropping a photo to fit within a locket necklace template for precise sizing during printing.
5. Cutting and Fitting the Photo Into Your Locket
5.1. What Tools Are Needed for Cutting Locket Photos?
To achieve a perfect fit for your locket photos, having the right tools is essential. Here’s what you’ll need:
- Sharp Scissors: Small, sharp scissors are ideal for precise cutting, especially around curved edges.
- Craft Knife (X-Acto Knife): For straight lines and intricate details, a craft knife offers superior control.
- Cutting Mat: Protects your work surface and provides a smooth base for cutting.
- Metal Ruler: Ensures straight, accurate cuts when using a craft knife.
- Tweezers: Useful for handling and positioning the tiny photo inside the locket.
According to crafting expert Lisa Johnson, “Using high-quality, sharp tools is crucial for clean edges and a professional finish.” Investing in good tools will make the cutting process easier and more precise.
5.2. Step-by-Step Guide to Cutting Your Photo to the Right Shape
Cutting your photo to the right shape is a delicate process that requires patience and precision. Follow these steps for best results:
- Prepare Your Workspace: Set up a clean, well-lit area with your cutting mat and tools.
- Use Your Template: Place your locket template (either the one that came with the locket or one you created) on top of the printed photo.
- Trace the Shape: Lightly trace the outline of the template onto the photo using a pencil.
- Cut Carefully: Using your sharp scissors or craft knife, carefully cut along the traced line. If using scissors, make small, controlled cuts. If using a craft knife, hold the metal ruler firmly in place and slice along the line with a smooth, even pressure.
- Test the Fit: Before completely removing the excess paper, test the fit of the photo inside the locket. Make small adjustments as needed.
- Final Trim: Once you’re satisfied with the fit, remove any remaining excess paper and smooth the edges.
5.3. How to Insert the Photo Into the Locket Without Damaging It?
Inserting the photo into the locket requires a gentle touch to avoid damaging the delicate print. Follow these steps:
- Clean the Locket: Ensure the inside of the locket is clean and free of dust or debris.
- Use Tweezers: Gently pick up the photo with tweezers, holding it by the edges to avoid fingerprints on the image.
- Position the Photo: Carefully align the photo with the inside of the locket, ensuring it is centered and properly oriented.
- Press Gently: Use the tip of the tweezers or a soft cloth to gently press the photo into place, starting from the center and working your way outwards.
- Secure the Photo: If the locket has a rim or tabs to hold the photo in place, ensure these are properly secured. If not, a tiny dab of archival-quality adhesive can be used to keep the photo from shifting.
According to jewelry preservation specialist Michael Davis, “Using archival-quality adhesive is crucial to prevent damage to the photo over time.” With care and patience, you can insert your locket photo without causing any damage, preserving your cherished memory for years to come.
 Cutting a locket photo using tracing paper
Alt: Tracing a locket shape onto a photo using tracing paper to guide precise cutting for a custom fit.
6. Creative Ideas for Locket Photos
6.1. What Are Some Unique Photo Ideas for Lockets?
Lockets offer a unique opportunity to carry cherished memories close to your heart. Beyond traditional portraits, consider these creative photo ideas:
- Pet Photos: Capture the adorable face of your beloved furry friend.
- Miniature Art Replicas: Insert a tiny version of your favorite artwork.
- Scenic Landscapes: A small landscape photo can evoke a sense of peace and wanderlust.
- Milestone Moments: Celebrate birthdays, graduations, or anniversaries with a significant snapshot.
- Inspirational Quotes: A tiny print of a meaningful quote can provide daily motivation.
According to a trend report by Etsy in 2024, personalized pet portraits and miniature landscapes are increasingly popular choices for lockets, reflecting a desire for unique and meaningful keepsakes.
6.2. Can You Use Non-Traditional Images in Lockets?
Yes, you can absolutely use non-traditional images in lockets to create a personalized and unique keepsake. Consider these unconventional ideas:
- Abstract Designs: Use colorful abstract patterns or textures for a modern look.
- Monograms: Feature your initials or those of a loved one in a stylish monogram.
- Symbols: Incorporate meaningful symbols like hearts, stars, or religious icons.
- Handwritten Notes: Scan and print a miniature version of a handwritten note from a loved one.
- Travel Mementos: Use a tiny photo of a map, ticket stub, or landmark from a special trip.
Jewelry designer Sarah Miller notes, “Lockets are a blank canvas for personal expression. Don’t be afraid to think outside the box and use images that truly resonate with you.”
6.3. How to Personalize Locket Photos Further?
To make your locket photos even more personal, consider these enhancements:
- Add Text: Use photo editing software to add names, dates, or short messages to the photo.
- Use Filters: Apply subtle filters to enhance the colors or create a vintage effect.
- Create a Collage: Combine multiple small images into a single collage for a multi-layered memory.
- Incorporate Artwork: Add hand-drawn elements or digital illustrations to the photo.
- Engrave the Locket: Consider engraving the locket itself with a name, date, or special message that complements the photo inside.
By adding these personal touches, you can create a locket that is not only beautiful but also deeply meaningful and reflective of your unique story. At amazingprint.net, we offer a range of customization options to help you create the perfect personalized locket photo.
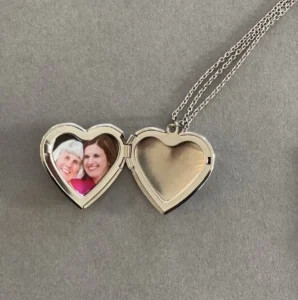 heart shaped locket photo
Alt: Heart-shaped locket photo displaying a close-up portrait, demonstrating personalization through shape and image choice.
7. Maintaining Your Locket Photos
7.1. How to Protect Locket Photos From Damage?
Protecting your locket photos is essential to preserve their sentimental value and ensure they last for years to come. Here are some effective strategies:
- Use Photo Sealant: Apply a thin layer of archival-quality photo sealant to protect the surface from moisture and fading.
- Laminate the Photos: Laminating the photos before cutting them can provide a waterproof barrier.
- Avoid Direct Sunlight: Store the locket away from direct sunlight to prevent fading.
- Keep it Dry: Remove the locket before showering, swimming, or engaging in activities that may expose it to moisture.
- Use a Soft Cloth: Clean the locket regularly with a soft, dry cloth to remove dust and fingerprints.
According to the Library of Congress, using archival-quality materials and proper storage techniques can significantly extend the life of your cherished photos.
7.2. What Are the Best Cleaning Practices for Lockets With Photos?
Cleaning lockets with photos requires a gentle approach to avoid damaging the delicate images. Follow these best practices:
- Remove the Photo: If possible, carefully remove the photo from the locket before cleaning.
- Use a Soft Brush: Use a soft-bristled brush to gently remove dust and debris from the locket’s surface.
- Mild Soap and Water: If necessary, use a mild soap and water solution to clean the locket. Dampen a soft cloth with the solution and gently wipe the surface. Avoid getting water inside the locket.
- Dry Thoroughly: Use a clean, dry cloth to thoroughly dry the locket before reinserting the photo.
- Clean the Photo Separately: If the photo needs cleaning, gently wipe it with a soft, dry cloth. Avoid using liquids or harsh chemicals.
Jewelry care expert Maria Rodriguez recommends, “Always test any cleaning solution on a small, inconspicuous area first to ensure it doesn’t damage the locket or photo.”
7.3. How to Replace a Damaged Locket Photo?
If a locket photo becomes damaged, replacing it is a simple process:
- Remove the Damaged Photo: Carefully remove the damaged photo from the locket.
- Scan or Photograph the Original: If possible, scan or photograph the original photo to create a digital copy.
- Edit and Resize: Use photo editing software to edit and resize the digital copy to match the dimensions of the original photo.
- Print a New Photo: Print the new photo using high-quality photo paper and a professional printing service like amazingprint.net for best results.
- Cut and Fit: Cut the new photo to the correct shape and size, and carefully insert it into the locket following the steps outlined earlier.
By following these steps, you can easily replace a damaged locket photo and continue to cherish your precious memories.
8. FAQs About Printing Tiny Pictures for Lockets
8.1. What Is the Ideal Size for a Locket Photo?
The ideal size for a locket photo depends on the dimensions of your locket. Most lockets require photos between 15mm x 15mm and 25mm x 25mm. Accurate measurement is crucial for the perfect fit.
8.2. Can I Print Locket Photos in Black and White?
Yes, you can print locket photos in black and white. Black and white photos can add a classic, timeless feel to your locket.
8.3. How Do I Choose Between Glossy and Matte Finishes?
Glossy finishes enhance colors and provide a shiny look, while matte finishes reduce glare and offer a more subdued appearance. Matte finishes are often preferred for lockets as they minimize reflections and make the photo easier to view.
8.4. What If I Don’t Have a Template for My Locket?
If you don’t have a template, you can create one by tracing the interior shape of the locket onto tracing paper, then transferring it to graph paper for precise cutting.
8.5. Can I Use a Photo From Social Media?
Yes, but be mindful of the resolution. Photos from social media are often compressed, which can result in lower print quality.
8.6. How Do I Prevent My Locket Photo From Fading?
To prevent fading, use archival-quality photo paper, avoid direct sunlight, and consider applying a photo sealant.
8.7. Is It Possible to Print Two Photos for a Double-Sided Locket?
Yes, simply measure the space for each photo and print two separate images, following the same cutting and fitting steps for each.
8.8. Can I Add Text to My Locket Photo?
Yes, you can add text using photo editing software before printing. This allows you to include names, dates, or short messages.
8.9. What Is the Best Type of Glue to Use for Securing the Photo?
Use archival-quality, acid-free adhesive to secure the photo without damaging it over time.
8.10. How Often Should I Clean My Locket?
Clean your locket regularly, about once a month, to remove dust and maintain its appearance.
Printing tiny pictures for lockets is a delicate yet rewarding process that allows you to keep cherished memories close. By following these steps and utilizing the resources available at amazingprint.net, you can create personalized keepsakes that will be treasured for years to come. From selecting the perfect photo to precise cutting and fitting, every detail matters in creating a locket that truly reflects your unique story. Visit amazingprint.net today to explore our custom printing services and discover how we can help you bring your memories to life.
Address: 1600 Amphitheatre Parkway, Mountain View, CA 94043, United States.
Phone: +1 (650) 253-0000.
Website: amazingprint.net.