Printing a mirror image on Word is a fantastic way to create reversed text or images for various projects, and at amazingprint.net, we’re here to guide you through it. By using simple techniques within Word, you can easily achieve the desired effect, and we’re excited to show you how, enhancing your design possibilities and ensuring your prints are perfect for heat transfers, crafts, and more. Now, let’s explore how to flip an image, reverse text, and utilize other print solutions to elevate your creations.
1. Understanding Mirror Image Printing in Word
Mirror image printing, also known as reverse printing, flips an image or text horizontally. It’s essential for projects like heat transfers, where the design needs to be reversed so that it appears correctly when ironed onto fabric. Let’s dive into the specifics.
1.1. What is a Mirror Image and Why is it Important?
A mirror image is a reversed copy of an image or text, as seen in a mirror. This reversal is crucial for specific applications:
- Heat Transfers: Ensures the design faces the correct way once transferred onto a T-shirt or other fabric.
- Stickers and Decals: Necessary for applying decals to windows or other surfaces where the adhesive side is facing the viewer.
- Crafts: Useful for various craft projects requiring reversed images.
1.2. Common Uses for Mirror Image Printing
Mirror image printing is used in numerous scenarios:
- T-Shirt Printing: The most common use, ensuring the design is right-reading after transfer.
- Glass Etching: Creating stencils for etching designs onto glass surfaces.
- Cake Decorating: Transferring edible images onto cakes and pastries.
- Temporary Tattoos: Printing temporary tattoos that appear correctly on the skin.
- Custom Stamps: Making custom stamps with reversed text and images.
1.3. Why Use Word for Mirror Image Printing?
Microsoft Word, while primarily a word processor, offers basic image manipulation capabilities that can be used for mirror image printing.
- Accessibility: Most users already have access to Word, making it a convenient option.
- Simplicity: The process is straightforward and doesn’t require specialized software.
- Basic Editing: Word allows for basic text and image editing before printing.
2. Step-by-Step Guide: How to Print a Mirror Image on Word
Here’s a detailed guide on how to print a mirror image using Microsoft Word, ensuring your projects turn out perfectly.
2.1. Method 1: Using Text Boxes and 3D Rotation
This method involves inserting a text box and using the 3D rotation feature to flip the text or image horizontally.
- Insert a Text Box:
- Open Microsoft Word.
- Go to the Insert tab.
- Click on Text Box and choose Draw Text Box.
- Draw a text box on your document.
 Draw Text Box Option in Word
- Enter and Format Text:
- Type your text inside the text box.
- Format the text as desired using the font, size, and color options in the Home tab.
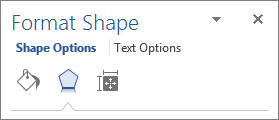
- Format the Shape:
- Right-click on the text box and select Format Shape.
- In the Format Shape pane, click on Effects (the pentagon icon).
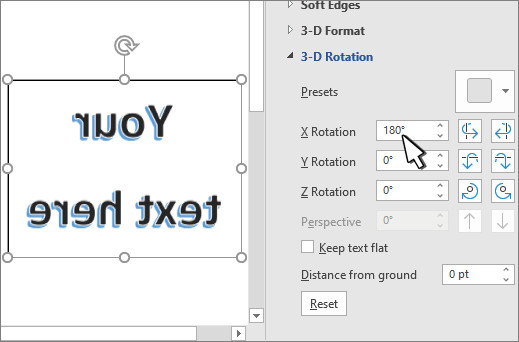
- Apply 3D Rotation:
- Expand 3-D Rotation.
- In the X Rotation box, enter 180°. This will flip the text horizontally.
 3-D rotation settings with X set to 180 deg
- Remove Fill and Outline (Optional):
- To remove the text box’s fill color, go to Shape Options in the Format Shape pane.
- Select the Fill & Line tab (the paint bucket icon).
- Expand Fill and select No fill.
- To remove the outline, right-click the text box, select Outline, and choose No Outline.
- Print the Document:
- Go to File > Print.
- Adjust your printer settings as needed and click Print.
2.2. Method 2: Using WordArt Text
WordArt provides another way to mirror text, offering more stylized options.
- Insert WordArt:
- Go to the Insert tab.
- Click on WordArt and choose a style.
- Enter your text in the WordArt text box.
- Format the Shape:
- Right-click on the WordArt and select Format Shape.
- Select Text Options, then Text Effects > 3D Rotation.
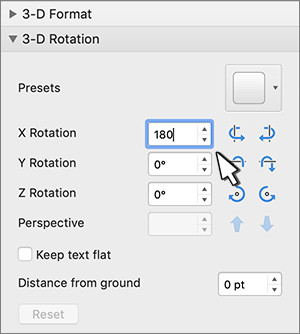
- Apply 3D Rotation:
- Under 3-D Rotation, set X Rotation to 180°.
- Print the Document:
- Go to File > Print.
- Adjust your printer settings and click Print.
2.3. Method 3: Mirroring Images in Word
To mirror an image in Word, follow these steps:
- Insert the Image:
- Go to the Insert tab.
- Click on Pictures and choose This Device to insert an image from your computer.
- Select your image and click Insert.
- Flip the Image:
- Click on the image to select it.
- Go to the Picture Format tab.
- In the Arrange group, click on Rotate > Flip Horizontal.
 Rotate and Flip Horizontal Options in Word
- Print the Document:
- Go to File > Print.
- Adjust your printer settings and click Print.
2.4. Step-by-Step Instructions with Screenshots
To further clarify the process, here are step-by-step instructions with screenshots for each method:
Method 1: Using Text Boxes and 3D Rotation
-
Insert a Text Box:
- Go to Insert > Text Box > Draw Text Box.
alt: Detailed steps to insert a text box in Word.
-
Enter and Format Text:
- Type your text inside the text box and format it.
alt: Entering and formatting text within a text box in Word.
-
Format the Shape:
- Right-click on the text box and select Format Shape.
alt: Formatting the shape of a text box in Microsoft Word.
-
Apply 3D Rotation:
- In the Format Shape pane, go to Effects > 3-D Rotation and set X Rotation to 180°.
alt: Applying 3D rotation by setting the X Rotation to 180 degrees in the Format Shape pane.
-
Remove Fill and Outline (Optional):
- Remove the fill and outline for a cleaner look.
alt: Removing the fill and outline from the text box in Word.
Method 2: Using WordArt Text
-
Insert WordArt:
- Go to Insert > WordArt and choose a style.
alt: Inserting WordArt into a Microsoft Word document.
-
Format the Shape:
- Right-click on the WordArt and select Format Shape.
alt: Formatting the shape of the WordArt text in Word.
-
Apply 3D Rotation:
- In the Format Shape pane, go to Text Options > Text Effects > 3D Rotation and set X Rotation to 180°.
alt: Applying 3D rotation to WordArt by setting the X Rotation to 180 degrees.
Method 3: Mirroring Images in Word
-
Insert the Image:
- Go to Insert > Pictures > This Device and select your image.
alt: Inserting an image into a Word document from your device.
-
Flip the Image:
- Click on the image, go to Picture Format > Rotate > Flip Horizontal.
alt: Flipping an image horizontally in Microsoft Word.
3. Advanced Tips and Tricks for Mirror Image Printing
To get the best results with mirror image printing, consider these advanced tips and tricks.
3.1. Choosing the Right Font for Mirror Printing
When printing text in mirror image, some fonts may look better than others.
- Sans-Serif Fonts: Generally, sans-serif fonts like Arial or Helvetica are easier to read when mirrored compared to serif fonts.
- Bold Fonts: Bold fonts tend to be more legible when reversed.
- Test Different Fonts: Always test a few different fonts to see which one works best for your specific project.
3.2. Adjusting Image Resolution for Best Results
Image resolution plays a crucial role in the final print quality.
- High Resolution: Use high-resolution images (300 DPI or higher) for sharp and clear prints.
- Avoid Low Resolution: Low-resolution images can appear pixelated or blurry when printed, especially after being mirrored.
- Optimize Image Size: Adjust the image size in Word to match your desired print dimensions without losing quality.
3.3. Using High-Quality Transfer Paper
The quality of the transfer paper significantly impacts the final outcome of heat transfers.
- Choose the Right Paper: Use transfer paper specifically designed for your project (e.g., light fabrics, dark fabrics).
- Follow Manufacturer Instructions: Always follow the manufacturer’s instructions for printing and transferring the design.
- Store Properly: Store transfer paper in a cool, dry place to prevent it from deteriorating.
3.4. Printer Settings for Optimal Mirror Printing
Adjusting your printer settings can improve the quality of your mirror prints.
- Print Quality: Set the print quality to “High” or “Best” for sharper images and text.
- Paper Type: Select the appropriate paper type (e.g., transfer paper, glossy paper) in the printer settings.
- Mirror Printing Option: Some printers have a built-in mirror printing option. If available, use this for convenience.
3.5. Troubleshooting Common Issues
Even with careful preparation, issues can arise. Here’s how to troubleshoot common problems:
- Image Appears Blurry:
- Cause: Low image resolution.
- Solution: Use a higher resolution image or resize the image to a smaller dimension.
- Text is Not Clear:
- Cause: Incorrect font or low print quality.
- Solution: Try a different font or increase the print quality in the printer settings.
- Transfer Paper Issues:
- Cause: Incorrect transfer paper or improper handling.
- Solution: Use the correct type of transfer paper and follow the manufacturer’s instructions carefully.
- Print Alignment Problems:
- Cause: Misalignment in the printer settings.
- Solution: Calibrate your printer and ensure the paper is loaded correctly.
4. Creative Project Ideas Using Mirror Image Printing
Mirror image printing opens up a world of creative possibilities. Here are some project ideas to inspire you.
4.1. Custom T-Shirts and Apparel
Create personalized T-shirts, hoodies, and other apparel with unique designs.
- Personalized Graphics: Design custom graphics with names, logos, or quotes.
- Photo Transfers: Transfer photos onto fabric for a personal touch.
- Event Merchandise: Create custom apparel for events, sports teams, or clubs.
4.2. Unique Home Decor Items
Add a personal touch to your home with custom-printed decor items.
- Pillow Covers: Design and print unique patterns or images on pillow covers.
- Canvas Prints: Create reversed images for transferring onto canvas.
- Glassware: Etch designs onto glassware using stencils created with mirror image printing.
4.3. Personalized Gifts
Create memorable and thoughtful gifts with mirror image printing.
- Custom Mugs: Print personalized designs or photos on mugs.
- Phone Cases: Design custom phone cases with unique graphics.
- Tote Bags: Create personalized tote bags with custom artwork.
4.4. DIY Craft Projects
Explore various DIY craft projects using mirror image printing.
- Scrapbooking: Create unique scrapbook layouts with reversed images and text.
- Card Making: Design custom greeting cards with personalized messages.
- Wood Burning: Transfer reversed images onto wood for burning intricate designs.
5. The Benefits of Using Amazingprint.net for Your Printing Needs
While Microsoft Word offers basic mirror image printing capabilities, amazingprint.net provides comprehensive solutions for all your printing needs.
5.1. High-Quality Printing Services
Amazingprint.net offers high-quality printing services that ensure your projects look professional and polished.
- Professional Equipment: We use state-of-the-art printing equipment for exceptional results.
- Wide Range of Materials: We offer a wide range of printing materials, including various types of paper, fabrics, and specialty items.
- Expertise and Experience: Our team of printing experts ensures that every project meets the highest standards of quality.
5.2. Wide Range of Printing Options
We provide a diverse array of printing options to cater to all your project requirements.
- Digital Printing: Ideal for small to medium print runs with quick turnaround times.
- Offset Printing: Best for large print runs, offering cost-effectiveness and high quality.
- Large Format Printing: Perfect for banners, posters, and other large-scale projects.
- 3D Printing: Create custom 3D models and prototypes with precision.
5.3. Customization and Personalization
At amazingprint.net, we understand the importance of personalization.
- Custom Designs: Create fully customized designs with our easy-to-use design tools.
- Personalized Products: Personalize a wide range of products, from apparel to home decor items.
- Branding Solutions: Develop consistent branding materials for your business.
5.4. Cost-Effective Solutions
We offer cost-effective printing solutions to meet your budget.
- Competitive Pricing: Our pricing is competitive, ensuring you get the best value for your money.
- Bulk Discounts: We offer discounts for large orders, making it more affordable to print in bulk.
- Custom Quotes: Get a custom quote tailored to your specific project needs.
5.5. Convenient Online Ordering
Our online ordering process is simple and convenient.
- Easy-to-Use Website: Our website is user-friendly, making it easy to place and track your orders.
- Upload Your Designs: Easily upload your designs and customize your products online.
- Fast Turnaround Times: We offer fast turnaround times to meet your deadlines.
6. Understanding Different Printing Techniques
Different printing techniques can influence the final product, particularly when dealing with mirror images.
6.1. Heat Transfer Printing
Heat transfer printing is a popular method for applying designs to fabrics.
- Process: The design is printed on special transfer paper and then applied to the fabric using heat and pressure.
- Mirror Image Requirement: The design must be printed in mirror image so that it appears correctly on the fabric after transfer.
- Best For: T-shirts, hoodies, and other apparel items.
6.2. Screen Printing
Screen printing involves creating a stencil and using it to apply ink to a surface.
- Process: A stencil is created on a screen, and ink is pushed through the stencil onto the material.
- Mirror Image Requirement: The stencil must be created in mirror image for the design to appear correctly.
- Best For: Large print runs on textiles, posters, and other flat surfaces.
6.3. Dye Sublimation
Dye sublimation is a process where ink is transferred to a material using heat.
- Process: The design is printed on special sublimation paper and then transferred to the material using heat and pressure, causing the ink to turn into a gas and bond with the material.
- Mirror Image Requirement: The design must be printed in mirror image for the colors to appear correctly on the final product.
- Best For: Polyester fabrics, mugs, and other coated items.
6.4. Inkjet Printing
Inkjet printing involves spraying tiny droplets of ink onto a surface.
- Process: The printer sprays ink droplets onto the paper to create the image.
- Mirror Image Requirement: For certain applications like heat transfers, the image needs to be mirrored before printing.
- Best For: General document printing, photo printing, and creating transfer paper designs.
6.5. Laser Printing
Laser printing uses a laser to create an image on a drum, which then transfers the image to the paper.
- Process: A laser beam creates an electrostatic image on a drum, toner is applied to the drum, and then the toner is transferred to the paper using heat and pressure.
- Mirror Image Requirement: Similar to inkjet printing, mirroring is needed for specific applications like heat transfers.
- Best For: High-quality text and graphics printing, ideal for professional documents and marketing materials.
7. How to Choose the Right Material for Your Printing Project
Selecting the appropriate material is crucial for achieving the desired outcome.
7.1. Different Types of Transfer Paper
Different transfer papers are designed for specific materials and applications.
- Light Fabric Transfer Paper: For use on white or light-colored fabrics.
- Dark Fabric Transfer Paper: For use on black or dark-colored fabrics.
- Specialty Transfer Paper: For use on specific materials like wood, metal, or ceramics.
7.2. Fabric Options for Heat Transfer
The type of fabric you choose will affect the quality and durability of the heat transfer.
- Cotton: A popular choice for its comfort and affordability.
- Polyester: Known for its durability and resistance to fading.
- Blends: Cotton-polyester blends offer a good balance of comfort and durability.
7.3. Paper Types for Different Printing Techniques
Different printing techniques require different types of paper.
- Glossy Paper: For high-quality photo prints with vibrant colors.
- Matte Paper: For professional documents with a non-reflective finish.
- Cardstock: For greeting cards, business cards, and other sturdy items.
7.4. Considerations for Durability and Longevity
When choosing materials, consider the durability and longevity of the final product.
- UV Resistance: Choose materials that are resistant to fading from UV exposure.
- Water Resistance: Select materials that are water-resistant for outdoor applications.
- Scratch Resistance: Opt for materials that are scratch-resistant for high-use items.
8. Future Trends in Mirror Image Printing
The world of printing is constantly evolving, with new trends and technologies emerging.
8.1. Advances in Heat Transfer Technology
Heat transfer technology continues to advance, offering improved quality and versatility.
- Better Adhesion: New adhesives provide stronger bonds between the transfer and the fabric.
- Higher Resolution: Improved printing techniques allow for higher resolution transfers with finer details.
- Eco-Friendly Options: Eco-friendly transfer papers and inks are becoming more widely available.
8.2. Innovations in Printing Materials
Innovative printing materials are expanding the possibilities of mirror image printing.
- Self-Weeding Transfer Paper: Eliminates the need to trim excess transfer paper, saving time and effort.
- Stretchable Transfer Paper: Allows for greater flexibility and durability on stretchy fabrics.
- 3D Printable Transfers: Create three-dimensional transfers with unique textures and effects.
8.3. The Role of Sustainability in Printing
Sustainability is becoming an increasingly important consideration in the printing industry.
- Recycled Materials: Using recycled paper and other materials reduces the environmental impact of printing.
- Water-Based Inks: Water-based inks are less harmful to the environment than solvent-based inks.
- Energy Efficiency: Energy-efficient printing equipment reduces energy consumption and lowers carbon emissions.
According to research from the Printing Industries of America (PIA), in July 2025, sustainable printing practices are expected to grow by 30%, driven by consumer demand and regulatory changes.
8.4. Integration with Digital Design Tools
The integration of printing with digital design tools is streamlining the creative process.
- Seamless Workflows: Integration with software like Adobe Photoshop and Illustrator allows for seamless design and printing workflows.
- Cloud-Based Solutions: Cloud-based printing solutions enable easy access to designs and printing resources from anywhere.
- Mobile Printing: Mobile printing apps allow you to print directly from your smartphone or tablet.
9. Frequently Asked Questions (FAQ) About Mirror Image Printing
Here are some frequently asked questions about mirror image printing to help you better understand the process.
9.1. What is the Difference Between Mirror Image and Reverse Printing?
Mirror image and reverse printing are the same thing; they both refer to flipping an image or text horizontally.
9.2. Can I Print a Mirror Image Directly from My Printer?
Some printers have a built-in mirror printing option in the printer settings. Check your printer’s manual for instructions.
9.3. What Type of Paper Should I Use for Heat Transfers?
Use transfer paper specifically designed for heat transfers, and choose the right type for light or dark fabrics.
9.4. How Do I Prevent the Image from Cracking After Heat Transfer?
Use high-quality transfer paper, apply the correct amount of heat and pressure, and follow the manufacturer’s instructions carefully.
9.5. Can I Use Mirror Image Printing for Stickers?
Yes, mirror image printing is used for stickers, especially those applied to glass or transparent surfaces.
9.6. What DPI Should My Images Be for Mirror Printing?
For the best results, use images with a resolution of 300 DPI (dots per inch) or higher.
9.7. How Do I Remove the Text Box Outline in Word?
Right-click on the text box, select “Outline” in the mini toolbar, and choose “No Outline”.
9.8. Can I Mirror an Image on My Phone and Print It?
Yes, many photo editing apps on smartphones allow you to flip images horizontally before printing.
9.9. What Are the Best Fonts to Use for Mirror Printing on T-Shirts?
Sans-serif and bold fonts are generally the best choices, as they are easier to read when mirrored.
9.10. Where Can I Find High-Quality Printing Services for Mirror Images?
Amazingprint.net offers high-quality printing services with a wide range of options for all your mirror image printing needs.
10. Conclusion: Unleash Your Creativity with Mirror Image Printing
Mirror image printing is a versatile technique that opens up a world of creative possibilities. Whether you’re creating custom apparel, personalized gifts, or unique home decor items, mastering this technique allows you to bring your visions to life. At amazingprint.net, we’re committed to providing you with the tools, resources, and expertise you need to achieve outstanding results. From understanding the basics of mirror image printing to exploring advanced techniques and future trends, we’ve covered everything you need to know to unleash your creativity.
So, take the next step and explore the endless possibilities of mirror image printing. Visit amazingprint.net today to discover our wide range of printing services, explore our design tools, and get inspired for your next project. Let us help you turn your ideas into reality with high-quality prints that make a lasting impression.
Ready to get started? Contact us at +1 (650) 253-0000 or visit our website at amazingprint.net to learn more and place your order today! Our address is 1600 Amphitheatre Parkway, Mountain View, CA 94043, United States. We can’t wait to help you bring your creative projects to life!