Printing large format maps can seem daunting if you don’t have access to large format printers. How To Print A Large Map On Multiple Pages is a question that many people face, and the solution lies in using readily available software and some clever techniques. At amazingprint.net, we specialize in providing comprehensive guides and resources to help you achieve high-quality prints, regardless of the size or complexity of your project. Discover how to easily tile and print your map, ensuring every detail is captured with precision.
1. Understanding the Need for Multi-Page Printing
1.1. Why Print a Large Map on Multiple Pages?
Printing a large map on multiple pages, also known as tiling, is essential when you need a map that exceeds the standard paper sizes your printer can handle. Here are a few reasons why this method is so valuable:
- Cost-Effective: Avoid the expense of using a professional large format printer.
- Accessibility: Utilize your standard home or office printer.
- Scalability: Create maps of virtually any size by adjusting the number of pages.
- Detail Preservation: Maintain high levels of detail in your map by printing at a higher resolution across multiple pages.
1.2. Common Uses for Large Format Maps
Large format maps are incredibly versatile and find applications in various fields. Here are some common uses:
- Navigation: Ideal for hiking, camping, and other outdoor activities.
- Urban Planning: Useful for displaying city layouts and zoning information.
- Construction: Provides detailed site plans for construction projects.
- Real Estate: Showcases property locations and neighborhood details.
- Education: Great for teaching geography and spatial awareness.
- Event Planning: Displays venue layouts and directional information for large events.
- Emergency Services: Assists in disaster response and management.
1.3. Key Considerations Before You Start
Before diving into the printing process, consider the following:
- Map Resolution: Ensure your map has a high enough resolution to maintain clarity when printed across multiple pages.
- Paper Quality: Choose a paper type that suits your needs, whether it’s standard printer paper, photo paper, or something more durable.
- Printer Capabilities: Know the maximum printable area of your printer to avoid unexpected cropping.
- Software Options: Select the right software for tiling and printing your map (more on this below).
- Assembly Method: Plan how you will assemble the printed pages to create the final map. Options include taping, gluing, or framing.
2. Essential Software for Tiling and Printing Maps
2.1. Adobe Acrobat Reader DC
Adobe Acrobat Reader DC is a free and widely used tool for viewing and printing PDF documents. It offers a “Poster” printing option specifically designed for tiling large images across multiple pages.
2.1.1. How to Use Adobe Acrobat Reader DC for Tiling:
- Open Your Map: Open your map image after converting it to a PDF file.
- Select Print: Go to
File > Print. - Choose Poster Option: In the print dialog box, select the “Poster” option under the “Page Sizing & Handling” section.
- Adjust Tile Scale: Modify the “Tile Scale” to adjust the size of the printed map. This will determine how many pages the map is split into.
- Overlap Settings: Adjust the “Overlap” setting to add a small overlap between the printed pages. This makes it easier to align and assemble the final map.
- Print: Click “Print” to start printing your map.
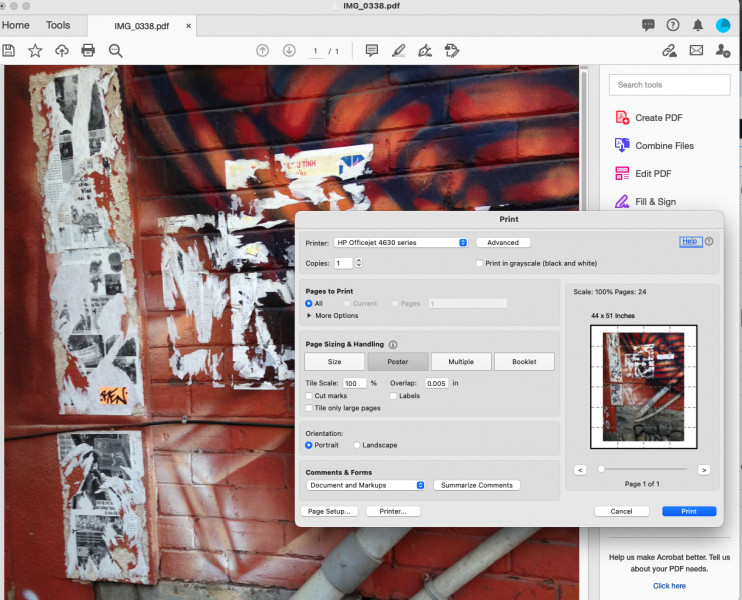 Adobe Acrobat Reader DC Print Settings
2.1.2. Advantages of Using Adobe Acrobat Reader DC:
- Free: Acrobat Reader DC is available for free.
- User-Friendly: It has a simple and intuitive interface.
- Overlap Option: The overlap feature simplifies the assembly process.
- Widely Compatible: It supports PDF files, which are a common format for maps.
2.2. Microsoft Excel
Microsoft Excel, while primarily a spreadsheet program, can also be used to print large images across multiple pages. This method is particularly useful for those who are comfortable with Excel’s interface.
2.2.1. How to Use Microsoft Excel for Tiling:
- Open a New Spreadsheet: Create a new spreadsheet in Excel (
File > New). - Insert Your Map: Place your cursor in cell A1. Go to
Insert > Pictures > Place Over Cells > Picture From File. - Size the Image: Drag the corner of the image to resize it. Excel will display the dimensions in inches as you drag.
- Adjust Page Breaks: Excel will automatically display dashed lines indicating page breaks. Adjust the image size to achieve the desired number of pages.
- Print: Go to
File > Print. Ensure that the print area is set correctly to include all parts of the image.
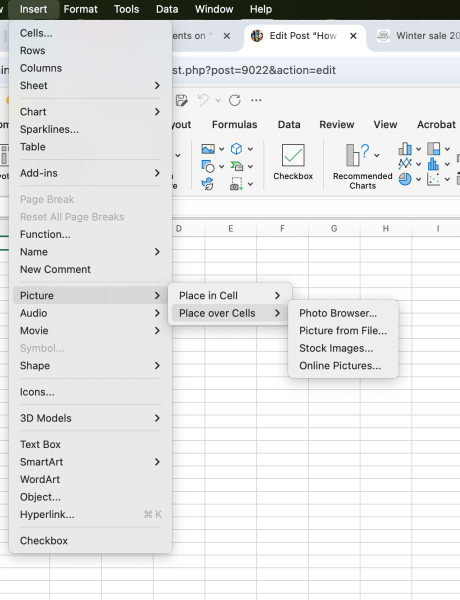 Microsoft Excel Spreadsheet
2.2.2. Advantages of Using Microsoft Excel:
- Precise Control: Excel allows for precise control over image size and page breaks.
- Familiar Interface: Many users are already familiar with Excel.
- Flexibility: It offers flexibility in adjusting the layout and size of the printed map.
2.2.3. Disadvantages of Using Microsoft Excel:
- Manual Adjustments: Adjusting page breaks can be tedious.
- Image Quality: Excel might compress the image, reducing its quality.
2.3. Google Sheets
Google Sheets, the free, web-based spreadsheet program, offers a similar method to Excel for printing large images across multiple pages. It’s a great option if you don’t have access to Microsoft Excel.
2.3.1. How to Use Google Sheets for Tiling:
- Create a New Spreadsheet: Open a new spreadsheet in Google Sheets (
File > New > Spreadsheet). - Insert Your Map: Go to
Insert > Image > Image over cells. Choose your image file from your computer or Google Drive. - Resize the Image: Drag the corner of the image to resize it.
- Adjust Page Breaks: Google Sheets will display dashed lines indicating page breaks. Adjust the image size to achieve the desired number of pages.
- Print: Go to
File > Print. Ensure that the print area is set correctly and scale is set to 100% to include all parts of the image.
2.3.2. Advantages of Using Google Sheets:
- Free: Google Sheets is free to use with a Google account.
- Accessibility: It is accessible from any device with an internet connection.
- Collaboration: It allows for easy collaboration with others.
2.3.3. Disadvantages of Using Google Sheets:
- Internet Dependency: Requires an internet connection.
- Limited Features: Fewer advanced features compared to Excel.
2.4. Specialized Tiling Software
For more advanced users, dedicated tiling software offers a range of features for precise control over the printing process.
2.4.1. PosteRazor
PosteRazor is a free software tool specifically designed for creating posters from images. It allows you to divide an image into multiple pages for printing and assembly.
How to Use PosteRazor:
- Open Your Image: Open your image file in PosteRazor.
- Adjust Paper Size and Overlap: Specify the paper size and desired overlap between pages.
- Set Poster Dimensions: Define the dimensions of the final poster. PosteRazor will automatically calculate the number of pages needed.
- Export to PDF: Export the tiled image as a PDF file.
- Print: Print the PDF file using Adobe Acrobat Reader or another PDF viewer.
Advantages of Using PosteRazor:
- Specialized Functionality: Specifically designed for tiling images.
- Customizable Settings: Offers a wide range of customizable settings.
- Free: PosteRazor is available for free.
2.4.2. Block Posters
Block Posters is an online tool that allows you to create posters from images by tiling them across multiple pages.
How to Use Block Posters:
- Upload Your Image: Upload your image to the Block Posters website.
- Adjust Poster Size: Specify the desired size of the poster.
- Customize Settings: Customize settings such as paper size and overlap.
- Download PDF: Download the tiled image as a PDF file.
- Print: Print the PDF file using Adobe Acrobat Reader or another PDF viewer.
Advantages of Using Block Posters:
- Online Tool: No software installation required.
- User-Friendly Interface: Simple and intuitive interface.
- Customizable Options: Offers various customization options.
3. Step-by-Step Guide to Printing a Large Map
3.1. Preparing Your Map Image
- Choose High-Resolution Image: Start with a high-resolution image to ensure clarity when printed across multiple pages. A resolution of at least 300 DPI (dots per inch) is recommended.
- Crop and Resize: Crop and resize the image to focus on the area you want to print. Use image editing software like Adobe Photoshop or GIMP to adjust the dimensions.
- Convert to PDF: Convert your image to a PDF file. This ensures that the image is universally compatible and maintains its formatting.
3.2. Printing with Adobe Acrobat Reader DC
- Open PDF in Acrobat Reader: Open the PDF file in Adobe Acrobat Reader DC.
- Go to Print: Click
File > Printto open the print dialog box. - Select Poster Option: Under “Page Sizing & Handling,” choose the “Poster” option.
- Adjust Tile Scale: Adjust the “Tile Scale” to fit the image to your desired size. The tile scale determines how many pages the map will be split into.
- Set Overlap: Set the “Overlap” to around 0.25 inches (6.35 mm). This will create a small overlap between the pages, making it easier to align them.
- Print: Click “Print” to send the job to your printer.
3.3. Printing with Microsoft Excel
- Open Excel and Insert Image: Open a new Excel spreadsheet and insert your map image into cell A1 (
Insert > Pictures > Place Over Cells > Picture From File). - Resize Image: Drag the corner of the image to resize it to your desired dimensions. Watch the tooltip to see the current size in inches.
- Adjust Page Breaks: Excel will show page breaks as dashed lines. Adjust the image size to fit the map across multiple pages as needed.
- Set Print Area: Go to
Page Layout > Print Area > Set Print Area. Select the area that contains the image. - Print: Go to
File > Print. Make sure the scaling is set to “No Scaling” to print the image at its actual size.
3.4. Printing with Google Sheets
- Open Google Sheets and Insert Image: Open a new Google Sheets spreadsheet and insert your map image (
Insert > Image > Image over cells). - Resize Image: Drag the corner of the image to resize it to your desired dimensions.
- Adjust Page Breaks: Google Sheets will show page breaks as dashed lines. Adjust the image size to fit the map across multiple pages as needed.
- Print: Go to
File > Print. Set the scale to “100%” and adjust the margins as needed.
4. Assembling Your Multi-Page Map
4.1. Trimming the Edges
- Gather Your Materials: You will need a paper cutter or scissors, a ruler, and tape or glue.
- Trim Excess Paper: Trim the edges of each page along the overlap areas. This will allow the pages to align seamlessly.
- Be Precise: Use a ruler and a paper cutter for straight, clean cuts.
4.2. Aligning and Securing the Pages
- Lay Out the Pages: Lay out the printed pages on a flat surface in the correct order.
- Align Carefully: Align the edges of the pages carefully, using the overlap as a guide.
- Secure with Tape or Glue: Use tape or glue to secure the pages together. If using tape, apply it to the back of the pages for a cleaner look.
- Check Alignment: After securing each page, double-check the alignment to ensure the map is accurate.
4.3. Finishing Touches
- Reinforce Seams: Reinforce the seams with additional tape or glue for added durability.
- Mount or Frame: Consider mounting the map on a foam board or framing it to protect it and make it easier to display.
- Laminate: Laminating the map can protect it from moisture and wear, making it suitable for outdoor use.
5. Tips for High-Quality Multi-Page Map Printing
5.1. Choosing the Right Paper
- Standard Printer Paper: Suitable for basic maps and temporary use.
- Photo Paper: Ideal for maps with vibrant colors and high detail.
- Matte Paper: Reduces glare and provides a professional look.
- Glossy Paper: Enhances colors but can be prone to glare.
- Waterproof Paper: Essential for outdoor use and protection against moisture.
5.2. Optimizing Printer Settings
- High Resolution: Set your printer to the highest resolution setting for the best quality.
- Color Settings: Adjust the color settings to match the colors in your map.
- Borderless Printing: If your printer supports it, use borderless printing to eliminate white borders around each page.
- Print Quality: Select the “Best” or “Photo” print quality option.
5.3. Managing Color Accuracy
- Calibrate Your Monitor: Calibrate your monitor to ensure accurate color representation.
- Use Color Profiles: Use color profiles (ICC profiles) to match the colors in your map to your printer’s capabilities.
- Test Prints: Perform test prints to check color accuracy and make adjustments as needed.
5.4. Addressing Common Printing Issues
- Banding: If you notice horizontal lines in your print, try cleaning your printer’s print heads.
- Color Casts: Adjust the color settings in your printer driver to correct any color casts.
- Blurry Prints: Ensure that your image resolution is high enough and that your printer settings are optimized for quality.
6. Real-World Applications and Case Studies
6.1. Case Study: Hiking Trail Map
A local hiking club needed a large, detailed map of a popular trail system. They used Adobe Acrobat Reader DC to tile a high-resolution map image across multiple pages, printed the pages on waterproof paper, and assembled the final map with durable tape. The map was then laminated to protect it from the elements.
6.2. Case Study: Event Venue Layout
An event planner needed a large layout of a venue for a conference. They used Microsoft Excel to tile the layout image across multiple pages, printed the pages on matte paper, and assembled the final layout with glue. The layout was then mounted on a foam board for easy display.
6.3. Practical Examples
- Emergency Evacuation Maps: Hospitals and schools can use multi-page printing to create large, detailed evacuation maps.
- Construction Site Plans: Construction companies can print large site plans for on-site reference.
- Home Decor: Individuals can create custom maps of their favorite cities or regions for home decor.
7. Common Mistakes to Avoid
7.1. Low-Resolution Images
Using low-resolution images will result in blurry and pixelated prints. Always start with a high-resolution image.
7.2. Incorrect Tile Scale
Setting the tile scale incorrectly can result in a map that is too small or too large. Double-check the tile scale settings before printing.
7.3. Insufficient Overlap
Not providing enough overlap between pages can make it difficult to align the pages accurately. Aim for at least 0.25 inches (6.35 mm) of overlap.
7.4. Poor Alignment
Careless alignment can result in a map that is skewed or inaccurate. Take your time and align the pages carefully.
7.5. Using Incompatible Paper
Using paper that is not compatible with your printer can result in poor print quality. Check your printer’s specifications for recommended paper types.
8. Future Trends in Map Printing
8.1. Advancements in Printing Technology
Advancements in printing technology are making it easier and more affordable to print large format maps. Inkjet printers are becoming more capable of handling large prints with high quality.
8.2. Sustainable Printing Practices
Sustainable printing practices are becoming increasingly important. Using recycled paper and eco-friendly inks can help reduce the environmental impact of map printing.
8.3. Integration with GIS Software
Integration with Geographic Information System (GIS) software is making it easier to create and print custom maps. GIS software allows users to create maps with precise geographic data and export them in formats suitable for multi-page printing. According to research from the Environmental Systems Research Institute (ESRI), in July 2024, GIS provides enhanced cartographic capabilities and data integration tools.
8.4. 3D Map Printing
3D map printing is an emerging technology that allows for the creation of tactile maps. These maps can be used to provide accessibility for visually impaired individuals or to create detailed models of terrain.
9. FAQ: Printing Large Maps on Multiple Pages
9.1. What is the best software for printing a large map on multiple pages?
Adobe Acrobat Reader DC is a great free option due to its poster printing feature. For more control, consider specialized tiling software like PosteRazor.
9.2. How do I ensure my map doesn’t lose quality when printed across multiple pages?
Always start with a high-resolution image (at least 300 DPI) and optimize your printer settings for the best quality.
9.3. What kind of paper should I use for a large map?
The choice depends on the use case. Standard printer paper is fine for basic maps, while photo paper is better for vibrant, detailed maps. Waterproof paper is ideal for outdoor use.
9.4. How much overlap should I use when tiling my map?
Aim for at least 0.25 inches (6.35 mm) of overlap to make alignment easier.
9.5. Can I print a large map from a mobile device?
Yes, many mobile apps allow you to print images across multiple pages. Check if your printer has a companion app that supports this feature.
9.6. What do I do if my printer is leaving white borders on the pages?
If your printer supports it, use borderless printing to eliminate white borders.
9.7. How can I protect my printed map from the elements?
Laminate the map or print it on waterproof paper.
9.8. How do I calibrate my monitor for accurate color representation?
Use a monitor calibration tool or software to adjust your monitor’s settings.
9.9. Can I use Google Docs to print a large map on multiple pages?
While Google Docs doesn’t have a built-in tiling feature, you can insert the image into Google Sheets and use the spreadsheet method described above.
9.10. Is it possible to print a map larger than my printer’s maximum paper size?
Yes, by tiling the map across multiple pages and assembling them, you can create a map of virtually any size.
10. Conclusion: Your Path to Stunning Large Maps
Printing a large map on multiple pages is a practical and cost-effective solution for various needs. By following the steps outlined in this guide and utilizing the recommended software and techniques, you can create stunning, high-quality maps without the need for expensive large format printers. Whether you’re planning a hiking trip, organizing an event, or creating a custom piece of home decor, mastering the art of multi-page map printing will open up a world of possibilities.
At amazingprint.net, we’re dedicated to providing you with the information and resources you need to achieve your printing goals. Explore our website for more guides, tips, and inspiration to elevate your printing projects. Don’t let size limit your creativity – start printing your large maps today and bring your visions to life. For further assistance, you can reach us at Address: 1600 Amphitheatre Parkway, Mountain View, CA 94043, United States. Phone: +1 (650) 253-0000.
Ready to start your next printing project? Visit amazingprint.net today to discover more tips, tricks, and ideas for all your printing needs! Dive into our comprehensive articles, compare printing options, and find the inspiration you need to bring your projects to life. Let amazingprint.net be your guide to achieving printing excellence. Explore now and unleash your creativity! Whether you need help with large format printing, understanding different paper types, or mastering color accuracy, amazingprint.net has the resources you need to succeed.
Keywords and LSI Keywords
- Keywords: How to print a large map on multiple pages, tiling maps, multi-page printing, large format printing, poster printing.
- LSI Keywords: Adobe Acrobat Reader, Microsoft Excel, Google Sheets, PosteRazor, Block Posters, map printing, high-resolution images, paper types, printer settings, assembling maps.