
Is your 3D printer churning out uneven prints or struggling with adhesion? Learning How To Level A 3d Printer Bed is key to achieving flawless results and it’s easier than you think! At amazingprint.net, we guide you through the process, ensuring your printer bed is perfectly trammed for optimal 3D printing success. Let’s dive into the world of print bed calibration, surface adhesion, and precision printing.
1. What Does It Mean To Level a 3D Printer Bed?
Leveling the 3D printer bed, more accurately termed “tramming,” means ensuring the nozzle maintains a consistent height across the entire print surface along the X and Y axes. This process guarantees uniform first layers and successful 3D prints.
In simpler terms, think of it as making sure your print bed is as flat and even as possible, so the distance between the nozzle and the bed is the same no matter where the nozzle is located. Here are some additional points to consider about leveling your 3D printer bed:
- Why is it called leveling when it’s actually tramming? The term “leveling” is commonly used because it’s easy to understand, even though the more precise term is “tramming.” Leveling implies making something horizontal, while tramming specifically refers to making the nozzle equidistant from the bed at all points.
- Importance of first layer: The first layer is the foundation of your entire 3D print. If the first layer is not properly adhered to the bed, the rest of the print is likely to fail.
- Impact on print quality: An unlevel bed can cause various issues, such as poor adhesion, warping, and uneven layers. Leveling the bed ensures that the print adheres properly and that each layer is consistent.
- Manual vs. Automatic Leveling: Some printers have automatic bed leveling features, which use sensors to detect the bed’s surface and compensate for any unevenness. However, many printers still require manual leveling, which involves adjusting screws or knobs under the bed to achieve the correct height.
- Frequency of Leveling: How often you need to level your bed depends on the printer, the materials you are using, and how often you print. It’s a good practice to check the level before each print or at least once a week.
- Tools for Leveling: While a piece of paper is commonly used, other tools like feeler gauges or specialized bed leveling tools can provide more precise measurements.
2. When Should You Level Your 3D Printer Bed?
You should level your 3D printer bed in several key situations to maintain optimal print quality and prevent issues. Level the bed:
- Before the First Print: Always level after assembling your new printer to ensure a properly calibrated starting point.
- After Nozzle Changes: Re-level whenever you change the nozzle to confirm the correct distance from the print bed.
- Regularly (Weekly): Check the level weekly to correct any shifts from regular use.
- After a Failed Print: If prints aren’t sticking, an unlevel bed is a likely cause.
Consistent leveling ensures your prints start right and stick every time. Leveling issues can be subtle but impactful, leading to frustration and wasted filament. Some additional points to consider about when you should level your 3D printer bed:
- Thermal Expansion: As your printer heats up, the bed and other components may expand slightly. Leveling the bed at printing temperature can account for this expansion, ensuring consistent results.
- Vibrations: The vibrations from printing can gradually cause the bed to become unlevel over time. Regular checks can prevent this from affecting your prints.
- Moving the Printer: If you move your printer, even slightly, it’s essential to re-level the bed. The movement can easily disrupt the bed’s alignment.
- Changing Filament Types: Different filaments may require slightly different bed temperatures and first layer settings. Adjusting the bed level can help optimize adhesion for each material.
- Upgrading Components: Any upgrades or modifications to your printer, such as installing a new bed surface or adjusting the frame, will likely require re-leveling the bed.
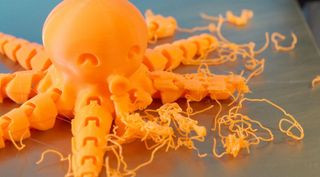 Leveling a 3D Printer Bed
3. What Are The Essential Tools For Leveling Your 3D Printer Bed?
Leveling your 3D printer bed requires a few simple tools to ensure accuracy and prevent damage. These include:
- Paper: A standard piece of paper is perfect for gauging the nozzle-bed distance.
- Filament: Load PLA filament for reliable test prints.
- Isopropyl Alcohol: Clean the bed thoroughly before leveling to remove residues.
- Paper Towel: Use for applying isopropyl alcohol and wiping the bed.
- Slicer App: Needed to slice your test print file (Ultimaker Cura is a great option).
- Bed Level Test Print: Download a test print file designed for bed leveling.
- 3D Printer: Essential for performing the leveling process.
Having these tools ready ensures a smooth and effective bed leveling process. Proper preparation prevents adhesion issues and guarantees successful prints. Some additional points to consider about the essential tools for leveling your 3D printer bed:
- Paper Type: While standard printer paper works well, some users prefer using receipt paper or business cards. These materials have a consistent thickness and can provide a more precise feel.
- Filament Storage: Store your filament in a dry place to prevent moisture absorption. Moist filament can cause printing issues and affect bed adhesion.
- Alcohol Concentration: Use isopropyl alcohol with a concentration of at least 70% for effective cleaning. Higher concentrations are even better.
- Microfiber Cloth: Consider using a microfiber cloth instead of a paper towel for cleaning the bed. Microfiber cloths are lint-free and won’t leave any residue on the surface.
- Digital Calipers: Digital calipers can be helpful for measuring the exact thickness of your paper or other leveling tools. This can improve the precision of your leveling process.
- Feeler Gauges: Feeler gauges are thin metal strips with precise thicknesses. They can be used to measure the gap between the nozzle and the bed more accurately than paper.
- Bed Leveling Probe: If you want to automate the bed leveling process, consider installing a bed leveling probe, such as a BLTouch. These probes use sensors to map the bed’s surface and compensate for any unevenness.
 Tools for Leveling
4. How Do You Prepare Your 3D Printer For Bed Leveling?
Preparing your 3D printer properly before leveling is crucial for accurate results. The steps include:
- Clean the Bed: Use isopropyl alcohol and a paper towel to scrub the print surface, removing any grease or residue.
- Preheat Printer and Bed: Set the nozzle to 200°C and the bed to 60°C for PLA. Allow 5-10 minutes for the printer to stabilize at these temperatures.
- Home the Printer: Move the printer to the 0,0,0 position using the “Home” function.
- Engage Bed Leveling Mode: Look for “Bed Leveling,” “Level Corners,” or “Bed Tramming” options in the printer controls.
- Position Print Head: Move the print head to each corner, centering it over the adjustment knob.
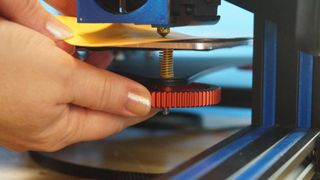
- Adjust Nozzle Height: Use the adjustment knobs to raise or lower the nozzle until it barely touches the paper.
Repeat this process for all corners and the center, as adjusting one corner may affect others. Following these steps carefully ensures a precise and effective leveling process. Some additional points to consider about preparing your 3D printer for bed leveling:
- Preheat Considerations: Some experts believe preheating the bed is unnecessary, as thermal expansion is minimal. However, leveling under printing conditions is generally recommended for best results.
- Disabling Steppers: Some printers require you to disable the stepper motors to allow manual movement of the print head. This can usually be done through the printer’s menu.
- Firmware Upgrades: Upgrading your printer’s firmware can add helpful features, such as a bed tramming routine.
- Bed Surface Type: Different bed surfaces, such as glass, PEI, or magnetic build plates, may require slightly different preparation steps. Refer to the manufacturer’s instructions for your specific bed surface.
- Automatic Bed Leveling Sensors: If your printer has an automatic bed leveling sensor, make sure it is properly calibrated before starting the leveling process.
- Leveling Order: Some users prefer to level the bed in a specific order, such as front-left, front-right, back-right, back-left. Experiment to see which order works best for your printer.
- Patience: Bed leveling can be a time-consuming process, especially if you are new to 3D printing. Be patient and take your time to ensure accurate results.
5. How Do You Run A Bed Level Test Print?
Running a test print after leveling is essential to verify the accuracy of your adjustments. Here’s how to do it:
- Load Test Print: Import a bed level test print file into your slicer software.
- Adjust Settings: Set the Z height to 0.4mm for a single-layer test print.
- Clean the Bed: Wipe the bed with isopropyl alcohol and a paper towel.
- Start the Print: Begin the test print and observe the first layer closely.
By carefully observing the first layer, you can quickly identify areas that need further adjustment, ensuring optimal bed adhesion and print quality. Some additional points to consider about running a bed level test print:
- Test Print Design: Choose a test print design that covers the entire bed surface. This will allow you to identify any areas that are not level.
- Print Speed: Reduce the print speed for the first layer to give the filament more time to adhere to the bed.
- Fan Settings: Turn off the cooling fan for the first layer to improve adhesion.
- Live Adjustments: Many printers allow you to make live Z-offset adjustments during the first layer. This can be helpful for fine-tuning the bed level on the fly.
- Material Compatibility: Make sure your test print settings are appropriate for the material you are using. Different materials may require different bed temperatures and first layer heights.
- Visual Inspection: Carefully examine the first layer for any signs of over-extrusion, under-extrusion, or poor adhesion.
- Iterative Process: Bed leveling is often an iterative process. You may need to run the test print multiple times and make adjustments to the bed level until you achieve satisfactory results.
6. How Do You Diagnose The Results Of A Bed Level Test Print?
Diagnosing the results of a bed level test print involves carefully examining the first layer to identify any issues with the nozzle-bed distance. Here’s what to look for:
- Nozzle Too Close: The filament appears rough and uneven, possibly plowing through the plastic, creating thin patches. It may be difficult to remove the print.
- Nozzle Too Far: Gaps are visible between the lines of filament. The lines appear rounded and may not stick to the bed.
- Nozzle Just Right: The filament appears slightly squished or flattened, blending smoothly with a uniform appearance and minimal roughness.
Adjust the bed level as needed based on these observations and rerun the test print until you achieve the desired first layer appearance. Some additional points to consider about diagnosing the results of a bed level test print:
- Over-Extrusion: If the nozzle is too close, the filament may be over-extruded, resulting in a thick, squished layer with ridges or bumps.
- Under-Extrusion: If the nozzle is too far, the filament may be under-extruded, resulting in a thin, weak layer with gaps between the lines.
- Warping: If the bed is not level, some areas of the print may warp or lift off the bed.
- Elephant’s Foot: If the first layer is too squished, it may result in an “elephant’s foot” effect, where the bottom of the print is wider than the rest of the print.
- Consistent Issues: If you are consistently seeing the same issues in the same areas of the bed, it may indicate a warped bed or other hardware problem.
- Online Resources: There are many online resources, such as forums and videos, that can help you diagnose bed leveling issues.
- Community Support: Don’t hesitate to ask for help from the 3D printing community. Other users may have experienced similar issues and can offer valuable advice.
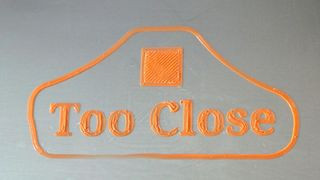 Nozzle Too Close
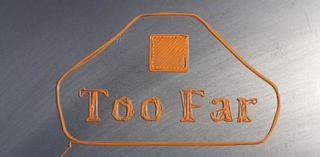 Nozzle Too Far
 Nozzle Just Right
7. What Are Some 3D Printer Bed Leveling Aids?
Achieving a perfect first layer through manual bed leveling can be challenging, but several aids can simplify the process. Consider these options before resorting to auto-leveling sensors:
- Clean the Bed: Ensure the bed is impeccably clean, as even minor grease can prevent adhesion.
- Use a Raft: Apply a raft via your slicer to create a robust first layer, which is especially useful for tall or delicate prints.
- Apply Glue Stick: Use a washable disappearing glue stick for better adhesion; apply a thin layer across the bed, and wash off after a few prints.
- Shim the Bed: Correct warped beds by shimming with aluminum foil or tape to level uneven spots.
Implementing these aids can significantly improve bed adhesion and print quality. Some additional points to consider about 3D printer bed leveling aids:
- Bed Adhesion Additives: In addition to glue sticks, there are other bed adhesion additives available, such as hairspray, painter’s tape, and specialized bed adhesion solutions.
- PEI Sheets: PEI (Polyetherimide) sheets are a popular bed surface that provides excellent adhesion for a variety of materials.
- Magnetic Build Plates: Magnetic build plates make it easy to remove prints from the bed. They also allow you to quickly swap out different bed surfaces.
- Automatic Bed Leveling (ABL) Sensors: ABL sensors, such as BLTouch, use a probe to measure the bed’s surface and automatically compensate for any unevenness.
- Mesh Bed Leveling: Mesh bed leveling is a software feature that creates a mesh of the bed’s surface and uses it to adjust the Z height during printing.
- Firmware Support: Make sure your printer’s firmware supports the bed leveling aids you are using.
- Experimentation: Experiment with different bed leveling aids to find what works best for your printer and materials.
8. How Do You Shim Your 3D Printer Bed?
Shimming a 3D printer bed is a method to correct warping or unevenness by adding thin materials under the print surface. To shim effectively:
- Remove Print Surface: Take off the removable print surface.
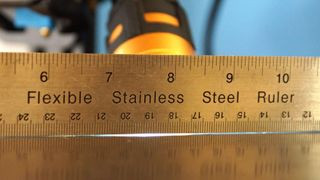
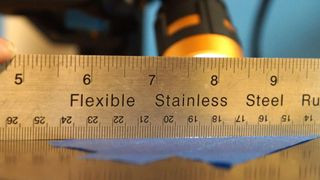
- Inspect Bed with Straight Edge: Place a steel ruler on the bed and use a flashlight to identify gaps.
- Cut Shims: Cut pieces of foil or tape sized to match the identified gaps.
- Apply Shims: Place the shims on the printer bed, checking with the ruler for flatness.
- Layer Shims: Add more layers of foil or tape until the bed is mostly flat.
- Replace Bed Surface: Put the print surface back on and level the bed again.
This technique helps create a more uniform printing surface, improving adhesion and print quality. Some additional points to consider about how to shim your 3D printer bed:
- Shim Materials: Aluminum foil and painter’s tape are commonly used for shimming, but you can also use other thin materials, such as paper or plastic shims.
- Precision: Use a straight edge and a flashlight to accurately identify the areas that need shimming.
- Gradual Adjustments: Add shims gradually and check the bed’s level after each adjustment.
- Even Distribution: Try to distribute the shims evenly across the bed to avoid creating new unevenness.
- Secure Attachment: Make sure the shims are securely attached to the bed to prevent them from moving during printing.
- Bed Surface Compatibility: Be careful not to damage the bed surface when shimming.
- Alternative Solutions: If shimming is not effective, you may need to replace the bed or use an automatic bed leveling system.
 Checking Bed for Warping
 Leveling After Shimming
9. What Are The Common Issues Encountered During Bed Leveling?
Several issues can arise during bed leveling, potentially hindering the process and affecting print quality. Here are some common problems and how to address them:
- Warped Bed: A warped bed can make it difficult to achieve a consistent level across the entire surface. Shimming or replacing the bed may be necessary.
- Loose Bed Adjustment Knobs: Over time, the bed adjustment knobs can loosen, causing the bed to become unlevel. Regularly check and tighten the knobs as needed.
- Inconsistent Nozzle Height: Variations in nozzle height can lead to uneven first layers. Ensure the nozzle is properly installed and tightened.
- Filament Adhesion Problems: Poor filament adhesion can result from an unlevel bed, incorrect temperature settings, or a dirty print surface. Adjust settings and clean the bed regularly.
- Incorrect Z-Offset: An incorrect Z-offset can cause the nozzle to be too close or too far from the bed. Calibrate the Z-offset to ensure proper first-layer adhesion.
- Vibrations and Movement: Vibrations or movement of the printer during leveling can affect accuracy. Ensure the printer is placed on a stable surface.
- Software and Firmware Issues: Outdated or faulty software or firmware can cause bed leveling problems. Update to the latest versions for optimal performance.
Addressing these common issues promptly will help ensure a smooth and successful bed-leveling process. Some additional points to consider about common issues encountered during bed leveling:
- Bed Material: Different bed materials, such as glass, aluminum, or PEI, can have different leveling characteristics. Choose a bed material that is suitable for your printing needs.
- Print Speed: Printing too fast can exacerbate bed leveling issues. Reduce the print speed for the first layer to improve adhesion.
- Environmental Factors: Environmental factors, such as temperature and humidity, can affect bed leveling. Maintain a stable environment for optimal results.
- Regular Maintenance: Regular maintenance, such as cleaning the bed and tightening screws, can help prevent bed leveling issues.
- Troubleshooting Resources: There are many online resources and communities dedicated to 3D printing troubleshooting. Utilize these resources to find solutions to common bed leveling problems.
10. How Can Amazingprint.net Help With Your 3D Printing Needs?
At amazingprint.net, we understand the challenges of achieving perfect 3D prints. From providing detailed guides on bed leveling to offering comprehensive resources on various 3D printing techniques, materials, and troubleshooting tips, we are here to support your 3D printing journey. Whether you’re a beginner or an experienced maker, our website offers valuable insights to enhance your skills and produce high-quality prints.
Explore our articles for step-by-step instructions, comparisons of different printing methods, and creative ideas to inspire your next project. Our goal is to be your go-to source for all things 3D printing, ensuring you have the knowledge and inspiration to bring your ideas to life.
Ready to take your 3D printing to the next level? Visit amazingprint.net today and discover a wealth of information to help you master bed leveling and beyond!
Address: 1600 Amphitheatre Parkway, Mountain View, CA 94043, United States
Phone: +1 (650) 253-0000
Website: amazingprint.net
Don’t let bed leveling frustrations hold you back. Explore amazingprint.net for expert guidance, innovative solutions, and a supportive community to help you achieve 3D printing success in the USA.
FAQ About Leveling a 3D Printer Bed
1. Why is bed leveling so important for 3D printing?
Bed leveling is crucial because it ensures the first layer of your print adheres properly to the print bed. A level bed guarantees a consistent distance between the nozzle and the bed, leading to better adhesion and overall print quality.
2. How often should I level my 3D printer bed?
You should level your bed before your first print, after changing the nozzle, weekly, and after any failed prints to maintain optimal printing conditions.
3. What tools do I need to level my 3D printer bed?
Essential tools include a piece of paper, filament, isopropyl alcohol, a paper towel, a slicer app, and a bed-level test print file.
4. What does it mean to “home” the printer before leveling?
Homing the printer moves the print head to the 0,0,0 position, providing a consistent starting point for the leveling process.
5. How do I know if my nozzle is too close to the bed?
If the nozzle is too close, the filament will appear rough and uneven, possibly plowing through the plastic and creating thin patches.
6. What happens if my nozzle is too far from the bed?
If the nozzle is too far, there will be gaps between the lines of filament, and the lines will appear rounded and may not stick to the bed.
7. What is a bed level test print, and why is it important?
A bed level test print is a file designed to print a single-layer pattern across the bed, allowing you to visually assess the bed’s level and identify areas needing adjustment.
8. What is “shimming” a 3D printer bed, and when is it necessary?
Shimming involves placing thin materials under the print surface to correct warping or unevenness, creating a more uniform printing surface.
9. Can I use automatic bed leveling instead of manual leveling?
Yes, automatic bed leveling (ABL) sensors can simplify the process by automatically compensating for any unevenness in the bed.
10. Where can I find more resources and help with 3D printing bed leveling?
Visit amazingprint.net for detailed guides, comparisons of different printing methods, and creative ideas to inspire your next project.