
Duplex printing, or two-sided printing, is a fantastic way to save paper and reduce your environmental footprint. Most modern printers offer this feature, but sometimes setting it up on your Mac can be a little tricky. If you’re struggling to figure out how to duplex print on your Mac, you’re not alone. Many users encounter issues where the duplex option is greyed out or simply doesn’t appear.
This comprehensive guide will walk you through several effective methods to enable duplex printing on your Mac, ensuring you can effortlessly print on both sides of the page. We’ll cover everything from basic settings checks to more advanced troubleshooting steps, so you can find the solution that works for you.
Troubleshooting Duplex Printing on macOS
Before diving into specific solutions, it’s important to understand why you might be facing issues with duplex printing. Common culprits include incorrect printer driver installations, misconfigured system settings, or even limitations within specific applications. Let’s explore some proven methods to get you printing double-sided documents in no time.
Method 1: Checking Basic Printer Settings on Your Mac
Often, the simplest solutions are the most effective. Let’s begin by checking the basic printer settings on your macOS system.
-
Access System Preferences: Click on the Apple icon in the top-left corner of your screen and select “System Preferences.”
-
Navigate to Printers & Scanners: In the System Preferences window, find and click on “Printers & Scanners.”
-
Select Your Printer: On the left side of the Printers & Scanners window, select the printer you are trying to use for duplex printing.
-
Check “Options & Supplies”: Click the “Options & Supplies…” button next to your printer’s name.
-
Go to the “Options” Tab: In the “Options & Supplies” window, click on the “Options” tab.
-
Look for Duplex Settings: Here, you should see options related to your printer’s features. Look for any settings related to “Duplex Unit,” “Two-Sided Printing,” or similar terms.
-
If you see a “Duplex Unit” or “Two-Sided Printing” option: Ensure it is checked or enabled. If it’s not checked, select the checkbox to activate duplex printing.
-
If you don’t see any Duplex options or it’s greyed out: This indicates a potential driver issue or that the system isn’t recognizing your printer’s duplex capability correctly. Proceed to the next methods.
-
 Ensure Duplex is checked in printer options to enable two-sided printing
Alt Text: Screenshot of printer options tab on macOS, highlighting the location of the Two-Sided printing option which is currently disabled and greyed out.
Method 2: Resetting the Printing System and Reinstalling Drivers
If the basic settings don’t reveal a duplex option, resetting the printing system and reinstalling your printer drivers can often resolve the issue. This method, suggested by user Zara1985 in the original forum, can be particularly effective when the system has become confused about printer capabilities.
-
Open Printers & Scanners: Go back to “System Preferences” and then “Printers & Scanners.”
-
Right-Click on Your Printer: Hover your mouse over your printer’s name in the left sidebar. Right-click (or Control-click) on the printer title.
-
Reset Printing System: From the context menu that appears, select “Reset printing system…”. Be aware that this will remove all printers from your list, so you’ll need to re-add them.
-
Confirm Reset: A confirmation dialog will appear. Click “Reset” to proceed.
-
Add Printer Again: After the printing system resets, click the “+” button at the bottom of the Printers & Scanners window to add a new printer.
-
Crucial Step: Choose the Correct Driver: When adding the printer, pay close attention to the “Use” field. Instead of selecting the default “Secure AirPrint” or “AirPrint” option, click on the “Use” dropdown menu.
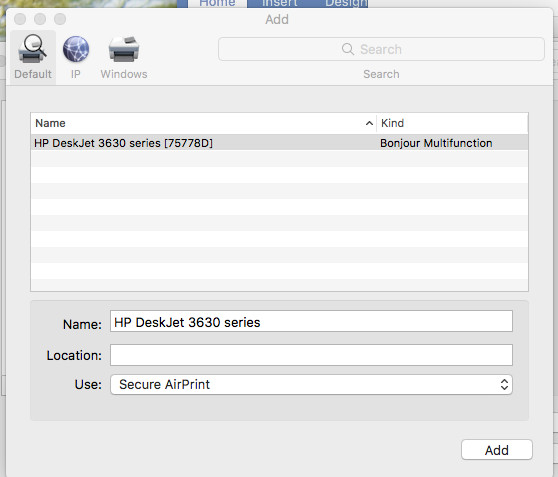 Click the Use dropdown menu to select printer driver
Alt Text: Screenshot showing the Add Printer dialog box on macOS, emphasizing the “Use” dropdown menu with “Secure AirPrint” selected as default.
-
Select Original Printer Software: From the “Use” dropdown menu, you should see a list of options. Look for the original software driver specifically for your printer model (e.g., “Epson Printer Driver,” “HP Laserjet Driver”). This is critical. AirPrint drivers are generic and may not expose all of your printer’s features, including duplexing. You might need to try different options listed that relate to your printer brand to find the one that offers duplex functionality.
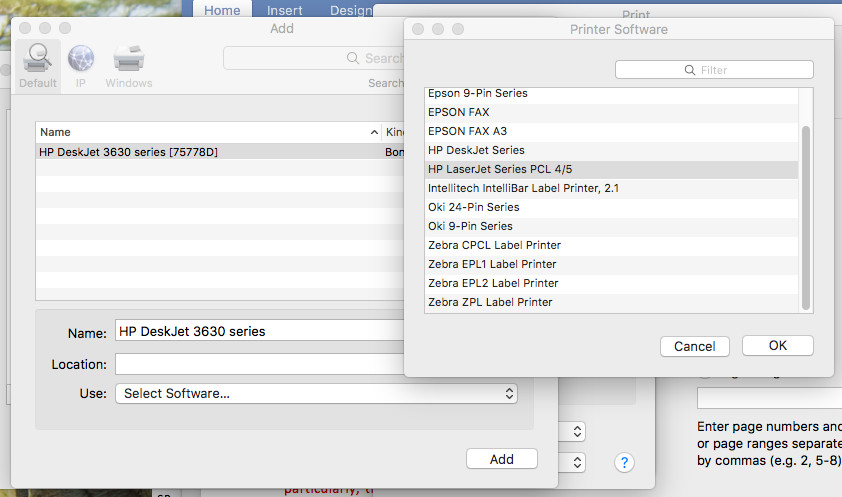 Select the original printer software driver from the Use menu
Alt Text: Screenshot of the “Use” dropdown menu expanded, showing a list of printer driver options, including specific manufacturer drivers and AirPrint options.
-
Add the Printer: Once you’ve selected the correct driver (the one that is not AirPrint and ideally named after your printer manufacturer), click the “Add” button in the bottom right corner.
 Click the Add button to finish adding the printer
Alt Text: Screenshot highlighting the “Add” button in the bottom right corner of the Add Printer dialog box, ready to finalize printer addition.
-
Check for Duplexer Option: After adding the printer with the correct driver, you might be prompted with additional options or settings. Specifically, look for a checkbox or option related to “Duplexer” or “Two-Sided Printing” and ensure it is selected. This step confirms to the system that your printer’s duplex unit is installed and should be used.
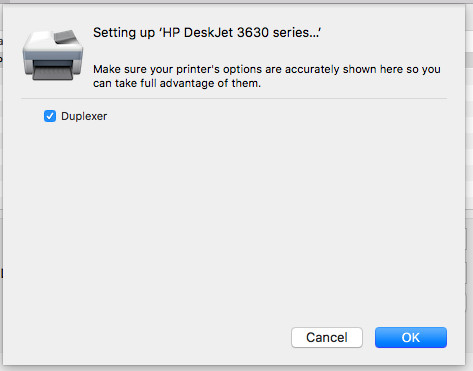 Ensure Duplexer option is checked during printer setup
Alt Text: Screenshot showing printer configuration options after adding a printer, specifically pointing to a checkbox labeled “Duplexer” which is currently checked to enable duplex printing.
-
Test Duplex Printing: Try printing a document and check if the two-sided printing option is now available in the print dialog.
Method 3: Utilizing the CUPS Web Interface (Advanced)
For more technically inclined users, or if the previous methods haven’t worked, you can try enabling duplex printing through the CUPS (Common Unix Printing System) web interface. This method, suggested by user BobHarris, allows you to directly configure printer options at a lower level.
-
Enable CUPS Web Interface: Open the “Terminal” application (found in Applications > Utilities).
-
Enter Command: Type or paste the following command into the Terminal window and press Enter:
sudo cupsctl WebInterface=yes -
Enter Password: You will be prompted to enter your Mac’s administrator password. Type your password and press Enter. (Note: You won’t see the password characters as you type).
-
Access CUPS in Web Browser: Open your web browser (Safari, Chrome, Firefox, etc.) and in the address bar, type:
localhost:631and press Enter. This will take you to the CUPS web interface. -
Navigate to Printers: In the CUPS web interface, click on the “Printers” tab.
-
Select Your Printer: Click on the name of your printer from the list of printers.
-
Administration Menu: You should see “Maintenance” and “Administration” dropdown menus. Click on the “Administration” dropdown and select “Set Default Options.”
-
Find Duplex Settings: Within the printer-specific options, look for settings related to “Duplex,” “Two-Sided Printing,” or “Duplex Unit.” The exact wording will vary depending on your printer model.
-
Enable Duplex Unit: If you find an option like “Duplex Unit” with choices like “Installed” and “Not Installed,” select “Installed.”
-
Set Default Options: After making changes, click the “Set Default Options” button at the bottom of the page.
-
Authentication: You may be prompted for a username and password. Use your macOS username and password.
-
Disable CUPS Web Interface (Optional but Recommended): For security reasons, it’s a good practice to disable the CUPS web interface after you’re done. In the Terminal, enter the following command and press Enter:
sudo cupsctl WebInterface=no -
Test Duplex Printing: Try printing from your Mac to see if duplex printing is now enabled.
Method 4: Application-Specific Print Settings
Sometimes, duplex printing issues are specific to certain applications, as noted by user theatermacker. Applications like Adobe Acrobat might have their own print dialogs that require separate configuration.
-
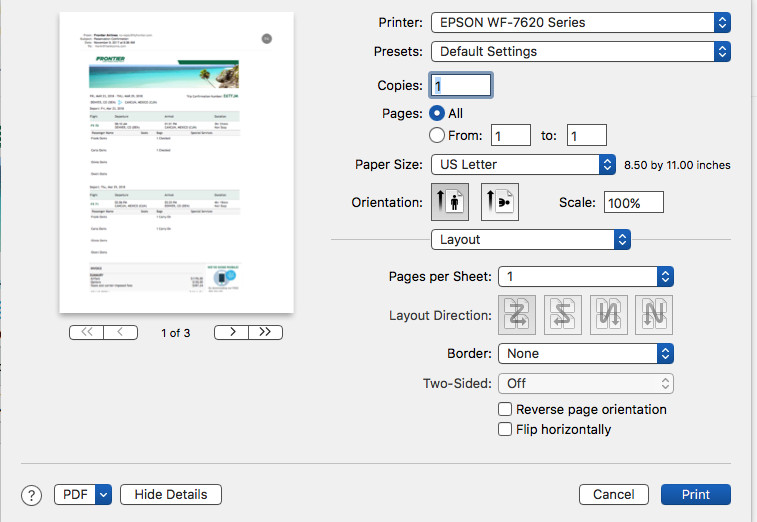
Adobe Acrobat/Reader: In Adobe Acrobat’s print dialog, look for a “Printer…” button. Clicking this might open the standard macOS print dialog where you can then access the “Two-Sided” printing options within the “Layout” settings, as mentioned by theatermacker.
-
Firefox: Firefox, as mentioned in the forum, often displays the “Two-Sided” option directly in its print dialog, next to the “Copies” setting. Check for this option if you’re printing from Firefox.
-
Safari, Preview, TextEdit, Keynote, Microsoft Word, Mail: These and many other standard Mac applications should generally use the system’s print settings. If duplex printing is enabled at the system level (using methods 1, 2, or 3), it should ideally be available in these applications’ print dialogs as well.
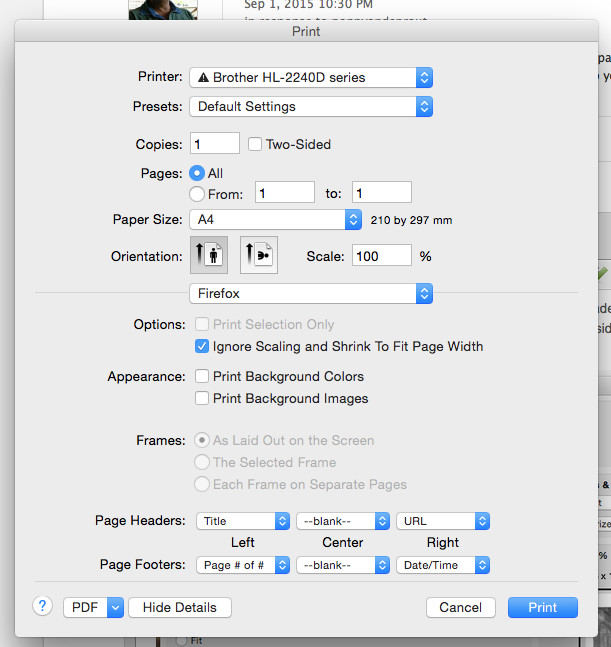 Example of Two-Sided option in Firefox print dialog
Alt Text: Screenshot of Firefox print dialog box, highlighting the “Two-Sided” dropdown menu conveniently located next to the “Copies” setting.
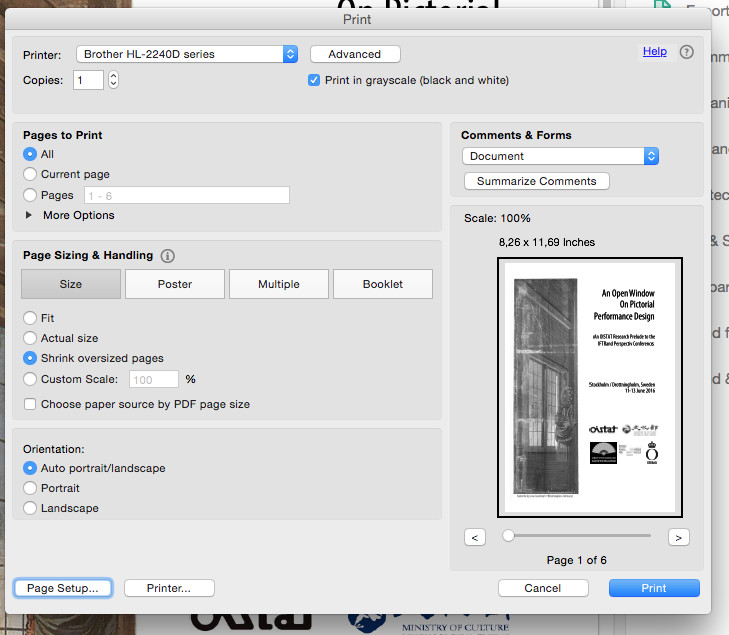 Example of missing Two-Sided option in Adobe Acrobat print dialog
Alt Text: Screenshot of Adobe Acrobat print dialog box, demonstrating the absence of the “Two-Sided” printing option near the “Copies” setting, indicating a different configuration approach might be needed.
Conclusion
Enabling duplex printing on your Mac can sometimes be a multi-step process, but by following these methods, you should be able to resolve most common issues. Start with the basic settings, and if needed, progress to resetting the printing system or using the CUPS interface. Remember to always use the correct printer-specific drivers rather than generic AirPrint drivers to access the full functionality of your printer.
By taking these steps, you’ll be well on your way to efficiently printing on both sides of the paper, saving resources and making the most of your printer’s capabilities. If you continue to experience problems, consulting your printer manufacturer’s support resources or website for model-specific drivers and troubleshooting advice is always a good next step.