Drawing paw prints for dogs is an enjoyable and creative activity, and understanding how to accurately represent them opens up a world of personalized artwork. If you’re looking to master the art of canine paw print illustration and create unique prints, amazingprint.net offers expert guidance and resources to make your artistic journey seamless. Enhance your creative projects with paw print designs, and explore a range of options that bring your artistic visions to life.
1. What is a Dog Paw Print and Its Significance?
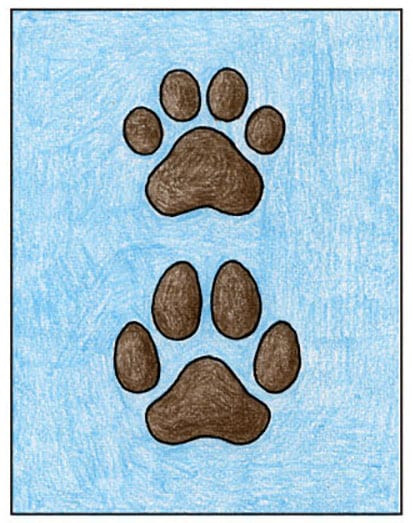
A dog paw print is the impression left behind by a dog’s paw, and it’s not just a cute mark; it’s a unique identifier and a symbol of the bond we share with our canine companions. Dog paw prints are significant because they:
- Uniquely Identify Dogs: Just like human fingerprints, each dog’s paw print is unique due to the individual patterns of ridges and pads.
- Symbolize Affection: Paw prints are often used in art and design to represent love and connection with dogs.
- Offer Sentimental Value: Many people create keepsakes with their dog’s paw prints to cherish their memories.
- Aid in Tracking: In certain situations, paw prints can help track a dog’s movements, especially in wildlife or search and rescue scenarios.
Understanding the anatomy and variations of paw prints helps in accurately representing them in drawings, crafts, and other creative projects.
2. What Are the Basic Shapes and Anatomy of a Dog Paw Print?
The basic shapes and anatomy of a dog paw print consist of several key elements:
- Main Pad (Metacarpal Pad): This is the largest pad in the center of the paw print, providing primary support and cushioning.
- Toe Pads (Digital Pads): Typically, there are four toe pads arranged around the main pad. These pads support each toe and help with traction.
- Claw Marks: Depending on the surface and how the dog walks, claw marks may or may not be visible at the front of each toe pad.
- Overall Shape: The general shape of the paw print can vary slightly depending on the breed and size of the dog, but it’s usually oval or roundish.
When drawing, start with the central pad and then add the toe pads around it, paying attention to the spacing and size to accurately represent a realistic paw print.
3. What Materials Do I Need To Draw Paw Prints Realistically?
To draw realistic paw prints, you’ll need a few essential materials. Here’s a list to get you started:
| Material | Description | Why It’s Important |
|---|---|---|
| Drawing Paper | Smooth surface paper suitable for drawing with pencils or markers. | Provides a clean base for your drawing and prevents ink from bleeding. |
| Pencils | A set of pencils with varying grades (e.g., HB, 2B, 4B) for sketching and shading. | Allows you to create different tones and add depth to your paw print drawing. |
| Eraser | A kneaded eraser or a regular eraser for correcting mistakes and lightening areas. | Essential for refining your drawing and achieving precise details. |
| Fine-Tip Markers/Pens | Black fine-tip markers or pens for outlining and adding details. | Help to define the edges and add intricate details to make the paw print stand out. |
| Blending Stumps | Paper blending stumps for smoothing out shaded areas. | Create smooth transitions and soften the pencil strokes for a more realistic look. |
| Reference Images | Photographs or illustrations of real dog paw prints. | Provide accurate references for the anatomy and details of the paw print. |
| Ruler | A ruler for measuring and ensuring symmetrical shapes, especially if you are creating a pattern. | Useful for maintaining consistency and precision in your drawing. |
| Compass | For drawing perfect circles or arcs if needed. | Can be helpful in creating evenly rounded pads and shapes within the paw print. |
| Coloring Supplies | Colored pencils, markers, or watercolors for adding color to your drawing. | Allow you to personalize your paw print and add a realistic touch if desired. |
| Fixative Spray | A spray to protect your finished drawing from smudging. | Helps to preserve your artwork, especially if you’ve used soft pencils that are prone to smudging. |
| Tracing Paper | For transferring initial sketches onto your final drawing surface. | Useful if you want to refine your sketch separately before committing to the final paper. |
| Surface Cleaner | Clean cloth or brush to clean your surface. | Keeping your workspace clean is important to avoid dust or debris sticking to your artwork. |
Having these materials on hand will help you create detailed and realistic drawings of dog paw prints. Remember to practice and experiment with different techniques to find what works best for you.
4. How Do You Start Drawing a Simple Dog Paw Print Step-By-Step?
Starting with a simple dog paw print is easy. Here’s a step-by-step guide:
-
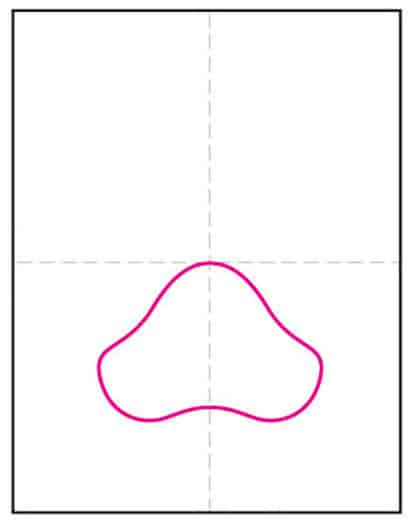
Draw the Main Pad: Begin by drawing a large oval shape. This will be the central pad of the paw print.
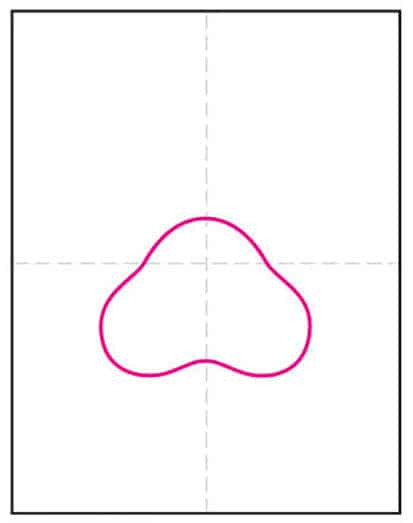 Drawing the main pad as a large oval shape for a dog paw print.
 -
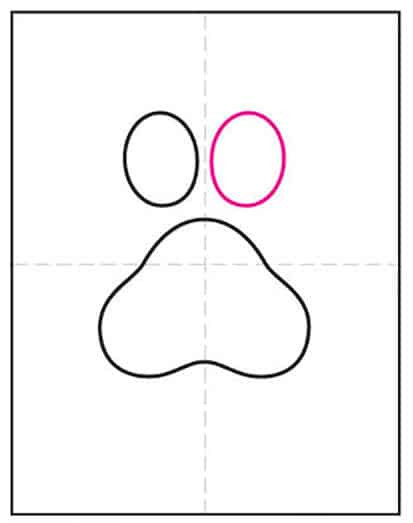
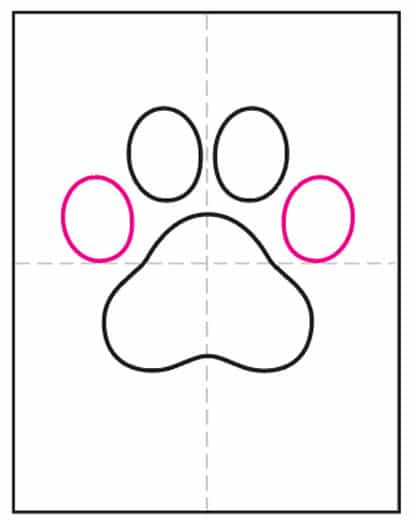
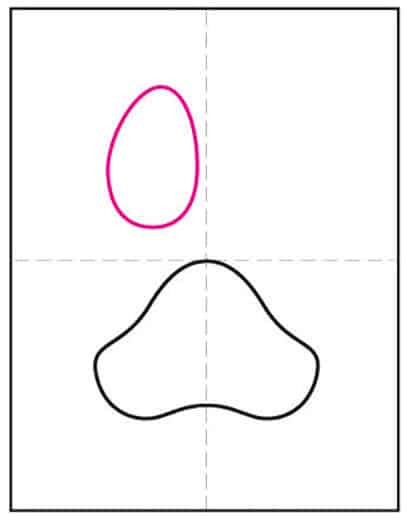
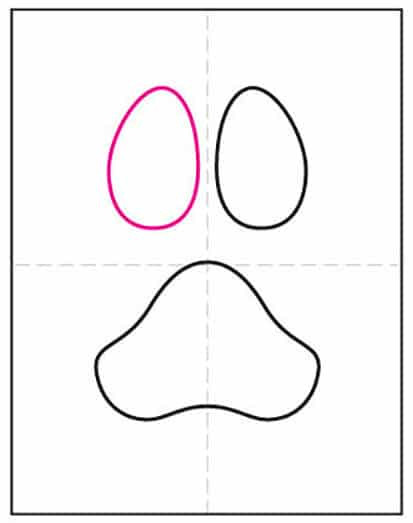
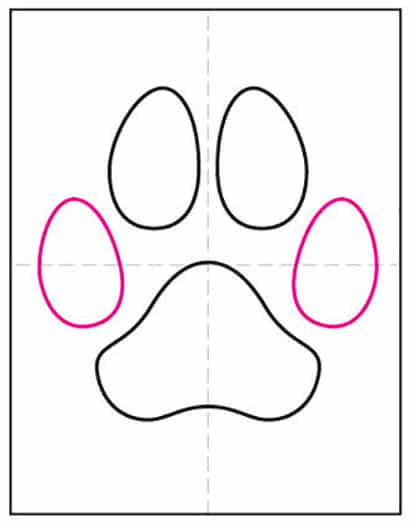
Add the Toe Pads: Draw four smaller ovals or circles around the main pad. Position them towards the top of the main pad, leaving a small gap between each toe pad.
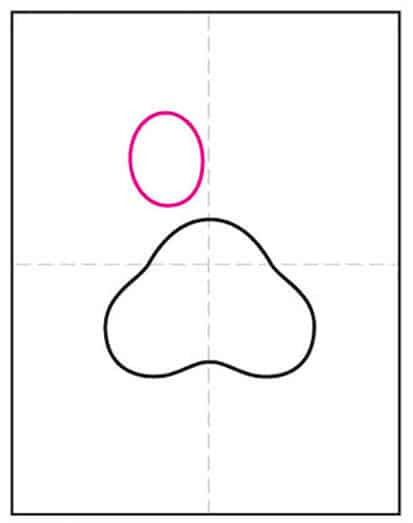 Adding four smaller ovals around the main pad to create the toe pads.
 -
Connect the Pads: Lightly sketch lines connecting each toe pad to the main pad. This creates the basic outline of the paw.
 Connecting toe pads to the main pad with light sketches.
 -
Refine the Shape: Erase any harsh lines and round out the shapes to make them look more natural. Adjust the size and position of the pads as needed to achieve a balanced look.
 Refining shapes and erasing harsh lines for a more natural paw print.
 -
Add Claw Marks (Optional): If you want to include claw marks, add small lines extending from the top of each toe pad. Keep these lines short and subtle for a realistic effect.
 Adding claw marks as small lines extending from the top of each toe pad.
 -
Outline and Detail: Once you’re satisfied with the basic shape, use a fine-tip marker or pen to outline the paw print. Add any additional details, such as wrinkles or textures, to enhance the realism.
 Outlining the paw print with a fine-tip marker and adding details.
 -
Erase Pencil Lines: After outlining, carefully erase any remaining pencil lines to leave a clean, finished paw print.
 Erasing remaining pencil lines to complete the paw print drawing.
By following these simple steps, you can create a basic yet realistic dog paw print that captures the essence of your furry friend’s unique mark.
5. How Can You Create Different Styles of Paw Prints?
Creating different styles of paw prints can add variety and personalization to your artwork. Here are several styles you can explore:
-
Realistic Paw Print: Focus on anatomical accuracy, shading, and fine details to replicate a real paw print. Use reference photos to guide your drawing.
 Realistic paw print style with detailed shading and anatomical accuracy.
 -
Cartoon Paw Print: Simplify the shapes and exaggerate certain features for a fun, whimsical look. Use bold lines and bright colors to make it more playful.
 Cartoon paw print style with simplified shapes and bold lines.
 -
Silhouette Paw Print: Create a solid, black outline of the paw print without any internal details. This style is clean, modern, and works well for logos or stencils.
- Minimalist Paw Print: Reduce the paw print to its essential shapes and lines. This style is simple, elegant, and conveys the essence of the paw print with minimal detail.
-
Watercolor Paw Print: Use watercolor paints to create a soft, flowing effect. Allow the colors to blend and bleed for a dreamy, artistic look.
- Abstract Paw Print: Experiment with abstract shapes, patterns, and colors to create a unique and expressive paw print. This style allows for creativity and non-traditional interpretations.
-
Tribal Paw Print: Incorporate tribal patterns and designs into the paw print for a bold, graphic style. Use thick lines and geometric shapes to create a striking visual effect.
To explore more styles, consider visiting amazingprint.net for a wide array of options and creative ideas to inspire your artwork.
6. How Do You Add Realistic Details Like Fur and Texture?
Adding realistic details like fur and texture can bring your paw print drawing to life. Here’s how to do it:
- Sketch Lightly: Begin by lightly sketching the basic shape of the paw print. This will serve as your guide for adding details.
- Observe References: Look at reference photos of real dog paws to understand the texture and direction of the fur. Pay attention to how the fur lies around the pads and between the toes.
- Add Fur Texture: Use short, fine pencil strokes to mimic the look of fur. Vary the length and direction of the strokes to create a natural, uneven texture. Concentrate the fur around the edges of the paw print and between the pads.
- Shade the Pads: Use a soft pencil to shade the pads of the paw print. Add subtle variations in tone to create depth and dimension. Blend the shading with a blending stump or your finger for a smooth, realistic look.
- Highlight Areas: Use an eraser to lift highlights from the fur and pads. This will create contrast and make the fur look more three-dimensional. Focus on areas where light would naturally hit, such as the top of the pads and the edges of the fur.
- Incorporate Wrinkles and Creases: Add small wrinkles and creases to the pads to give them a more realistic appearance. Use a fine-tip pencil to create these details, and make sure they follow the natural contours of the pads.
- Layer Details: Continue to layer details, adding more fur texture, shading, and highlights until you achieve the desired level of realism. Take your time and work in small increments to avoid overdoing it.
- Final Touches: Step back and assess your drawing. Make any final adjustments to ensure the fur and texture look natural and cohesive. Erase any remaining guidelines and clean up any smudges.
Incorporating fur and texture into your paw print drawing will add depth, dimension, and realism, making your artwork stand out.
7. How Can I Use Paw Prints in Creative Projects?
Paw prints can be used in a variety of creative projects, adding a personal and heartwarming touch to your crafts. Here are some ideas:
-
Personalized Pet Portraits: Incorporate paw prints into drawings or paintings of your pet. You can use the paw print as a background element, a signature, or even the main focus of the artwork.
 Personalized pet portrait incorporating paw prints as a background element.
 -
Custom Jewelry: Create custom pendants, earrings, or charms featuring your pet’s paw print. You can either draw the paw print and have it engraved, or use a mold to create a three-dimensional paw print.
-
Greeting Cards and Invitations: Design greeting cards or invitations with paw print motifs. These are perfect for pet-themed events, birthday cards for pet lovers, or thank-you notes from your pet.
-
Home Decor: Use paw prints to decorate your home. You can create wall art, throw pillows, or even stencil paw prints onto furniture.
-
Scrapbooking: Incorporate paw prints into your scrapbook layouts to document your pet’s milestones and memories. Use paw print stamps, stickers, or hand-drawn paw prints to add a personal touch.
-
T-Shirts and Apparel: Design custom t-shirts, hoodies, or tote bags featuring paw prints. These are great for pet owners, animal lovers, or fundraising events for animal shelters.
-
Digital Designs: Use paw prints in digital designs for websites, social media graphics, or phone wallpapers. You can create seamless paw print patterns or use individual paw prints as design elements.
-
Memorials and Keepsakes: Create memorials or keepsakes featuring your pet’s paw print. You can make a framed paw print, a paw print ornament, or even a paw print tattoo to honor your beloved companion.
Incorporating paw prints into your creative projects allows you to celebrate your love for animals in a unique and personal way.
8. What Are Some Tips for Making Paw Prints Look More Professional?
To make your paw print drawings look more professional, consider the following tips:
- Use High-Quality Materials: Invest in good-quality drawing paper, pencils, and markers to ensure your artwork looks polished and professional.
- Practice Proper Techniques: Practice and refine your drawing techniques to achieve clean lines, smooth shading, and realistic textures.
- Pay Attention to Detail: Focus on the small details that make a big difference, such as fur texture, wrinkles, and variations in tone.
- Use Reference Photos: Refer to real paw prints for accuracy and inspiration. Pay attention to the anatomy, proportions, and unique characteristics of each paw print.
- Vary Line Weight: Use different line weights to create depth and visual interest. Thicker lines can define the outer edges of the paw print, while thinner lines can add detail and texture.
- Create Depth with Shading: Use shading to create depth and dimension in your drawing. Experiment with different shading techniques, such as hatching, cross-hatching, and blending.
- Add Highlights: Incorporate highlights to create contrast and make the paw print look more three-dimensional. Use an eraser to lift highlights from the fur and pads.
- Keep It Clean: Keep your drawing clean and free of smudges by using a kneaded eraser and protecting your artwork with a fixative spray.
- Practice Consistency: Strive for consistency in your drawing style and technique. This will give your artwork a cohesive and professional look.
- Seek Feedback: Ask for feedback from other artists or art enthusiasts to identify areas for improvement and refine your skills.
By following these tips, you can elevate your paw print drawings and create professional-quality artwork that captures the beauty and charm of your furry friend’s unique mark.
9. How Do I Choose the Right Colors for My Paw Print Art?
Choosing the right colors for your paw print art can greatly enhance its visual appeal and emotional impact. Here are some tips to guide your color selection:
- Consider Realism: If you want to create a realistic paw print, choose colors that closely resemble those found in nature. Earth tones like browns, grays, and blacks are good choices for the pads, while lighter shades of brown, white, or cream can be used for the fur.
- Reflect Your Pet’s Coat: If you’re creating a portrait of your pet, consider using colors that reflect their coat. This will help to personalize the artwork and make it more meaningful.
- Create Contrast: Use contrasting colors to create visual interest and make the paw print stand out. For example, you can use a dark color for the pads and a light color for the fur.
- Use Complementary Colors: Experiment with complementary colors, which are colors that are opposite each other on the color wheel. These colors create a vibrant and dynamic effect when used together.
- Incorporate Personal Preferences: Don’t be afraid to incorporate your personal preferences into your color choices. Use colors that you love and that make you happy.
- Consider the Mood: Think about the mood you want to convey with your artwork. Warm colors like reds, oranges, and yellows can create a sense of energy and excitement, while cool colors like blues, greens, and purples can create a sense of calm and serenity.
- Use Color Theory: Familiarize yourself with basic color theory principles, such as hue, saturation, and value. This will help you make informed decisions about your color choices.
- Test Your Colors: Before you start painting or drawing, test your colors on a separate piece of paper to see how they look together. This will help you avoid any surprises and ensure that you’re happy with your color palette.
- Limit Your Palette: Stick to a limited color palette to create a cohesive and harmonious look. Choose a few key colors and use variations of those colors throughout your artwork.
By considering these tips, you can choose the right colors for your paw print art and create a visually stunning and emotionally resonant piece of artwork.
10. What Are Some Common Mistakes To Avoid When Drawing Paw Prints?
When drawing paw prints, there are several common mistakes that artists often make. Here’s how to avoid them:
| Mistake | Solution |
|---|---|
| Incorrect Proportions | Measure and sketch lightly to maintain accurate proportions between the main pad and toe pads. |
| Lack of Detail | Add details like fur texture, wrinkles, and claw marks to make the paw print look more realistic. |
| Inconsistent Line Weight | Vary the line weight to create depth and visual interest. Use thicker lines for outlines and thinner lines for details. |
| Poor Shading | Practice different shading techniques to create depth and dimension in your drawing. Pay attention to light and shadow. |
| Ignoring Reference Photos | Refer to real paw prints for accuracy and inspiration. Pay attention to the anatomy, proportions, and unique characteristics of each paw print. |
| Overworking the Drawing | Avoid overworking the drawing by stepping back and assessing your progress regularly. Know when to stop adding details. |
| Using Low-Quality Materials | Invest in good-quality drawing paper, pencils, and markers to ensure your artwork looks polished and professional. |
| Neglecting Composition | Pay attention to the overall composition of your drawing. Consider the placement of the paw print and other elements in the artwork. |
| Forgetting Highlights | Incorporate highlights to create contrast and make the paw print look more three-dimensional. Use an eraser to lift highlights from the fur and pads. |
| Rushing the Process | Take your time and work in small increments to avoid making mistakes. Allow yourself plenty of time to complete the drawing. |
By avoiding these common mistakes, you can improve the quality of your paw print drawings and create more realistic and visually appealing artwork.
Drawing paw prints for dogs is a rewarding way to express your love for animals and create personalized art. With the right techniques and a bit of practice, you can master the art of canine paw print illustration. For more creative ideas and printing solutions, visit amazingprint.net and explore a world of artistic possibilities. Address: 1600 Amphitheatre Parkway, Mountain View, CA 94043, United States. Phone: +1 (650) 253-0000. Website: amazingprint.net.
FAQ About Drawing Paw Prints for Dogs
1. What is the easiest way to draw a dog paw print?
The easiest way to draw a dog paw print is to start with a large oval for the main pad and then add four smaller ovals around the top for the toe pads. Connect the pads with curved lines and refine the shape.
2. How do I make my paw print drawing look realistic?
To make your paw print drawing look realistic, pay attention to details like fur texture, shading, and accurate proportions. Use reference photos and high-quality materials.
3. What materials do I need to draw a paw print?
You will need drawing paper, pencils, an eraser, fine-tip markers, and reference images. Optional materials include blending stumps and coloring supplies.
4. Can I use different styles for drawing paw prints?
Yes, you can use different styles such as realistic, cartoon, silhouette, minimalist, watercolor, abstract, and tribal. Experiment to find your preferred style.
5. How do I add fur texture to my paw print drawing?
Add fur texture by using short, fine pencil strokes around the edges of the paw print and between the pads. Vary the length and direction of the strokes for a natural look.
6. What are some creative projects I can do with paw prints?
Creative projects include personalized pet portraits, custom jewelry, greeting cards, home decor, scrapbooking, t-shirts, digital designs, and memorials.
7. How can I make my paw print art look more professional?
Use high-quality materials, practice proper techniques, pay attention to detail, vary line weight, use shading, add highlights, and seek feedback to improve your artwork.
8. How do I choose the right colors for my paw print art?
Consider realism, reflect your pet’s coat, create contrast, use complementary colors, incorporate personal preferences, and think about the mood you want to convey.
9. What are some common mistakes to avoid when drawing paw prints?
Avoid incorrect proportions, lack of detail, inconsistent line weight, poor shading, ignoring reference photos, overworking the drawing, and using low-quality materials.
10. Where can I find inspiration and resources for drawing paw prints?
You can find inspiration and resources at amazingprint.net, which offers a variety of creative ideas and printing solutions for your artistic projects.