
Taking a screen print, also known as a screenshot or screen capture, on your PC is a fundamental skill in today’s digital world. Whether you need to save important information, share something you see online, or document evidence, knowing how to screen print on your PC is essential. This guide will provide you with detailed instructions on how to easily capture your screen on both Windows and Mac operating systems.
Understanding Screen Printing on Your PC
Before diving into the methods, let’s clarify what screen printing on a PC entails. Essentially, it’s the process of capturing a digital image of your computer screen. This image can then be saved, shared, or edited as needed. Screen prints are invaluable for various reasons:
- Capturing Information: Save online receipts, important documents displayed on screen, or error messages for troubleshooting.
- Sharing Visuals: Easily show someone exactly what you are seeing on your screen, whether it’s a funny meme, a website design, or a software interface.
- Creating Tutorials and Guides: Illustrate steps in guides and tutorials with visual screen captures.
- Documenting Evidence: As mentioned in the original article, screen prints can be crucial for recording instances of cyberbullying or online harassment.
Methods for Screen Printing on a Windows PC
Windows offers several built-in methods to screen print, catering to different needs and preferences.
Using the Print Screen (PrtScn) Key
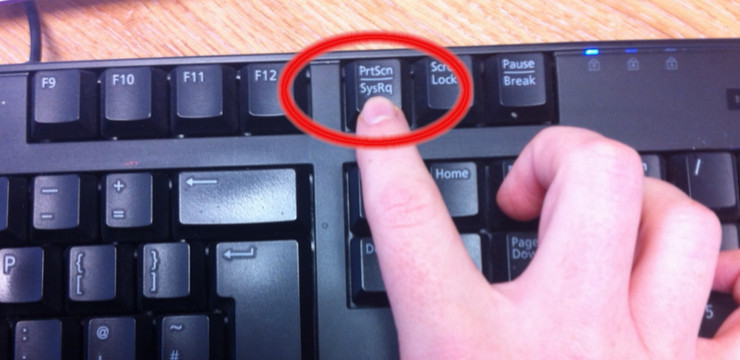
The most straightforward method is using the Print Screen key, often labeled as PrtScn or Print Scrn, typically located in the top right area of your keyboard.
- Capture the Entire Screen: Simply press the PrtScn key. This action copies an image of your entire screen to the clipboard, a temporary storage area.
- Paste the Screenshot: To view and save the screenshot, you need to paste it into an application that supports images, such as:
- Paint: A basic image editing program included with Windows. Open Paint and press Ctrl + V (or right-click and select “Paste”) to paste the screenshot. You can then save the image as a file (e.g., PNG, JPG).
- Word: Microsoft Word or other word processing programs also allow you to paste images. Open a document and press Ctrl + V to insert the screenshot.
- Image Editing Software: More advanced software like Adobe Photoshop or GIMP can also be used to paste and edit your screen print.
 How to Screenshot
- Capture the Active Window: If you only want to capture the currently active window (the window you are currently working in), press Alt + PrtScn keys simultaneously. This will copy a screen print of only that window to the clipboard, which you can then paste into an application as described above.
Utilizing the Snipping Tool
For more control and editing options directly after capturing your screen print, Windows offers the Snipping Tool.
- Open Snipping Tool: Search for “Snipping Tool” in the Windows search bar and open the application.
- Choose a Snip Type: Click on “New” to start a new snip. You can select different snip types from the dropdown menu next to “New”:
- Free-form Snip: Draw a freehand shape around the area you want to capture.
- Rectangular Snip: Drag a rectangle to select the area to capture.
- Window Snip: Capture a specific window by clicking on it.
- Full-screen Snip: Capture the entire screen (similar to pressing PrtScn).
- Capture and Edit: After selecting your snip type and capturing the screen print, the Snipping Tool window will open, displaying your screenshot. Here, you can:
- Annotate: Use the pen and highlighter tools to draw or highlight directly on the screenshot.
- Save: Click the “Save Snip” button to save your screen print as a file. You can choose different file formats like PNG, JPG, or GIF.
- Copy: Click the “Copy” button to copy the screenshot to the clipboard for pasting into other applications.
- Email: Use the “Email Snip” button to quickly email the screenshot.
Methods for Screen Printing on a Mac
Mac also provides convenient ways to take screen prints using keyboard shortcuts and a built-in utility.
Using Keyboard Shortcuts
Mac’s keyboard shortcuts are efficient for capturing screen prints quickly.
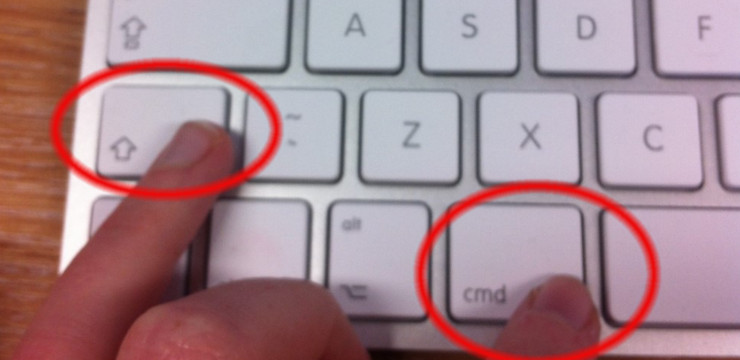
- Capture the Entire Screen: Press Command + Shift + 3 keys together. This instantly captures a screen print of your entire screen and saves it as a PNG file directly to your desktop.
- Capture a Selected Area: To capture only a specific portion of your screen, press Command + Shift + 4 keys together. Your cursor will change to a crosshair. Click and drag to select the rectangular area you want to capture. Once you release the mouse button, a screen print of the selected area will be saved as a PNG file on your desktop.
 How to Screenshot
- Capture a Specific Window: Press Command + Shift + 4, then press the Space bar. The cursor will change to a camera icon. Click on the window you want to capture. A screen print of that window will be saved to your desktop.
Utilizing the Grab Utility (macOS Mojave and earlier) / Screenshot Utility (macOS Catalina and later)
For more control and options, macOS includes the Grab utility (in older versions) and the Screenshot utility (in newer versions).
- Open Grab/Screenshot:
- Grab (macOS Mojave and earlier): Go to Applications > Utilities > Grab.
- Screenshot (macOS Catalina and later): Press Command + Shift + 5. This opens the Screenshot toolbar at the bottom of your screen.
- Choose Capture Options:
- Capture Entire Screen: Select the first icon (Capture Entire Screen) in the Screenshot toolbar or in the Grab menu, choose Capture > Screen.
- Capture Selected Window: Select the second icon (Capture Selected Window) in the Screenshot toolbar or in the Grab menu, choose Capture > Window.
- Capture Selected Portion: Select the third icon (Capture Selected Portion) in the Screenshot toolbar or in the Grab menu, choose Capture > Selection.
- Capture and Manage: After capturing, the screenshot will open in a preview window (Screenshot utility) or as a new window (Grab utility). From here, you can save, annotate (in Preview), or share your screen print. The Screenshot utility in newer macOS versions also offers screen recording capabilities.
Conclusion
Mastering screen printing on your PC, whether it’s a Windows or Mac system, significantly enhances your digital proficiency. By utilizing the methods outlined above, you can efficiently capture and share information, create visual aids, and document important moments on your computer screen. Practice these techniques to become comfortable with screen printing and leverage its benefits in your daily digital activities.
