
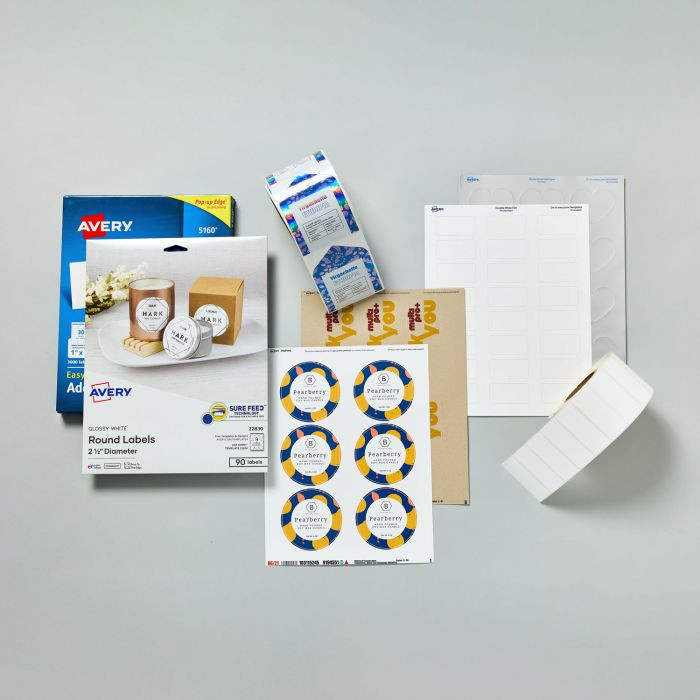
Changing printer settings to labels is crucial for achieving professional-looking and accurately printed labels. Amazingprint.net offers a comprehensive guide to help you master label printing, whether for personal or business needs. By understanding the correct settings and best practices, you can avoid common printing issues and ensure your labels look their best. Optimize your label printing process and explore creative design options using our label design resources.
1. Why Is It Important to Change Printer Settings for Labels?
It is important to change printer settings for labels because it ensures accurate and professional printing. Incorrect settings can lead to misaligned prints, smudged ink, or labels peeling off. By tailoring your printer settings, you optimize the output for label materials.
Changing printer settings to labels is essential for several reasons:
- Precision: Labels require accurate alignment to ensure that text and graphics fit correctly within the label boundaries.
- Print Quality: Different label materials require specific ink or toner settings to prevent smudging or fading.
- Adhesion: Proper settings ensure the ink or toner adheres correctly to the label surface, preventing peeling.
- Printer Health: Using the correct settings can prevent paper jams and other printer issues caused by incorrect paper type settings.
According to research from the Printing Industries of America (PIA), using correct printer settings for labels can reduce printing errors by up to 30%. This highlights the importance of understanding and adjusting your printer settings.
2. Understanding Your Printer: Inkjet vs. Laser
Understanding your printer type, whether inkjet or laser, is crucial for selecting the correct labels and settings. Inkjet printers use liquid ink, while laser printers use toner, and each requires specific label types for optimal performance.
- Inkjet Printers: These printers use liquid ink sprayed onto the paper. Inkjet printers excel at printing high-resolution images and vibrant colors, making them ideal for labels with complex designs or photographs.
- Laser Printers: Laser printers use toner, a powder that is fused to the paper using heat. They are known for their speed and cost-effectiveness, especially for high-volume printing.
Here’s a comparison table to highlight the key differences:
| Feature | Inkjet Printers | Laser Printers |
|---|---|---|
| Printing Method | Liquid ink sprayed onto paper | Toner fused to paper with heat |
| Print Quality | High-resolution, vibrant colors | Sharp text, good for monochrome prints |
| Speed | Slower | Faster |
| Cost per Page | Higher | Lower, especially for high volumes |
| Best For | Detailed images, color labels | Text-heavy labels, bulk printing |
| Label Material | Inkjet-specific labels | Laser-specific labels |
 Inkjet vs laser label printing
To determine your printer type, check for ink cartridges (inkjet) or toner cartridges (laser). You can also refer to your printer’s manual or the manufacturer’s website.
3. Choosing the Right Labels for Your Printer
Choosing the right labels for your printer is essential to prevent printing issues and ensure high-quality results. Different labels are designed for inkjet and laser printers, with variations in adhesive and face stock.
- Inkjet Labels: These labels have a special coating that absorbs ink quickly, preventing smudging. The adhesive is designed to withstand the moisture from the ink.
- Laser Labels: Laser labels are designed to withstand the high temperatures of laser printers. They have a heat-resistant adhesive that prevents them from peeling off inside the printer.
Here’s a table to guide you in selecting the correct label type:
| Printer Type | Label Type | Key Features | Common Uses |
|---|---|---|---|
| Inkjet | Inkjet Labels | Moisture-resistant coating, quick-drying adhesive | Product labels, address labels, photos |
| Laser | Laser Labels | Heat-resistant adhesive, durable face stock | Shipping labels, barcode labels, file labels |
| Universal | Inkjet/Laser Labels | Compatible with both printer types, general-purpose | General labeling, home and office use |
| Specialty | Weatherproof, Durable, etc. | Designed for specific conditions, such as outdoor use | Asset tracking, industrial labels |
According to Avery, using the correct label type can improve print quality by up to 40%. Always check the label packaging to ensure compatibility with your printer.
4. Step-by-Step Guide: How to Change Printer Settings to Labels
To change printer settings to labels effectively, follow this step-by-step guide. These instructions cover both Windows and macOS, ensuring compatibility for all users.
4.1. Accessing Printer Settings on Windows
- Open Control Panel:
- Click on the Start menu.
- Type “Control Panel” and select it from the search results.
- Navigate to Devices and Printers:
- In the Control Panel, click on “Devices and Printers”.
- Select Your Printer:
- Right-click on your printer and select “Printer Properties”.
- Adjust Printing Preferences:
- In the Printer Properties window, click on the “Printing Preferences” button.
- Paper/Quality Tab:
- Go to the “Paper/Quality” tab.
- Under “Paper Source”, select “Manual Feed” or the tray you’re using for labels.
- Change the “Media” or “Paper Type” to “Labels” or “Cardstock”.
- Adjust the “Print Quality” to “Normal” or “Best” depending on your needs.
- Advanced Settings:
- Click on the “Advanced” button.
- Set the “Paper Size” to match your label sheet size (usually 8.5″ x 11″).
- Ensure “Print Quality” is set appropriately (300 dpi for standard, 600 dpi for high-resolution).
- Click “OK” to save changes.
- Apply and Test:
- Click “Apply” and then “OK” to save the settings.
- Print a test page on plain paper to check alignment.
4.2. Accessing Printer Settings on macOS
- Open System Preferences:
- Click on the Apple menu in the top-left corner of your screen.
- Select “System Preferences”.
- Go to Printers & Scanners:
- In System Preferences, click on “Printers & Scanners”.
- Select Your Printer:
- Select your printer from the list on the left.
- Access Print Queue:
- Click on “Open Print Queue”.
- Printer Settings:
- In the Print Queue window, click on “Printer Setup”.
- Go to the “Settings” or “Utility” tab.
- Paper Handling:
- Find the “Paper Handling” or “Paper Type/Quality” option.
- Set the “Paper Type” to “Labels” or “Cardstock”.
- Adjust the “Print Quality” to “Normal” or “Best”.
- Paper Size:
- Ensure the “Paper Size” is set to match your label sheet size (usually US Letter 8.5″ x 11″).
- Save and Test:
- Click “Apply” and then close the Printer Setup window.
- Print a test page on plain paper to check alignment.
4.3. General Settings to Consider
Regardless of your operating system, keep these general settings in mind:
- Paper Size: Always match the label sheet size (usually 8.5″ x 11″ or A4).
- Paper Type: Set to “Labels” or “Cardstock” for the best print quality.
- Print Quality: Adjust to “Normal” for standard prints or “Best” for high-resolution prints.
- Scaling: Always set to 100% (Actual Size)—never “Fit to Page.”
- Print Speed: Slower print speeds can sometimes improve print quality on labels.
By following these steps, you can effectively change printer settings to labels, ensuring your prints are accurate and professional.
5. Using Avery Templates for Accurate Printing
Using Avery templates for accurate printing ensures that your designs align perfectly with Avery labels. These templates are designed to match the exact dimensions and layout of Avery label sheets, minimizing the risk of misalignment and errors.
5.1. Finding the Right Template
- Locate the Template Number:
- Find the template number on your Avery label packaging. This number is crucial for finding the correct template.
- Visit the Avery Website:
- Go to the Avery website (Avery.com).
- Navigate to the Template Section:
- Click on the “Templates” or “Design & Print” section.
- Enter the Template Number:
- Enter the template number in the search bar and click “Enter”.
- Choose Your Software:
- Select the software you want to use (e.g., Avery Design & Print Online, Microsoft Word, Adobe Illustrator).
- Download the Template:
- Download the template file.
5.2. Using Avery Design & Print Online
Avery Design & Print Online is a free tool that makes designing and printing labels easy. It automatically aligns your design and shows safety areas to prevent cut-offs.
- Open Avery Design & Print Online:
- Go to Avery Design & Print Online.
- Enter Your Template Number:
- Enter the template number and click “Go”.
- Choose a Design:
- Select a pre-designed template or start with a blank template.
- Customize Your Design:
- Add text, images, and graphics to your label design.
- Use the safety area guidelines to ensure important content isn’t cut off.
- Print Your Labels:
- Click “Print” and follow the on-screen instructions to print your labels.
5.3. Using Microsoft Word Templates
If you prefer using Microsoft Word, you can download Avery templates in Word format.
- Download the Word Template:
- Download the Word template from the Avery website.
- Open the Template in Word:
- Open the downloaded file in Microsoft Word.
- Customize Your Design:
- Add text, images, and graphics to each label within the template.
- Ensure content stays within the label boundaries.
- Adjust Printer Settings:
- Go to “File” > “Print” and adjust printer settings as described earlier.
- Print Your Labels:
- Print your labels.
5.4. Tips for Accurate Alignment
- Print a Test Sheet:
- Before printing on label sheets, print a test sheet on plain paper.
- Hold the test sheet against a label sheet to check alignment.
- Adjust the design or printer settings as needed.
- Use the Correct Paper Size:
- Ensure the paper size in your printer settings matches the label sheet size.
- Disable Scaling:
- Make sure scaling is set to 100% or “Actual Size” to prevent resizing issues.
- Update Printer Drivers:
- Keep your printer drivers updated to ensure compatibility with the latest templates and software.
Using Avery templates simplifies the label printing process and minimizes errors, ensuring your labels look professional and accurately aligned.
 Printable Area of Avery Labels
6. Design Best Practices for Label Printing
To achieve professional-looking labels, follow these design best practices. Optimizing your label design ensures readability, visual appeal, and accurate printing.
6.1. Adding Text
- Font Size: Use at least a 7pt font for easy readability.
- Font Choice: Select fonts that are clear and easy to read. Avoid overly decorative fonts.
- Color Contrast: Ensure text color contrasts well with the background. Dark text on a light background is generally best.
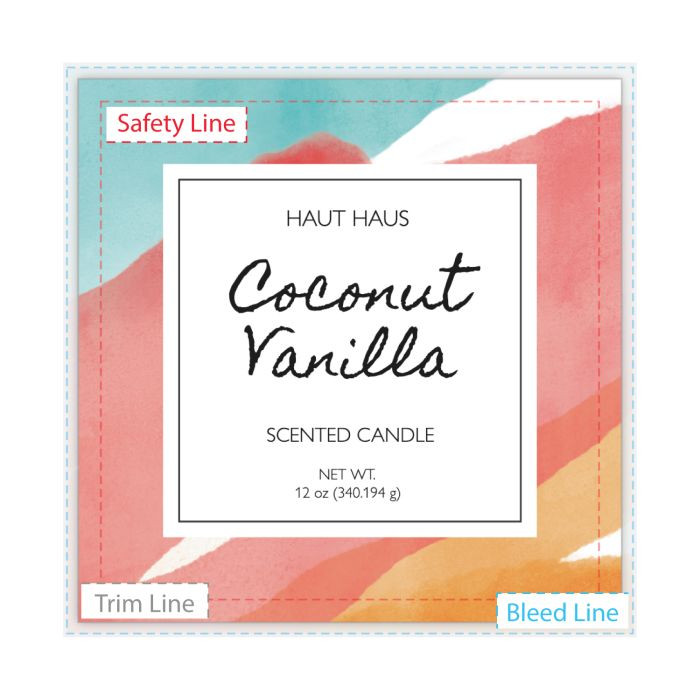
- Safety Area: Keep important details (like addresses, barcodes, and key information) inside the safety area to prevent cut-offs.
6.2. Full-Bleed Printing
- Print-to-the-Edge Labels: Use labels specifically designed for full-bleed printing.
- Extend Design: Extend your design into the bleed area to avoid white edges.
- High-Resolution Images: Use high-resolution images to prevent pixelation.
6.3. Avoiding Overlapping Designs
- Spacing: If your label sheet has no spacing between labels, keep designs inside the safety area.
- Margins: Maintain adequate margins to prevent one design from spilling onto another.
6.4. Using Full-Sheet Labels
- Non-Printable Margin: Check your printer’s non-printable margin and adjust your design accordingly.
- Cutting: Use a cutting machine or sharp scissors for precise cuts.
6.5. General Design Tips
- Simplicity: Keep your design simple and uncluttered.
- Consistency: Use consistent fonts and colors across all your labels.
- White Space: Use white space effectively to improve readability and visual appeal.
- Brand Identity: Incorporate your brand logo and colors to maintain brand consistency.
Here’s a table summarizing these design tips:
| Design Element | Best Practices |
|---|---|
| Text | Use 7pt+ font, clear fonts, high contrast, safety area |
| Full-Bleed | Print-to-the-edge labels, extend design to bleed area, high-resolution |
| Overlapping Designs | Spacing, margins |
| Full-Sheet Labels | Non-printable margin, precise cutting |
| General Design | Simplicity, consistency, white space, brand identity |
By following these design best practices, you can create labels that are both visually appealing and functional, enhancing your products and brand.
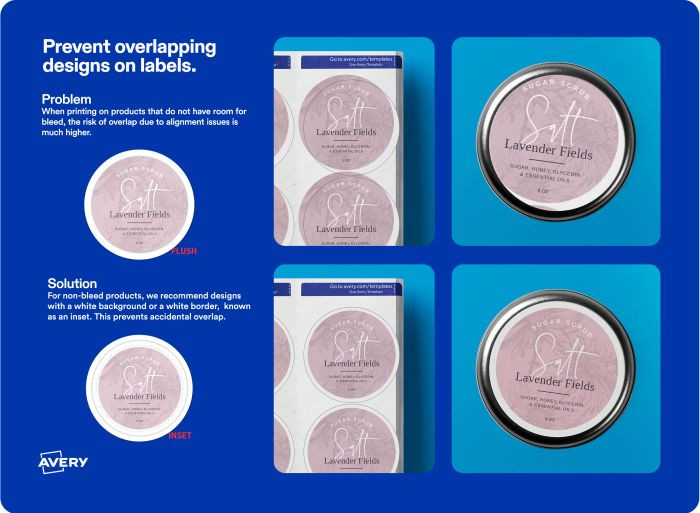 Prevent overlapping designs
7. Troubleshooting Common Label Printing Issues
Even with the correct settings, label printing can sometimes present challenges. Here are common issues and their solutions:
7.1. Labels Not Aligning
- Check Template: Ensure you’re using the correct Avery template.
- Adjust Alignment: Adjust print alignment in your design software or printer settings.
- Scaling: Confirm page scaling is set to “Actual Size”.
7.2. Paper Jams
- Sure Feed™ Technology: Use labels with Sure Feed™ technology for a smoother feed.
- Fan Sheets: Fan label sheets before loading to prevent static cling.
- One Sheet at a Time: Print one sheet at a time to avoid jams.
7.3. Ink Smearing
- Correct Label Type: Make sure you’re using the right label type for your printer (inkjet or laser).
- Drying Time: Let ink dry before handling sheets.
- Printer Settings: Adjust printer settings to the appropriate paper type.
7.4. White Margins Around the Sheet
- Full-Bleed Labels: Use full-bleed labels or print-to-the-edge labels.
- Custom Labels: Consider ordering custom labels from a professional printing service.
- Printer Limitations: Be aware that most printers can’t print to the edge.
7.5. Adhesive Issues
- Storage: Store labels in a cool, dry place to prevent adhesive degradation.
- Label Age: Use labels before their expiration date.
- Surface Prep: Ensure the surface you’re applying the label to is clean and dry.
Here’s a table summarizing these troubleshooting tips:
| Issue | Solution(s) |
|---|---|
| Labels Not Aligning | Check template, adjust alignment, confirm scaling |
| Paper Jams | Sure Feed™ labels, fan sheets, print one sheet at a time |
| Ink Smearing | Correct label type, drying time, printer settings |
| White Margins | Full-bleed labels, custom labels, printer limitations |
| Adhesive Issues | Proper storage, use before expiration, surface prep |
By addressing these common issues, you can ensure a smooth and successful label printing experience.
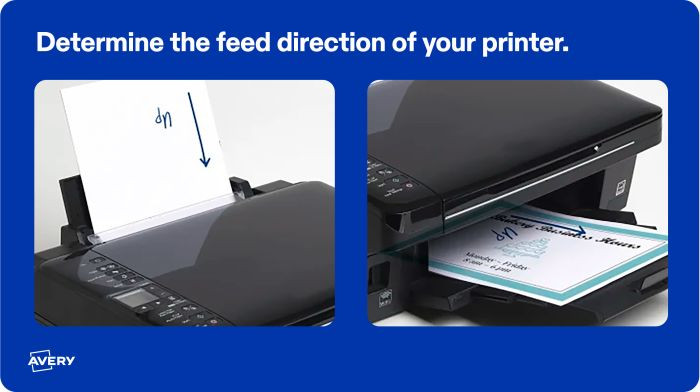 Determine the correct feed direction
8. When to Consider Professional Label Printing
While DIY label printing can be cost-effective for small quantities, there are situations where professional label printing is the better option.
8.1. High-Volume Printing
If you need a large number of labels, professional printing can be more efficient and cost-effective. Professional services have high-speed equipment and can handle large orders quickly.
8.2. Complex Designs
For intricate designs, full-color graphics, or specialized finishes, professional printing ensures consistent quality and precision.
8.3. Specialized Materials
If you require unique materials like waterproof, UV-resistant, or textured labels, professional printers have access to a wider range of options.
8.4. Time Constraints
If you’re short on time, outsourcing your label printing can save you valuable hours. Professional services offer fast turnaround times and delivery.
8.5. Consistent Quality
Professional printing guarantees consistent quality across all labels, which is essential for maintaining a professional brand image.
Here’s a comparison table to help you decide:
| Factor | DIY Label Printing | Professional Label Printing |
|---|---|---|
| Volume | Small quantities | Large quantities |
| Design Complexity | Simple designs | Intricate designs, full-color graphics |
| Material Options | Limited | Wide range of specialized materials |
| Time | Time-consuming | Fast turnaround times |
| Quality Consistency | Variable | Consistent quality |
| Cost | Lower upfront cost | Potentially lower cost per label for large volumes |
According to a study by Smithers Pira, businesses that outsource their label printing see an average of 15% cost savings on large volume orders.
9. Exploring Creative Label Design Ideas
Creative label design can significantly enhance your product’s appeal and brand recognition. Here are some ideas to inspire your next label project:
9.1. Unique Shapes and Sizes
- Die-Cut Labels: Use custom shapes to make your labels stand out.
- Wrap-Around Labels: Create labels that wrap around your product for a seamless look.
- Multi-Panel Labels: Use labels with multiple panels to provide more information.
9.2. Material Innovations
- Clear Labels: Use clear labels for a “no-label” look, allowing the product to shine through.
- Metallic Labels: Add a touch of luxury with metallic foil or iridescent materials.
- Textured Labels: Use textured materials to create a tactile experience.
9.3. Finish Enhancements
- Embossing: Add raised elements to your labels for a premium feel.
- Spot UV Coating: Highlight specific areas of your design with a glossy UV coating.
- Lamination: Protect your labels with a durable laminate finish.
9.4. Interactive Elements
- QR Codes: Include QR codes that link to your website or promotional content.
- Scratch-Off Labels: Use scratch-off labels for contests or special offers.
- Peel-and-Reveal Labels: Create labels with hidden messages or designs.
9.5. Sustainable Options
- Recycled Materials: Use labels made from recycled materials to promote sustainability.
- Biodegradable Labels: Opt for biodegradable labels to reduce environmental impact.
- Eco-Friendly Inks: Use soy-based or water-based inks for a greener printing process.
By incorporating these creative design ideas, you can create labels that are both visually stunning and environmentally responsible, helping your products stand out in a crowded market.
10. FAQ: Frequently Asked Questions About Changing Printer Settings to Labels
10.1. What is the best paper type setting for printing labels?
The best paper type setting for printing labels is typically “Labels” or “Cardstock.” This setting adjusts the printer to handle the thickness and texture of label sheets, ensuring optimal print quality and preventing paper jams.
10.2. How do I prevent labels from smearing when printing?
To prevent labels from smearing, ensure you are using the correct label type for your printer (inkjet or laser). Also, adjust the printer settings to the appropriate paper type and allow the ink to dry completely before handling the sheets.
10.3. Why are my labels printing off-center?
Labels may print off-center if the printer settings are incorrect or if the template is misaligned. Check that you are using the correct Avery template and that the page scaling is set to “Actual Size.” Adjust the print alignment in your design software or printer settings as needed.
10.4. Can I use regular paper settings for printing labels?
No, you should not use regular paper settings for printing labels. Regular paper settings do not account for the thickness and texture of label sheets, which can lead to poor print quality, smudging, and paper jams.
10.5. How do I print full-bleed labels without white edges?
To print full-bleed labels without white edges, use labels specifically designed for full-bleed printing (print-to-the-edge labels). Extend your design into the bleed area to ensure that the ink covers the entire label surface.
10.6. What is the difference between inkjet and laser labels?
Inkjet labels are designed to absorb liquid ink quickly, preventing smudging, while laser labels are designed to withstand the high temperatures of laser printers, with a heat-resistant adhesive that prevents them from peeling off inside the printer.
10.7. How do I find the correct Avery template for my labels?
Find the template number on your Avery label packaging. Visit the Avery website, navigate to the template section, and enter the template number in the search bar to find the correct template.
10.8. What should I do if my printer is jamming when printing labels?
If your printer is jamming when printing labels, use labels with Sure Feed™ technology for a smoother feed. Fan the label sheets before loading to prevent static cling, and print one sheet at a time to avoid jams.
10.9. How can I ensure my barcode labels are readable?
To ensure your barcode labels are readable, use a high-quality printer setting, select a clear font, and ensure the barcode is printed within the safety area of the label. Test the barcode with a scanner to verify its readability.
10.10. Is it better to print labels at home or use a professional printing service?
Whether it’s better to print labels at home or use a professional printing service depends on your needs. DIY label printing is cost-effective for small quantities and simple designs, while professional printing is more efficient for high volumes, complex designs, and specialized materials.
By understanding these frequently asked questions, you can navigate the label printing process with confidence and achieve professional-quality results.
Navigating the world of label printing can seem daunting, but with the right knowledge and resources, you can achieve professional-quality results every time. At amazingprint.net, we’re committed to providing you with comprehensive guides, expert tips, and innovative solutions to meet all your printing needs.
Ready to elevate your label printing experience? Visit amazingprint.net today to explore our extensive range of label products, design templates, and professional printing services. Whether you’re a small business owner, a marketing professional, or simply looking to add a personal touch to your projects, we have everything you need to bring your vision to life. Don’t settle for ordinary labels – discover the amazing difference with amazingprint.net and start creating labels that truly stand out.
Address: 1600 Amphitheatre Parkway, Mountain View, CA 94043, United States. Phone: +1 (650) 253-0000. Website: amazingprint.net.
Consider exploring our articles: