
Gone are the days of needing a computer to print documents and photos from your phone. Today, mobile printing is easier than ever, thanks to advancements in wireless technology. Whether you’re using an Android or iOS device, connecting to a printer can be achieved through Wi-Fi, Bluetooth, and even email. This guide will provide you with a detailed walkthrough on how to add a printer to your phone, ensuring you can print directly from your mobile device with ease.
Setting Up Your Printer for Wireless Connectivity
Before you can print from your phone, your printer needs to be set up for wireless use. This typically involves connecting it to your Wi-Fi network. The setup process can vary slightly depending on the printer brand and model, so the best starting point is your printer’s manual. If you can’t find the physical manual, a digital version is usually available online. Simply search for your printer brand and model number, which is often located on the printer itself, either on the bottom, side, or a sticker.
Once you have access to the manual, follow the networking instructions to connect your printer to your Wi-Fi. After your printer is online, you can proceed to connect your Android or iOS phone using the steps outlined below.
Connecting a Printer to an Android Phone
Android devices offer a straightforward way to connect to printers through the Default Print Service. This built-in service replaced Google Cloud Print and simplifies the process of finding and connecting to compatible printers.
Connecting via Wi-Fi on Android
The Android Default Print Service is designed to automatically detect printers on the same Wi-Fi network as your phone. Most major printer manufacturers like Canon and Epson support this service, making Wi-Fi connection a highly compatible option.
To establish a Wi-Fi connection, ensure both your printer and Android phone are connected to your home Wi-Fi network. Mobile data connections like 4G or 5G will not allow your phone to discover printers on your local network.
Here’s how to connect via the Default Print Service:
- Open your phone’s Settings app.
- Search for “printing” in the settings search bar.
- Select Printing from the search results.
- Tap on Printing within Connection preferences.
- Choose Default Print Service and toggle it On.
Your phone will now scan for and display a list of compatible printers on your Wi-Fi network. Select your printer from this list to complete the connection.
 Default Print Service activated on Android device showing list of available printers on the network
If your printer doesn’t appear in the initial list, you have a few alternative methods to try.
Option 1: Adding a Manufacturer-Specific Print Service
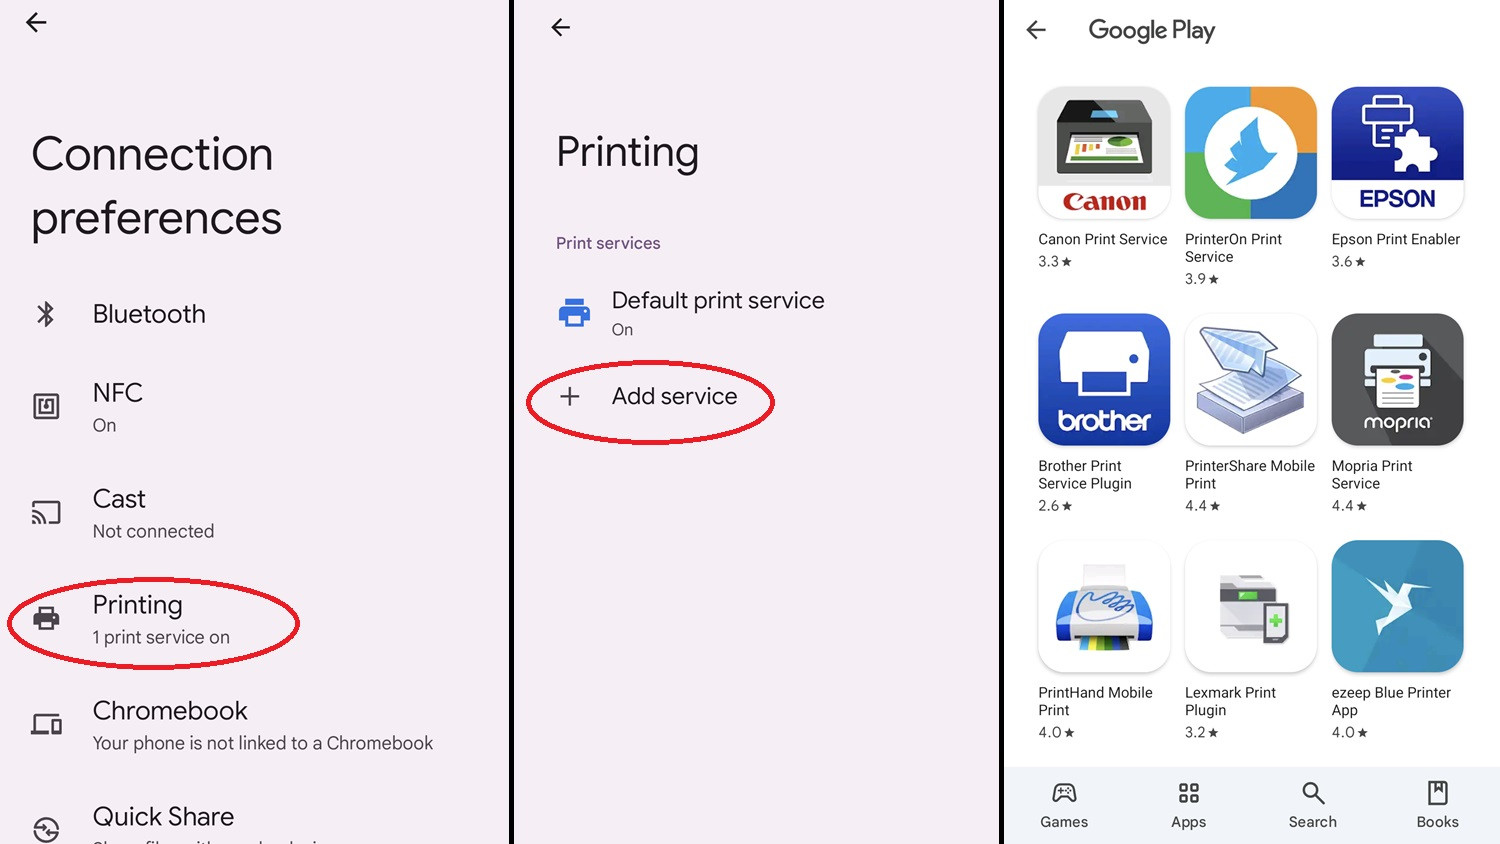
If the Default Print Service doesn’t automatically find your printer, you can try adding a printer service specific to your printer’s brand.
- In the Printing settings, instead of Default Print Service, tap Add service.
- This will direct you to the Google Play Store listing printer service plugins from various manufacturers.
- Find and select your printer brand’s service.
- Download and install the service plugin.
- Return to Printing settings and select the brand-specific service. Follow the on-screen instructions provided by the plugin to locate and connect to your printer.
 Android screen showing options to add print services for various printer brands from Google Play Store
Option 2: Using a Third-Party Print Service
If a brand-specific plugin isn’t available or doesn’t work, consider using a third-party print service app. These apps are also found on the Google Play Store and are designed to detect printers across different brands on your network. Popular third-party options include PrinterOn and PrinterShare Mobile Print, although it’s recommended to research user reviews before choosing a third-party app.
Option 3: Manually Adding Your Printer via IP Address or Wi-Fi Direct
For advanced users, or if other methods fail, you can manually add your printer using its IP address or Wi-Fi Direct.
-
Adding via IP Address:
- Access your router’s settings page (the steps to do this vary by router brand – consult your router manual if needed).
- Look for a section like Attached Devices or Device List.
- Find your printer in the list of connected devices and note its IP address (e.g., 192.168.1.100).
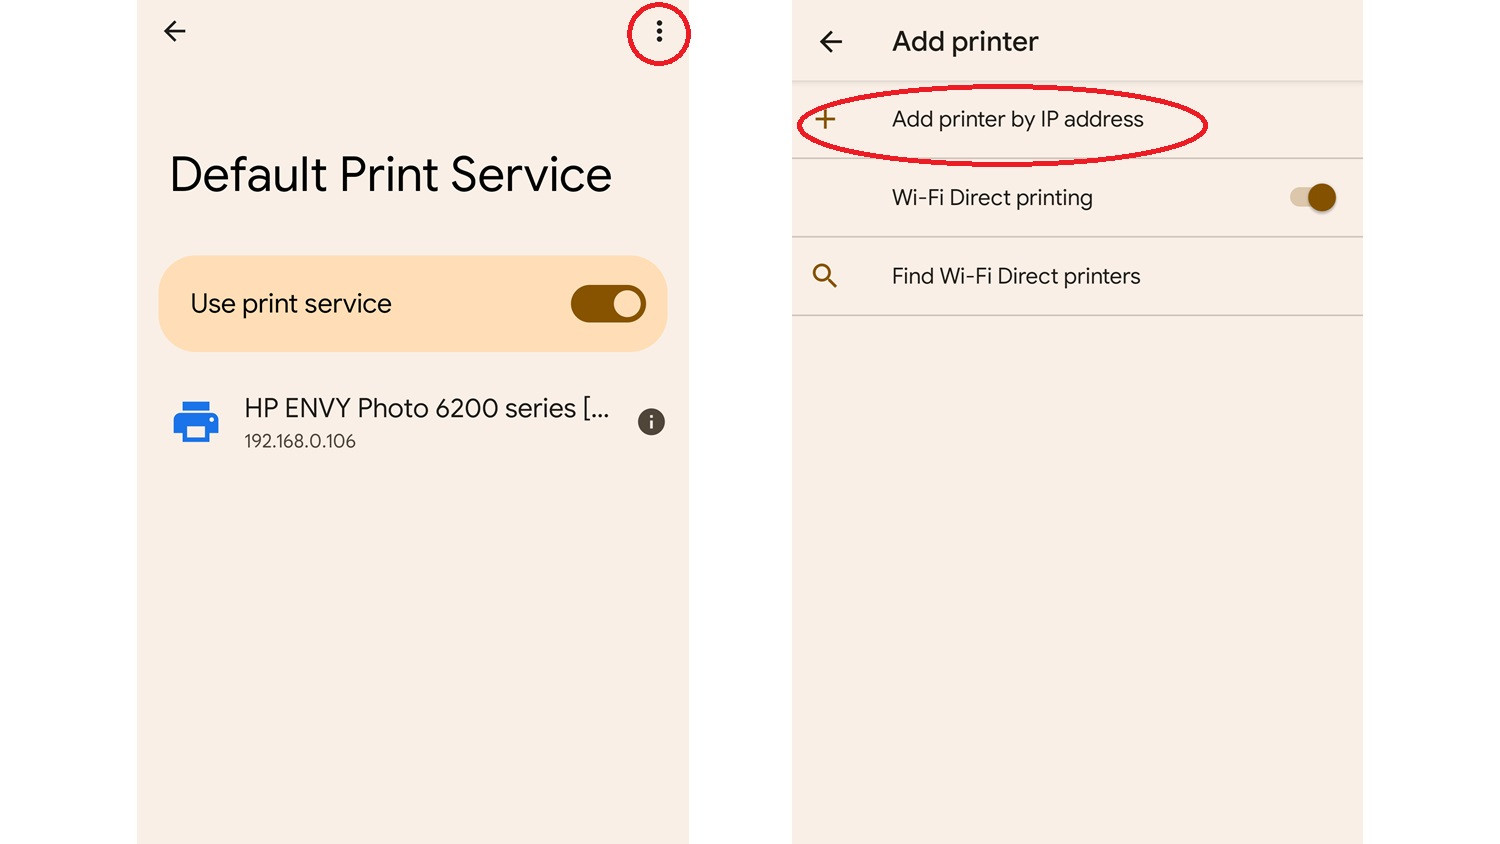
- Go back to your phone’s Default Print Service settings.
- Tap the three vertical dots (menu icon) usually in the top right corner.
- Select Add printer, then Add printer by IP address.
- Enter the IP address you noted down and tap Add. Your printer should now appear in the list.
-
Adding via Wi-Fi Direct:
- In the Add printer menu (accessed via the three dots in Default Print Service), select Wi-Fi Direct printing.
- Turn on Wi-Fi Direct printing. Your phone will scan for printers that support Wi-Fi Direct in the vicinity.
- Select your printer from the list to establish a direct connection without needing an internet network.
 Android Default Print Service menu showing options to add printer by IP address and Wi-Fi Direct printing
 Android screens showing interface for adding printer by IP address (left) and list of Wi-Fi Direct enabled printers (right)
Connecting via Bluetooth on Android
While less common, some printers support Bluetooth connectivity. This method is simpler for users who prefer not to use Wi-Fi and is similar to connecting to a Bluetooth speaker.
- Enable Bluetooth scanning on your printer. The method to do this varies by printer model; refer to your printer’s manual.
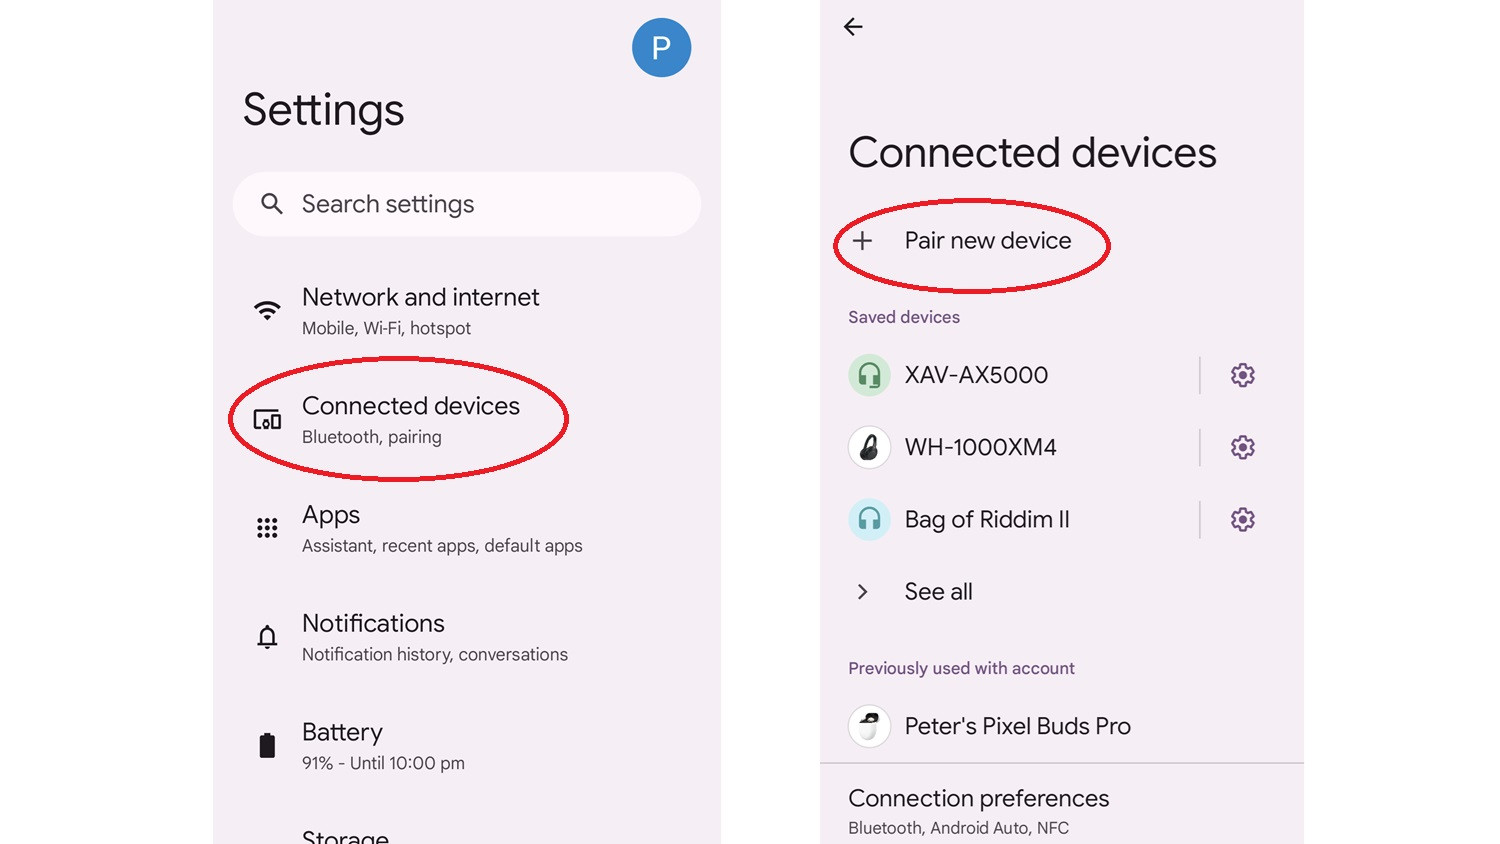
- On your Android phone, go to Settings > Connected devices.
- Tap Pair new device. Your phone will scan for Bluetooth devices nearby.
- When your printer appears in the list, tap to connect.
 Android Bluetooth settings showing "Pair new device" option and list of previously connected devices including a printer
Once connected, your printer will appear in the list of paired devices. Note that Bluetooth connections have a limited range, and the connection will drop if your phone moves too far from the printer or if Bluetooth is turned off. To reconnect, ensure Bluetooth is enabled on both devices, and if necessary, select your printer from the list of previously connected devices in your phone’s Bluetooth settings.
You can also rename your printer in the Bluetooth settings for easier identification. Tap the cog icon next to the printer’s name in the connected devices list, then the pencil icon next to Device details to enter a new name.
How to Print from an Android Phone
Once your printer is connected to your Android phone via any of the methods above, printing is straightforward and consistent across connection types.
To print an image or document:
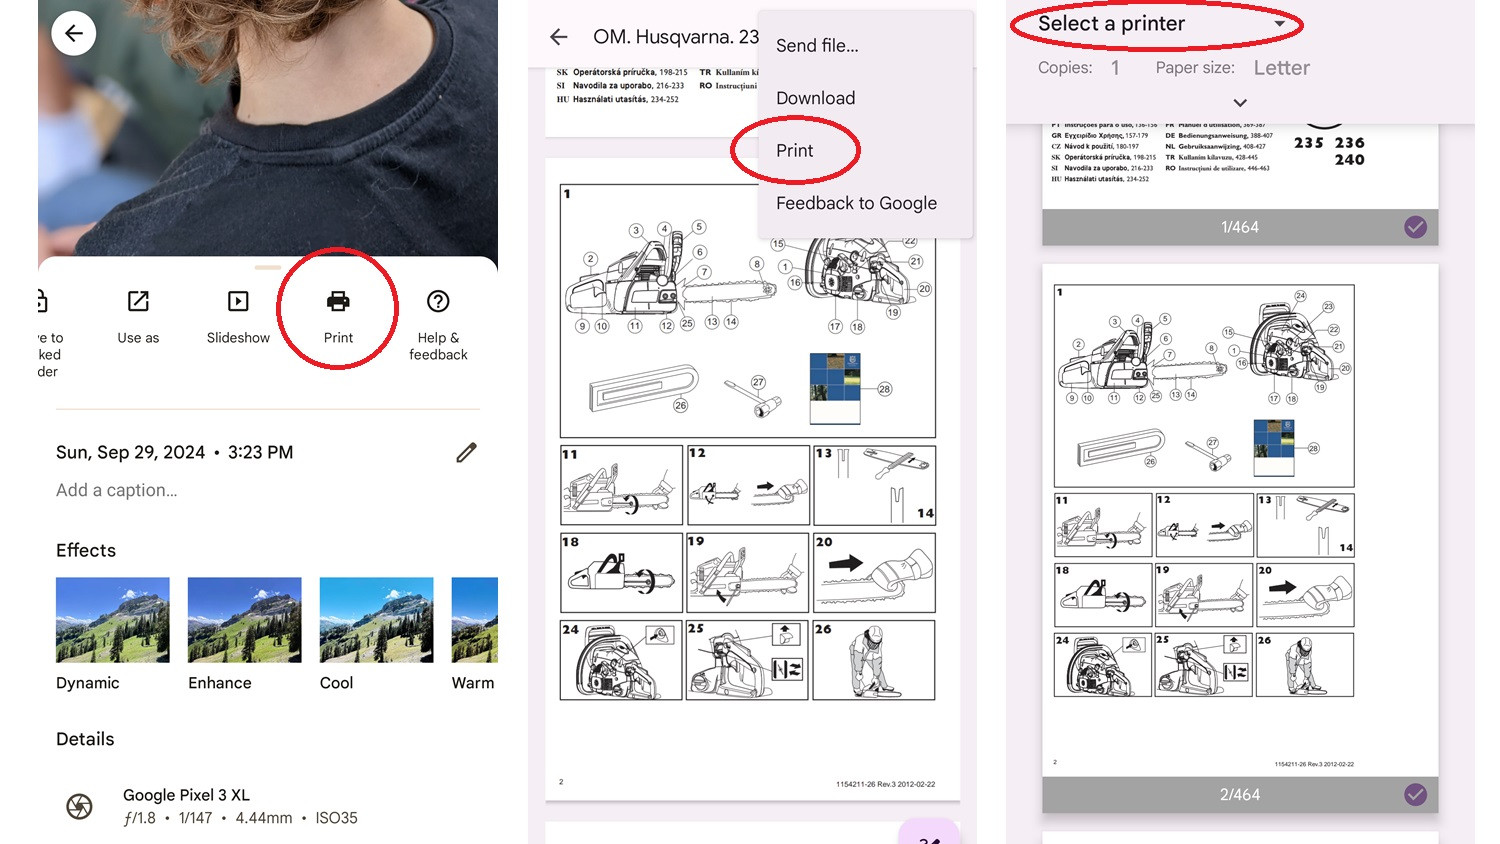
- Open the image or document you wish to print.
- Look for the three vertical dots menu icon (often in the top right corner of apps).
- In the menu, scroll through the options until you find Print. (In some apps, like Google Photos, you might find the Print option under the Share menu).
- Tap Print to open the print preview screen.
- In the print preview, tap Select a printer and choose your connected printer from the list.
- Adjust any print settings as needed (like paper size, color, or number of copies).
- Tap the print icon (usually a printer symbol) to start printing.
 Android print screen showing options to select printer and adjust print settings before tapping the print icon
 Android print preview screen with print icon highlighted, ready for user to initiate printing
Connecting and Printing from an iOS Device (iPhone or iPad)
For iOS devices like iPhones and iPads, Apple’s AirPrint technology provides a seamless way to connect to compatible printers over Wi-Fi.
Connecting via AirPrint on iOS
AirPrint is integrated into iOS and macOS, allowing for easy discovery and printing to AirPrint-enabled printers on the same Wi-Fi network. You can find a comprehensive list of AirPrint compatible printers on Apple’s support website. When purchasing a new printer for use with your iPhone or iPad, look for the AirPrint logo on the packaging to ensure compatibility.
To set up AirPrint:
- Connect your AirPrint-compatible printer to your Wi-Fi network, following the printer’s setup instructions.
- Ensure AirPrint is enabled in your printer’s settings. This is usually found in the network settings via the printer’s control panel or web interface (accessed by entering the printer’s IP address in a web browser).
 AirPrint logos, indicating compatibility with Apple's AirPrint technology
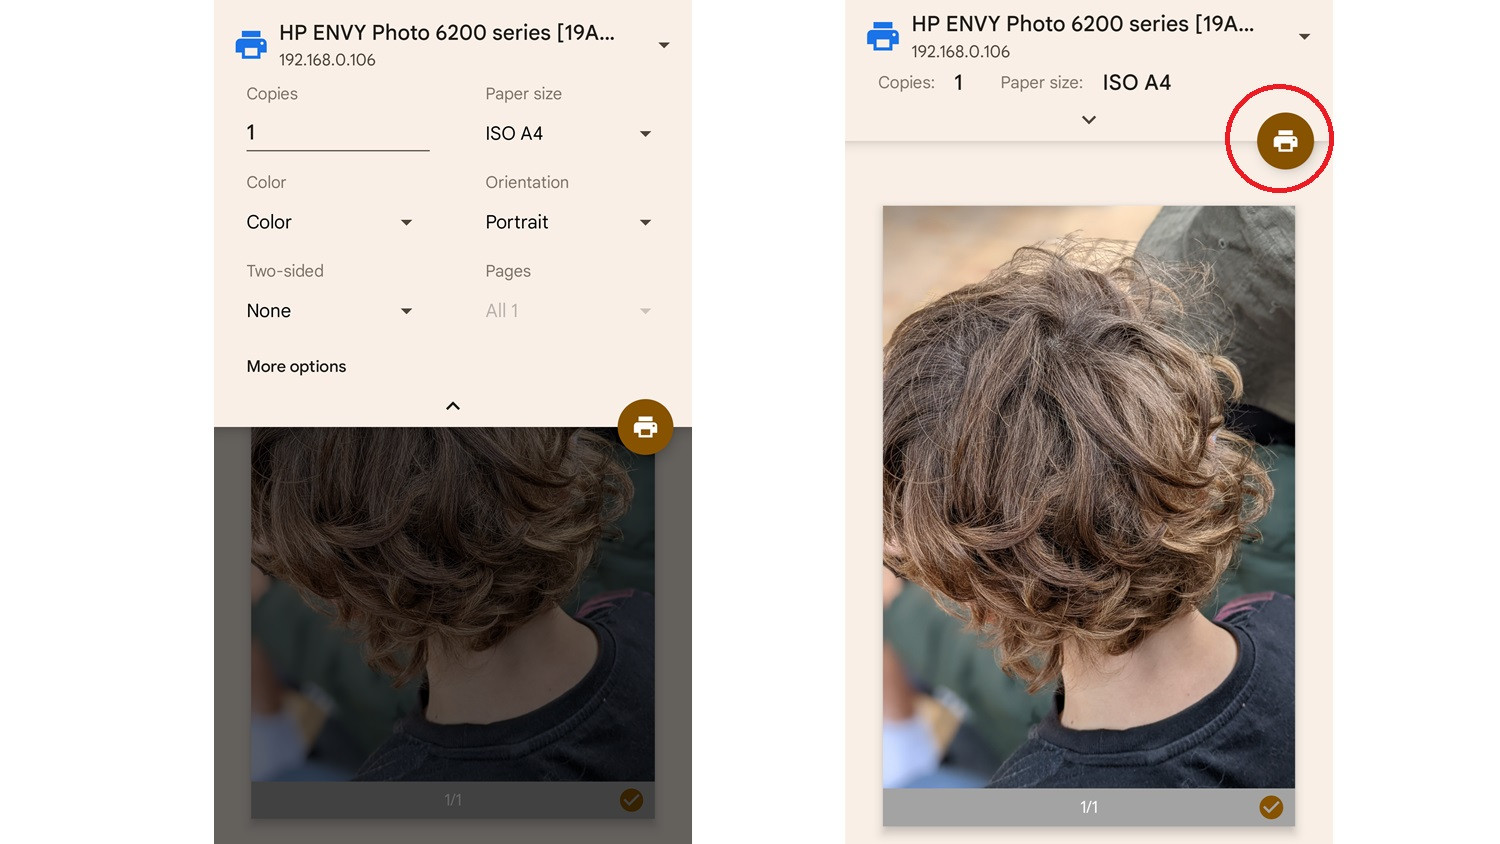
To print using AirPrint:
- Open the document, photo, or webpage you want to print on your iPhone or iPad.
- Tap the Share icon (a square with an arrow pointing upwards), typically located at the bottom of the screen.
- Scroll down the share options and select Print. This will open the Printer Options screen.
- If this is your first time using AirPrint, tap Select Printer at the top of the screen.
- Choose your AirPrint-enabled printer from the list of detected printers. iOS will usually remember this selection for future use as the default printer.
- Tap Print in the top right corner to send your document to the printer.
 iOS share sheet showing "Print" option, which leads to Printer Options for AirPrint
 iOS Printer Options screen showing selected AirPrint printer and print button in the top right corner
If your printer is not AirPrint-compatible, you may need to use the printer manufacturer’s app. Most major printer brands offer free apps in the App Store that enable printing from iOS devices. Search for your printer brand in the App Store, download the app, and follow its instructions to connect to your printer. Some apps require you to open and print files directly through the app, while others may integrate with the iOS share sheet for more convenient printing from various apps. Third-party apps like Printopia 3 or Print n Share are also available, offering potentially different interfaces or features, though they may come with a cost.
Connecting via Bluetooth on iOS
While Bluetooth printing from iOS devices is not officially supported by Apple and can be unreliable, some third-party solutions or printer-specific apps might offer Bluetooth connectivity. However, for a consistent and reliable experience, AirPrint is generally recommended for iOS users.
Tap and Print with NFC
Near Field Communication (NFC) offers another convenient way to initiate a connection, particularly for Bluetooth or Wi-Fi setup. Some printers are equipped with NFC.
To use NFC for printing:
- Ensure both your smartphone and printer are connected to the same Wi-Fi network (if using Wi-Fi printing).
- Enable NFC on your phone (usually found in connection settings).
- Tap your phone against the NFC touchpoint on your printer. This area is usually marked with the NFC logo.
 NFC logo on a printer indicating the touchpoint for NFC connection
NFC will automatically handle the connection process, simplifying pairing, especially for Bluetooth. After the NFC handshake, you can proceed to print as you normally would.
Printing via Email from Android or iOS
Many modern printers offer an “ePrint” feature, allowing you to print by simply emailing documents or photos to a dedicated printer email address. This method is particularly useful for printing remotely, as you don’t need to be on the same network as the printer.
To set up email printing:
- Check if your printer supports email printing (often branded as ePrint by HP, or similar by other manufacturers).
- Follow your printer’s instructions to set up an email address for your printer. This process varies by brand and may involve using printer software, registering your printer online, or configuring settings directly on the printer. Some printers automatically assign an email address, while others allow you to create a custom one.
Once set up, to print via email:
- Compose a new email from any email account.
- Attach the documents or photos you want to print.
- Send the email to your printer’s dedicated email address.
- Your printer will automatically print the attachments once it receives the email, provided it’s powered on and connected to the internet.
Email printing is a versatile option, allowing you to print from virtually anywhere, making it ideal for sending documents to your home or office printer while you are away.
Conclusion
Adding a printer to your phone has transformed mobile productivity, enabling you to print documents and photos directly from your Android or iOS device without the need for a computer intermediary. Whether you opt for Wi-Fi, Bluetooth, NFC, or email printing, the process is designed to be user-friendly. By following the steps outlined in this guide, you can easily set up your printer for mobile printing and enjoy the convenience of printing on the go.