Adding a printer to your Mac is a straightforward process that enhances your productivity by enabling seamless printing of documents and photos. At amazingprint.net, we offer comprehensive guidance and solutions to ensure your printing experience is smooth and efficient. Discover expert tips and step-by-step instructions to effortlessly set up your printer on your Mac. Explore our resources for more insights on printing solutions, digital printing options, and high-quality printing services.
1. How to Ensure Your Mac and Printer Are Compatible?
Confirming compatibility between your Mac and printer is the first essential step to ensure a smooth setup process. Compatibility ensures that your devices can communicate effectively, allowing you to print without issues.
1.1. Checking Basic Compatibility
- Operating System: Ensure your printer supports the version of macOS you are running.
- Connection Type: Determine if your printer connects via USB, Wi-Fi, or Ethernet, and ensure your Mac has the necessary ports or wireless capabilities.
- Driver Availability: Verify that the printer manufacturer offers drivers compatible with your macOS version.
1.2. Finding Printer Specifications
The printer’s specifications can be found on the manufacturer’s website or in the product manual. Look for the following details:
- Supported Operating Systems: Check if macOS is listed as a supported OS.
- Connectivity Options: Confirm the types of connections the printer supports (e.g., USB, Wi-Fi, Ethernet).
- Driver Downloads: Locate the driver download section for macOS.
1.3. Utilizing Apple’s AirPrint
AirPrint is Apple’s technology that allows you to print wirelessly without needing to install drivers.
- Check AirPrint Compatibility: See if your printer is AirPrint-enabled by visiting Apple’s AirPrint support page.
- Automatic Setup: AirPrint printers are often automatically detected by macOS, simplifying the setup process.
1.4. Compatibility Issues and Solutions
If you encounter compatibility issues, consider the following solutions:
- Driver Updates: Install the latest drivers from the manufacturer’s website.
- AirPrint: If your printer supports AirPrint, use this feature for driver-free printing.
- Compatibility Mode: Some printers offer a compatibility mode for older operating systems.
- Virtualization: Run an older version of macOS in a virtual machine to support older printers.
2. How to Update Printer Software on Your Mac?
Keeping your printer software up to date is essential for maintaining optimal performance, compatibility, and security. Updated software ensures that your printer works seamlessly with your Mac and can resolve any existing issues.
2.1. Why Update Printer Software?
- Compatibility: Updates ensure compatibility with the latest macOS versions.
- Bug Fixes: Updates address bugs and glitches that can cause printing issues.
- Performance Improvements: Updates often include enhancements that improve printing speed and quality.
- Security Patches: Updates provide security patches to protect against potential vulnerabilities.
2.2. Checking for Updates
- Check with the Printer Manufacturer: Visit the printer manufacturer’s website to check for available updates.
- Use the Mac App Store: Some printer manufacturers distribute updates through the Mac App Store.
- Printer Software Utility: Many printers come with their own software utility that can check for updates.
2.3. Steps to Update Software
- Visit the Manufacturer’s Website:
- Go to the support or downloads section of the printer manufacturer’s website (e.g., HP, Epson, Canon).
- Enter your printer model number.
- Download the latest drivers and software for macOS.
- Install the Software:
- Open the downloaded file and follow the installation instructions.
- Restart your Mac if prompted.
- Check for Updates in System Preferences:
- Go to System Preferences > Printers & Scanners.
- Select your printer and click Options & Supplies.
- Click the Utility tab and look for an option to update the printer software.
2.4. AirPrint Printers
If you have an AirPrint printer, you typically don’t need to manually update the software. AirPrint printers receive updates automatically through macOS.
2.5. Troubleshooting Update Issues
- Download Errors: Ensure you have a stable internet connection and try downloading the software again.
- Installation Problems: Make sure you have administrative privileges on your Mac.
- Compatibility Issues: Verify that the update is compatible with your macOS version.
- Contact Support: If you encounter persistent issues, contact the printer manufacturer’s support for assistance.
Updating your printer software regularly helps ensure smooth and efficient printing from your Mac.
3. How to Prepare Your Printer for Connection?
Preparing your printer correctly is a vital step before connecting it to your Mac. This involves unpacking the printer, installing ink or toner, loading paper, and ensuring the printer is error-free. Proper preparation can prevent setup complications and ensure smooth printing.
3.1. Unpacking the Printer
- Carefully Unpack: Remove the printer from its box and take out all packing materials, including foam inserts, plastic coverings, and tape.
- Inventory: Check that all components are included, such as the power cord, ink or toner cartridges, and any included documentation or software.
- Placement: Place the printer on a stable, flat surface with adequate ventilation and access to a power outlet.
3.2. Installing Ink or Toner
- Open the Cartridge Compartment: Locate and open the cartridge compartment, following the printer’s instructions.
- Remove Protective Seals: Take the new ink or toner cartridges out of their packaging and remove any protective seals or covers.
- Install Cartridges: Insert the cartridges into the correct slots, ensuring they click into place securely.
- Close the Compartment: Close the cartridge compartment. The printer may run a calibration process.
3.3. Loading Paper
- Open the Paper Tray: Open the paper tray and adjust the paper guides to fit the paper size you will be using.
- Load Paper: Fan the stack of paper to prevent sticking and load it into the tray, ensuring it’s aligned correctly.
- Adjust Guides: Adjust the paper guides so they gently hold the paper in place without being too tight.
- Close the Tray: Close the paper tray.
3.4. Powering On and Initial Checks
- Connect Power Cord: Plug the power cord into the printer and a power outlet.
- Turn On: Press the power button to turn on the printer.
- Check for Errors: Observe the printer’s display panel for any error messages or indicators. Resolve any issues before proceeding.
- Print a Test Page: Print a test page to ensure the printer is functioning correctly. This can usually be done through the printer’s control panel.
3.5. Wireless Setup Considerations
If you plan to connect the printer via Wi-Fi, consider these additional steps:
- Locate Router: Ensure the printer is within range of your Wi-Fi router.
- Access Wireless Setup: Use the printer’s control panel to access the wireless setup menu.
- Enter Network Credentials: Select your Wi-Fi network and enter the password if prompted.
By properly preparing your printer, you can avoid common setup issues and ensure a smooth connection to your Mac.
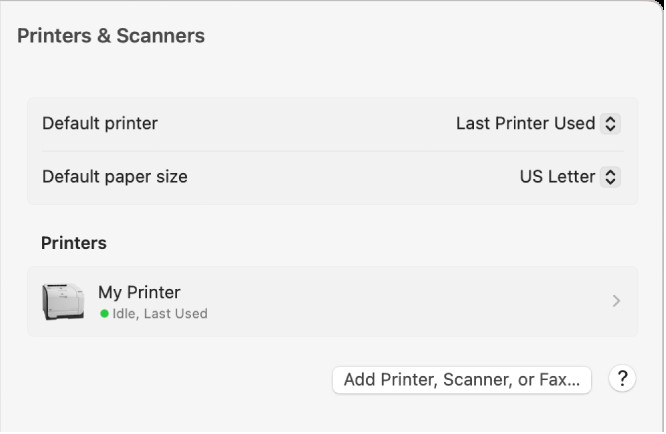 Printer and scanner dialog box
4. How to Connect Your Printer to Your Mac?
Connecting your printer to your Mac involves either a wired (USB) or wireless (Wi-Fi) connection. The method you choose depends on your printer’s capabilities and your network setup. Properly connecting your printer ensures seamless communication between your devices.
4.1. USB Connection
- Plug in the USB Cable: Connect the USB cable to both the printer and your Mac.
- Power On: Turn on the printer.
- Automatic Detection: macOS should automatically detect the printer. If prompted, download and install any necessary drivers.
- Add Printer: If the printer is not automatically added, go to System Preferences > Printers & Scanners.
- Click the “+” Button: Click the “+” button to add a new printer.
- Select Printer: Choose your printer from the list and click Add.
4.2. Wi-Fi Connection
- Printer Setup: Follow the printer’s instructions to connect it to your Wi-Fi network. This usually involves using the printer’s control panel to select your network and enter the password.
- macOS Detection: On your Mac, go to System Preferences > Printers & Scanners.
- Click the “+” Button: Click the “+” button to add a new printer.
- Select Printer: Your printer should appear in the list. Select it and click Add.
4.3. AirPrint Connection
- Ensure AirPrint Compatibility: Verify that your printer supports AirPrint.
- Connect to Wi-Fi: Make sure both your printer and Mac are connected to the same Wi-Fi network.
- Automatic Detection: macOS should automatically detect the AirPrint printer.
- Add Printer: If not detected, go to System Preferences > Printers & Scanners and click the “+” button.
- Select Printer: Choose your printer from the list and click Add.
4.4. Ethernet Connection
- Connect Ethernet Cable: Plug an Ethernet cable into the printer and your router.
- Check IP Address: Ensure the printer has an IP address. This is usually configured automatically via DHCP.
- Add Printer: On your Mac, go to System Preferences > Printers & Scanners and click the “+” button.
- Select IP: Choose the IP tab and enter the printer’s IP address.
- Add Printer: Select the correct protocol (usually Line Printer Daemon – LPD) and click Add.
4.5. Troubleshooting Connection Issues
- Check Connections: Ensure all cables are securely connected.
- Restart Devices: Restart both your printer and Mac.
- Update Drivers: Make sure you have the latest drivers installed.
- Network Issues: Verify that your Wi-Fi network is functioning correctly.
- Firewall Settings: Check if your firewall is blocking the printer connection.
Connecting your printer to your Mac properly ensures you can print documents and photos effortlessly. At amazingprint.net, we provide resources and support to help you troubleshoot any connection issues.
5. How to Add a Printer to Your List of Available Printers on Mac?
Adding a printer to your list of available printers on your Mac is a simple process that allows you to easily select and use the printer whenever you need to print something.
5.1. Accessing Printers & Scanners Settings
- Open System Preferences: Click on the Apple menu in the top-left corner of your screen.
- Select System Preferences: Choose System Preferences from the dropdown menu.
- Click Printers & Scanners: In the System Preferences window, find and click on the Printers & Scanners icon. You may need to scroll down to find it.
5.2. Adding a New Printer
- Open Printers & Scanners: The Printers & Scanners window will display a list of currently installed printers.
- Click the “+” Button: Below the list of printers, you’ll see a “+” button. Click this button to add a new printer.
- Add Printer Dialog: A dialog box will appear, listing printers on your local network.
5.3. Selecting Your Printer
- Choose Your Printer: When your printer appears in the list, select it. macOS will attempt to find the appropriate drivers for the printer.
- Add the Printer: After selecting your printer, click the Add button. It may take a minute or two for your printer to be added.
- Install Software: If you see a message prompting you to download new software, make sure to download and install it. This ensures that your printer functions correctly with your Mac.
5.4. Setting Up Printer Options
- Configure Options: When you add a printer, macOS can usually detect whether the printer has special accessories installed, such as additional paper trays, extra memory, or a duplex unit.
- Specify Accessories: If macOS can’t detect the accessories, a dialog box will appear that lets you specify them. Make sure the settings in that dialog accurately reflect your printer’s installed accessories so you can take full advantage of them.
5.5. Using Print Center
- Open Print Center: You can quickly add a printer when using Print Center, which you can find in the Utilities folder.
- Access Utilities Folder: Open Finder, click on Applications in the sidebar, and then open the Utilities folder.
- Add Printer: When Print Center is open, choose Printer > Add Printer to set up a new printer to use.
5.6. Troubleshooting
- Printer Not Listed: If you don’t see your printer listed, make sure the printer is turned on and connected to the same network as your Mac.
- Check Connection: Verify the printer’s connection (Wi-Fi or Ethernet) and ensure it’s properly configured.
- Download Drivers: If the printer still doesn’t appear, you may need to download and install the latest drivers from the manufacturer’s website.
6. What to Do if Your Printer Doesn’t Appear in the List?
If your printer doesn’t appear in the list when trying to add it to your Mac, there are several troubleshooting steps you can take to resolve the issue.
6.1. Basic Checks
- Power On: Ensure that your printer is turned on.
- Network Connection: Verify that your printer and Mac are connected to the same network.
- Check Cables: If using a USB connection, make sure the cable is securely connected to both the printer and your Mac.
6.2. Restart Devices
- Restart Printer: Turn off your printer, wait a few seconds, and then turn it back on.
- Restart Mac: Restart your Mac to refresh the system and network connections.
6.3. Check Network Settings
- Wi-Fi Connection: If using Wi-Fi, ensure that both the printer and Mac are connected to the correct network.
- IP Address: Confirm that the printer has a valid IP address. You can usually find this information in the printer’s network settings menu.
6.4. Add Printer Manually
- Open Printers & Scanners: Go to System Preferences > Printers & Scanners.
- Click the “+” Button: Click the “+” button to add a new printer.
- Select IP: Choose the IP tab.
- Enter Printer Details:
- Address: Enter the printer’s IP address.
- Protocol: Select the appropriate protocol (usually Line Printer Daemon – LPD or Internet Printing Protocol – IPP).
- Queue: Leave this field blank unless your printer documentation specifies a queue name.
- Name: Enter a name for the printer.
- Location: Enter the printer’s location (optional).
- Use: Select the printer’s driver from the dropdown menu. If your printer is not listed, try selecting Generic PostScript Printer or Generic PCL Printer.
- Add Printer: Click Add.
6.5. Check Firewall Settings
- Open System Preferences: Go to System Preferences > Security & Privacy.
- Click Firewall: Select the Firewall tab.
- Firewall Options: Click the Firewall Options button.
- Allow Incoming Connections: Ensure that the printer-related services are allowed to receive incoming connections.
6.6. Update Printer Drivers
- Visit Manufacturer’s Website: Go to the printer manufacturer’s website (e.g., HP, Epson, Canon).
- Download Drivers: Download the latest drivers for your printer model and macOS version.
- Install Drivers: Follow the installation instructions to install the drivers.
6.7. Reset Printing System
- Open Printers & Scanners: Go to System Preferences > Printers & Scanners.
- Right-Click Printer List: Right-click (or Control-click) in the list of printers on the left side of the window.
- Reset Printing System: Select Reset printing system.
- Confirm Reset: You may be prompted to enter your administrator password.
- Add Printer Again: After resetting, add the printer again using the “+” button.
6.8. AirPrint Troubleshooting
- Check AirPrint Compatibility: Verify that your printer supports AirPrint.
- Same Network: Ensure that both your printer and Mac are connected to the same Wi-Fi network.
- Restart Router: Restart your Wi-Fi router to refresh the network connection.
7. How to Download and Install Printer Drivers?
Downloading and installing the correct printer drivers is crucial for ensuring that your printer works seamlessly with your Mac. Drivers act as the communication bridge between your Mac and the printer, allowing them to interact properly.
7.1. Why Are Printer Drivers Important?
- Compatibility: Drivers ensure that your printer is compatible with your Mac’s operating system.
- Functionality: They enable all of the printer’s features, such as printing, scanning, and faxing.
- Performance: Updated drivers can improve printing speed and quality.
- Bug Fixes: Drivers often include fixes for known issues and bugs.
7.2. Finding the Correct Drivers
- Identify Your Printer Model: Locate the model number of your printer. This is usually found on the printer itself or in the documentation.
- Visit the Manufacturer’s Website: Go to the official website of your printer manufacturer (e.g., HP, Epson, Canon).
- Navigate to the Support or Downloads Section: Look for a section labeled “Support,” “Downloads,” or “Drivers.”
- Enter Your Printer Model: Enter your printer model number in the search bar or browse through the list of available printers.
- Select Your Operating System: Choose your Mac’s operating system (e.g., macOS 11 Big Sur, macOS 12 Monterey, macOS 13 Ventura).
- Download the Driver: Download the appropriate driver for your printer.
7.3. Installing the Drivers
- Locate the Downloaded File: Find the downloaded driver file in your Downloads folder. It is usually a .dmg or .zip file.
- Open the File: Double-click the file to open it.
- Follow the Installation Instructions:
- If it’s a .dmg file, a new window will open. Double-click the installer package (usually a .pkg file) inside the window.
- If it’s a .zip file, extract the contents and then double-click the installer package.
- Grant Permissions: You may be prompted to enter your administrator password or grant permissions during the installation process.
- Restart Your Mac: After the installation is complete, restart your Mac to ensure the drivers are properly installed.
7.4. Alternative Methods
- Mac App Store: Some printer manufacturers offer drivers through the Mac App Store. Search for your printer model in the App Store and download the driver if available.
- Software Update: Go to System Preferences > Software Update to check for any available printer driver updates.
7.5. Troubleshooting Driver Issues
- Incompatible Drivers: Make sure you are downloading the correct drivers for your printer model and macOS version.
- Installation Errors: If you encounter errors during installation, try restarting your Mac and running the installer again.
- Driver Conflicts: If you have multiple printers installed, there may be driver conflicts. Try removing the existing printers and reinstalling the drivers.
- Contact Support: If you are still experiencing issues, contact the printer manufacturer’s support for assistance.
8. How to Set Up Printer Options and Accessories on Your Mac?
After adding a printer to your Mac, you can configure its options and accessories to ensure it operates according to your specific needs. Setting up these options allows you to take full advantage of your printer’s capabilities, such as duplex printing, additional paper trays, and more.
8.1. Accessing Printer Options
- Open System Preferences: Click on the Apple menu in the top-left corner of your screen.
- Select System Preferences: Choose System Preferences from the dropdown menu.
- Click Printers & Scanners: In the System Preferences window, find and click on the Printers & Scanners icon.
- Select Your Printer: In the list of printers on the left, select the printer you want to configure.
- Click Options & Supplies: On the right side of the window, click the Options & Supplies button.
8.2. Configuring Printer Options
- Options Tab: In the Options & Supplies window, click the Options tab.
- Installable Options: You will see a list of installable options and accessories for your printer. This may include:
- Duplex Unit: Allows you to print on both sides of the paper automatically.
- Additional Paper Trays: Increases the paper capacity of your printer.
- Memory: Adds extra memory to your printer for handling large print jobs.
- Finisher: Provides options for stapling, hole-punching, and folding printed documents.
- Select Options: Check the boxes next to the options that are installed on your printer.
- Click OK or Apply: After selecting the appropriate options, click OK or Apply to save your changes.
8.3. Setting Default Print Options
- Open Any Application: Open any application that you can print from, such as TextEdit or Safari.
- Go to Print: Choose File > Print from the menu bar.
- Show Details: If the print dialog is in its simplified form, click the Show Details button.
- Select Print Options: Configure the print options as desired. This may include:
- Paper Size: Choose the correct paper size for your document.
- Orientation: Select portrait or landscape orientation.
- Duplex Printing: Enable or disable duplex printing.
- Color Options: Choose color or grayscale printing.
- Quality: Select the desired print quality (e.g., draft, standard, high).
- Save as Preset: Click the Presets dropdown menu and choose Save Current Settings as Preset.
- Name Your Preset: Enter a name for your preset (e.g., “Default Print Settings”) and choose whether to apply the preset to all printers or just the current printer.
- Click OK: Click OK to save the preset.
8.4. Using Custom Paper Sizes
- Open Print Dialog: Go to File > Print in any application.
- Show Details: Click Show Details if the print dialog is in its simplified form.
- Paper Size Menu: Click the Paper Size menu and choose Manage Custom Sizes.
- Add Custom Size: Click the “+” button to add a new custom paper size.
- Enter Dimensions: Enter the width and height of your custom paper size.
- Name Your Size: Give your custom paper size a descriptive name.
- Adjust Non-Printable Area: Adjust the non-printable area settings as needed.
- Click OK: Click OK to save your custom paper size.
8.5. Troubleshooting Option Issues
- Options Not Showing: If the options and accessories are not showing up, make sure that you have installed the correct drivers for your printer.
- Incorrect Settings: Double-check the settings in the Options & Supplies window to ensure they accurately reflect your printer’s installed accessories.
- Restart Printer: Try restarting your printer to refresh the settings.
9. What Are the Best Practices for Maintaining Your Printer on Mac?
Maintaining your printer properly ensures that it continues to function efficiently and reliably. Regular maintenance can prevent common issues, extend the lifespan of your printer, and ensure high-quality printing.
9.1. Regular Cleaning
- Exterior Cleaning:
- Power Off: Turn off the printer and unplug it from the power source.
- Wipe Down: Use a soft, damp cloth to wipe down the exterior of the printer. Avoid using harsh chemicals or abrasive cleaners.
- Dust Removal: Use a vacuum cleaner with a brush attachment to remove dust from vents and crevices.
- Interior Cleaning:
- Access Interior: Open the printer and access the interior components, such as the print head and paper path.
- Clean Print Head: Use a lint-free cloth or cotton swab dampened with isopropyl alcohol to gently clean the print head.
- Remove Paper Dust: Use a soft brush or vacuum cleaner to remove paper dust and debris from the paper path.
9.2. Print Head Maintenance
- Print Head Cleaning Utility:
- Access Utility: Most printers have a built-in print head cleaning utility. Access this utility through the printer’s control panel or software.
- Run Cleaning Cycle: Follow the prompts to run a cleaning cycle. This will help to clear any clogs in the print head nozzles.
- Manual Cleaning:
- Remove Cartridges: Remove the ink cartridges from the printer.
- Clean Print Head: Use a lint-free cloth or cotton swab dampened with isopropyl alcohol to gently clean the print head.
- Reinstall Cartridges: Reinstall the ink cartridges and run a test print.
9.3. Paper Handling
- Use Correct Paper Type: Use the correct type of paper for your printer. Check the printer’s documentation for recommended paper types.
- Store Paper Properly: Store paper in a cool, dry place to prevent it from becoming damp or curled.
- Load Paper Correctly: Load paper into the paper tray according to the printer’s instructions. Make sure the paper is aligned properly and not overfilled.
9.4. Software and Driver Updates
- Check for Updates: Regularly check for software and driver updates from the printer manufacturer’s website.
- Install Updates: Install any available updates to ensure that your printer is functioning optimally and has the latest features and bug fixes.
9.5. Ink and Toner Management
- Monitor Ink Levels: Monitor the ink or toner levels in your printer. Replace cartridges before they run out completely to prevent print quality issues.
- Use Genuine Cartridges: Use genuine ink or toner cartridges from the printer manufacturer. Generic cartridges may not provide the same print quality or reliability.
- Proper Storage: Store ink and toner cartridges in a cool, dry place away from direct sunlight.
9.6. Regular Usage
- Print Regularly: Print something at least once a week to prevent the ink from drying out and clogging the print head nozzles.
- Run Test Prints: Run a test print periodically to check the print quality and ensure that all colors are printing correctly.
9.7. Troubleshooting Common Issues
- Paper Jams:
- Power Off: Turn off the printer and unplug it from the power source.
- Remove Paper: Carefully remove any jammed paper from the paper path.
- Check Sensors: Check the paper sensors to make sure they are clean and functioning properly.
- Print Quality Issues:
- Clean Print Head: Run a print head cleaning cycle or manually clean the print head.
- Check Ink Levels: Check the ink levels and replace any empty cartridges.
- Adjust Settings: Adjust the print quality settings in the printer software.
10. FAQ About Adding a Printer to Your Mac
Here are some frequently asked questions about adding a printer to your Mac to help you troubleshoot and understand the process better.
10.1. Why is My Printer Not Showing Up on My Mac?
There are several reasons why your printer may not be showing up on your Mac:
- Not Connected: Ensure your printer is turned on and connected to the same Wi-Fi network as your Mac.
- Driver Issues: The necessary drivers may not be installed or may be outdated.
- Connection Problems: Check the USB or network connection to ensure it is properly connected.
- Firewall Settings: Your firewall settings may be blocking the printer.
10.2. How Do I Install Printer Drivers on My Mac?
To install printer drivers on your Mac:
- Visit Manufacturer’s Website: Go to the official website of your printer manufacturer (e.g., HP, Epson, Canon).
- Download Drivers: Navigate to the support or downloads section and enter your printer model. Download the appropriate drivers for your macOS version.
- Install Drivers: Open the downloaded file and follow the installation instructions.
10.3. Can I Use an AirPrint Printer Without Installing Drivers?
Yes, AirPrint printers allow you to print wirelessly without needing to install drivers. Ensure that your printer and Mac are connected to the same Wi-Fi network, and your Mac should automatically detect the printer.
10.4. How Do I Add a Wireless Printer to My Mac?
To add a wireless printer to your Mac:
- Connect to Wi-Fi: Ensure your printer is connected to your Wi-Fi network.
- Open Printers & Scanners: Go to System Preferences > Printers & Scanners.
- Click the “+” Button: Click the “+” button to add a new printer.
- Select Printer: Choose your printer from the list and click Add.
10.5. How Do I Set a Default Printer on My Mac?
To set a default printer on your Mac:
- Open Printers & Scanners: Go to System Preferences > Printers & Scanners.
- Select Default Printer: Choose your desired default printer from the Default printer dropdown menu.
10.6. What Should I Do if My Mac Says “Printer is Offline?”
If your Mac says “Printer is offline,” try the following:
- Check Power: Ensure the printer is turned on.
- Check Connection: Verify the printer is connected to the network or USB.
- Restart Printer: Restart the printer.
- Check Network: Ensure your Mac and printer are on the same network.
10.7. How Do I Reset the Printing System on My Mac?
To reset the printing system on your Mac:
- Open Printers & Scanners: Go to System Preferences > Printers & Scanners.
- Right-Click Printer List: Right-click (or Control-click) in the list of printers on the left side of the window.
- Reset Printing System: Select Reset printing system.
- Confirm Reset: You may be prompted to enter your administrator password.
10.8. Can I Share a Printer Between Multiple Macs?
Yes, you can share a printer between multiple Macs:
- Connect Printer: Connect the printer to one Mac.
- Enable Sharing: On that Mac, go to System Preferences > Sharing and enable Printer Sharing.
- Connect Other Macs: On the other Macs, add the shared printer through Printers & Scanners.
10.9. How Do I Update Printer Drivers on My Mac?
To update printer drivers on your Mac:
- Visit Manufacturer’s Website: Go to the printer manufacturer’s website.
- Download Drivers: Download the latest drivers for your printer model and macOS version.
- Install Drivers: Follow the installation instructions to install the drivers.
10.10. Why is My Printer Printing Blank Pages on My Mac?
If your printer is printing blank pages on your Mac, try the following:
- Check Ink Levels: Ensure the ink or toner cartridges are not empty.
- Clean Print Head: Run a print head cleaning cycle.
- Check Settings: Verify the print settings in the print dialog.
- Update Drivers: Make sure you have the latest printer drivers installed.
Adding a printer to your Mac is a straightforward process when you follow the correct steps. At amazingprint.net, we’re dedicated to providing you with the information and resources you need for all your printing needs. Explore our website for more detailed guides, product comparisons, and creative printing ideas.
Address: 1600 Amphitheatre Parkway, Mountain View, CA 94043, United States.
Phone: +1 (650) 253-0000.
Website: amazingprint.net.