
Setting up a printer with your Macbook can seem daunting, but it’s actually a straightforward process. Whether you’re connecting a brand-new printer or adding an existing one to your Macbook, this guide will walk you through each step to get you printing in no time. In many cases, if your printer and Macbook are on the same Wi-Fi network, your Macbook might automatically detect the printer. However, if it doesn’t, or if you want to ensure a smooth setup, follow these instructions to manually add a printer to your Macbook.
Step 1: Initial Check – Is Your Printer Already Connected?
Before diving into the setup process, it’s worth quickly checking if your printer is already recognized by your Macbook.
- Go to File > Print in any application (like TextEdit or Safari).
- Click the Printer dropdown menu.
- Look for your printer in the list. If you see it, select it and you might be ready to print!
- If your printer isn’t listed, select Other Printers or Printers & Scanners settings… to open the Printers & Scanners settings panel. Check again if your printer appears here.
If you still don’t see your printer, proceed to the next steps to manually add it.
Step 2: Update Your Printer Software on Your Mac
Ensuring your printer software is up to date is a crucial first step for a seamless connection.
- Check the Printer Manufacturer’s Website: Visit the official website of your printer’s manufacturer (e.g., HP, Canon, Epson, Brother).
- Search for Drivers & Downloads: Look for a “Support,” “Drivers,” or “Downloads” section.
- Enter Your Printer Model: Find the drivers and software download page specifically for your printer model.
- Download and Install Updates: Download the latest drivers and software compatible with macOS. Follow the installation instructions provided by the manufacturer.
Note for AirPrint Printers: If you own an AirPrint-enabled printer, you generally don’t need to install drivers. AirPrint is a technology built into macOS and iOS that allows for driverless printing over Wi-Fi. However, checking for firmware updates for your printer on the manufacturer’s website is still recommended for optimal performance and security.
Step 3: Prepare Your Printer for Connection
Proper printer preparation is essential before connecting it to your Macbook.
- Unpack and Set Up: Follow the setup guide that came with your printer to unpack it, install ink or toner cartridges, and load paper into the paper tray.
- Power On and Check for Errors: Turn on your printer and ensure it powers up without displaying any error messages. A printer in error state can prevent successful connection.
Step 4: Connect Your Printer to Your Network
The connection method depends on your printer type (Wi-Fi, Ethernet, or USB).
For Wi-Fi Printers:
- Wi-Fi Setup on Printer: Most modern Wi-Fi printers have a setup wizard accessible through their control panel (often a touchscreen or buttons and a display). Use this wizard to connect your printer to your Wi-Fi network. You’ll typically need to select your Wi-Fi network name (SSID) and enter your Wi-Fi password.
- Temporary USB Connection (If Necessary): Some Wi-Fi printers might initially require a USB connection to your Macbook for the initial Wi-Fi setup. Connect the printer to your Macbook using a USB cable, install any software that came with the printer, and use the printer’s setup assistant to configure the Wi-Fi connection. Once configured, you can disconnect the USB cable, and the printer should remain connected wirelessly.
- AirPrint Printers and Wi-Fi: For AirPrint printers, ensure it is connected to the same Wi-Fi network as your Macbook. Refer to Apple’s guide on Connecting AirPrint printers to Wi-Fi for detailed instructions.
For USB Printers:
- Direct USB Connection: Simply connect your printer to your Macbook using a USB cable. In many cases, macOS will automatically detect the printer and install the necessary drivers.
For Ethernet (Wired Network) Printers:
- Connect to Network: Connect your printer to your network router using an Ethernet cable. Ensure your Macbook is also connected to the same network (via Wi-Fi or Ethernet). Network printers on the same subnet should be discoverable.
Step 5: Add the Printer to Your Macbook’s Printer List
Once your printer is prepared and connected to the network (or directly via USB), you need to add it to your Macbook’s list of available printers in System Settings.
-
Open System Settings: Click on the Apple menu in the top-left corner of your screen and select System Settings. (On older macOS versions, this might be called “System Preferences”).
-
Go to Printers & Scanners: Scroll down in the sidebar and click on Printers & Scanners. You might need to scroll down to find it.
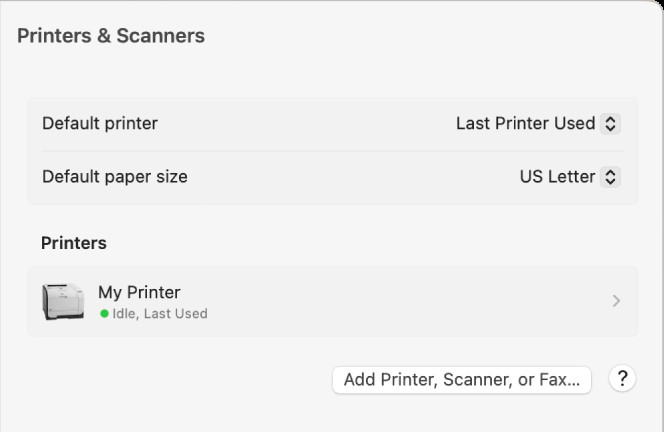 Printers & Scanners settings in System Settings on macOS, highlighting the Add Printer, Scanner, or Fax button.
 -
Click “Add Printer, Scanner, or Fax…”: If you don’t see your printer in the list on the left, click the Add Printer, Scanner, or Fax button on the right side of the Printers & Scanners window. This will open a dialog box to search for available printers.
-
Select Your Printer: A list of printers on your local network will appear. Wait a moment; it may take a minute or two for your printer to show up. Once you see your printer’s name in the list, select it.
-
Click “Add”: After selecting your printer, click the Add button. macOS will attempt to communicate with the printer and configure it.
-
Install Software if Prompted: If you see a message asking you to download new software or drivers, be sure to download and install them. This ensures optimal compatibility and features.
Step 6: Configure Printer Accessories (Optional)
After adding your printer, macOS may detect if it has any special accessories installed, such as extra paper trays or a duplex unit (for double-sided printing).
- Accessory Configuration Dialog: If macOS can’t automatically detect accessories, a dialog box may appear prompting you to specify them manually.
- Accurate Settings: Ensure that the settings in this dialog accurately reflect the accessories installed on your printer. This allows you to take full advantage of your printer’s capabilities when printing documents.
Alternative Method: Using Print Center Utility
For more advanced printer management or troubleshooting, macOS provides the Print Center utility.
- Open Print Center: Go to Finder > Applications > Utilities > Print Center.
- Add Printer in Print Center: Once Print Center is open, choose Printer > Add Printer from the menu bar. This will initiate the same printer discovery process as in System Settings.
- Follow the Prompts: Follow the on-screen prompts to add your printer, similar to the steps in System Settings.
Print Center can also be used to manage print jobs and monitor printer status. Refer to Apple’s guide on managing printers and print jobs with Print Center for more information.
Start Printing!
Congratulations! You’ve successfully added a printer to your Macbook. You should now be able to select your printer from the printer list when you choose to print from any application. Enjoy seamless and efficient printing from your Macbook.