Adding a printer to a MacBook is straightforward and enhances your productivity, so how do you add a printer to a MacBook? You can add a printer to your MacBook by heading to System Settings, clicking Printers & Scanners, and selecting your printer from the list. Amazingprint.net offers comprehensive guides and services to ensure your printing experience is seamless, covering everything from wireless setup to troubleshooting driver issues. Discover expert tips and solutions for all your printing needs, enhancing your document management and output quality with our printer management resources.
1. Understanding Printer Compatibility With Your MacBook
Before diving into the setup, it’s crucial to ensure your printer is compatible with your MacBook. Different printers use various connection methods and require specific drivers to function correctly.
1.1. Checking Printer Compatibility
Confirming compatibility involves a few key steps to ensure a smooth setup.
- Check the Manufacturer’s Website: Visit the printer manufacturer’s website (e.g., HP, Epson, Canon) and look for drivers and software compatible with macOS.
- Review System Requirements: Ensure your printer supports the macOS version running on your MacBook. This information is usually available in the printer’s specifications or on the manufacturer’s website.
- AirPrint Compatibility: If your printer supports AirPrint, it’s designed to work seamlessly with macOS without needing additional drivers. Apple provides a list of AirPrint-compatible printers on its support pages.
- Consult Online Forums and Reviews: Check online forums and customer reviews for compatibility reports from other users with the same printer model and MacBook.
1.2. Connection Types: USB, Wi-Fi, and Network
Printers connect to MacBooks via USB, Wi-Fi, or network connections, each with its advantages and setup requirements.
- USB Connection: The simplest method, requiring only a USB cable. Connect the printer, and macOS will usually detect and install the necessary drivers.
- Wi-Fi Connection: Allows wireless printing from anywhere within the network range. Requires connecting the printer to your Wi-Fi network, often through the printer’s control panel or accompanying software.
- Network Connection (Ethernet): Suitable for office environments. Connect the printer to the network using an Ethernet cable, then add it to your MacBook through System Preferences.
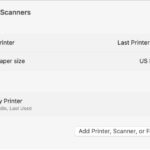
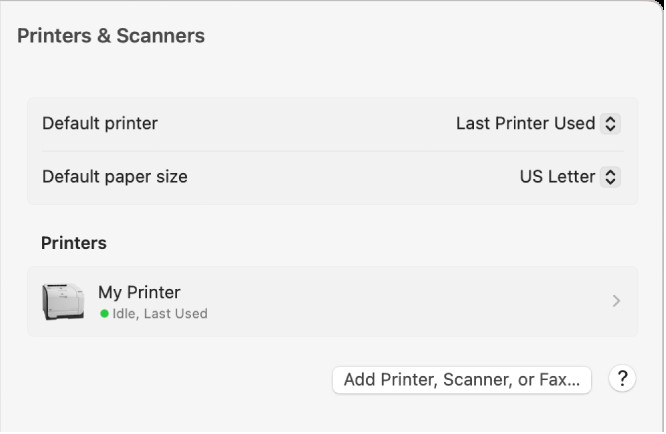 The Printers & Scanners dialog showing options for setting up a printer and a printers list with an Add Printer, Scanner, or Fax button.
1.3. Driver Installation: Automatic vs. Manual
macOS often automatically detects and installs the necessary drivers, but sometimes manual installation is required.
- Automatic Installation: macOS usually detects the printer and prompts you to download and install the drivers automatically. This is the most straightforward method.
- Manual Installation: If automatic installation fails, download the drivers from the manufacturer’s website and follow the installation instructions. This may involve running an installer package or manually adding the printer in System Preferences.
2. Step-by-Step Guide to Adding a Printer to Your MacBook
Adding a printer to your MacBook involves several methods, including using System Settings, connecting via USB, and utilizing AirPrint.
2.1. Using System Settings
System Settings is the primary way to add and manage printers on your MacBook.
-
Open System Settings: Click the Apple menu in the top-left corner of your screen and select “System Settings”.
-
Navigate to Printers & Scanners: In the System Settings window, find and click on “Printers & Scanners”.
-
Add a Printer: Click the “Add Printer, Scanner, or Fax” button. A list of available printers on your network will appear.
- Select Your Printer: Choose your printer from the list. If it doesn’t appear, ensure it’s turned on and connected to the same network as your MacBook.
- Install Drivers (If Prompted): If macOS prompts you to install drivers, follow the on-screen instructions.
-
Click “Add”: After selecting your printer, click the “Add” button to complete the setup.
2.2. Adding a USB Printer
Connecting via USB is straightforward, often requiring minimal setup.
- Connect the Printer: Plug the USB cable from your printer into a USB port on your MacBook.
- Turn On the Printer: Power on your printer.
- Wait for Detection: macOS should automatically detect the printer and start the driver installation process.
- Add the Printer (If Necessary): If the printer isn’t automatically added, follow the steps in Section 2.1 to add it manually via System Settings.
2.3. Adding a Wi-Fi Printer
Setting up a Wi-Fi printer involves connecting it to your wireless network and then adding it to your MacBook.
- Connect Printer to Wi-Fi: Follow the printer’s instructions to connect it to your Wi-Fi network. This usually involves using the printer’s control panel to select your network and enter the password.
- Add Printer in System Settings:
- Follow steps 1-3 in Section 2.1 to open “Printers & Scanners” and click “Add Printer, Scanner, or Fax”.
- Select your printer from the list. It should appear once connected to the Wi-Fi network.
- Install Drivers (If Prompted): If prompted, install any necessary drivers.
- Click “Add”: Complete the setup by clicking the “Add” button.
2.4. Using AirPrint
AirPrint allows you to print wirelessly without installing drivers, provided your printer supports it.
- Ensure AirPrint Compatibility: Check that your printer is AirPrint-compatible. Apple provides a list of supported printers on its website.
- Connect to the Same Wi-Fi Network: Ensure your printer and MacBook are connected to the same Wi-Fi network.
- Print as Usual:
- Open the document or image you want to print.
- Choose “File” > “Print”.
- Select your AirPrint printer from the “Printer” dropdown menu.
- Adjust settings and click “Print”.
2.5. Adding a Network Printer (Ethernet)
For printers connected via Ethernet, ensure both the printer and MacBook are on the same network.
- Connect Printer to Network: Plug the Ethernet cable from your printer into an available port on your network router or switch.
- Add Printer in System Settings:
- Follow steps 1-3 in Section 2.1 to open “Printers & Scanners” and click “Add Printer, Scanner, or Fax”.
- Select your printer from the list. It should appear once connected to the network.
- Install Drivers (If Prompted): Install any necessary drivers.
- Click “Add”: Finish the setup by clicking the “Add” button.
3. Troubleshooting Common Printer Issues
Even with careful setup, printer problems can arise. Here are some common issues and solutions.
3.1. Printer Not Appearing in the List
If your printer doesn’t appear when trying to add it, try these steps:
- Check Network Connection: Ensure both your printer and MacBook are connected to the same Wi-Fi network.
- Restart Printer and MacBook: Power cycle both devices to refresh their connections.
- Verify Printer is Online: Check the printer’s display or configuration page to ensure it is online and not in an error state.
- Update Printer Drivers: Ensure you have the latest drivers installed on your MacBook.
- Check Firewall Settings: Ensure your firewall isn’t blocking the printer’s connection.
3.2. Driver Installation Problems
Driver issues can prevent your printer from functioning correctly.
- Download the Latest Drivers: Always download the latest drivers from the manufacturer’s website.
- Uninstall Old Drivers: Remove any old or conflicting drivers before installing new ones.
- Restart Your MacBook: Restart your MacBook after installing drivers to ensure they load properly.
- Run in Compatibility Mode: If you’re using older drivers, try running the installer in compatibility mode (if applicable).
3.3. Printing Errors and Jams
Encountering printing errors or paper jams can disrupt your workflow.
- Check Paper Tray: Ensure the paper is loaded correctly and that the paper type matches the printer settings.
- Clear Paper Jams: Carefully remove any jammed paper, following the printer’s instructions to avoid damaging the mechanism.
- Check Ink/Toner Levels: Low ink or toner can cause print quality issues or prevent printing altogether.
- Run Printer Diagnostics: Use the printer’s built-in diagnostic tools to identify and fix any hardware or software issues.
3.4. Wireless Printing Problems
Wireless printing can be convenient but sometimes unreliable.
- Check Wi-Fi Signal Strength: Ensure your printer has a strong Wi-Fi signal.
- Reconfigure Wi-Fi Connection: Reconnect the printer to your Wi-Fi network, ensuring you enter the correct password.
- Update Printer Firmware: Keep your printer’s firmware updated to ensure compatibility and performance.
- Use a Static IP Address: Assign a static IP address to your printer to prevent IP address conflicts on your network.
3.5. Print Quality Issues
Poor print quality can be frustrating, but it’s often fixable.
- Check Ink/Toner Levels: Low ink or toner is a common cause of poor print quality.
- Clean Print Heads: Use the printer’s cleaning utility to clean the print heads, which can become clogged over time.
- Adjust Print Settings: Ensure the print settings (e.g., quality, paper type) are appropriate for your document.
- Calibrate Printer: Calibrate the printer to align the print heads and improve print quality.
4. Optimizing Your Printing Experience
Beyond basic setup, several techniques can optimize your printing experience on a MacBook.
4.1. Setting Default Printer Options
Configuring default options can save time and ensure consistent results.
- Set Default Printer: In System Settings > Printers & Scanners, select your preferred printer from the “Default printer” dropdown menu.
- Customize Print Presets: Create custom print presets for different types of documents (e.g., black and white, draft quality) to quickly apply specific settings.
4.2. Using Print Queues
Managing print queues helps you monitor and control your print jobs.
- Access Print Queue: When you send a document to print, a printer icon appears in the Dock. Click it to open the print queue.
- Manage Print Jobs: In the print queue, you can pause, resume, cancel, or rearrange print jobs.
4.3. Sharing Printers on a Network
Sharing printers allows multiple users on a network to access the same printer.
- Enable Printer Sharing: In System Settings > General > Sharing, enable “Printer Sharing”.
- Select Printers to Share: Choose the printers you want to share from the list.
- Configure User Access: Specify which users or groups have access to the shared printers.
4.4. Printing From Mobile Devices
Printing from iPhones and iPads is seamless with AirPrint.
- Ensure AirPrint Compatibility: Confirm that your printer supports AirPrint.
- Connect to the Same Wi-Fi Network: Ensure your mobile device and printer are on the same Wi-Fi network.
- Print Directly: Open the document or image you want to print, tap the share icon, select “Print”, and choose your AirPrint printer.
4.5. Advanced Printing Features
Explore advanced features for specialized printing tasks.
- Duplex Printing: Print on both sides of the paper to save resources.
- Borderless Printing: Print photos and images without borders.
- Watermarks: Add watermarks to documents for branding or security.
- Booklet Printing: Create booklets and brochures with automatic page ordering.
5. Exploring Advanced Printing Techniques
For users with specific needs, advanced printing techniques can enhance functionality and quality.
5.1. Color Management and Calibration
Achieving accurate color reproduction is crucial for professional printing.
- Calibrate Your Monitor: Use a monitor calibration tool to ensure your display accurately represents colors.
- Use Color Profiles: Apply appropriate color profiles (ICC profiles) to your documents and printer settings to ensure consistent color output. According to research from the International Color Consortium (ICC), using standardized color profiles can reduce color discrepancies by up to 30%.
- Test Prints: Print test pages with color charts to evaluate and adjust color settings.
5.2. Understanding DPI and Resolution
DPI (dots per inch) and resolution affect the clarity and detail of your prints.
- Higher DPI for Detailed Prints: Use higher DPI settings (e.g., 300 DPI or 600 DPI) for images and graphics that require fine detail.
- Lower DPI for Drafts: Use lower DPI settings (e.g., 150 DPI) for draft prints to save ink and speed up printing.
- Match Resolution to Output: Ensure the resolution of your images matches the intended output size to avoid pixelation or blurriness.
5.3. Choosing the Right Paper Type
Selecting the correct paper type can significantly impact print quality and durability.
- Plain Paper: Suitable for everyday documents and draft prints.
- Glossy Paper: Ideal for printing photos and marketing materials with vibrant colors.
- Matte Paper: Best for documents and graphics with a non-reflective finish.
- Specialty Paper: Use specialty papers like cardstock, labels, and transfer paper for specific projects.
5.4. Using Third-Party Printing Software
Third-party software can offer advanced features and greater control over your printing.
- Print Management Software: Tools like PaperCut and Printix offer features like print tracking, quota management, and secure printing.
- RIP (Raster Image Processor) Software: RIP software optimizes print quality and color accuracy, especially for large-format and professional printing.
- Label Design Software: Programs like BarTender and NiceLabel simplify the design and printing of labels for various applications.
5.5. Printing Security Best Practices
Protecting sensitive information requires implementing security measures.
- Secure Print: Use secure print features that require a PIN or authentication to release print jobs, preventing unauthorized access to confidential documents.
- Encryption: Encrypt print data transmitted over the network to prevent interception.
- Access Control: Restrict access to printers and print settings to authorized users only.
- নিয়মিত Updates: Keep your printer’s firmware and software updated to patch security vulnerabilities.
6. Maintaining Your Printer for Longevity
Proper maintenance ensures your printer operates efficiently and lasts longer.
6.1. Regular Cleaning
Cleaning your printer prevents buildup and ensures optimal performance.
- Clean Exterior: Wipe down the exterior of the printer with a soft, damp cloth to remove dust and debris.
- Clean Interior: Use a lint-free cloth or vacuum to remove dust and paper particles from the interior.
- Clean Print Heads: Run the printer’s cleaning utility to clean the print heads, preventing clogs and ensuring clear prints.
6.2. Updating Firmware
Keeping your printer’s firmware up-to-date ensures compatibility and performance.
- Check for Updates: Visit the manufacturer’s website or use the printer’s control panel to check for firmware updates.
- Install Updates: Follow the instructions to download and install the latest firmware version.
6.3. Replacing Ink and Toner
Using high-quality ink and toner extends the life of your printer and ensures consistent print quality.
- Use Original Supplies: Opt for original ink and toner cartridges from the manufacturer to ensure compatibility and optimal performance.
- Store Supplies Properly: Store ink and toner cartridges in a cool, dry place away from direct sunlight to prevent degradation.
- Recycle Used Cartridges: Recycle used ink and toner cartridges to reduce environmental impact.
6.4. Preventing Paper Jams
Avoiding paper jams minimizes downtime and prevents damage to the printer.
- Load Paper Correctly: Ensure the paper is loaded correctly in the tray, following the printer’s guidelines.
- Use Recommended Paper: Use the paper type recommended by the manufacturer to avoid jams and ensure optimal print quality.
- Store Paper Properly: Store paper in a dry environment to prevent it from becoming damp and causing jams.
6.5. Monitoring Printer Usage
Tracking printer usage helps you optimize resource allocation and identify potential issues.
- Use Print Management Software: Implement print management software to monitor print volumes, user activity, and costs.
- Analyze Usage Data: Review usage data to identify areas for improvement and optimize printing practices.
- Set Quotas: Implement print quotas to control usage and reduce waste.
7. Staying Updated With Printing Technology Trends
The printing industry is constantly evolving, so staying informed is essential.
7.1. 3D Printing
3D printing is revolutionizing manufacturing, prototyping, and customization.
- Explore 3D Printers: Investigate 3D printer models suitable for your needs, from desktop units to industrial-grade machines.
- Learn 3D Modeling: Acquire skills in 3D modeling to design and create your own 3D-printed objects.
- Experiment With Materials: Explore different 3D printing materials like PLA, ABS, and nylon to achieve various properties and finishes.
7.2. Sustainable Printing Practices
Adopting sustainable practices reduces environmental impact and saves resources.
- Use Recycled Paper: Opt for recycled paper to reduce deforestation and promote environmental stewardship.
- Print Double-Sided: Print on both sides of the paper to reduce paper consumption.
- Reduce Ink Usage: Use draft mode and grayscale printing to minimize ink usage.
- Recycle Printer Components: Recycle used ink and toner cartridges and other printer components.
7.3. Mobile Printing Solutions
Mobile printing solutions enable convenient printing from smartphones and tablets.
- Use AirPrint: Take advantage of AirPrint for seamless printing from iOS devices without installing drivers.
- Explore Mobile Printing Apps: Use mobile printing apps from printer manufacturers or third-party developers to enhance functionality and compatibility.
- Cloud Printing: Implement cloud printing solutions like Google Cloud Print or Microsoft Universal Print for remote printing and device management.
7.4. Digital Transformation in Printing
Digital transformation is reshaping the printing industry, driving efficiency and innovation.
- Automated Workflows: Implement automated workflows to streamline print processes and reduce manual intervention.
- Cloud-Based Solutions: Adopt cloud-based solutions for document storage, management, and printing.
- Data Analytics: Leverage data analytics to gain insights into printing trends, costs, and environmental impact.
7.5. Innovations in Ink and Toner Technology
Advancements in ink and toner technology are improving print quality, efficiency, and sustainability.
- New Ink Formulations: Explore new ink formulations that offer improved color gamut, durability, and water resistance.
- Toner Efficiency: Utilize toner cartridges with higher yields and improved transfer efficiency to reduce costs and waste.
- Eco-Friendly Inks: Opt for eco-friendly inks made from sustainable materials to minimize environmental impact.
8. FAQ: Adding a Printer to a MacBook
8.1. Why can’t my MacBook find my printer?
Ensure both your MacBook and printer are on the same Wi-Fi network, and the printer is turned on and online. Check the connection settings and restart both devices.
8.2. Do I need to install drivers for an AirPrint printer?
No, AirPrint printers don’t require driver installation. Ensure both devices are on the same Wi-Fi network, and your MacBook should automatically detect the printer.
8.3. How do I update my printer drivers on a MacBook?
Visit the printer manufacturer’s website and download the latest drivers for macOS. Follow the installation instructions provided.
8.4. Can I add a printer to my MacBook using Bluetooth?
While some printers have Bluetooth capabilities, it’s not the primary connection method for printing from a MacBook. Wi-Fi or USB connections are more reliable.
8.5. How do I share a printer connected to my MacBook with other devices on the network?
Go to System Settings > General > Sharing and enable “Printer Sharing.” Select the printers you want to share and configure user access.
8.6. What should I do if my printer is printing blank pages?
Check the ink or toner levels, clean the print heads, and ensure the paper is loaded correctly. Also, verify the print settings and driver configurations.
8.7. How do I change the default printer on my MacBook?
In System Settings > Printers & Scanners, select your preferred printer from the “Default printer” dropdown menu.
8.8. Is it possible to print from my iPhone or iPad to a printer connected to my MacBook?
Yes, as long as both devices are on the same Wi-Fi network and the printer supports AirPrint or is shared via Printer Sharing on your MacBook.
8.9. How do I troubleshoot a paper jam on my printer?
Follow the printer’s instructions to carefully remove any jammed paper, ensuring not to damage the mechanism. Check the paper tray and use the recommended paper type.
8.10. How do I ensure my printer is using the correct color profile?
Calibrate your monitor, use appropriate ICC profiles in your documents, and adjust the printer settings to match the intended color output. Print test pages to evaluate and fine-tune color accuracy.
9. Conclusion: Streamlining Your Printing Workflow
Adding a printer to your MacBook is a straightforward process that enhances productivity. By following the steps outlined in this guide, you can easily connect your printer, troubleshoot common issues, and optimize your printing experience. For more in-depth information and support, visit amazingprint.net.
Are you looking to enhance your printing capabilities and streamline your workflow? Visit amazingprint.net today to explore our comprehensive guides, compare printing options, and discover innovative ideas for your next project. Let us help you achieve exceptional printing results with our expert advice and services. Address: 1600 Amphitheatre Parkway, Mountain View, CA 94043, United States. Phone: +1 (650) 253-0000. Website: amazingprint.net.