Do you want to capture and share what’s on your laptop screen? How Do You Print The Screen On A Laptop efficiently? At amazingprint.net, we provide simple, step-by-step methods to capture your screen, including using the Print Screen key, the Snipping Tool, and keyboard shortcuts. With our comprehensive guides, you’ll master screen printing on your laptop in no time. For more innovative printing ideas, including digital printing, offset printing, and 3D printing, explore our resources at amazingprint.net.
1. Understanding the Print Screen Key and Its Functionality
The Print Screen key is a quick and easy way to capture a snapshot of your laptop screen. It allows you to take a screenshot, which is then copied to your clipboard. Depending on your needs, you can capture the entire screen, all active windows, or just the current active window.
1.1. What is the Print Screen Key Used For?
The Print Screen key captures a snapshot of your screen, copying it to the clipboard. From there, you can paste the screenshot into an image editor, document, or email. This is perfect for sharing information, creating tutorials, or documenting issues you encounter on your computer. According to Microsoft, the Print Screen key has been a standard feature in Windows for decades, making it a reliable tool for capturing screen content.
1.2. How Does the Print Screen Key Work?
When you press the Print Screen key (often labeled PrtScn), Windows takes a snapshot of your screen and saves it to the clipboard. The clipboard is a temporary storage area, so you need to paste the image into another application to save it permanently. Here’s how it works:
- Press the Print Screen key: This captures the image.
- Open an image editor: Programs like Microsoft Paint, Photoshop, or GIMP will work.
- Paste the image: Use the Ctrl + V shortcut to paste the screenshot into the image editor.
- Save the image: Save the file in your preferred format (JPEG, PNG, etc.).
1.3. Where is the Print Screen Key Located on a Laptop?
The location of the Print Screen key can vary depending on the laptop model. Typically, it’s found on the upper right side of the keyboard, often near the Function keys. Some laptops may require you to press the Fn (Function) key along with the Print Screen key to activate it.
- Desktop Keyboards: Usually in the upper right corner, labeled as PrintScreen, PrntScrn, or similar.
- Laptop Keyboards: Often on the Function Key row, requiring the Fn key to be pressed simultaneously.
- Dell Wireless Keyboard (KM3322W): Requires pressing the Fn key and the Insert key together.
If you’re having trouble finding it, consult your laptop’s user manual for the exact location. Knowing this key’s location will make screen capturing much more efficient.
2. Step-by-Step Guide: Printing Your Screen on Different Windows Versions
The method for printing your screen may vary slightly depending on the version of Windows you are using. Here’s a detailed guide for Windows 11 and Windows 10.
2.1. How to Print Screen on Windows 11
Windows 11 offers several ways to capture your screen, making it versatile for different needs.
2.1.1. Capturing the Entire Screen
To capture the entire screen in Windows 11, press the Windows logo key + PrtScn key together. On tablets, press the Windows logo button + the volume down button together. The screenshot is automatically saved in the Screenshots folder in the Pictures folder. This method is quick and saves the image directly, which is great for those who need to capture and store screenshots frequently.
2.1.2. Capturing All Active Windows
To capture all active windows, simply press the PrtScn key. This copies the image to your clipboard, allowing you to paste it into an image editor. This method is useful when you want to capture multiple windows at once and edit them later.
2.1.3. Capturing a Single Active Window
To capture a single active window, select the window you want to capture and press the Alt + PrtScn keys together. This is perfect for capturing specific application windows without including the entire screen.
2.1.4. Using the Snipping Tool
The Snipping Tool is a built-in utility in Windows 11 that allows you to capture specific parts of your screen. To use it:
- Open the Snipping Tool by searching for it in the Start menu.
- Click “New” to start a new snip.
- Select the area you want to capture by dragging your mouse.
- The screenshot will open in the Snipping Tool, where you can edit and save it.
2.2. How to Print Screen on Windows 10
The process for capturing your screen in Windows 10 is very similar to Windows 11, ensuring a consistent experience.
2.2.1. Capturing the Entire Screen
Press the Windows logo key + PrtScn key together. On tablets, press the Windows logo button + the volume down button together. (The screenshot is saved in the Screenshots folder in the Pictures folder.) This is a straightforward method for capturing everything displayed on your screen.
2.2.2. Capturing All Active Windows
Press the PrtScn key. The screenshot is copied to your clipboard, ready to be pasted into an image editor. This method is ideal for quickly capturing and editing multiple windows.
2.2.3. Capturing a Single Active Window
Select the window that you want to capture and press the Alt + PrtScn keys together. This is useful when you need to focus on a specific application or window.
2.2.4. Using the Snipping Tool
The Snipping Tool in Windows 10 works the same way as in Windows 11. It provides options to capture free-form, rectangular, window, or full-screen snips. Here’s how to use it:
- Open the Snipping Tool by searching for it in the Start menu.
- Click “New” to start a new snip.
- Select the area you want to capture.
- Edit and save the screenshot in the Snipping Tool.
3. Advanced Techniques: Beyond the Basics of Print Screen
While the Print Screen key is useful, Windows offers more advanced tools for capturing your screen. The Snipping Tool and keyboard shortcuts provide additional flexibility and options.
3.1. Utilizing the Snipping Tool for Precise Screen Captures
The Snipping Tool is a powerful utility that comes standard with Windows. It allows you to capture specific sections of your screen, making it ideal for creating tutorials, capturing error messages, or sharing specific information.
3.1.1. Different Snipping Modes
The Snipping Tool offers several modes to suit different needs:
- Free-form Snip: Draw a free-form shape around the area you want to capture.
- Rectangular Snip: Drag your mouse to create a rectangle around the area you want to capture.
- Window Snip: Select a specific window to capture.
- Full-screen Snip: Capture the entire screen.
3.1.2. Editing and Annotating Screenshots
Once you’ve captured a screenshot with the Snipping Tool, you can edit and annotate it using the built-in tools. You can add highlights, draw arrows, and write notes directly on the screenshot. This is particularly useful for providing feedback or instructions.
3.1.3. Saving and Sharing Your Snips
After editing your screenshot, you can save it in various formats, including PNG, JPEG, and GIF. You can also share it directly via email or other applications. The Snipping Tool makes it easy to capture, edit, and share screenshots quickly.
3.2. Mastering Keyboard Shortcuts for Screen Printing
Keyboard shortcuts can significantly speed up the process of capturing your screen. Here are some essential shortcuts to master:
- PrtScn: Captures the entire screen and copies it to the clipboard.
- Alt + PrtScn: Captures the active window and copies it to the clipboard.
- Windows logo key + PrtScn: Captures the entire screen and saves it as a file in the Screenshots folder.
- Windows logo key + Shift + S: Opens the Snipping Tool, allowing you to select a specific area to capture.
By using these shortcuts, you can quickly capture and share your screen without having to open additional applications.
3.3. Third-Party Tools for Enhanced Screen Capturing
While Windows offers built-in tools for capturing your screen, several third-party applications provide additional features and functionality. These tools can offer advanced editing options, screen recording capabilities, and cloud storage integration.
3.3.1. Snagit
Snagit is a popular screen capture and recording tool that offers a wide range of features. It allows you to capture screenshots, record videos, and edit images with ease. Snagit also includes advanced editing tools, such as annotations, effects, and callouts. According to TechSmith, the makers of Snagit, it’s used by millions of professionals to communicate ideas visually.
3.3.2. Greenshot
Greenshot is a free and open-source screen capture tool that offers many of the same features as paid alternatives. It allows you to capture screenshots, annotate images, and save them in various formats. Greenshot also includes plugins for uploading screenshots to online services like Imgur and Dropbox.
3.3.3. Lightshot
Lightshot is a lightweight and easy-to-use screen capture tool that allows you to quickly capture and share screenshots. It includes basic editing tools, such as drawing, highlighting, and text annotations. Lightshot also offers a convenient search feature that allows you to find similar images online.
4. Troubleshooting Common Print Screen Issues
Even with the right tools and techniques, you may encounter issues when trying to print your screen. Here are some common problems and how to troubleshoot them.
4.1. Print Screen Key Not Working
If the Print Screen key isn’t working, there could be several reasons.
4.1.1. Hardware Problems
The Print Screen key itself may be damaged or malfunctioning. Try using an external keyboard to see if the issue is with the laptop’s keyboard. If the external keyboard works, you may need to repair or replace your laptop’s keyboard.
4.1.2. Software Conflicts
Certain applications or processes may interfere with the Print Screen function. Close any unnecessary programs and try again. You can also try restarting your computer to clear any temporary software conflicts.
4.1.3. Driver Issues
Outdated or corrupted keyboard drivers can also cause the Print Screen key to malfunction. Update your keyboard drivers through the Device Manager:
- Open the Device Manager by searching for it in the Start menu.
- Expand the “Keyboards” section.
- Right-click on your keyboard and select “Update driver.”
- Follow the on-screen instructions to update the driver.
4.2. Screenshots Not Saving
If you’re capturing screenshots using the Windows logo key + PrtScn shortcut but can’t find the saved images, they may be in the wrong folder or not saving correctly.
4.2.1. Checking the Default Screenshots Folder
By default, screenshots are saved in the Screenshots folder within the Pictures folder. Make sure you’re looking in the correct location.
4.2.2. Adjusting Save Settings
In some cases, the default save location may have been changed. Check your settings to ensure screenshots are being saved to the correct folder. You can also try changing the save location to a different folder to see if that resolves the issue.
4.2.3. Insufficient Disk Space
If your hard drive is full, screenshots may not save correctly. Free up some disk space by deleting unnecessary files and programs.
4.3. Clipboard Problems
The Print Screen key copies the screenshot to the clipboard, so issues with the clipboard can prevent you from pasting the image into another application.
4.3.1. Clearing the Clipboard
Sometimes, a full or corrupted clipboard can cause issues. Clear the clipboard by copying something small, like a single letter, to it. This will overwrite any existing content and may resolve the problem.
4.3.2. Restarting the Clipboard Service
The Clipboard service may be malfunctioning. Restarting it can sometimes fix issues:
- Press Windows logo key + R to open the Run dialog box.
- Type “services.msc” and press Enter.
- Locate the “Clipboard User Service” in the list.
- Right-click on it and select “Restart.”
5. Optimizing Print Screen for Business and Personal Use
Knowing how to print your screen effectively can be a valuable skill for both business and personal use. Here are some tips for optimizing your screen capturing process.
5.1. Using Screenshots for Professional Communication
Screenshots can be a powerful tool for professional communication. They can help you illustrate points, provide feedback, and document issues more effectively.
5.1.1. Creating Tutorials and Guides
Screenshots are essential for creating tutorials and guides. They allow you to visually demonstrate steps and provide clear instructions. Use the Snipping Tool to capture specific areas of the screen and annotate them with arrows, text, and highlights.
5.1.2. Providing Feedback and Annotations
When providing feedback on designs, documents, or websites, screenshots can help you pinpoint specific areas and provide clear annotations. Use editing tools to highlight issues and suggest improvements.
5.1.3. Documenting Issues and Errors
Screenshots are invaluable for documenting issues and errors. Capture the error message or problem area and include it in your support request. This helps technical support understand the issue and provide a solution more quickly.
5.2. Enhancing Personal Projects with Screen Captures
Screen captures can also enhance personal projects, allowing you to share information, create visual content, and document your experiences.
5.2.1. Sharing Gaming Moments
Capture your best gaming moments with screenshots and share them with friends and online communities. Use screen recording tools to create videos of your gameplay.
5.2.2. Creating Visual Diaries and Journals
Use screenshots to create visual diaries and journals. Capture interesting websites, quotes, and images and document your thoughts and experiences.
5.2.3. Sharing Social Media Content
Capture interesting content from social media and share it with your followers. Use editing tools to add your own commentary and insights.
5.3. Best Practices for Organizing and Storing Screenshots
Organizing and storing your screenshots is essential for easy access and future reference.
5.3.1. Creating a Clear Folder Structure
Create a clear folder structure for your screenshots. Use descriptive names for your folders and subfolders to easily locate specific images.
5.3.2. Using Descriptive File Names
Use descriptive file names for your screenshots. Include the date, time, and a brief description of the content. This makes it easier to search for specific images later.
5.3.3. Utilizing Cloud Storage Solutions
Use cloud storage solutions like Google Drive, Dropbox, or OneDrive to back up your screenshots. This ensures that your images are safe and accessible from any device.
6. The Future of Screen Capturing Technology
Screen capturing technology continues to evolve, with new tools and features emerging regularly. Here are some trends to watch.
6.1. Integration with AI and Machine Learning
AI and machine learning are being integrated into screen capturing tools to automate tasks and enhance functionality. For example, AI can automatically recognize text in screenshots and convert it to editable text.
6.2. Enhanced Screen Recording Capabilities
Screen recording capabilities are becoming more advanced, with features like automatic noise reduction, webcam integration, and real-time annotations.
6.3. Collaboration and Sharing Features
Collaboration and sharing features are being enhanced, allowing multiple users to annotate and edit screenshots in real-time.
7. Case Studies: How Professionals Use Print Screen
To illustrate the practical applications of screen capturing, let’s look at a few case studies.
7.1. Marketing Teams
Marketing teams use screenshots to create visually appealing presentations, social media posts, and website content. They capture product images, website layouts, and social media campaigns to showcase their work.
7.2. IT Support
IT support teams use screenshots to troubleshoot issues, provide remote assistance, and document solutions. They capture error messages, system configurations, and network diagrams to help users resolve problems quickly.
7.3. Educators
Educators use screenshots to create engaging lesson plans, online courses, and tutorials. They capture website content, diagrams, and images to illustrate concepts and provide clear instructions.
8. Print Screen and Data Privacy: What You Need to Know
When capturing and sharing screenshots, it’s important to be aware of data privacy issues.
8.1. Avoiding Sensitive Information
Avoid capturing sensitive information, such as passwords, credit card numbers, and personal data. If you need to capture a screen containing sensitive information, use editing tools to redact the data before sharing it.
8.2. Complying with Data Protection Regulations
Comply with data protection regulations, such as GDPR and CCPA, when capturing and sharing screenshots. Obtain consent from individuals before capturing their personal data and ensure that you have a legal basis for processing the data.
8.3. Securing Your Screenshots
Secure your screenshots by storing them in encrypted folders and using strong passwords. Avoid sharing screenshots via unsecured channels, such as email, and use secure file transfer protocols instead.
9. Frequently Asked Questions (FAQ) About Printing the Screen on a Laptop
Here are some frequently asked questions about printing the screen on a laptop.
9.1. How Do I Take a Screenshot on My Laptop?
Press the Print Screen key (PrtScn) to capture the entire screen and copy it to the clipboard. To capture a single window, press Alt + PrtScn. For more options, use the Snipping Tool.
9.2. Where Are Screenshots Saved on Windows?
Screenshots taken with the Windows logo key + PrtScn are saved in the Screenshots folder, located within the Pictures folder.
9.3. How Do I Use the Snipping Tool?
Open the Snipping Tool from the Start menu, click “New,” and select the area you want to capture. You can then edit and save the screenshot.
9.4. What Do I Do if the Print Screen Key Isn’t Working?
Check for hardware problems, software conflicts, and driver issues. Try restarting your computer or updating your keyboard drivers.
9.5. Can I Edit Screenshots?
Yes, you can edit screenshots using the Snipping Tool or other image editing software like Microsoft Paint or Adobe Photoshop.
9.6. How Can I Capture a Specific Part of My Screen?
Use the Snipping Tool and select the “Rectangular Snip” or “Free-form Snip” mode to capture a specific area.
9.7. How Do I Record My Screen on a Laptop?
Use the Xbox Game Bar (Windows logo key + G) or third-party screen recording software like Snagit or OBS Studio to record your screen.
9.8. How Do I Share a Screenshot?
Paste the screenshot into an email, document, or messaging app. You can also save it as a file and attach it to your message.
9.9. Is There a Way to Print Screen on a Mac?
On a Mac, press Command + Shift + 3 to capture the entire screen or Command + Shift + 4 to select a specific area.
9.10. How Can I Optimize Screenshots for Web Use?
Save screenshots in JPEG format for smaller file sizes. Use image optimization tools to reduce the file size without sacrificing quality.
10. Conclusion: Mastering the Art of Screen Capturing on Your Laptop
Mastering the art of screen capturing on your laptop can significantly enhance your productivity, communication, and creativity. Whether you’re creating tutorials, providing feedback, or sharing personal experiences, the ability to capture and share your screen is a valuable skill. By understanding the various tools and techniques available, you can optimize your screen capturing process and make the most of this powerful technology.
Ready to take your printing and screen capturing skills to the next level? Visit amazingprint.net for more in-depth guides, creative ideas, and expert advice. Explore our wide range of printing services, from digital and offset to 3D printing, and discover how we can help you bring your projects to life. Contact us today and let us help you unlock the full potential of printing and screen capturing. You can reach us at Address: 1600 Amphitheatre Parkway, Mountain View, CA 94043, United States. Phone: +1 (650) 253-0000. Website: amazingprint.net.
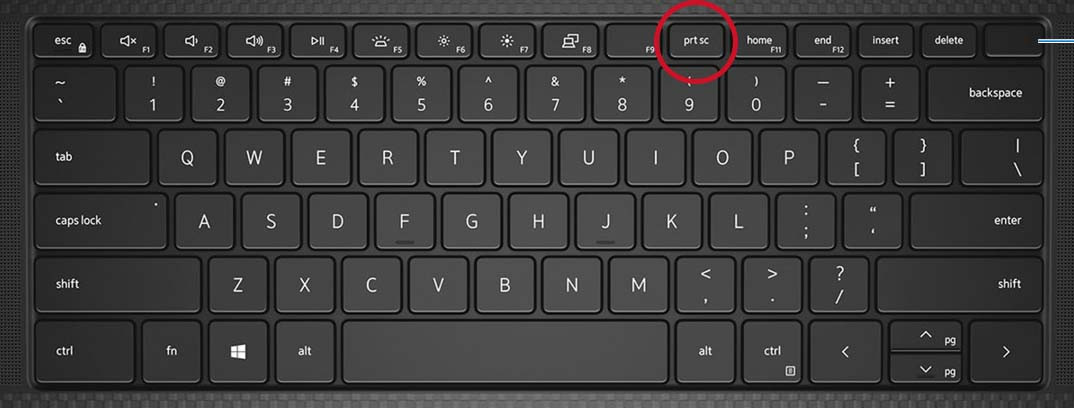 Illustration of the print screen key on Dell Precision 5550 mobile workstation keyboard