Printing documents from your Mac is a straightforward process, thanks to the intuitive Print dialog. This guide will walk you through each step, ensuring you can effortlessly select your printer and customize print options to achieve the perfect output every time.
To begin, ensure your printer is properly connected and set up with your Mac. If you need assistance with this initial step, refer to Apple’s guide on adding a printer to your printer list. For troubleshooting printer issues, you can consult the guide on checking if a printer is working or the printer manufacturer’s documentation.
-
Open the Print Dialog: With the document you wish to print open on your Mac, navigate to the menu bar at the top of your screen. Click on “File” and then select “Print” from the dropdown menu. Alternatively, you can use the keyboard shortcut Command-P to quickly access the Print dialog.
Upon opening, the Print dialog will appear, presenting a preview of your document as it will be printed.
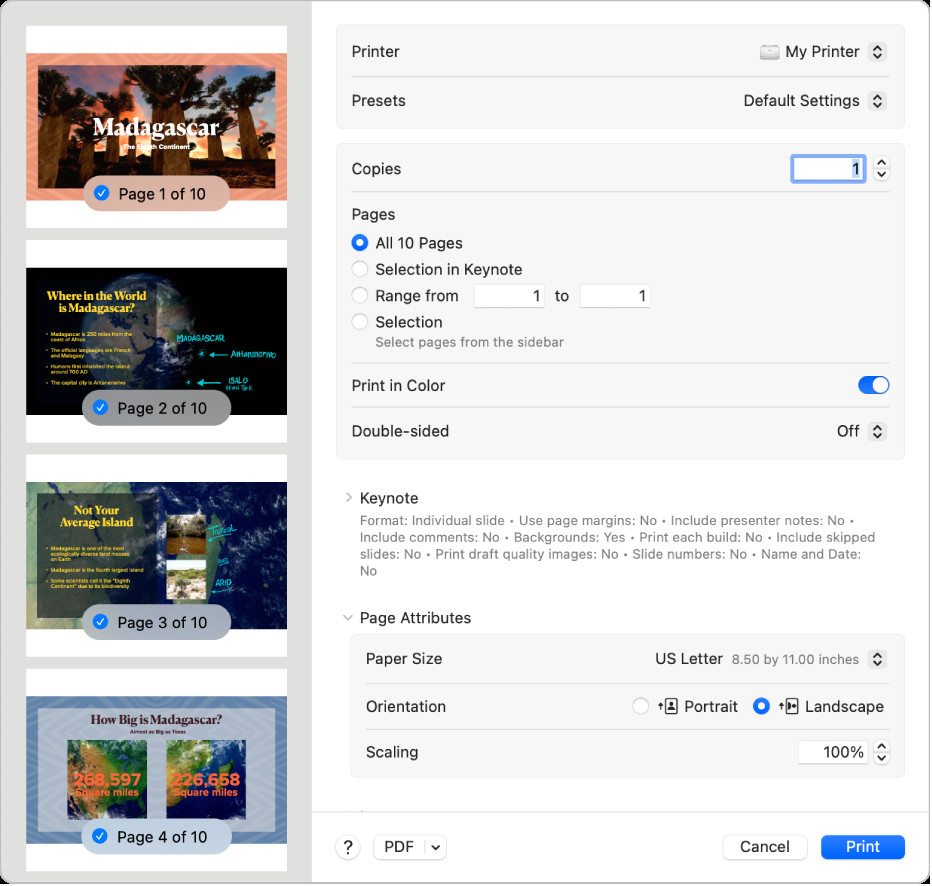 The Print dialog box on macOS, displaying print settings such as printer selection, presets, copies, pages, paper size and orientation, along with a document preview.
Note: The specific options you see in the Print dialog may vary based on your printer model and the application you are using. If the following steps differ from your view, consult the help documentation for your application by clicking “Help” in the menu bar. For a larger preview, click the “PDF” pop-up menu and choose “Open in Preview”.
-
Initiate Printing with Default Settings: If the displayed settings in the Print dialog are satisfactory, simply click the “Print” button to start your print job.
-
Customize Print Settings: To tailor your print output, explore the various options available within the Print dialog. Here’s a breakdown of common print settings you can adjust:
-
Printer Selection: At the top of the dialog, you’ll find a dropdown menu labeled “Printer.” This allows you to choose the specific printer you want to use. If you use multiple Apple devices under the same Apple ID, recently used AirPrint printers will automatically appear across your devices (requires macOS Sequoia, iOS 18, or iPadOS 18 or later). If your desired printer is not listed, you can add it by following the steps in Add a printer to your printer list.
-
Presets for Efficiency: The “Presets” menu offers saved groups of print settings for quick access. While the “Default Settings” are suitable for most print jobs, you can create and select custom presets for frequently used configurations. To learn more about saving presets, see Save frequently used print settings.
-
Number of Copies: Specify the required number of copies in the “Copies” field. For multi-page documents, ensure pages are collated by selecting “Paper Handling” and checking “Collate Sheets” to print complete copies sequentially. More details on page ordering can be found in Print pages in normal order.
-
Print Range Options: Define which pages to print using the “Print Range” section. Choose “All Pages” to print the entire document or “Pages” to specify a range (e.g., 6-9). You can also print non-consecutive pages by selecting pages in the Preview sidebar and choosing “Selection.”
-
Color or Black & White: If your printer supports color printing, the “Print in Color” option will be available. Check this box to print in color, or uncheck it to print in black and white.
-
Double-Sided Printing (Duplex): To save paper, utilize double-sided printing if your printer is capable. Select “On” from the “Double-Sided” pop-up menu for standard duplex printing. For documents intended for binding at the top edge, choose “On (Short Edge).”
-
Paper Size Selection: Ensure the “Paper Size” setting matches the paper loaded in your printer. Common options include “US Letter” (8.5 x 11 inches) and “A4”.
-
Orientation: Portrait or Landscape: Switch between portrait (vertical) and landscape (horizontal) orientation using the orientation buttons. The preview sidebar will reflect your chosen orientation.
-
Scaling for Size Adjustment: The “Scaling” option allows you to adjust the size of the printed image relative to the paper size. Enter a percentage to enlarge or reduce the output. The preview will update to show the scaling effect.
-
-
Finalize and Print: After adjusting all desired settings, click the “Print” button to send your document to the printer.
Troubleshooting Print Issues on Mac
Sometimes, you might encounter unexpected results when printing. Here’s a common issue and how to resolve it:
Margin and Text Clipping Problems: If you notice incorrect margin sizes or text being cut off after printing, it might be due to a conflict between the margins set in your application and the non-printable area defined for your printer. To fix this, try setting the non-printable area to “0” (zero) for your chosen paper size. For detailed instructions on adjusting non-printable areas and creating custom paper sizes, refer to Print on unusual sized paper by creating a custom paper size.
Further Resources:
For more in-depth information and solutions to other printing-related issues on your Mac, explore these helpful resources:
- Choose a paper size for your printed document on Mac
- Add a printer to your printer list so you can use it on Mac
- Check on a printer or print job using the Dock on Mac
- Solve printing problems on Mac
By following these steps, you can confidently print documents from your Mac and utilize the Print dialog’s extensive options to achieve your desired printing results.